To check your hard drive health immediately, you can use the free tools already built into your computer: on Windows, open Command Prompt as an administrator and type wmic diskdrive get status to get a quick “OK” or “Pred Fail” message, on Mac, open Disk Utility, select your drive and check the “S.M.A.R.T. Status” line at the bottom to check it reads “Verified.”
Long before a total hard drive crash happens, your drive leaves clear warning signs. Learning how to read these signs can save your data from disappearing forever. In this guide, we will show you how to check hard drive health on Windows and Mac using the free tools already built into your computer.
Quick Answer: Use Command Prompt on Windows or Terminal on Mac to check hard drive health. If you prefer a graphical option, use the Error Checking tool in Windows and Disk Utility on Mac for SMART Status hard drive monitoring. In case of a negative result, you must immediately back up and restore the files using reliable data recovery software such as Notchox.
Hard Drive Health Check Diagnostics
Operating System
Built-in Diagnostic Tool/ Command
Step-by-Step Instructions
Failing Indicator
macOS
Disk Utility
Open Disk Utility.
Select the top internal device storage.
Look at S.M.A.R.T. Status.
“Failing”
Terminal Console
Open Terminal.
Type: diskutil info disk0 and press Return.
Read the SMART Status line.
“Failing”
Windows
Command Prompt (WMIC)
Open CMD as administrator.
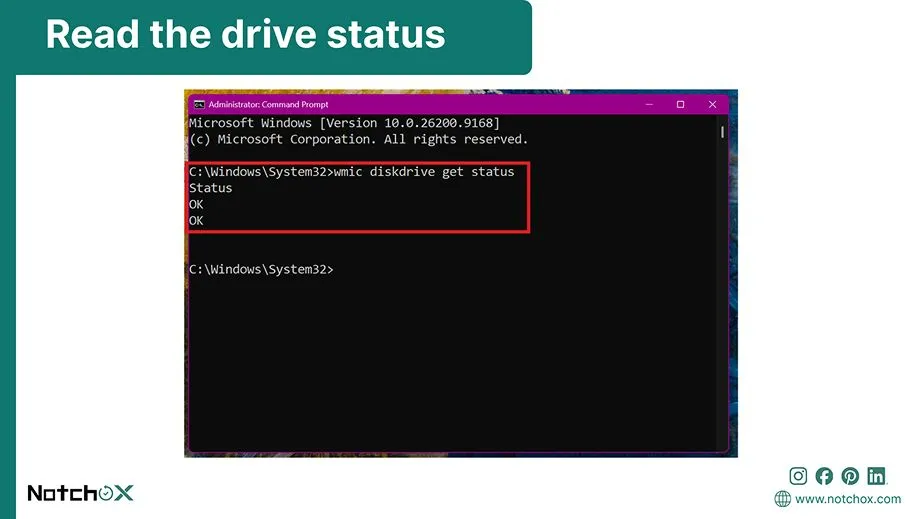
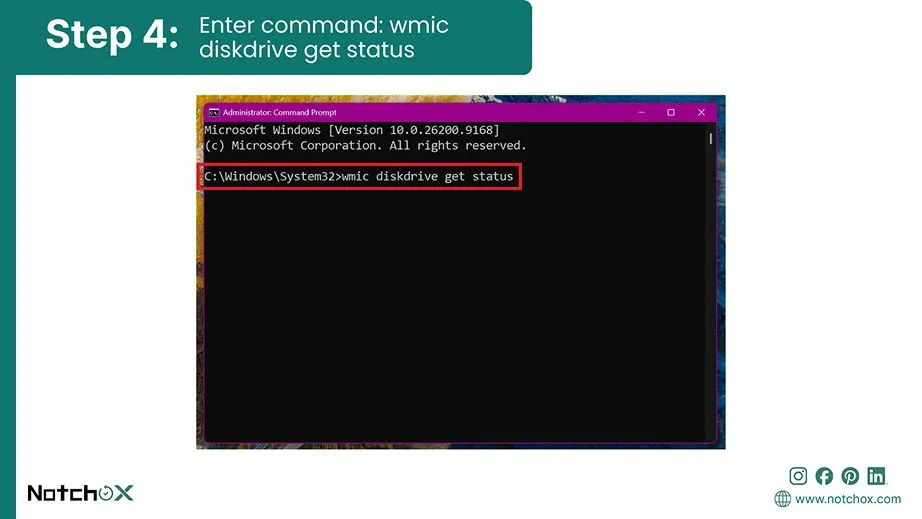
Type: wmic diskdrive get status and press Enter.
“Pred Fail”
Error Checking GUI
Open File Explorer > This PC.
Right-click C: Drive > Properties > Tools.
Click the Check button.
“Windows found errors on this drive…”
Windows PowerShell
Open PowerShell as administrator.
Run Get-PhysicalDisk | Select-Object DeviceID, FriendlyName, OperationalStatus, HealthStatus
“Warning” or “Unhealthy”
How to Check Hard Drive Health Using Built-In Operating System Tools?
To check your hard drive health using built-in operating system tools, you must interact directly with your system’s native command-line interfaces or management tools. Every major operating system, be it macOS or Windows, includes pre-installed diagnostic tools. They are designed to monitor and fix hard drive issues without needing any external software.
Here are the internal utilities across macOS and Windows that check hard drive health using S.M.A.R.T. (Self-Monitoring, Analysis, and Reporting Technology) technology which also acts like an early warning system.
How to Check Hard Drive Health on Mac? 2 Methods
Apple’s Mac computers have integrated storage architectures where the flash storage is soldered directly onto the main logic board. To monitor this, macOS includes diagnostic subsystems.
You can assess the drive health Mac using two primary methods:
Method 1: Using the Graphical Disk Utility Interface
Disk Utility on a Mac provides a safe visual interface for hard drive health check. This graphical component reads system logs and instantly checks stability to give you an accurate SMART hard drive status.
Here is how to check hard drive health using Disk Utility on a Mac:
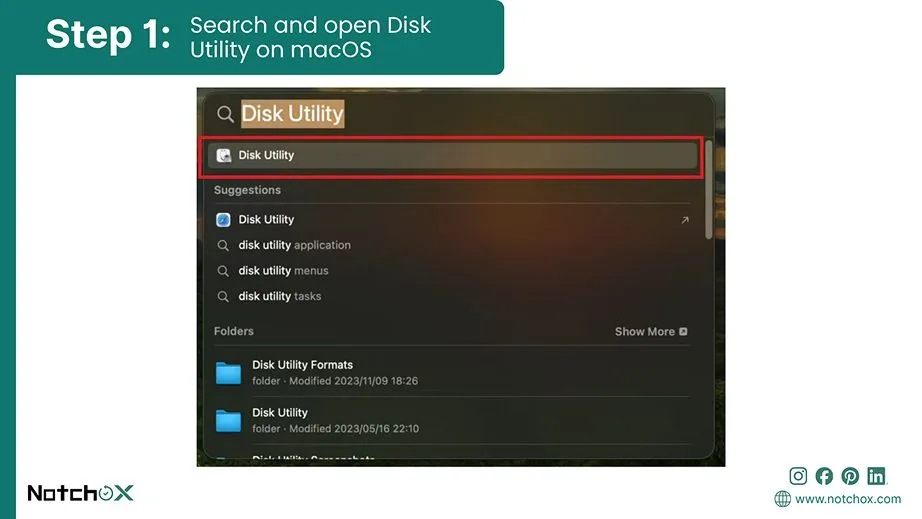
Press Command (⌘) + Spacebar to open Spotlight Search. Type Disk Utility and press Return.
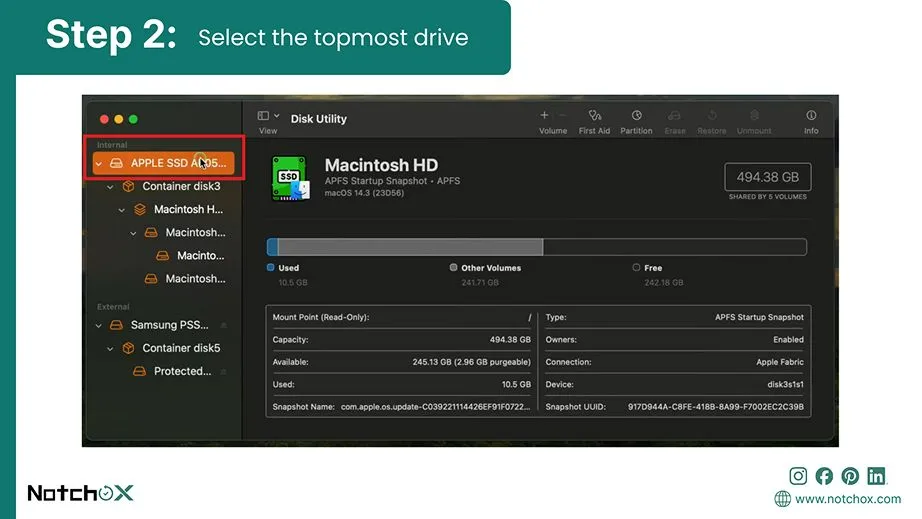
Select the topmost internal drive from the left-hand sidebar (example, APPLE SSD or Macintosh HD).
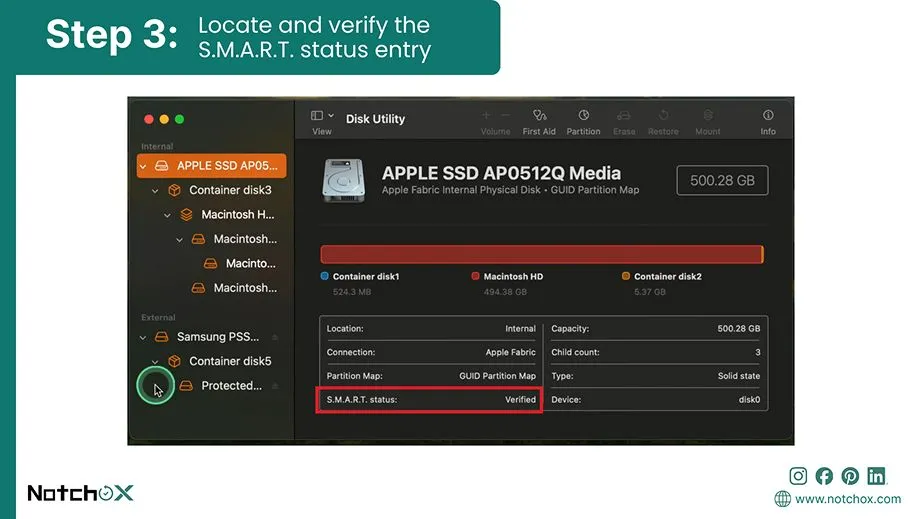
Look at the properties pane at the bottom of the Window. Locate the S.M.A.R.T. status entry.
Verify that it says Verified. If it displays Failing, your drive requires immediate replacement.
Tip: On Mac’s Disk Utility, you can also view drive health by selecting your hard drive and clicking the Info (ⓘ) button.
Method 2: Using macOS Terminal Command
The macOS Terminal console gives direct command-line access to your computer’s core disk management subsystem (diskutil). It shows detailed hardware configurations of the drive.
To use macOS Terminal to check hard drive health, follow these steps:
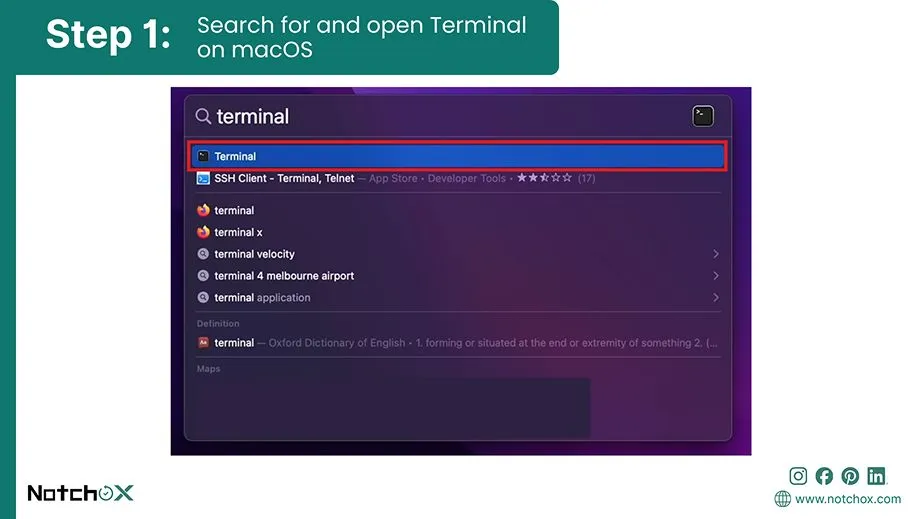
Press Command (⌘) + Spacebar, type Terminal, and press Return. This will open the Terminal on macOS.
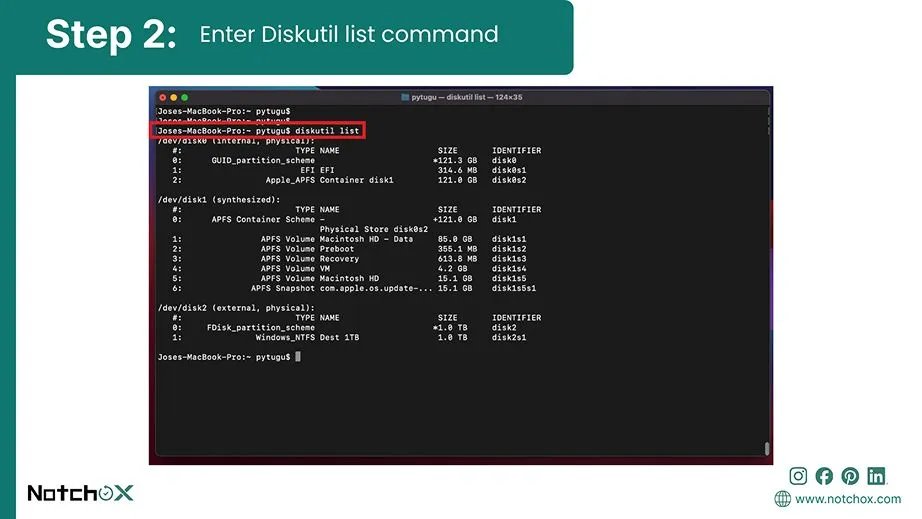
Type the following command to list all connected storage drives and locate your primary identifier.
diskutil list
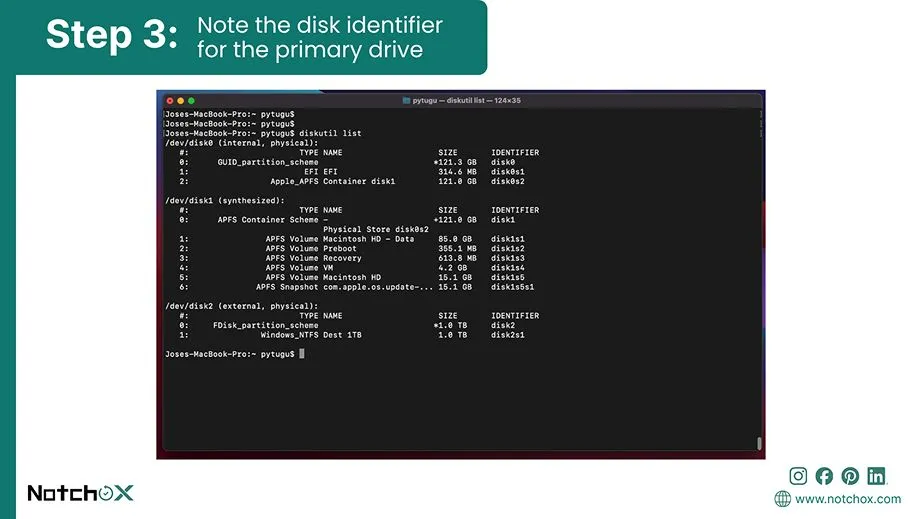
Note your primary internal drive identifier (example, disk0, disk1).
Run the following command, replacing disk0 with your actual drive identifier if it differs.
diskutil info disk0
Scroll through the output to find the SMART Status line to ensure it reads Verified.
How To Recover Data When Standard Recovery Software Fails
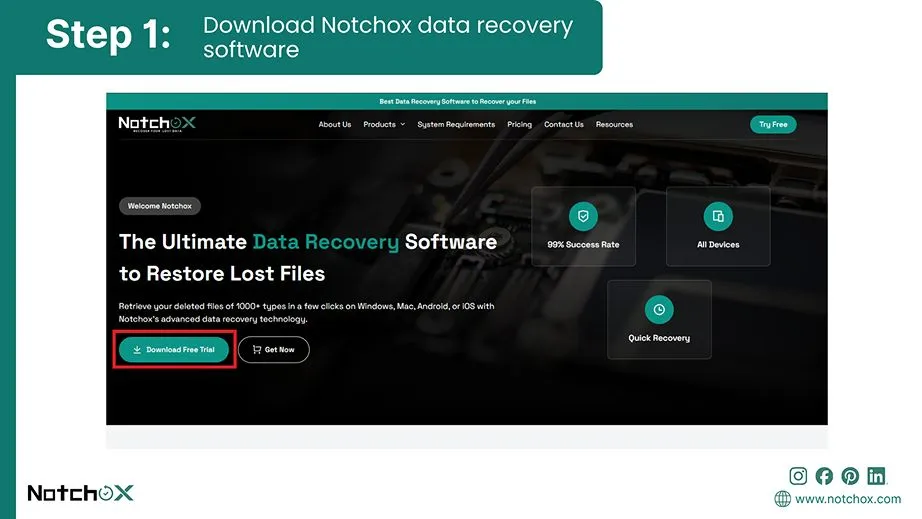
Many users attempt to run standard data recovery scans on a Mac storage drive. This is highly dangerous. Standard scans work by repeatedly scanning the drive for lost file signatures, which can cause system crashes and permanent data loss. So, when your drive is physically healthy but suffering from logical data loss, using the best data recovery software for Mac such as Notchox, is highly recommended.
Recovering data from a hard drive using Notchox on Mac:
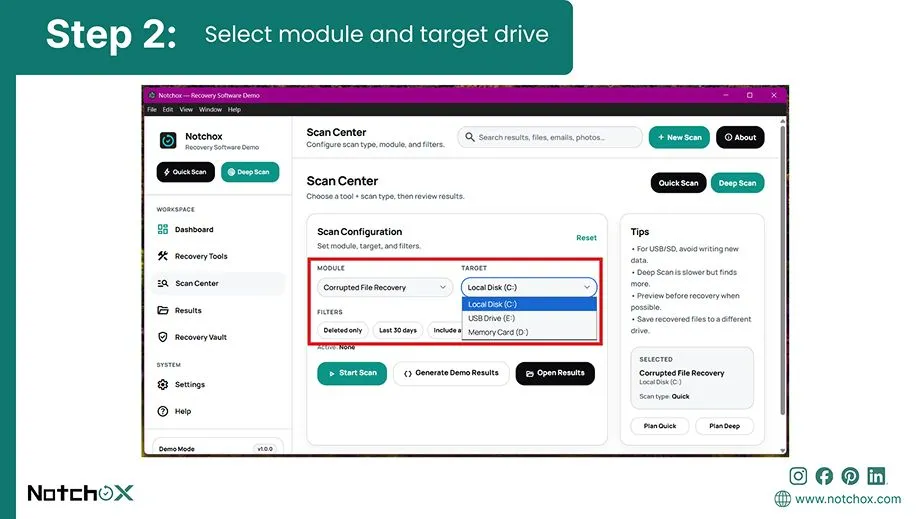
Select the Recovery Module and theTarget Drive to scan from the home dashboard. The software detects and recovers data from crashed hard drives, corrupted SD cards, and more.
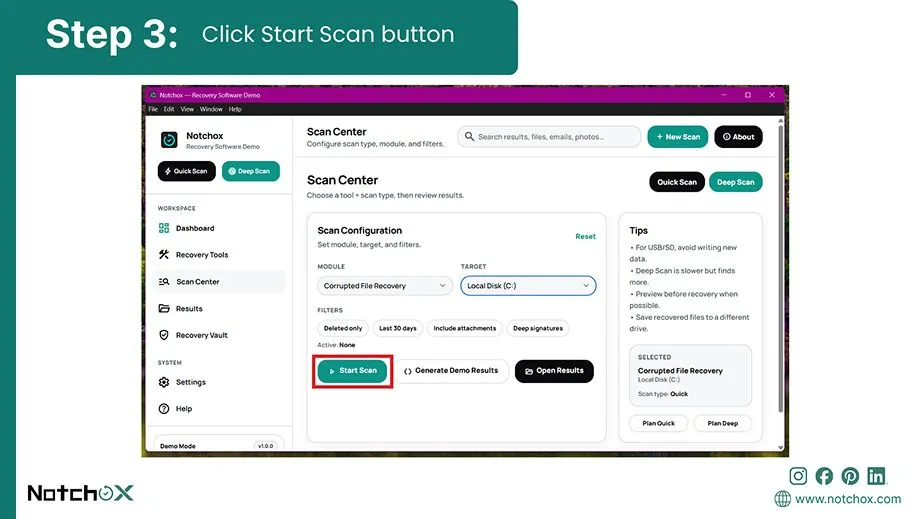
Click the Start Scan button to begin the recovery process.
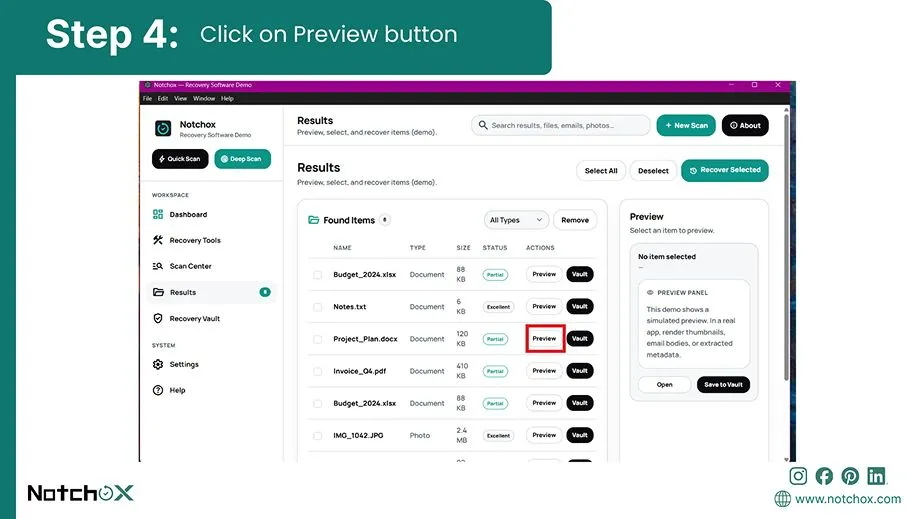
View the results and easily check the integrity of files by clicking the Preview button before recovering.
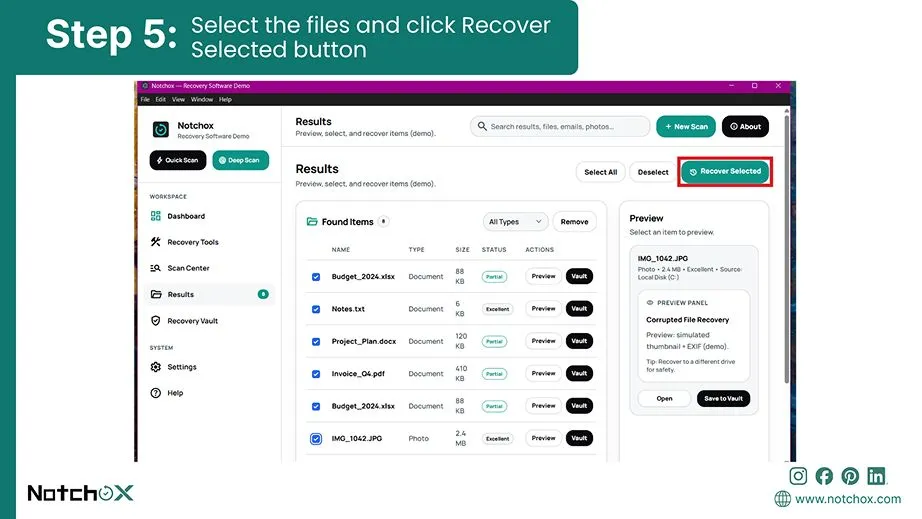
Select the files to recover and click the Recover Selected button at the top to restore them safely.
How to Check Hard Drive Health on Windows Systems? 3 Methods
Windows 10 and 11 feature built-in diagnostic subsystems designed to check and maintain hard drive health status. They directly communicate with the drive’s internal firmware using S.M.A.R.T. telemetry to check early signs of drive degradation.
Microsoft provides multiple hard drive diagnostic layers to check for hard drive failure signs: the graphical Error Checking tool that identifies basic filesystem corruption in a few clicks, and the advanced Windows PowerShell console, which checks the storage controllers directly. If these checks reveal filesystem corruption, you can learn how to fix the file or directory is corrupted and unreadable.
Fun Fact: The internal platters of a standard desktop hard drive spin at speeds up to 7,200 RPM.
Method 1: Run S.M.A.R.T. Status Verification via Command Prompt (WMIC)
The Windows Management Instrumentation Command-line (WMIC) engine gives a faster way to run hardware diagnostics. Using the Command Prompt, you can easily view the hard drive health status using a single command.
Command to run S.M.A.R.T. verification on Windows:
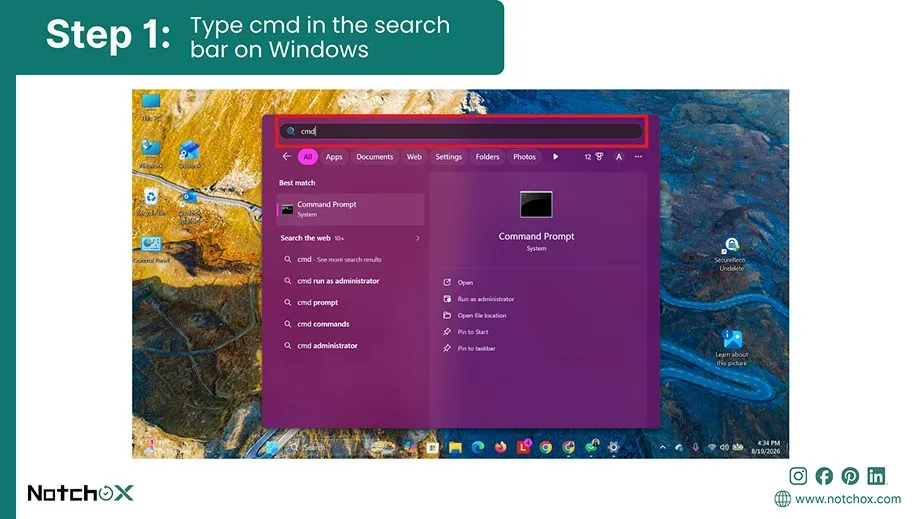
Open the Windows search bar or press the Windows key on your keyboard and type cmd.
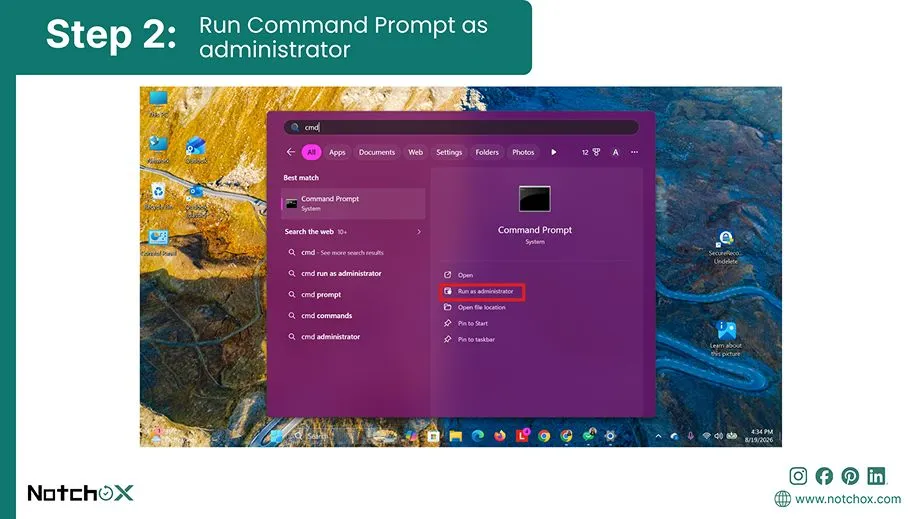
Select Run as administrator for Command Prompt.
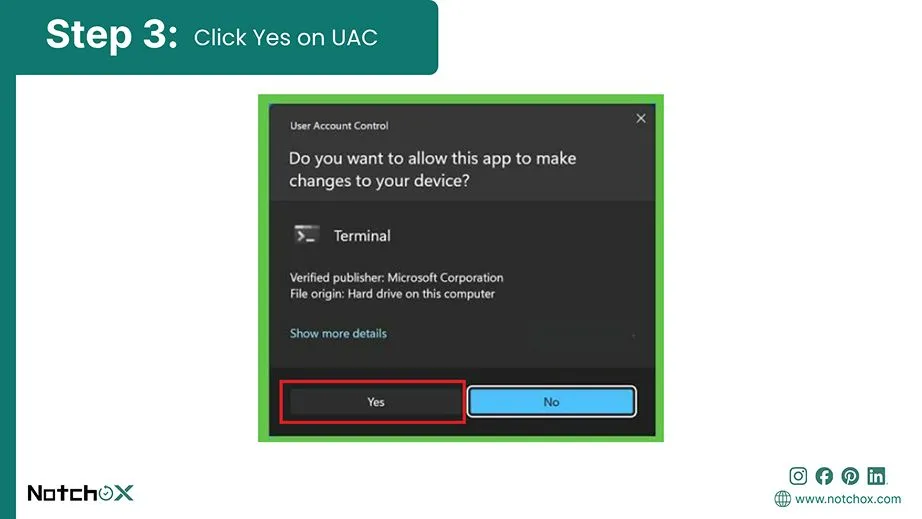
Click Yes if a User Account Control pop-up asks for permission.
In the black console window, type the following command exactly as shown and press Enter:
wmic diskdrive get status
How to Read the Results after WMIC:
OK: Your drive is healthy
Pred Fail: Your drive is actively failing and could collapse at any second.
Method 2: Using Error Checking Tool
The Windows Error Checking tool is a built-in graphical interface powered by the native CHKDSK engine. In this method, you scan the storage drive’s logical file system allocation table by clicking one button. Then, the system identifies file integrity errors and automatically attempts to repair bad or corrupted sectors. If the drive needs to be formatted, further troubleshooting may be required.
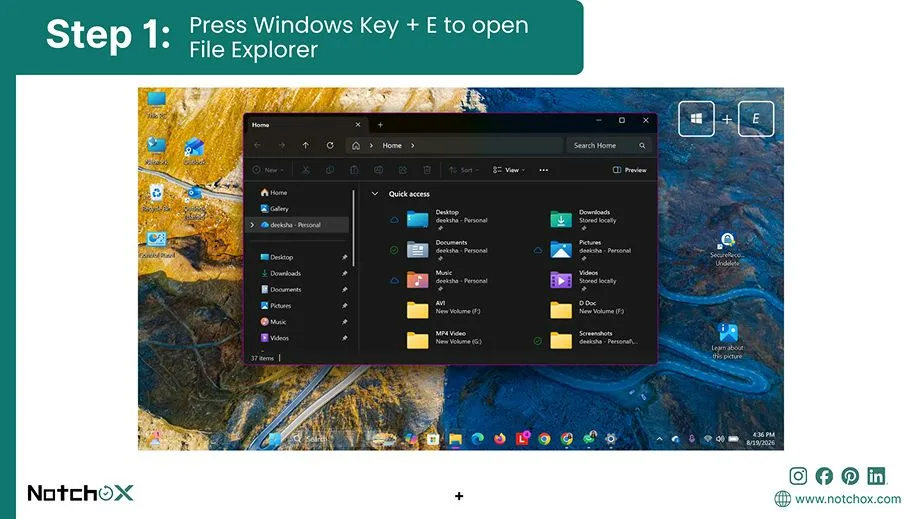
Open File Explorer by pressing the Windows Key + E shortcut.
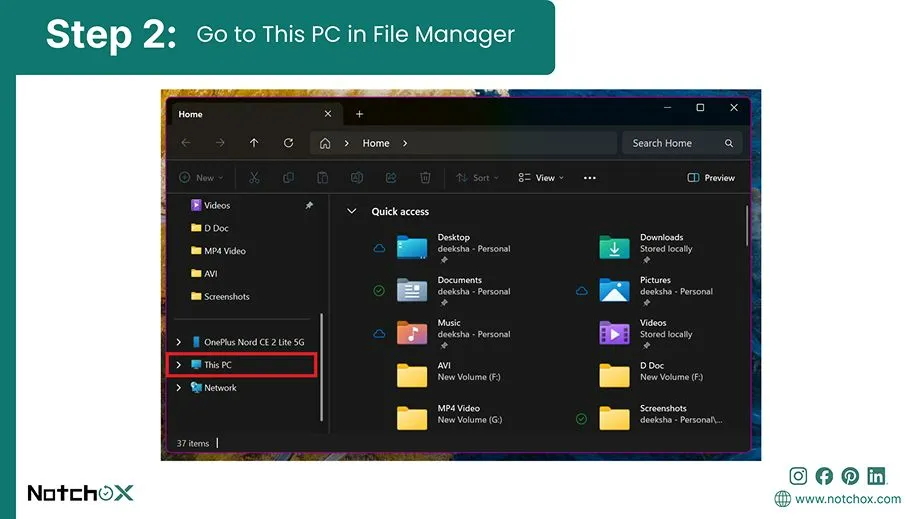
Click on This PC in the left-hand navigation sidebar.
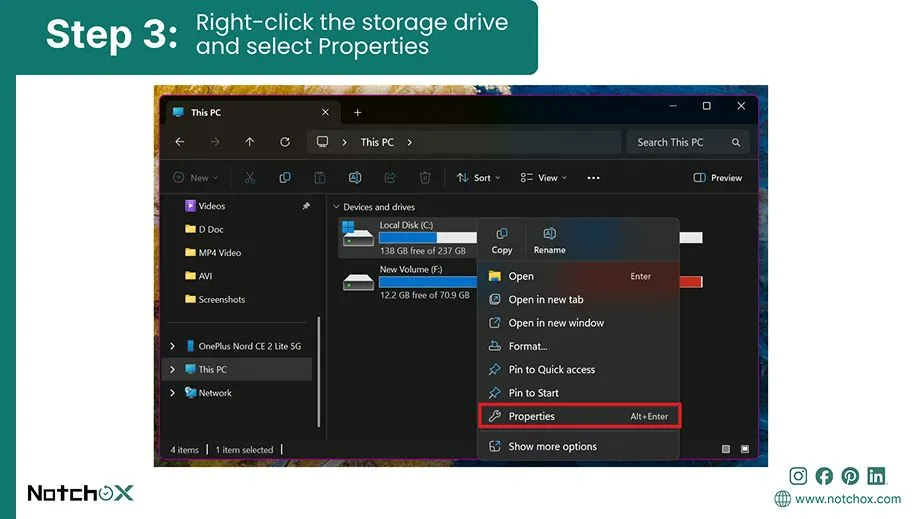
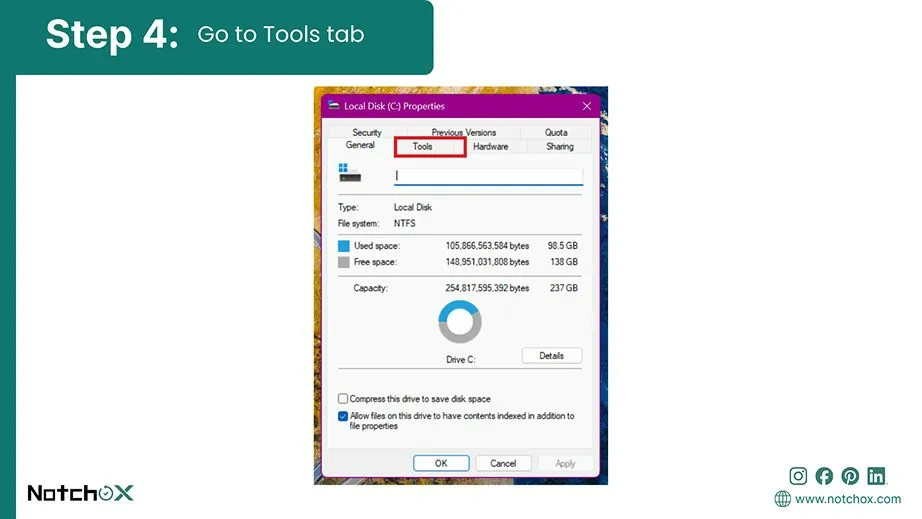
Right-click the primary storage drive you want to evaluate (usually Local Disk C:) and select Properties.
Switch to the Tools tab.
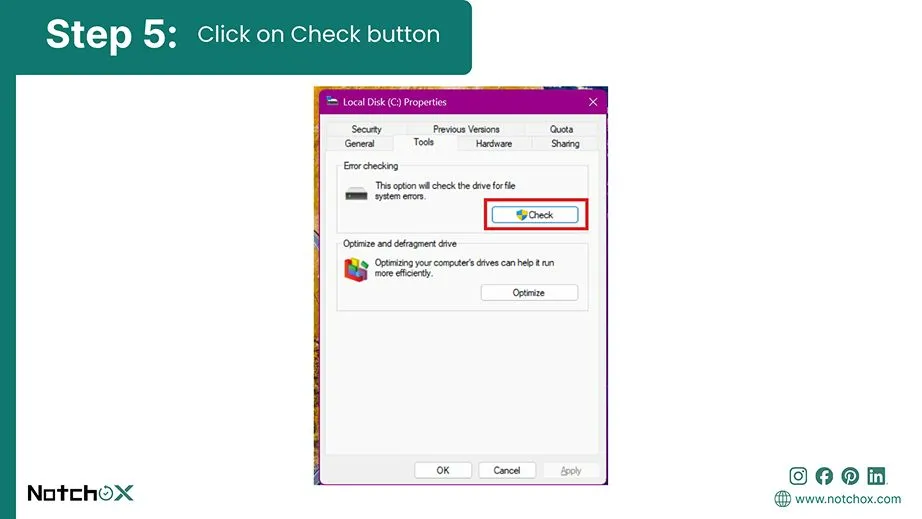
Click the Check button under the Error checking section.
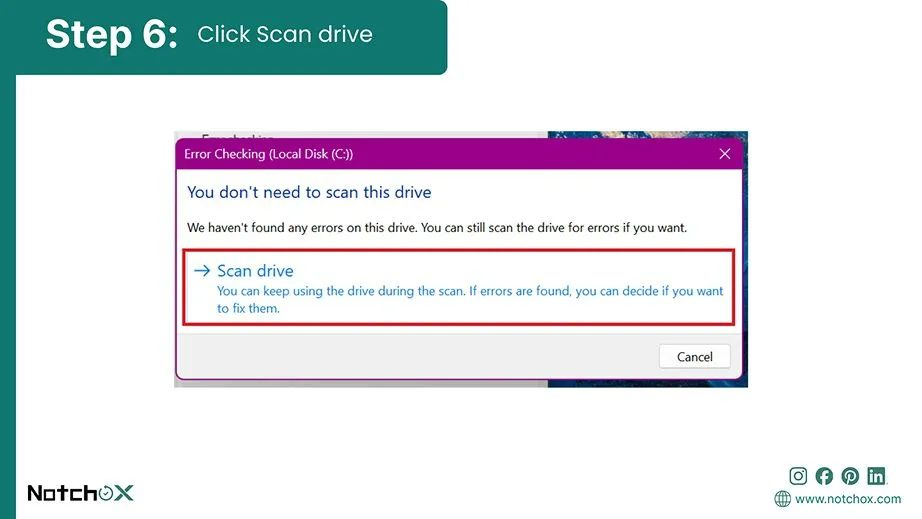
Click Scan drive in the pop-up window to execute a live system analysis.
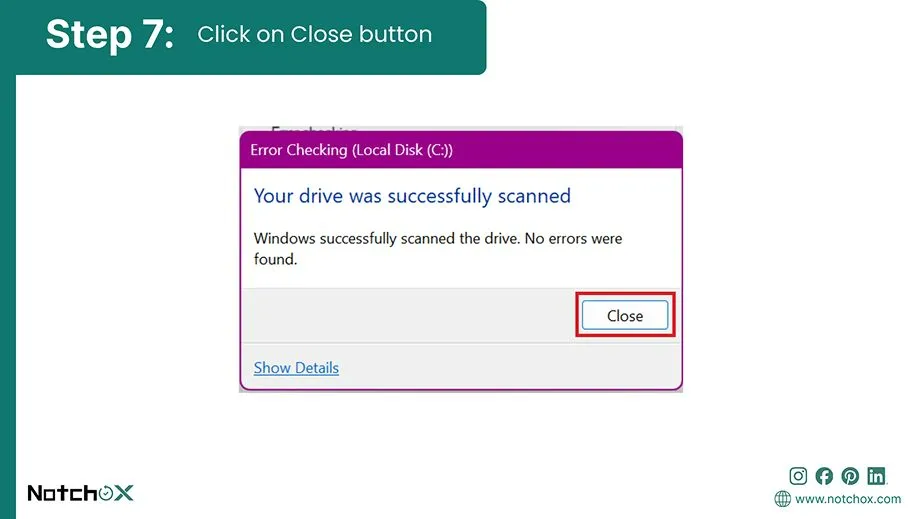
Review the final report. If the utility displays errors, select the option to schedule a full repair upon the next system start.
Method 3: Using PowerShell Commands
Windows PowerShell gives an advanced command-line environment to check drive health Windows. It retrieves the raw operational status of your hard drive or solid-state drive directly from the hardware controller.
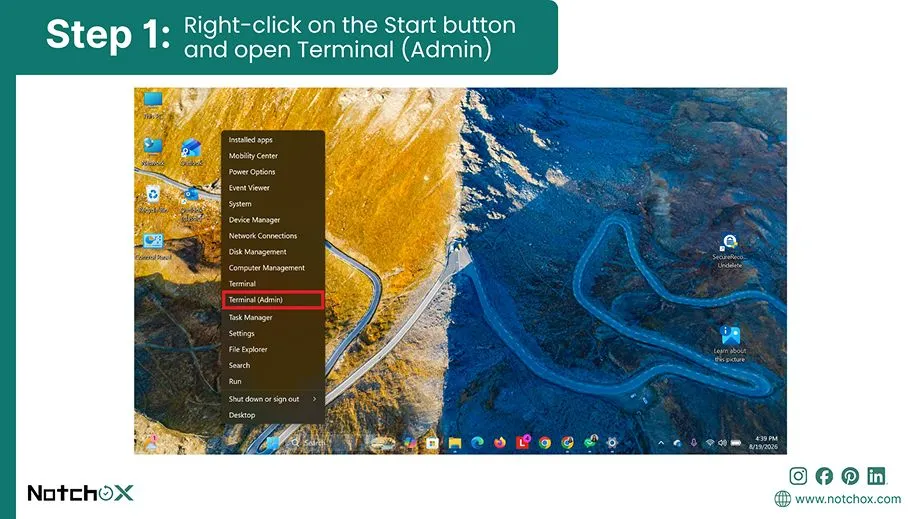
Right-click on the Start button or press Windows Key + X to open the Power User menu. Select Terminal (Admin) or Windows PowerShell (Admin) to open the console.
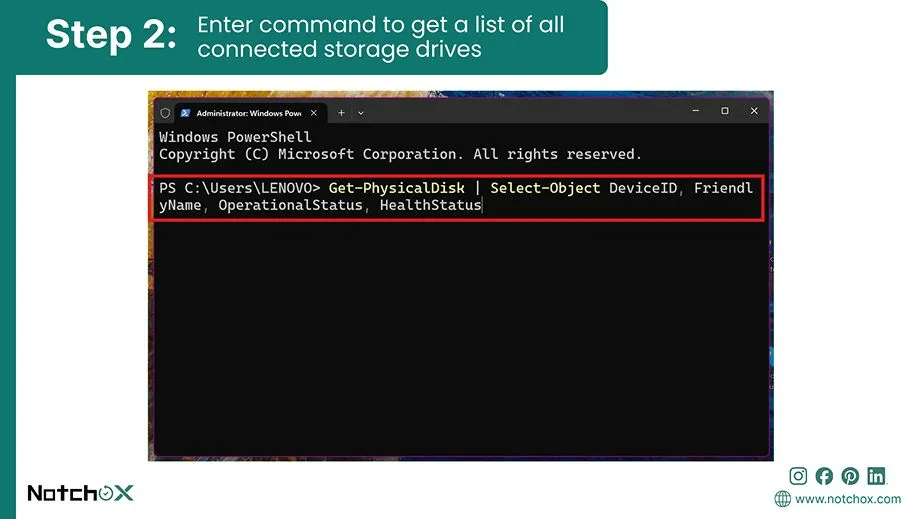
Type the following command to get a list of all connected storage drives and their operational states. Press Enter.
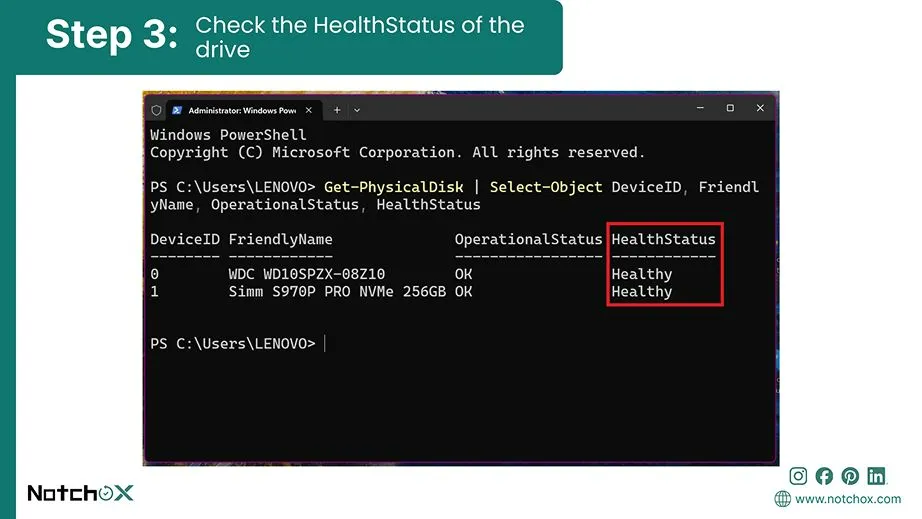
Check the HealthStatus column of your target drive. It must be Healthy to be error-free.
If the column displays Warning or Unhealthy, your drive has exceeded its safe manufacturer thresholds and is at immediate risk of failure.
Note: If your Windows diagnostic tests return a status of “Warning” or “Unhealthy,” your storage drive is actively failing. In such a critical case, you must immediately recover your data using Notchox data recovery software to pull your files off the degraded sectors safely.
Warning Signs That Require Hard Drive Health Check
Noticing early warning signs of hardware degradation is important to prevent permanent data loss. Storage drives rarely fail without prior symptoms. For mechanical hard disk drives (HDDs), physical wear can be detected as audible disruptions, and solid-state drives (SSDs) show an inability to work when their flash memory cells reach maximum writing capacity.
Noting these red flags is the first step in the process of how to check hard drive health, letting you run diagnostics before extensive damage. If the drive is already showing serious signs of failure, learn how to recover files from a crashed hard drive before the data becomes inaccessible.
Drive Warning Signs and Solutions
Warning Sign Type
Symptoms
Action to Take
Physical & Mechanical
Clicking sound of death
Power off immediately.Seek Professional services.
Physical & Thermal
Severe overheating
Power off immediately.Let the drive cool and diagnose.
System Behaviour
Frequent crashes and BSODs
Check system event logs.Run S.M.A.R.T. health test.
Software & Files
File corruption
Use Notchox data recovery software to rescue corrupted files.
Performance
System freezes and lags
Check Task Manager for counters.
Summary: Checking Drive Health
Storage drives indicate issues long before they completely collapse, giving warning signs such as frequent crashes and file corruption. By using built-in diagnostic systems such as the Error Checking GUI and PowerShell commands, you can instantly check HDD health.
If your hard drive health test results in an “Unhealthy” or “Warning” status, the immediate lesson is to stop forcing the standard read-retry operations and deploy Notchox data recovery software to restore as much data as possible as soon as possible.
Frequently Asked Questions
Q1: How to check hard drive health on Windows?
Ans: To check hard drive health on Windows:
Use the WMIC query in the Command Prompt.
Use the advanced PowerShell Get-PhysicalDisk storage management cmdlet.
Run the native Error Checking Tool via drive properties.
Q2: How to check hard drive health on Mac?
Ans: To check hard drive health on Mac:
Verify the status bar directly within the native Disk Utility interface.
Run the diskutil info disk0 command in the Terminal.
Q3: How often should I check my hard drive health?
Ans: You should check your hard drive health at least once every three to six months. If your computer is older than three years, or if you frequently move a laptop while running, you should check it monthly for early hardware degradation detection.
Q4: What is the difference between HDD and an SSD health check?
Ans: An HDD health check focuses on mechanical components of the drive. An SSD health check monitors flash memory wear and electronic stability. Both types of drives use the same built-in S.M.A.R.T. commands to report overall hard drive health status.
Q5: Can a hard drive with a “Pred Fail” status be repaired?
Ans: No, a “Pred Fail” (Predictive Failure) status shows physical hardware degradation that cannot be fixed by software. This shows that internal components are actively failing. You must stop using the drive immediately and rescue your data.
Q6: Does formatting a hard drive fix bad sectors?
Ans:Formatting only fixes logical bad sectors by resetting the file allocation system. It cannot repair physical bad sectors caused by hardware scratches or component wear.
Q7: How long it takes for hard drive health check test?
Ans: It takes around 30 seconds for S.M.A.R.T. queries to finish, and basic logical filesystem error checks take between 5 and 20 minutes.
Q8: What is the lifespan of an HDD?
Ans: Most mechanical hard drives last between 3 and 5 years in active environments and 8+ years for general home use.
Kajal Singh is a Data Recovery Writer at Notchox, specializing in data recovery, storage systems, RAID, and digital forensics. She writes technical processes, tools, and cases into clear, engaging articles, blogs, and guides. Kajal does thorough research, deep analysis, and collaborates with experts to produce high-quality and engaging content that is easy to understand for every reader.