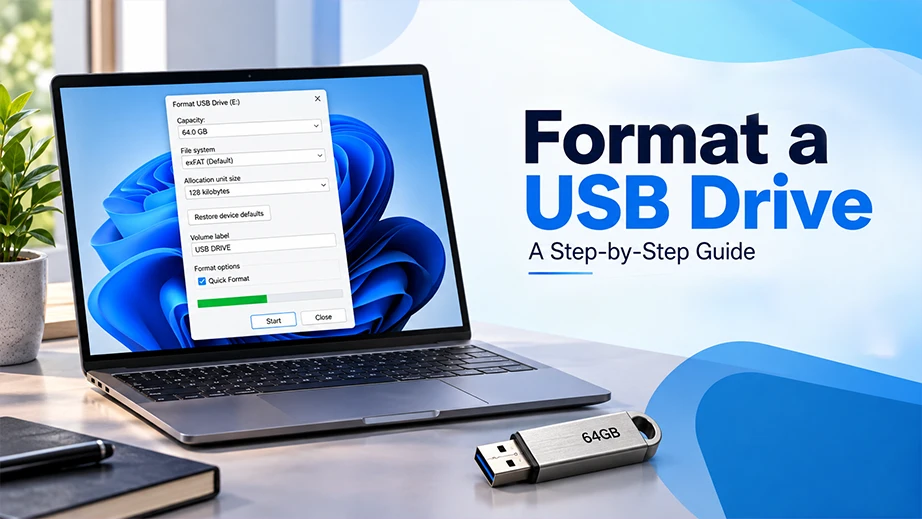
A USB drive is formatted when you need to clear the storage, fix corruption errors, or optimize the file layout. For a quick way to format a USB drive, simply right-click on the drive in Windows File Explorer or use Mac’s Disk Utility tool to trigger a basic erase. But because formatting permanently wipes your USB, successful execution needs a bit of preparation. You must first ensure all important data is backed up and then match your drive to the correct file system (exFAT, NTFS, or APFS).
In this article, we will explain everything you need to know: how to format a USB drive on Windows and Mac safely, providing you with step-by-step methods.
Quick Answer: To format USB drive on Windows: Open File Explorer, right-click your drive, select Format, choose your file system, and click Start.
To format USB flash drive on a Mac: Open Disk Utility, select your root drive, click Erase, choose your file system (like exFAT), and click Erase.
USB Drive Formatting Methods
Operating System
Formatting Method
Skill Level
Windows
File Explorer
Beginner
Disk Management
Intermediate
System Settings
Beginner
Command Prompt (DiskPart)
Advanced
PowerShell
Advanced
macOS
Disk Utility
Beginner
Terminal
Advanced
How to Format a USB Drive on Windows?
Formatting a drive on Windows is a quick way to wipe all data and fix errors. Because formatting permanently erases everything, always back up your files first. There are 5 Windows-offered ways that you can use for USB drive formatting:
File Explorer
Disk Management
System Settings
Command Prompt
PowerShell
Before starting the detailed steps below, use this comparison table to select the correct Windows file system format:
Windows USB File Systems
File System
Maximum File Size
OS Compatibility
FAT32
4 GB
Virtually all older and modern devices
exFAT
2^64–1 bytes
Windows, Mac, Linux
NTFS
2^64–1 bytes
Windows-only (Read-only on Mac)
Method 1: Using Windows File Explorer (Quickest Way)
Windows File Explorer is the fastest and easiest way to format USB drive. This standard graphical method is built directly into your operating system and lets you clean the drive and change its file system in just a few clicks.
In the news: As per Axios market research, flash drive prices are rising rapidly due to big changes in the AI economy.
Follow these steps to format USB flash drive quickly:
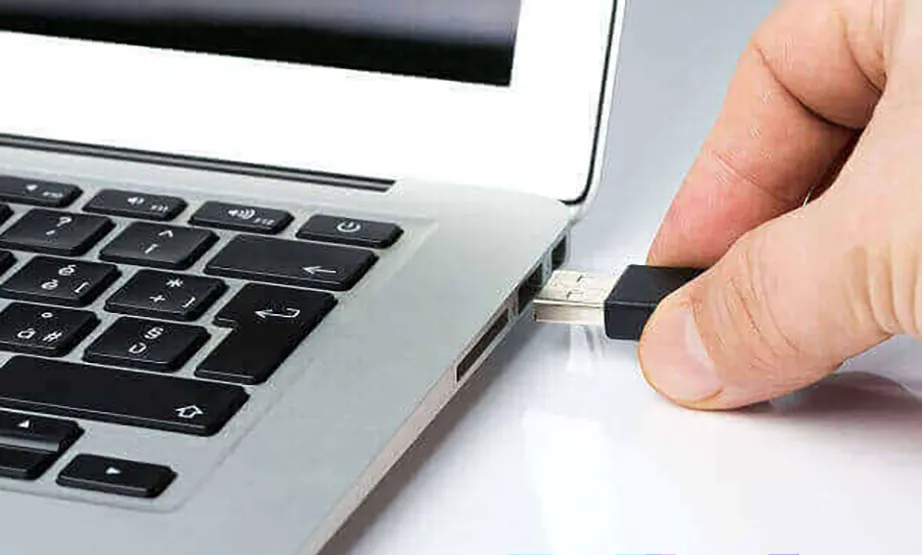
Plug your flash drive into an open USB port on your PC.
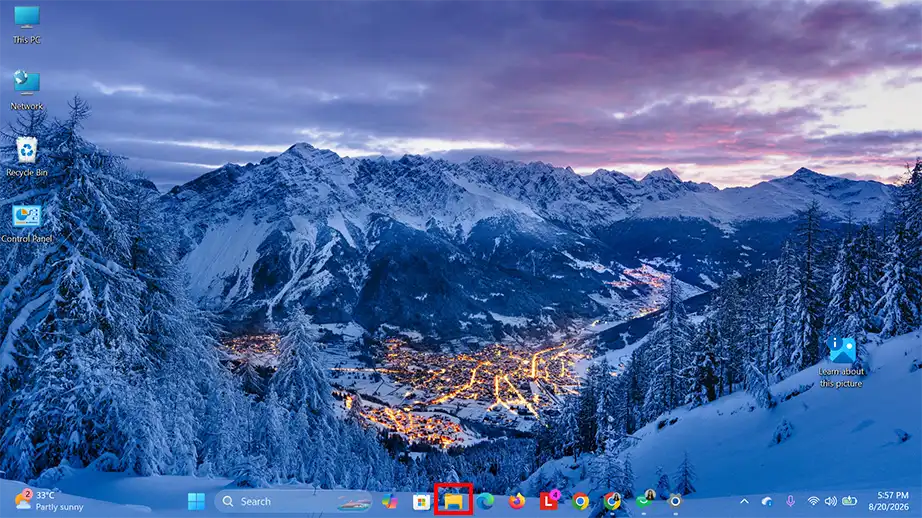
Press the Windows Key + E shortcut on your keyboard, or click the folder icon on your taskbar to open File Explorer.
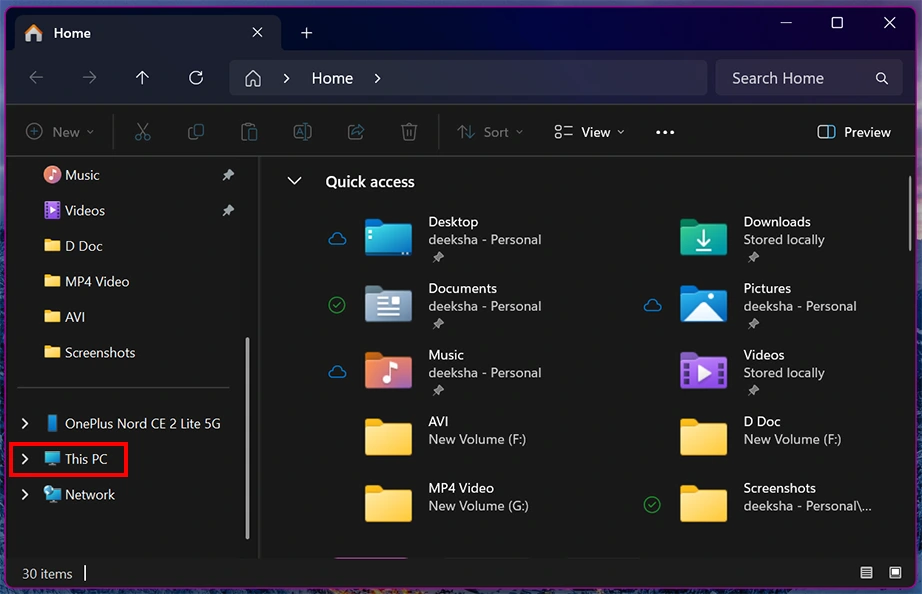
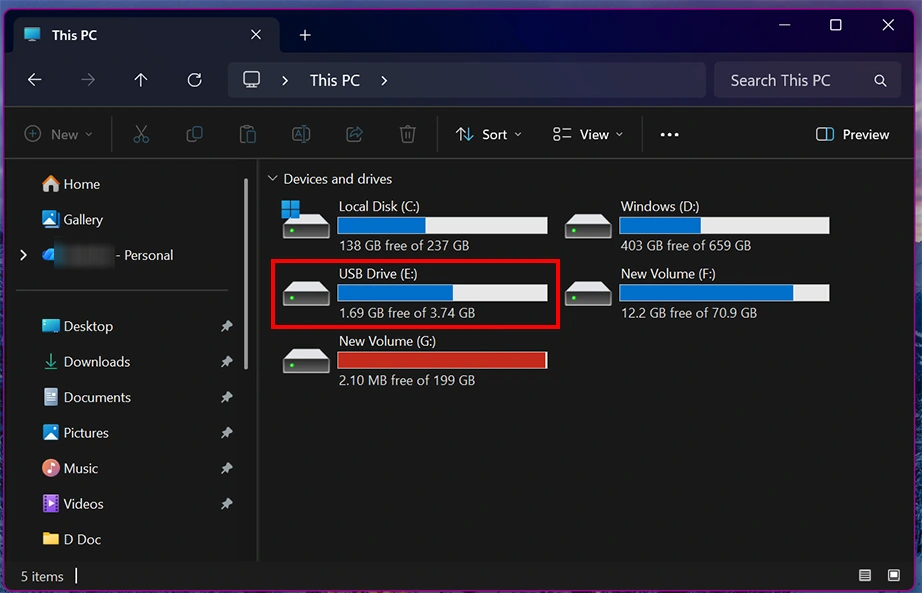
Click on This PC in the left sidebar.
Look under the Devices and drives section to find your connected USB.
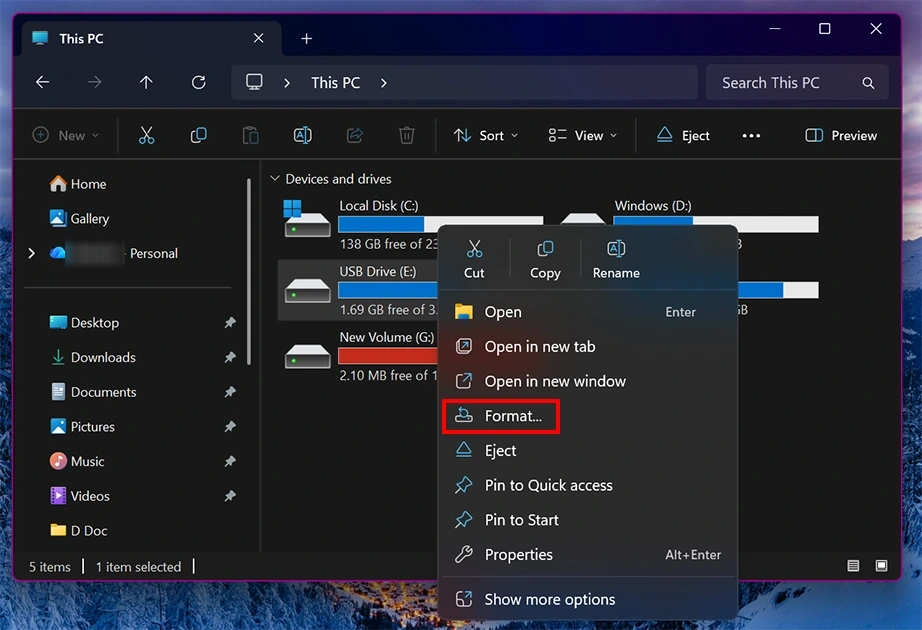
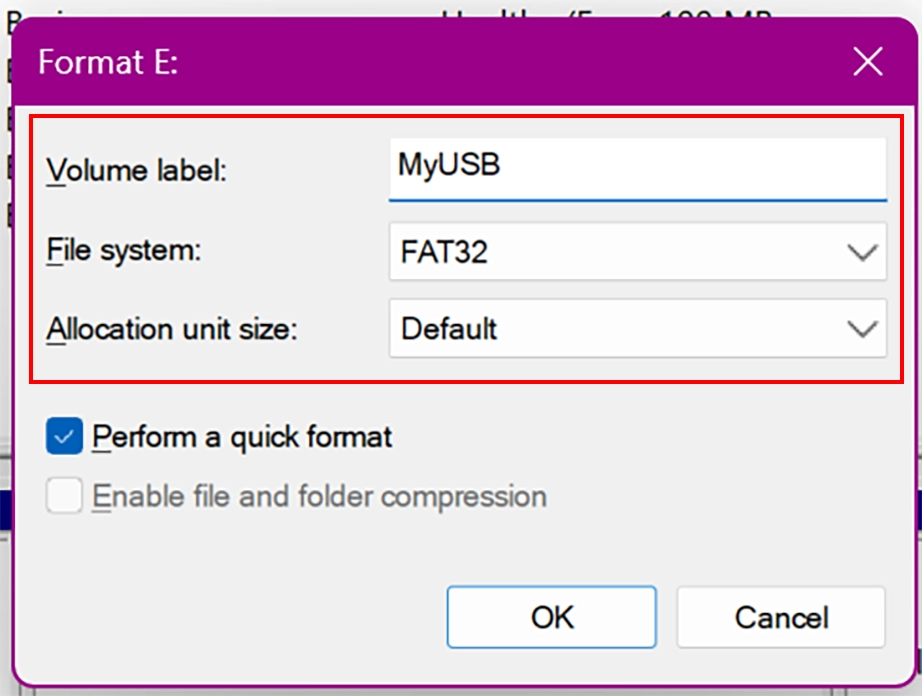
Right-click on your USB drive icon and select Format… from the context menu. A small configuration window will pop up.
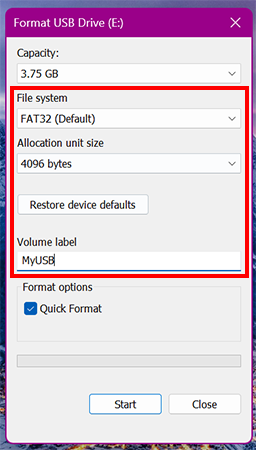
Configuration formatting options:
File System: Open the drop-down menu and select your preferred format (exFAT, NTFS, or FAT32).
Allocation Unit Size: Leave this setting at its default.
Volume Label: Type a new name for your USB drive if you want to rename it.
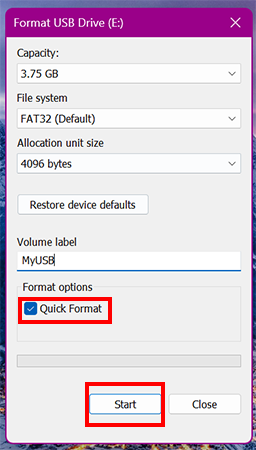
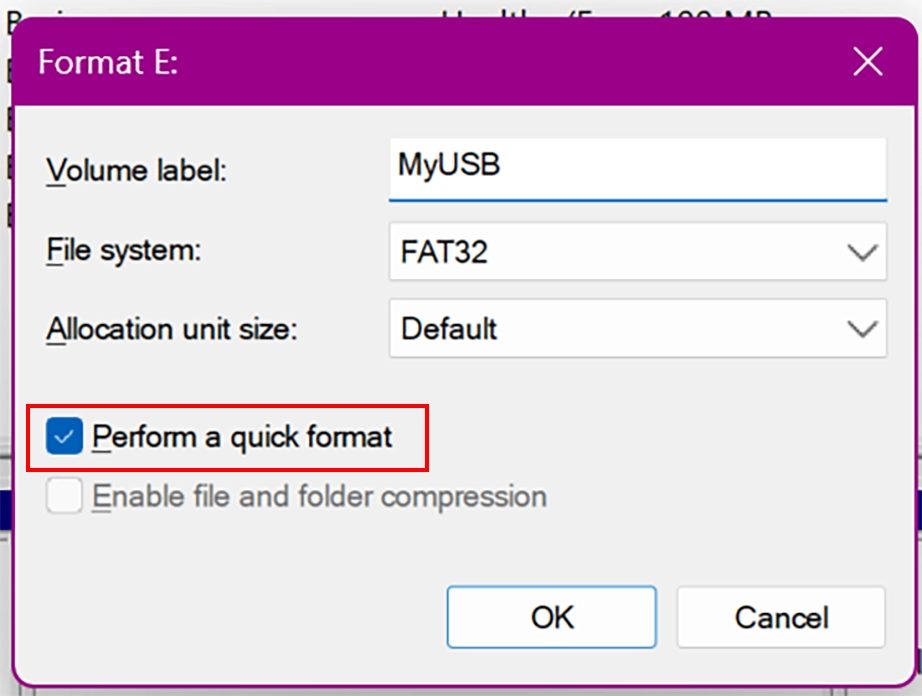
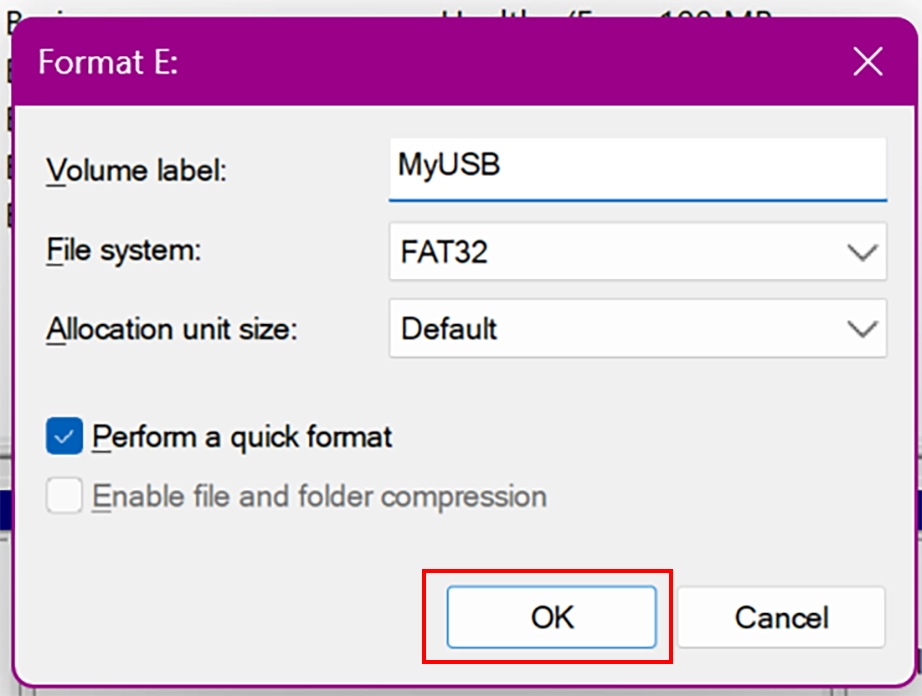
Ensure the Quick Format checkbox is ticked. This skips scanning the drive for bad sectors to save time. Click Start.
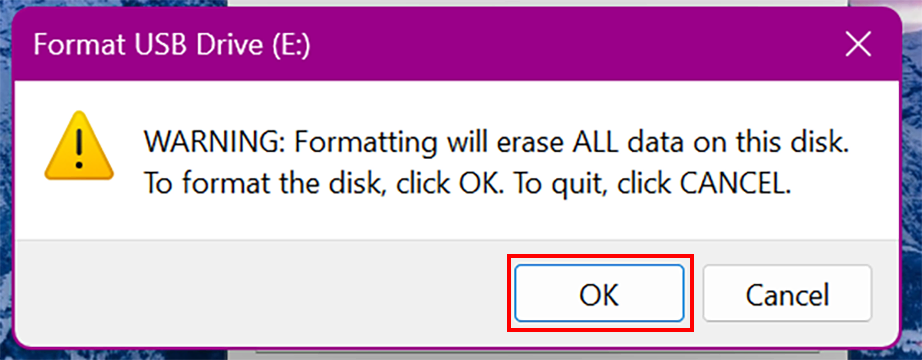
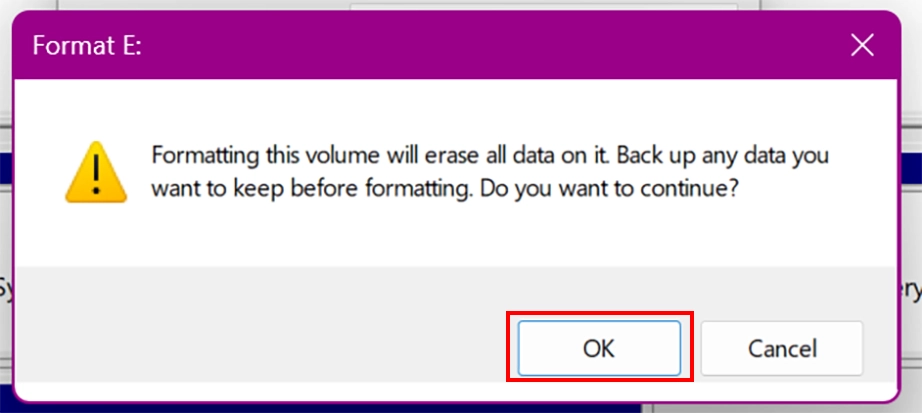
A warning pop-up will appear stating that formatting will erase all data. Click OK to confirm. Once a final pop-up says “Format Complete,” click OK and close the tool.
Method 2: Using Disk Management
Windows Disk Management is a powerful built-in system tool designed for advanced configurations, so it can be used to format your USB flash drive even if it is not shown or recognized by File Explorer. It bypasses these graphical issues to successfully access and format the drive.
Steps to format USB using Disk Management:
Connect your USB drive to the PC.
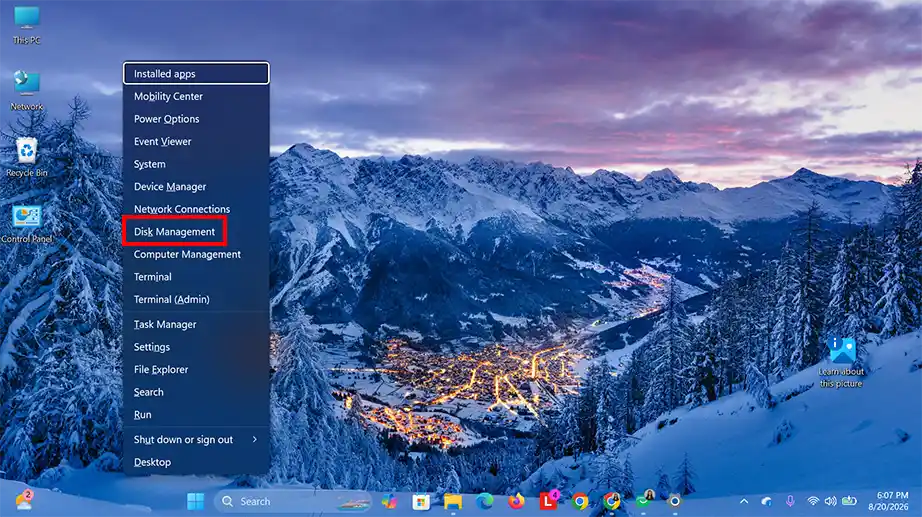
Right-click on the Start button (Windows logo) on your taskbar and select Disk Management from the Power User menu, or press Windows Key + X and select it.
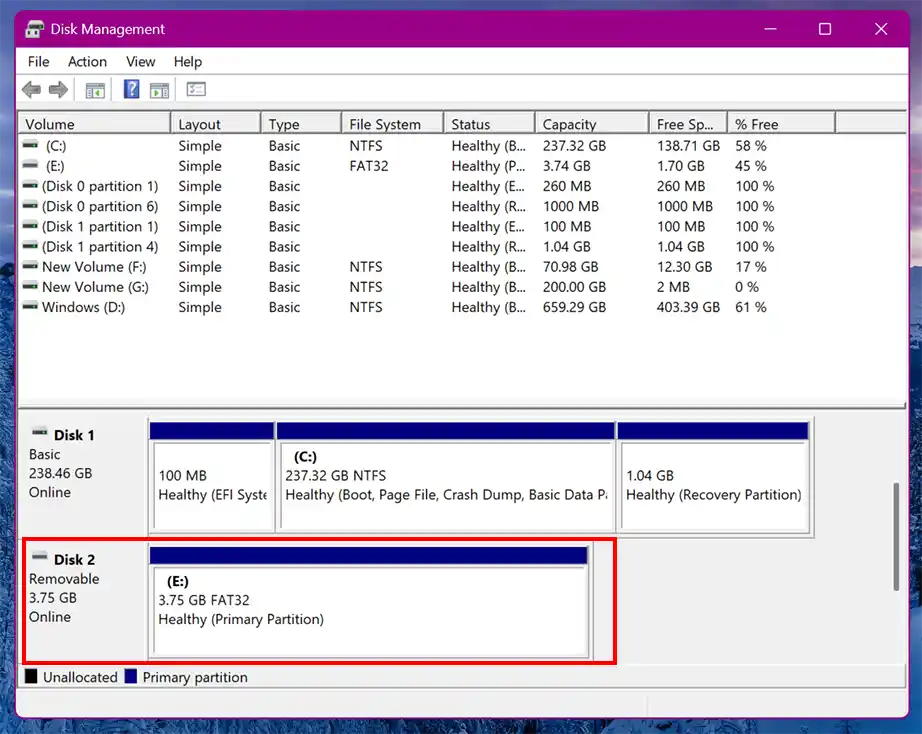
Look at the bottom half of the window where all connected drives are displayed. Match your USB drive by its storage capacity (example, Disk 1 or Disk 2) so that you do not select your main Windows drive.
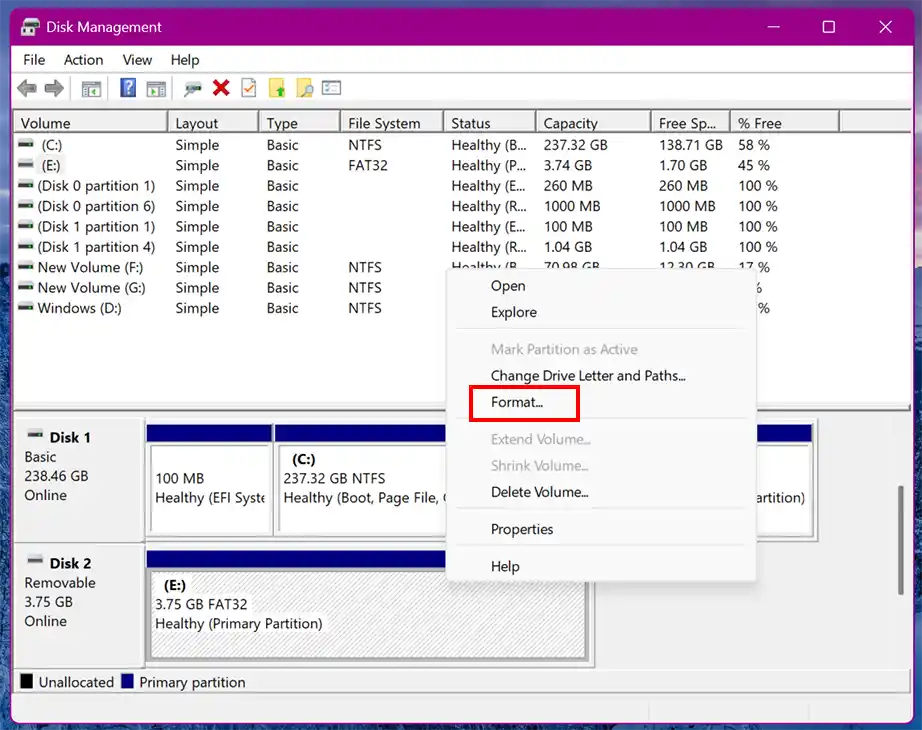
Right-Click on the rectangular bar or partition representing your USB drive’s storage space and click Format… from the context menu.
Set your formatting preferences:
Volume Label: Type a preferred name for your flash drive
File System: Choose exFAT, NTFS, or FAT32 from the dropdown menu based on your compatibility needs.
Allocation Unit Size: Leave this set to default.
Check the box for Perform a quick format to speed up the process.
Note: Leaving the checkbox for Perform a quick format unchecked will begin a slow format that overwrites the drive and checks for hardware errors.
Click OK at the bottom of the window.
A data loss warning pop-up will appear. Click OK to confirm. The drive status will change to “Formatting” and then turn back to “Healthy,” showing your USB drive is ready for use.
Method 3: Using System Settings
Windows 11 and updated Windows 10 versions include a dedicated storage management tool directly inside the native System Settings app. This allows a safer alternative to older legacy tools when you want to format and rename your drive.
How to format a USB drive using System Settings:
Make sure your USB drive is connected to the PC before beginning the formatting process.
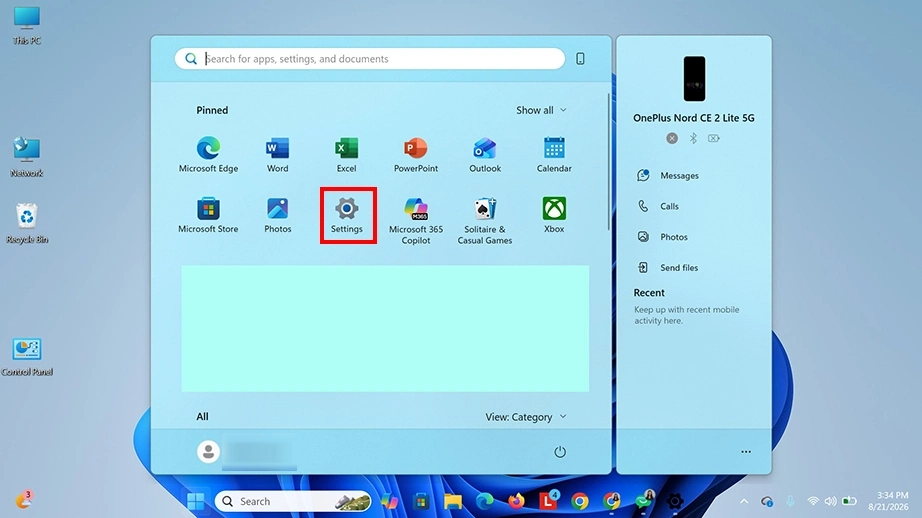
Click the Start menu and select the gear icon for Settings, or use the keyboard shortcut Windows Key + I.
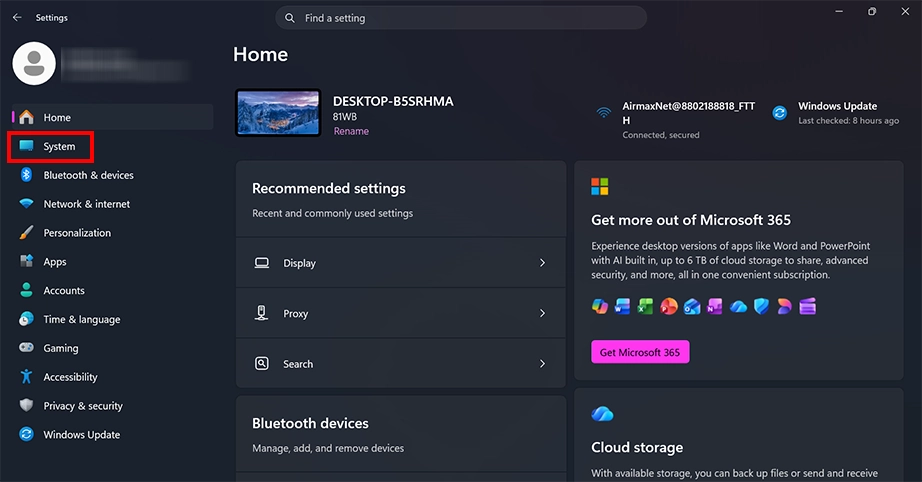
Click on System in the left sidebar.
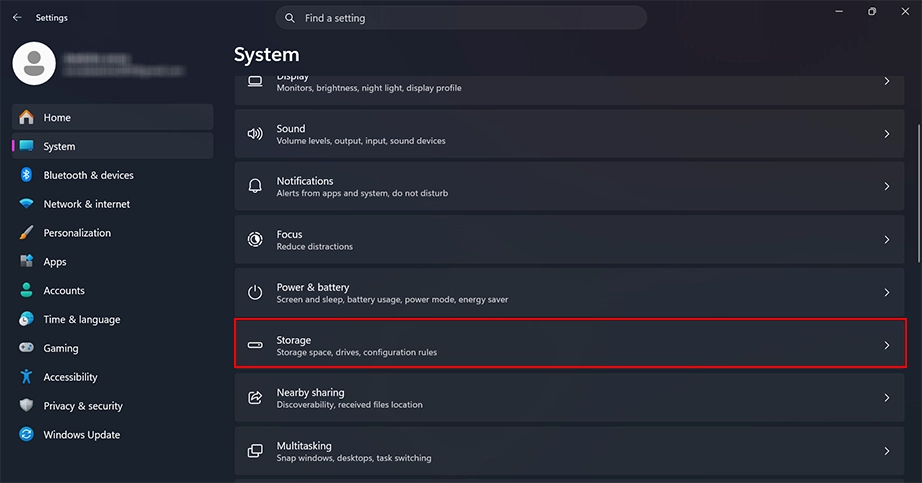
Select Storage from the main right-hand panel.
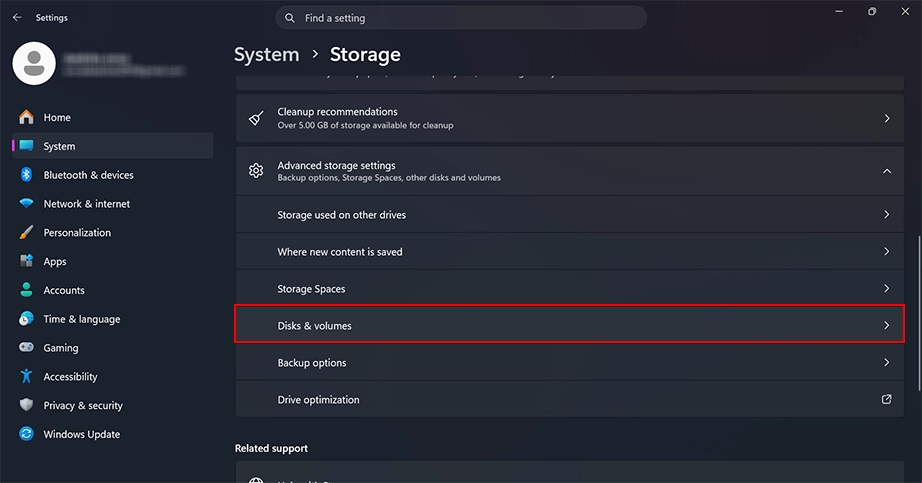
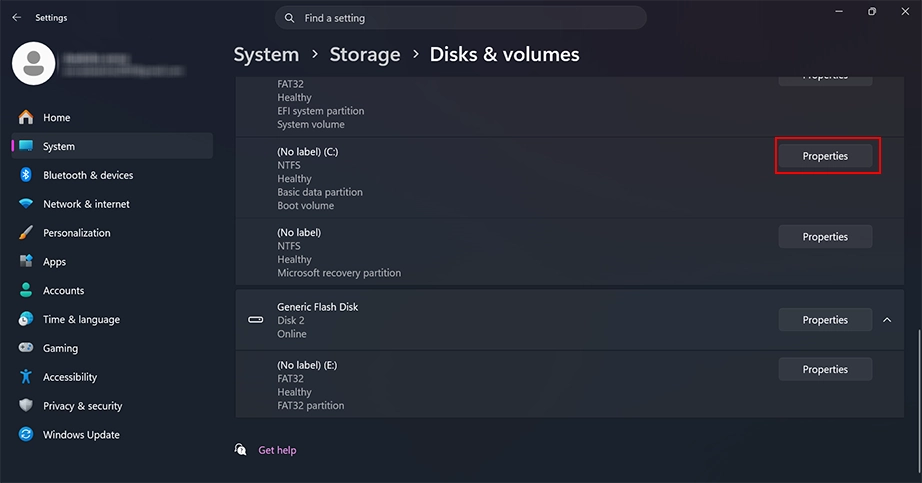
Scroll down the storage page, click on Advanced storage settings to expand the menu, and then select Disks & volumes.
Find your connected USB flash drive from the list of hardware disks. Click on it to expand its options, then click the Properties button next to its volume name.
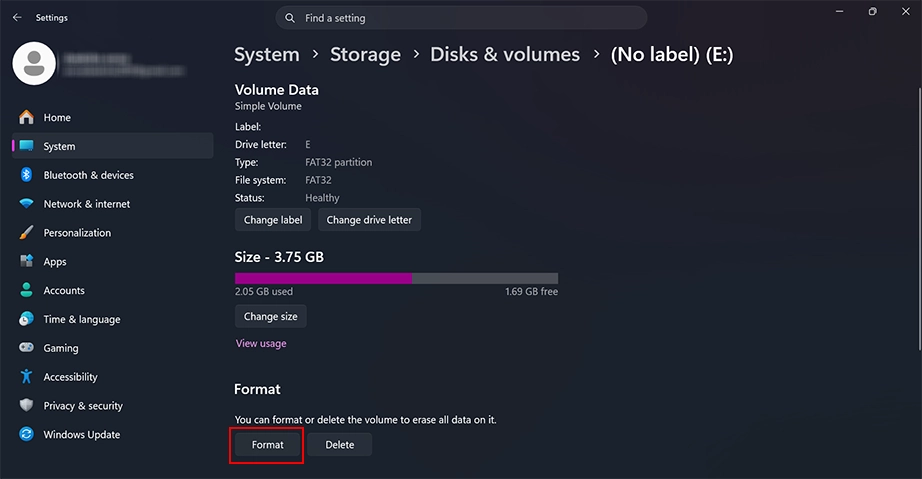
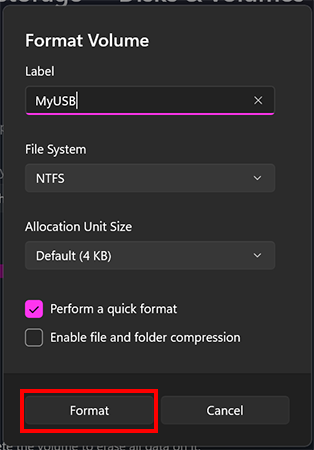
Scroll down the properties page until you see the Format button under the Status section, then click it.
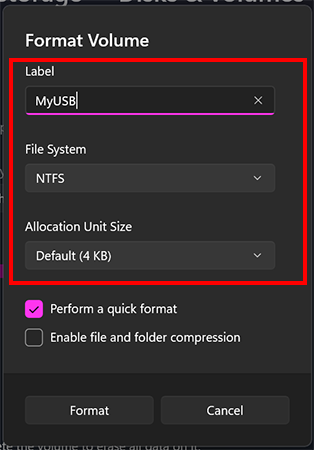
Configure your format:
Label: Type a new name for your flash drive.
File System: Choose exFAT, NTFS, or FAT32 from the dropdown menu.
Allocation Unit Size: Leave this set to default.
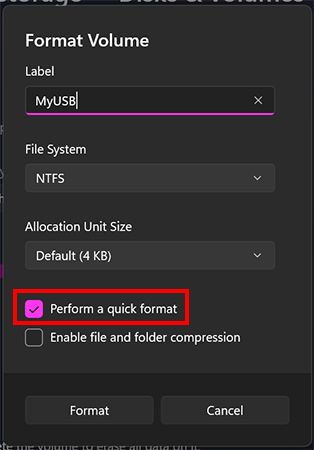
Check the box for Perform a quick format.
Click the Format button.
Wait a few seconds for the progress bar to finish. The status will update to “Healthy,” confirming your drive has been successfully reset.
Method 4: Using Command Prompt/Diskpart
The DiskPart tool inside Command Prompt is a powerful text-based command-line method that can be used if your drive is severely corrupted, write-protected, or showing errors in File Manager. It ignores all the glitches and forcefully attempts to read, write, or format the drive.
Here are the steps to format USB drive using DiskPart:
Connect the external USB flash drive to your PC.
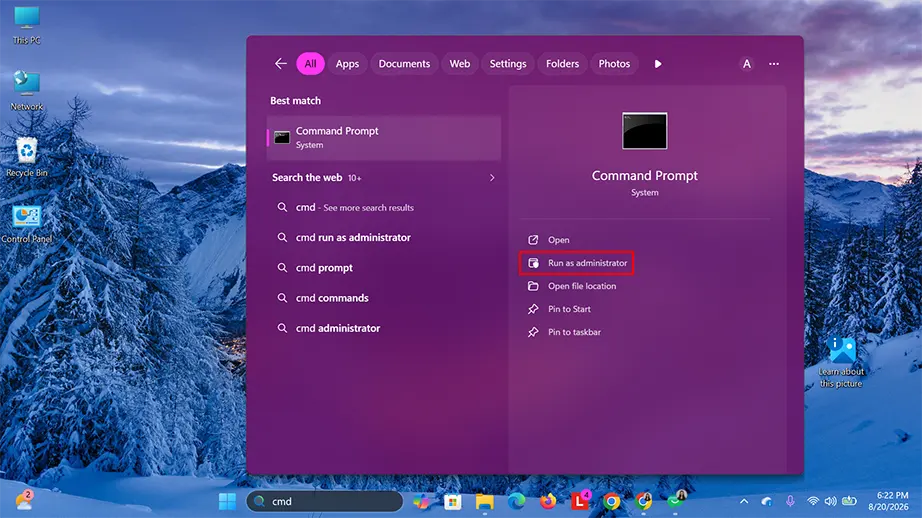
Click the Windows Search bar, type cmd, and click Run as administrator next to Command Prompt.
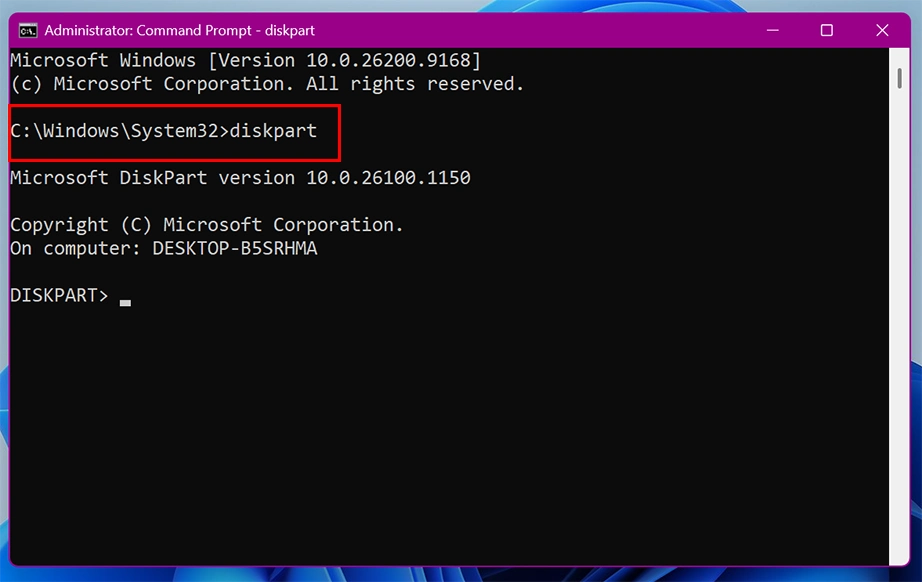
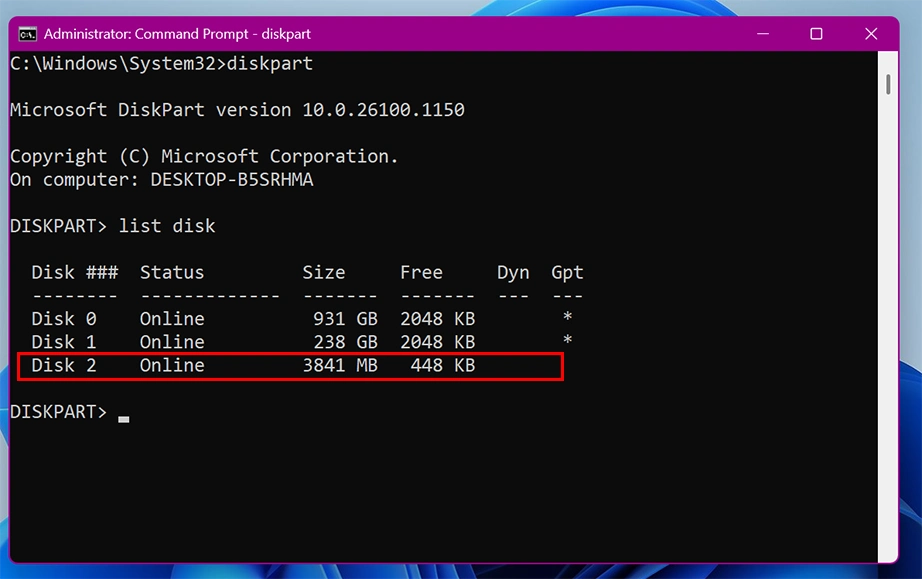
Type diskpart and press Enter to launch it. The command line prompt will change to DISKPART>.
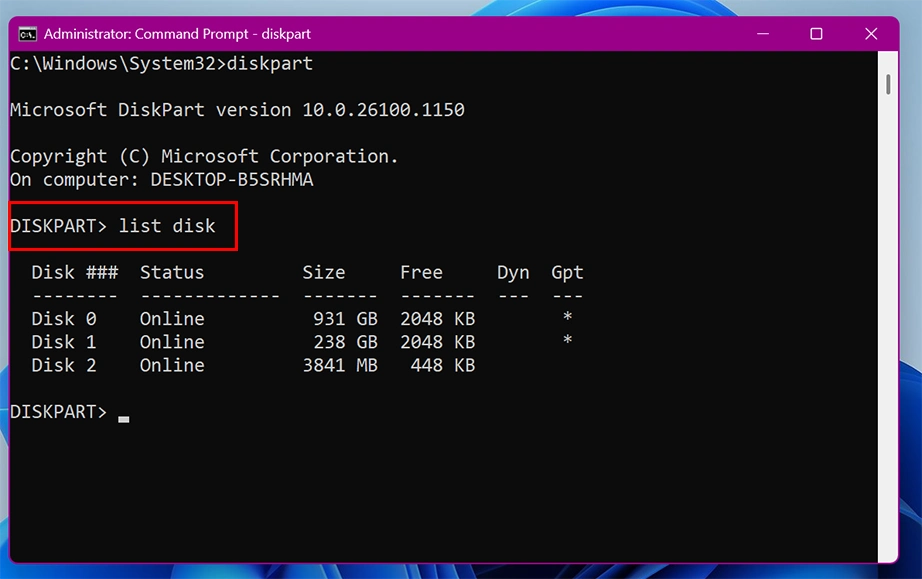
Type list disk and press Enter. A table showing all storage drives on your computer will appear.
Look closely at the sizes listed. Identify your USB drive by its storage capacity so you do not accidentally format the main Windows hard drive.
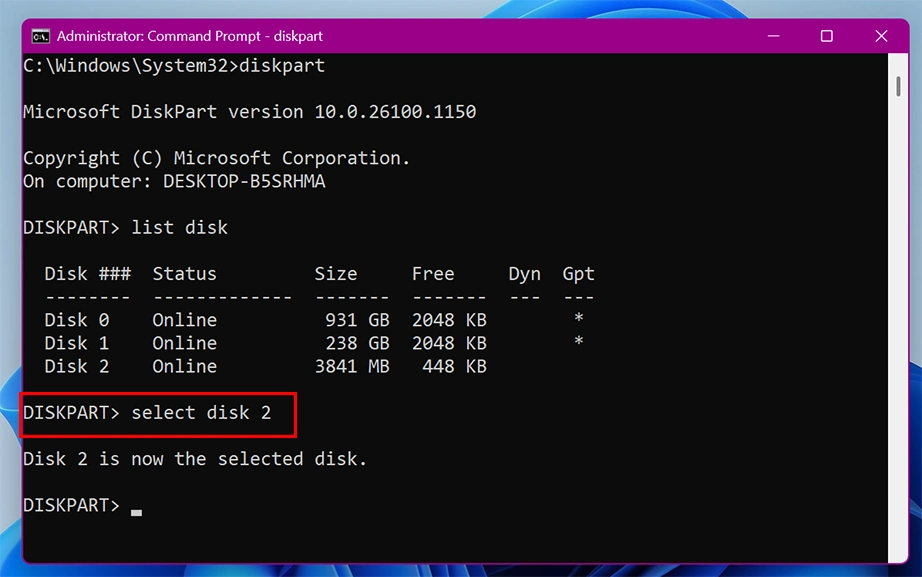
Type select disk X (replace X with the actual number assigned to your USB drive, such as select disk 2) and press Enter. You will see a message saying “Disk X is now the selected disk.”
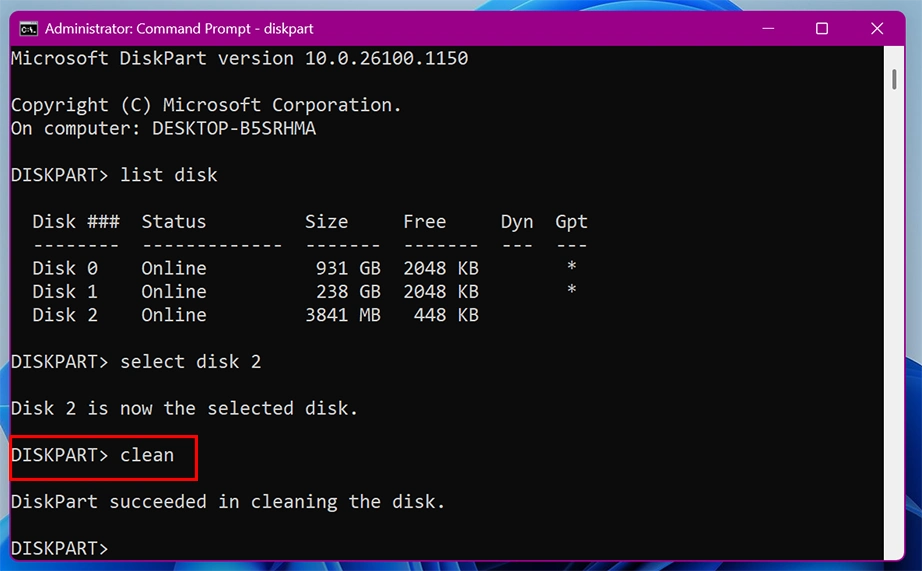
Type clean and press Enter. This completely clears the drive’s existing layout and removes all partitions.
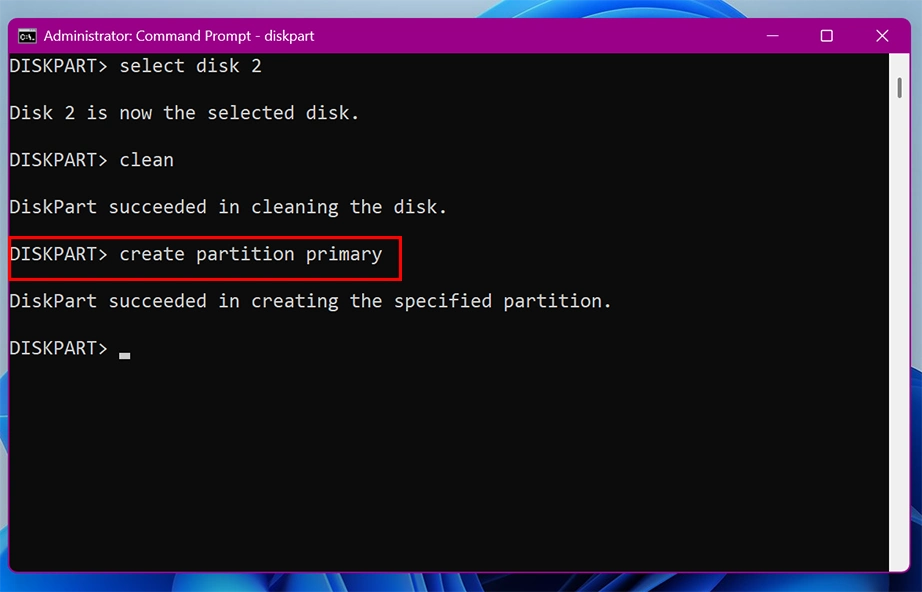
Type create partition primary and press Enter to make the drive usable again.
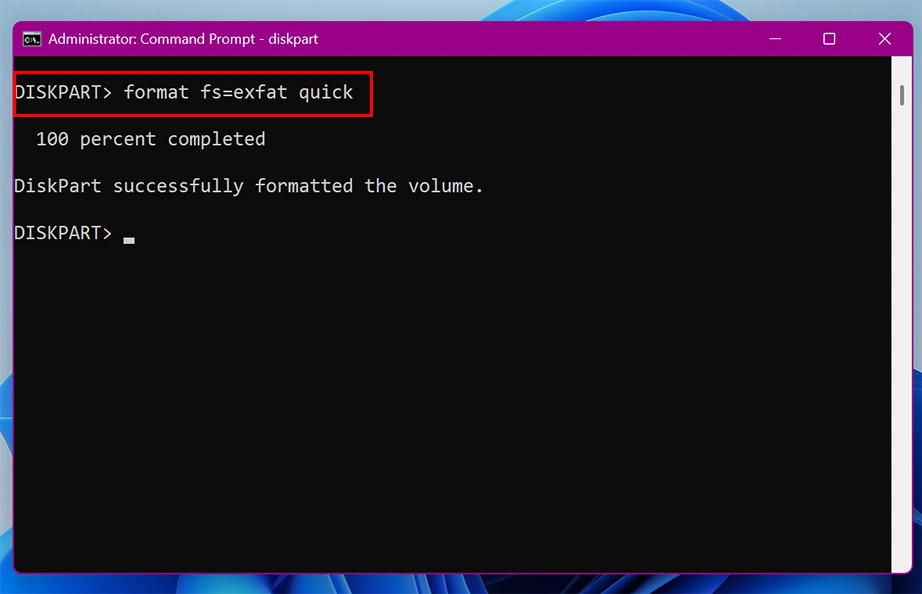
Enter format fs=exfat quick and press Enter.
Tip: You can replace exfat with ntfs or fat32 depending on the file system you need.
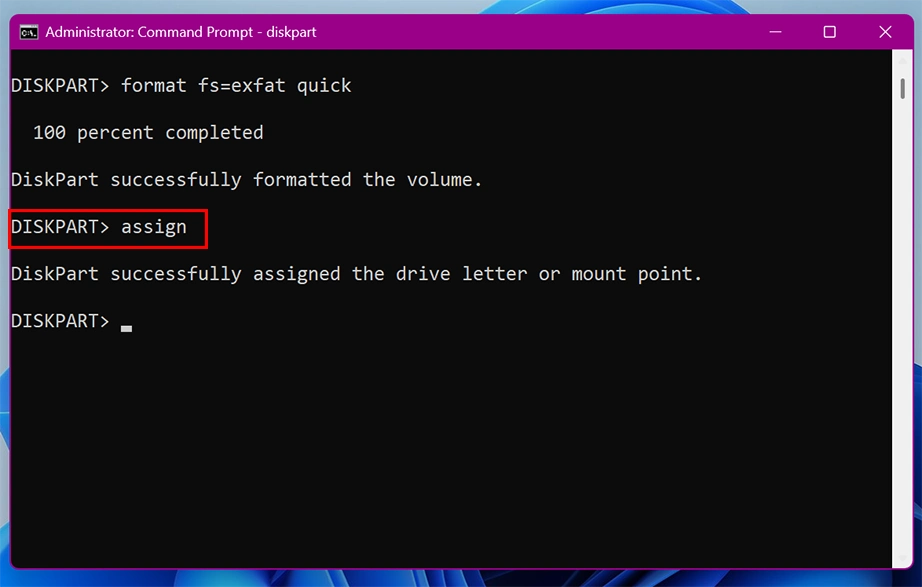
Type assign and press Enter to give your formatted USB drive a letter so Windows can detect it in File Explorer.
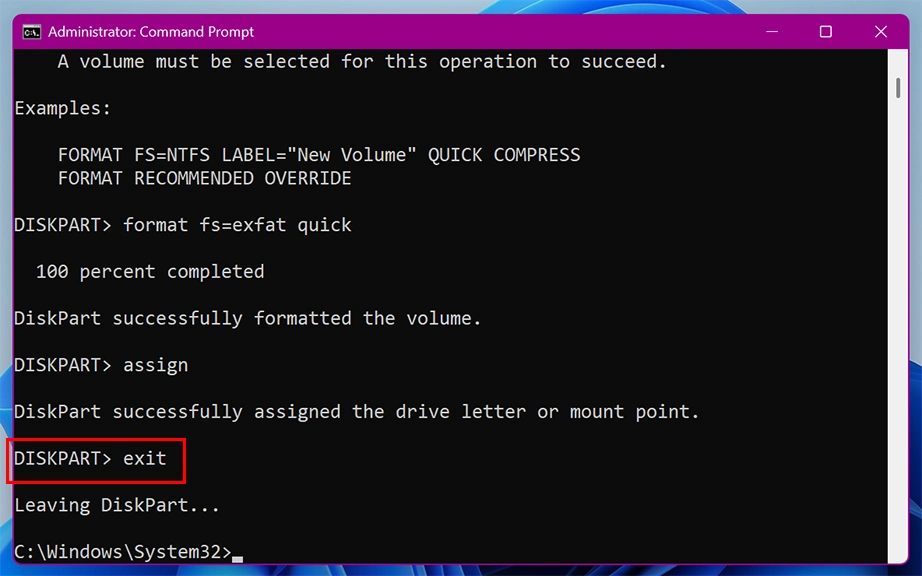
Type exit and press Enter to close DiskPart, then close the Command Prompt window. Your USB drive is now ready.
Method 5: Using Windows PowerShell
Windows PowerShell is a modern command-line shell and scripting language designed for advanced automation. Using PowerShell commands, you can format USB drive much faster than clicking through visual interfaces. It is highly effective to secure large-capacity USB flash drive formats.
Here’s how to format a USB drive using PowerShell commands:
Connect the USB flash drive to your PC.
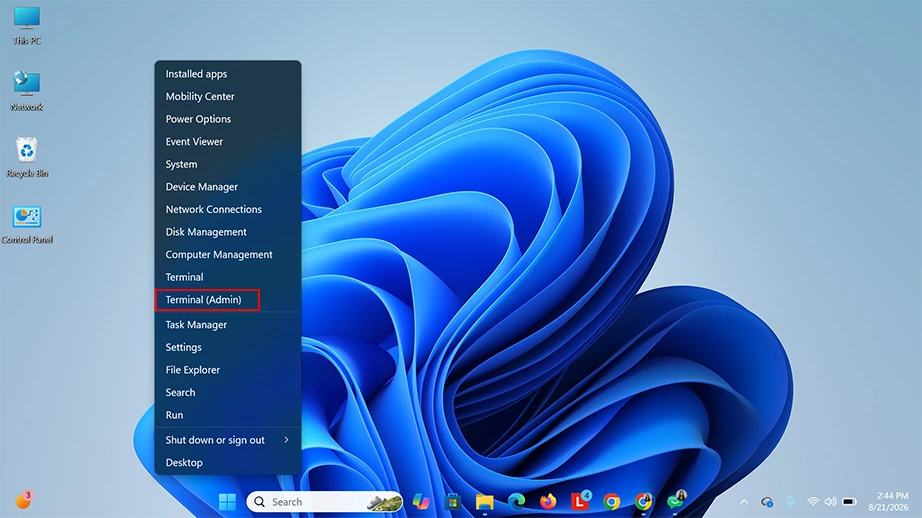
Right-click on the Start button (Windows logo) on your taskbar and select Terminal (Admin) or Windows PowerShell (Admin) from the menu.
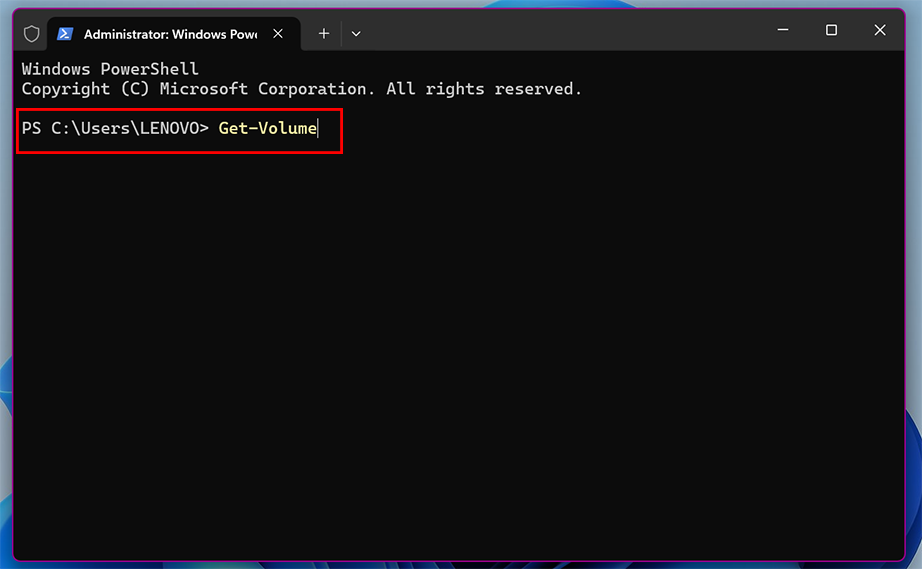
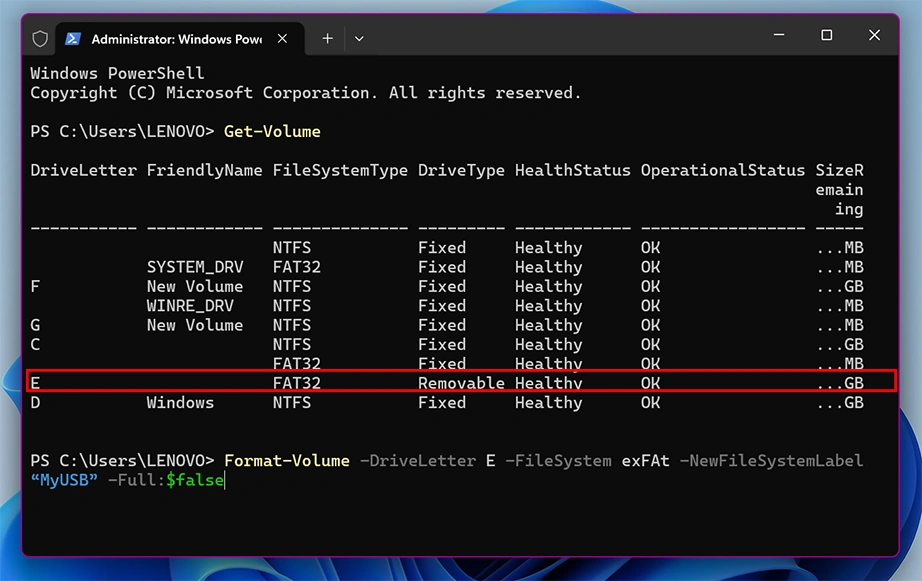
Type Get-Volume and press Enter.
Find your USB drive in the list and note its assigned Drive Letter (example, E, F, or G).
Warning: Windows PowerShell may or may not give a warning to confirm the format.
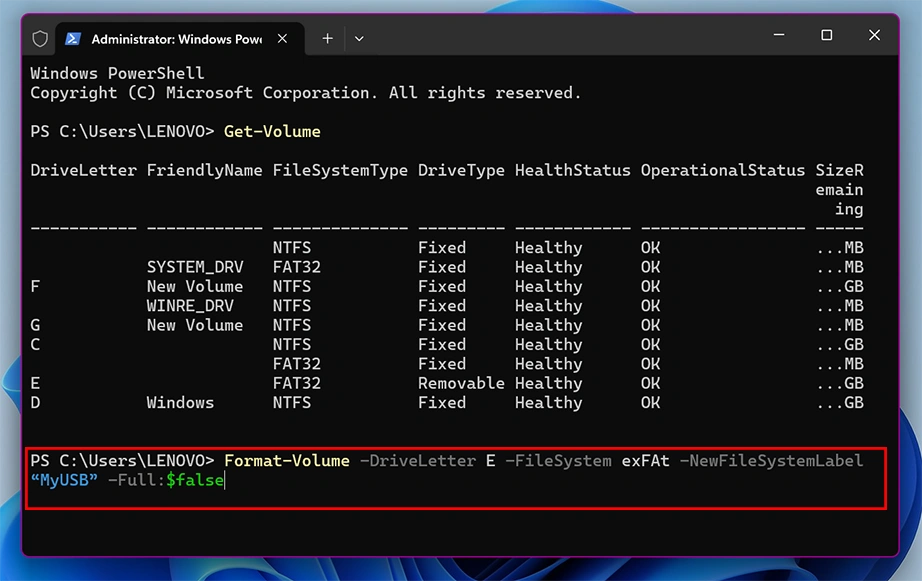
Type the following command and press Enter (make sure to replace X with your actual USB drive letter):
Format-Volume -DriveLetter X -FileSystem exFAT -NewFileSystemLabel “MyUSB” -Full:$false
Tip: You can change exFAT to NTFS or FAT32 based on your preference, and change “MyUSB” to whatever name you want to give your drive.
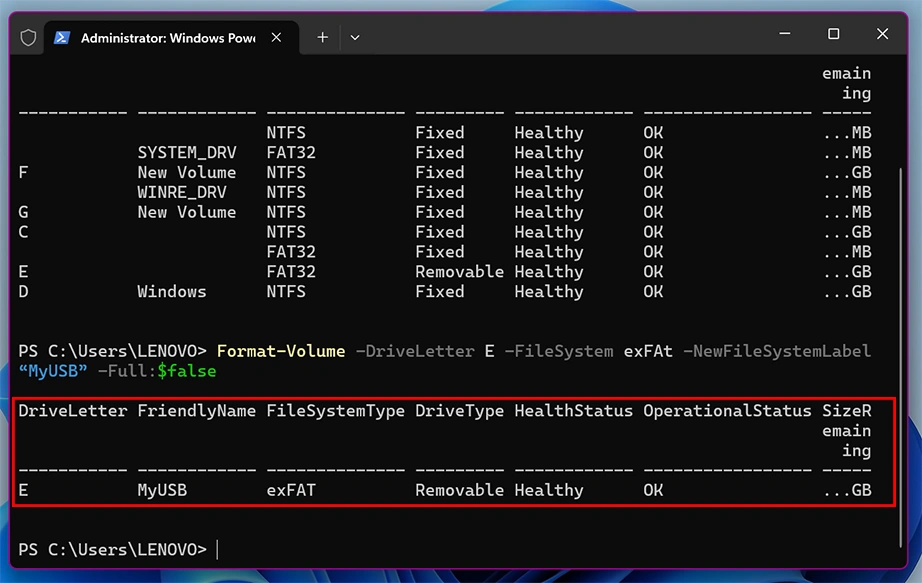
PowerShell will display a small progress bar. Once finished, a status summary showing your drive letter, file system type, and healthy status will appear on your screen.
How to Format a USB Drive on Mac?
Formatting a USB drive on a Mac gives you a clean USB with fewer software glitches and file architecture. Apple provides two built-in methods to safely wipe and configure external storage. Remember to back up all your data before formatting the USB drive.
You can choose between a visual menu or a text-based terminal shortcut to format a USB drive. But before that, here is a breakdown of the available USB file system formats on Mac.
macOS USB File Systems
File System
Maximum File Size
OS Compatibility
APFS
2^63 – 1 bytes
macOS 10.13 and newer only (incompatible with Windows)
exFAT
2^64 – 1 bytes
Windows, Mac, Linux
Mac OS Extended (HFS+)
2^63 – 1 bytes
Legacy Mac-only (Read-only on Windows)
FAT32
4 GB
Virtually all older and modern devices
Method 1: Using Mac Disk Utility
Apple’s Disk Utility is the system’s core storage manager. It handles everything from partition layouts to drive health monitoring. When you format a USB drive here, the tool erases the partition and creates a clean partition map as per Apple’s optimization protocols. It is the safest choice for standard storage.
Steps to format USB using Disk Utility on a Mac:
Plug your flash drive into an open port on your Mac.
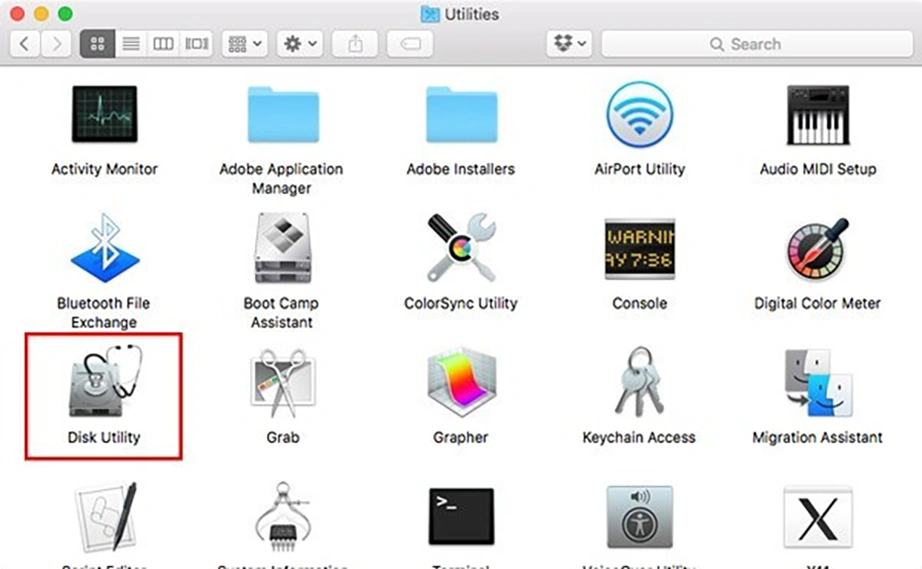
Go to Applications > Utilities and double-click Disk Utility.
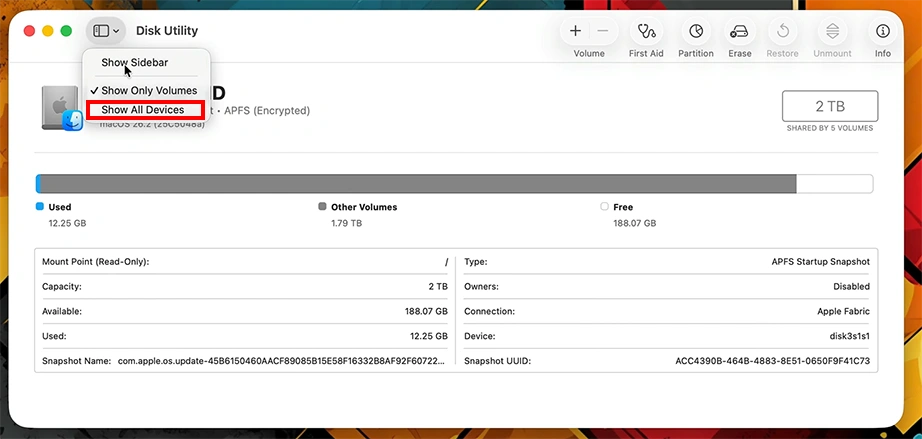
Click the View icon in the top-left corner and select Show All Devices.
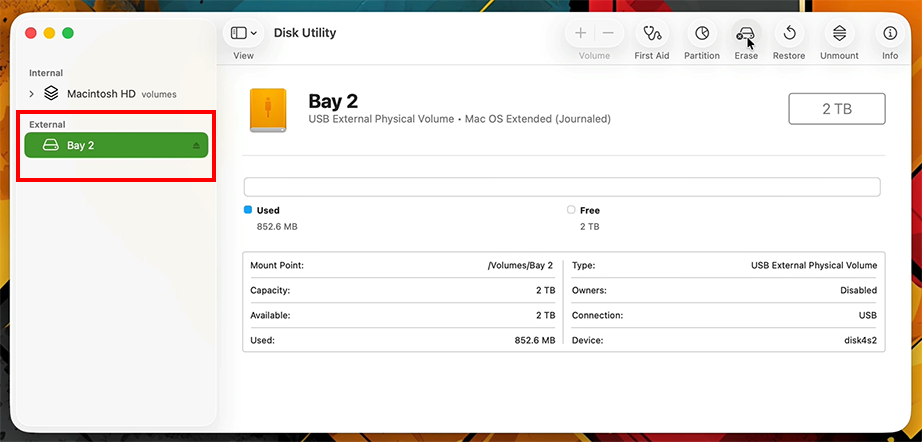
Click the top-level hardware name of your USB drive in the left sidebar.
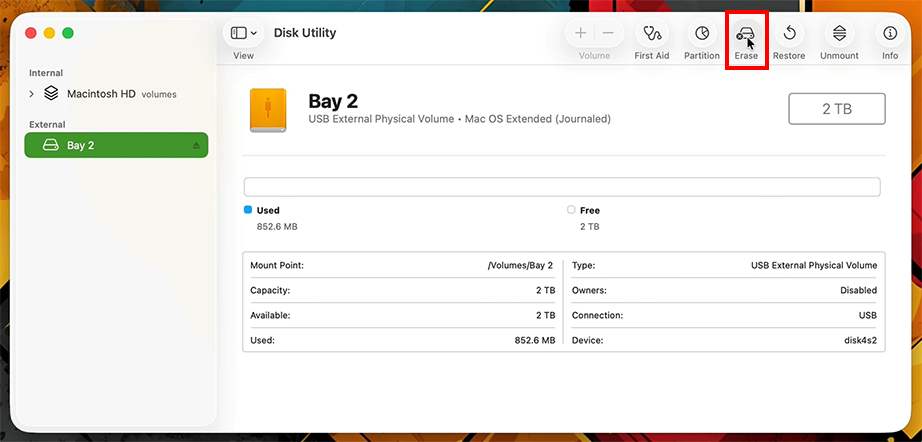
Click the Erase button located in the top toolbar menu.
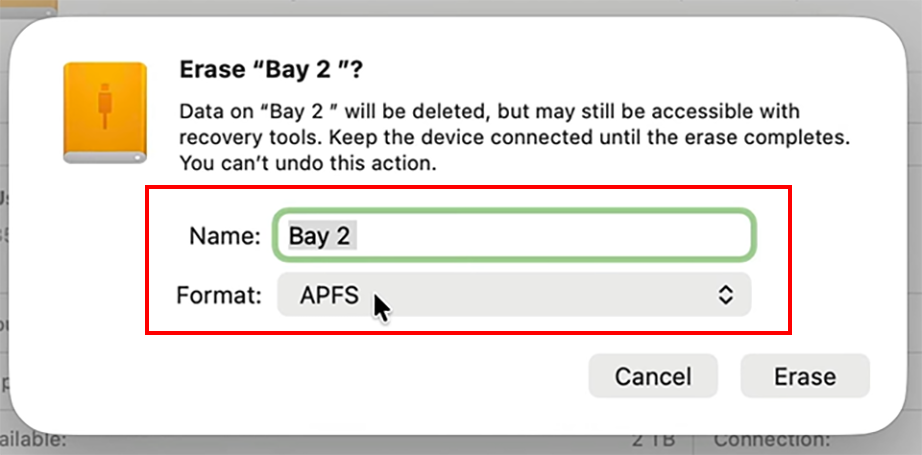
Configure the format:
Name: Type a new name for your flash drive.
Format: Select your preferred system (APFS or exFAT) from the dropdown menu.
Scheme (Optional): Choose GUID Partition Map.
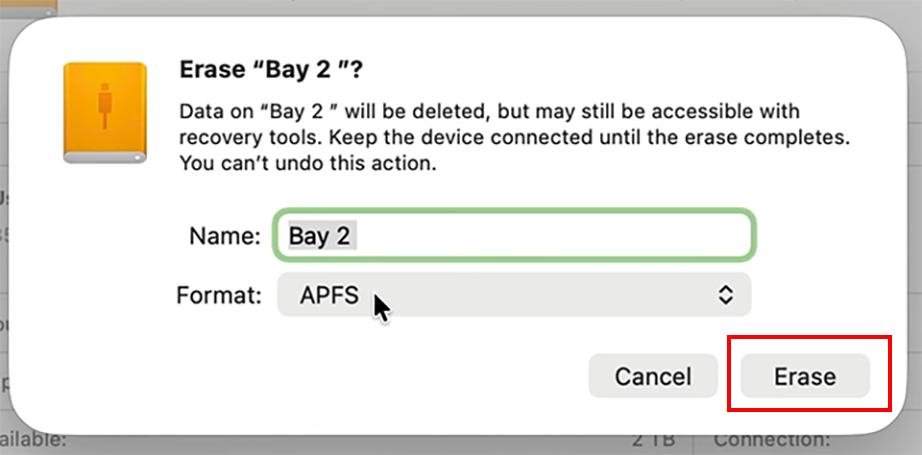
Click the Erase button in the pop-up configuration window.
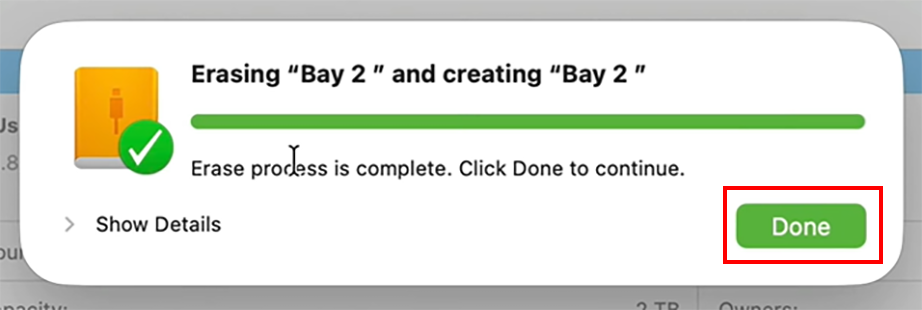
Wait for the progress bar to finish, then click Done.
Method 2: Using Terminal
Using the macOS Terminal gives you low-level access to Darwin, the core Unix operating system underlying macOS. One advantage of using this Terminal command to format USB flash drive on a Mac is that the previous method can hang if the USB drive has corrupted blocks or an unusable file structure, but using this diskutil command in Terminal will forcefully format the USB.
How to format a USB drive on Mac using Terminal?
Plug your USB flash drive into your Mac computer.
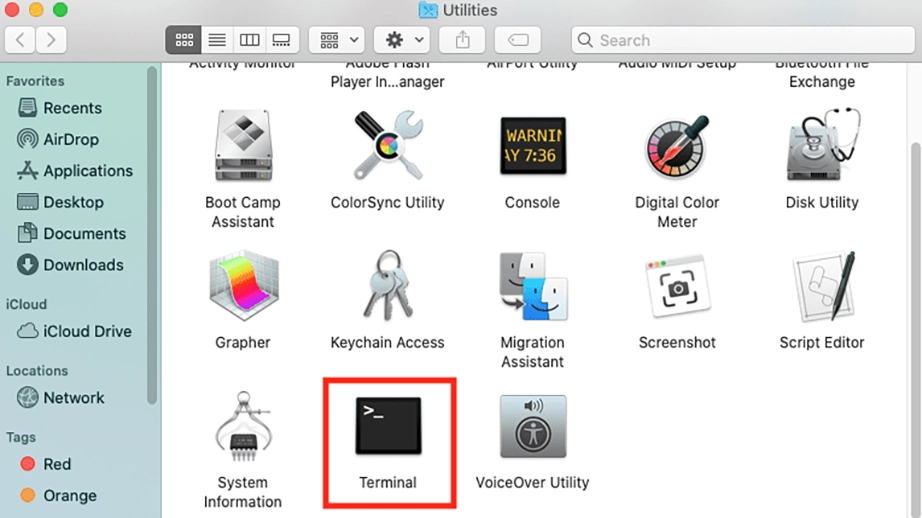
Navigate to Applications> Utilities and double-click the Terminal app.
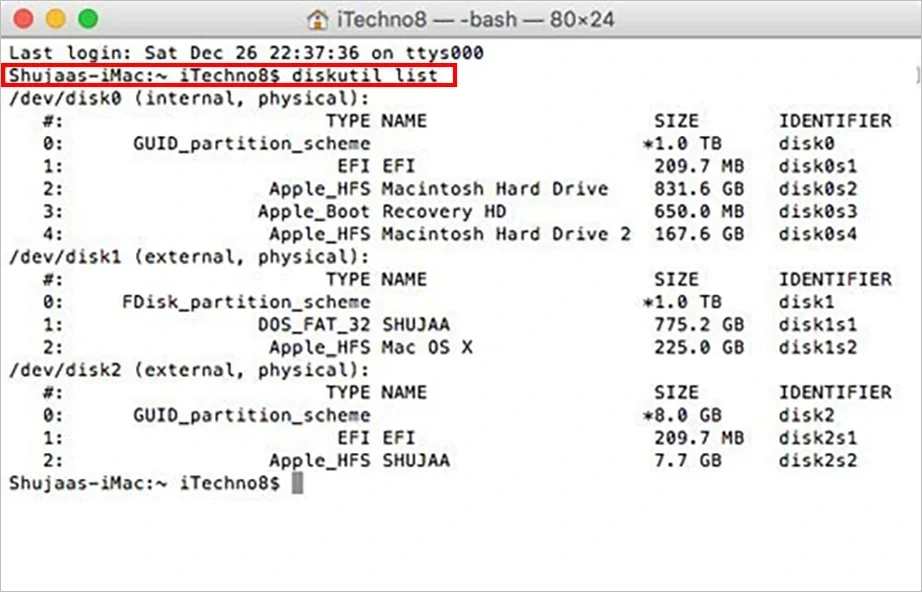
Type diskutil list and press Enter to display all connected drives.
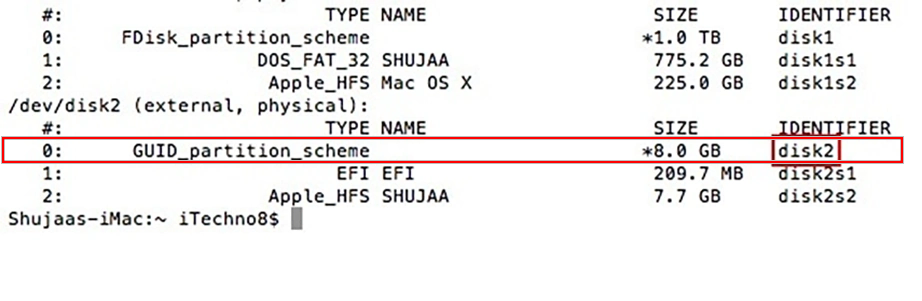
Look at the storage capacity sizes to find your USB drive letter layout. Note its identifier node located in the right column (example, disk2 or disk3).
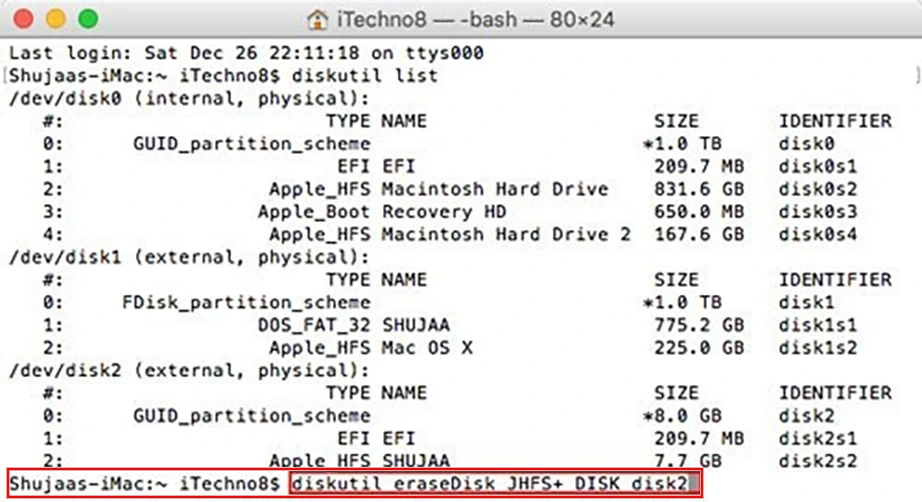
Type the following command and press Return. (Make sure to replace diskX with your USB identifier)
diskutil ereaseDisk exFAT MyUSB GPT diskX
Tip: You can replace exFAT with APFS if you want a Mac-exclusive file structure and rename MyUSB to any label you prefer.
Wait a few moments until the command line shows Finished erase on diskX.
What to Do If Your USB Won’t Format?
Solution 1.If the drive shows “Write-Protected” or error messages: Use text-based commands in Command Prompt (DiskPart) or Mac Terminal
Solution 2. If the drive is not recognized or shows “Unallocated Space”: Use the Disk Management method to format the USB drive
Solution 3. If the Format wizard freezes: Use Windows PowerShell to run the direct script to format.
How to Recover Files If You Formatted the Wrong Drive?
Accidents happen during storage cleanup. You might misidentify the drive or hit “Format” on a flash drive before confirming that your backups are up to date. In fact, sometimes you may encounter an “unable to complete the format” alert. So, if you find yourself in such situations, you need data recovery software for your USB drive.
Recover Files Using Notchox Data Recovery Software
Using Notchox data recovery software will let you recover data after accidental quick format on USB drive in no time. It is a professional-grade software designed to scan raw, formatted, or corrupted storage architectures.
Follow these steps to recover data from a formatted USB drive:
Plug your formatted or unreadable USB drive into the PC.
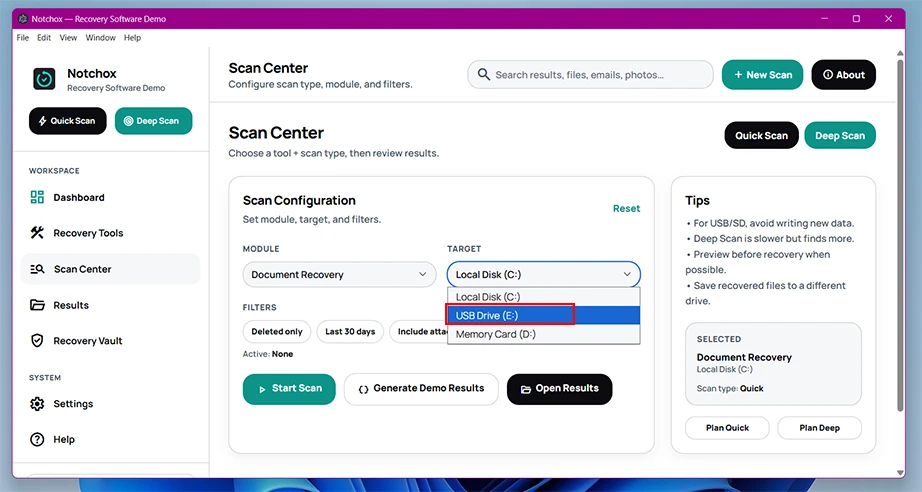
Locate the storage drive on the home screen and click on your connected USB drive from the target drive drop-down list.
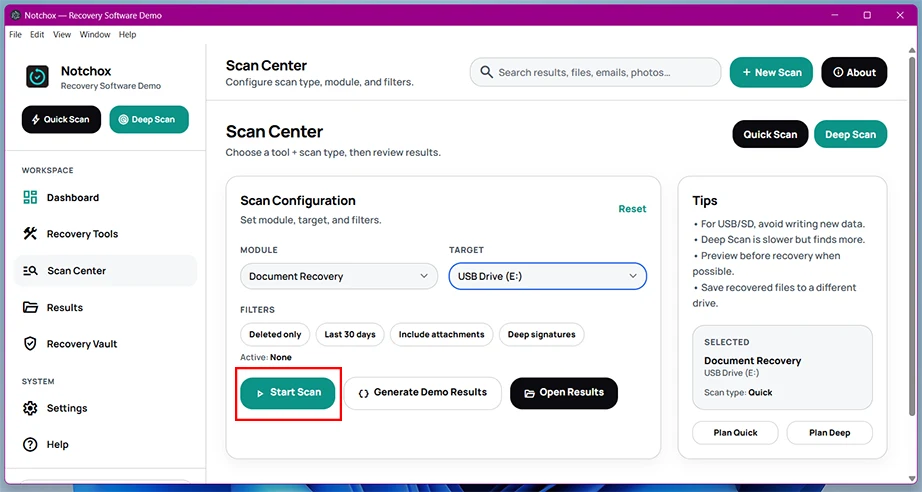
Click the Start Scan button. The software will begin executing algorithm blocks to trace lost partitions and file signatures.
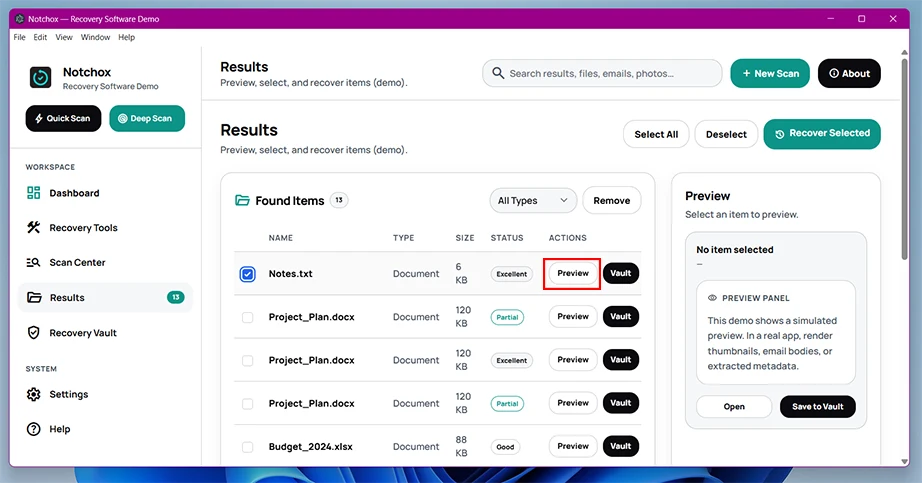
Click on the Preview button next to images, PDFs, documents, or videos to check their integrity.
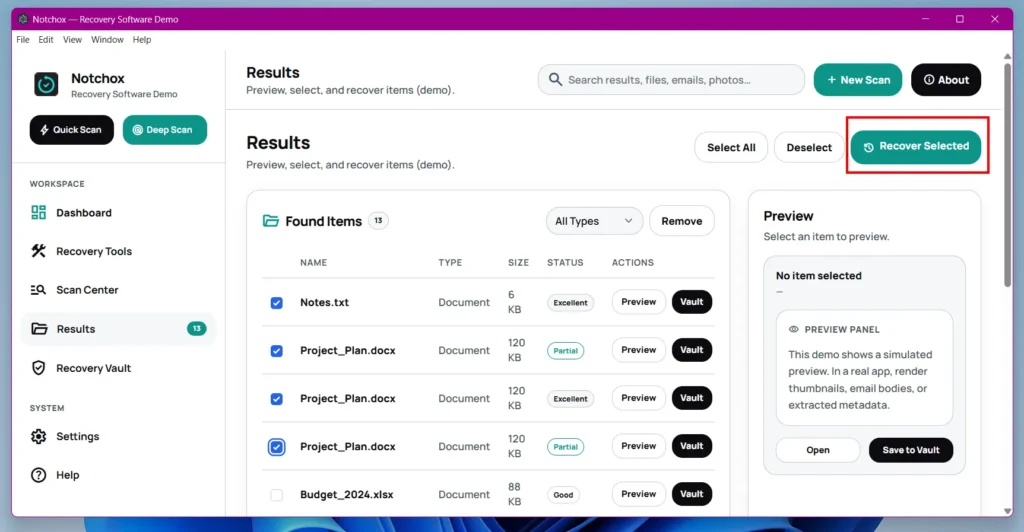
Now select the files you want to restore and click the Recover Selected button at the top of the window.
The Bottom Line
Both Mac and Windows provide several built-in ways for your how to format a USB drive. It ranges from the graphical simplicity of Mac’s Disk Utility and Windows File Explorer to advanced control of Terminal.
Formatting your USB drive on Mac or Windows is easy when you know about your system.
By choosing the right file system format, like cross-platform exFAT or native NTFS and APFS, you will get seamless device compatibility every time.
Frequently Asked Questions
Q1: How to format a USB drive?
Ans: To format USB drive, plug it into your computer, right-click the drive icon in Windows File Explorer (or use Disk Utility on Mac), select the Format (or Erase option on Mac), choose your preferred file system, and click Start. Note that this permanently deletes all content of the drive.
Q2: Will USB drive formatting delete everything on it permanently?
Ans: Yes, formatting wipes all data. A Quick Format deletes the file system index, making the storage space available for new data, while a Full Format completely overwrites the sectors.
Q3: Should I format my USB drive NTFS or FAT32 or exFAT?
Ans: Choose exFAT if you need cross-platform compatibility for transferring large files between Windows and Mac. Select NTFS for Windows-only systems that need security features. Use FAT32 only if you need to connect the drive to older electronics.
Q4: Do new flash drives need to be formatted?
Ans: No, most new flash drives come pre-formatted out of the box (usually as FAT32 or exFAT) and are ready for immediate use. You only need to reformat a brand-new drive if you want to change its layout to match a platform-specific file system like NTFS or APFS.
Q5: How do I format a USB drive on my Mac?
Ans: There are two ways to format a USB drive on a Mac:
Disk Utility: Open Disk Utility > select the drive > click Erase. Type a name, choose a file format, and confirm.
Terminal: Open Terminal > type “diskutil list” (note your USB drive number) > run diskutil eraseDisk exFAT MyUSB GPT diskX (replacing diskX with your drive’s identifier number)
Q6: Why won’t my Mac let me write files to my Windows-formatted USB drive?
Ans: Your USB drive is likely formatted in NTFS, which macOS can natively read but cannot write to or edit. To fix this without software, back up your files to another location, then reformat the drive to exFAT to gain full read and write access on both systems.
Deeksha Arora is a Data Protection & Recovery Writer focusing on writing accurate, informative, and easy-to-understand technical articles for Notchox’s readers. Her content on the prevention of data loss, understanding risks of device failures, and guides to fix problems helps readers make the right decisions and understand the technical terms easily. She works closely with Subject Matter Experts to ensure high usability and accuracy of her writing.