You can easily recover your deleted pictures on your personal computer if you take action immediately. Your first step should be opening the desktop Recycle Bin or Trash folder to see if the deleted files are there. Even if you cannot find them there, the photos are still there on the drive until you save new files over them. The same holds for deleted screenshots, which live in the same folders and follow the same recovery steps.
To avoid permanent deletion, do not save any new files to that computer drive. Instead, launch a reliable desktop recovery tool like Notchox to scan your system and pull your pictures back
Quick Answer: To recover deleted photos fast and safe, use the Notchox Photo Recovery Software that recovers deleted data from any device. It works as a cross-device solution for both Windows and Mac Systems.
How To Recover Deleted Photos Fast and Safe on Windows and Mac: Step-by-Step Methods
Getting your files back depends on how you lost them and your specific computer setup, because when you delete a file, it does not disappear instantly from your hard drive. Your photos remain fully intact as long as you do not save the new files in their place.
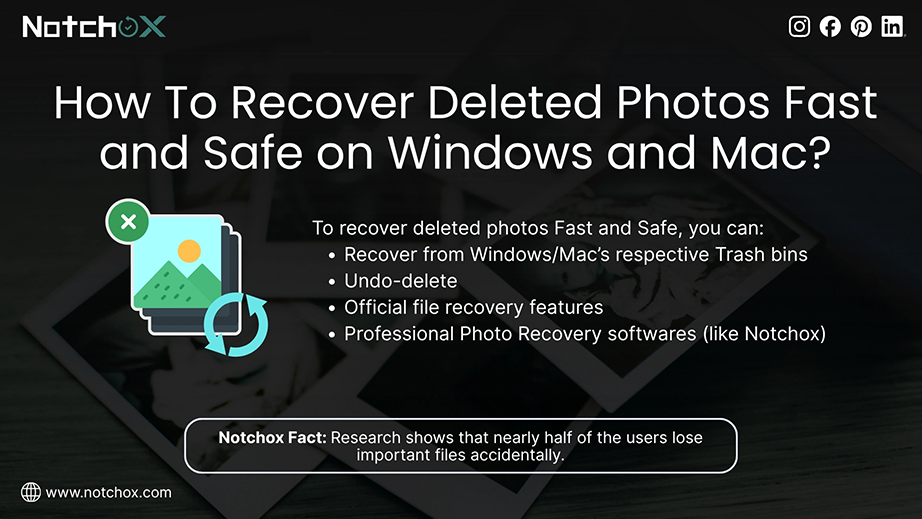
Research shows that nearly half of the users lose important files accidentally. Luckily, you can recover them by using proper computer data recovery strategies.
Method 1: Notchox Photo Recovery Software Method
The easiest and fastest way to recover deleted photos on Windows or Mac is to use recovery software. And Notchox, being the best data recovery software, helps you recover your deleted data in no time. Simply download, install, select the drive, and scan. Your files are recovered!
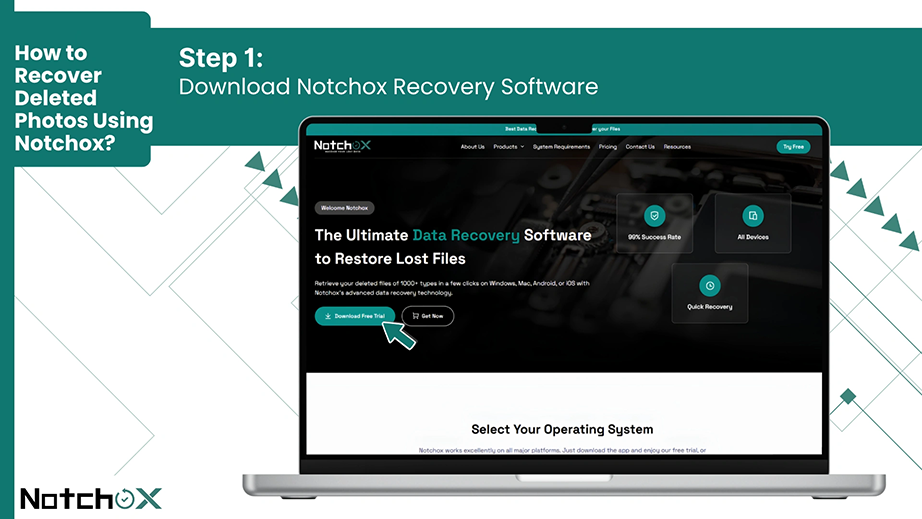
Step 1: Download the Notchox Photo Recovery Softwarefrom the official website. Put it on a separate drive. Install the software on your Windows or Mac PC.
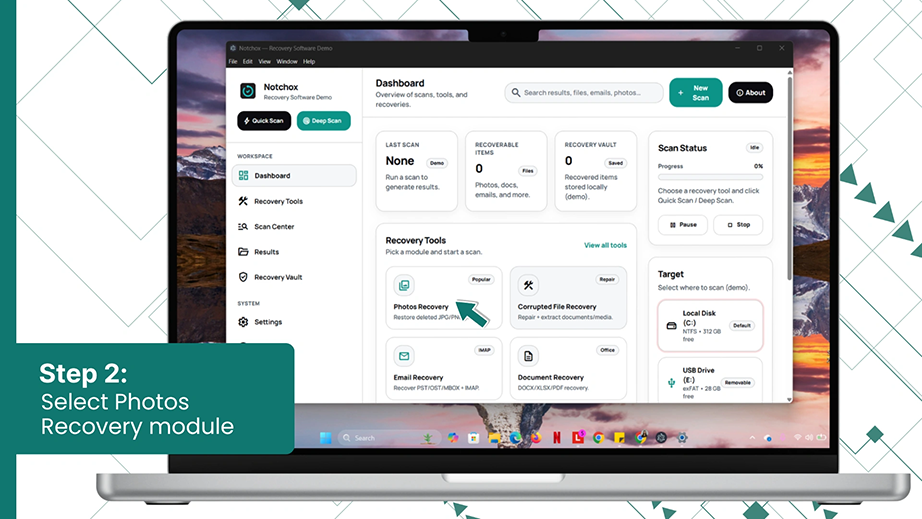
Step 2: Open Notchox application and select Photos Recovery module from the dashboard.
Step 3: Connect your external drive or camera SD card to your computer’s USB port. Make sure the system detects the device before you begin the scan. Now, select the target drive.
Note: Notchox can recover 1000+ file types. You can recover a wide range of photo file formats, which include BMP, GIF, PNG, JPEG, JPG, TIFF, PSD, Adobe EPS, and more.
Step 4: Before you begin the scan, make sure to apply the filters to narrow down the search and save time. To recover photos only, select Photos in the filter or the Photo format.
Step 5: Run a deep scan or a quick scan. Depending on the number of photos and when it was deleted, select the scan and click the Start Scan button.
Step 6: Notchox lets you preview the file before you completely recover and save it. Click on any recoverable file in the results and preview it to check its integrity.
Step 7: Restore the photos. Select the photos you want to restore and click the Save to Vault button on the right side to safely restore the pictures.
Notchox lets you recover data across all devices, so whether you are thinking about how to recover pictures on Android, iPhone, Mac, or Windows, Notchox has your back.
Mac (macOS) Photo Recovery Methods
Mac offers several fast and safe methods to restore missing pictures right from your internal drive. Firstly, check the Trash folder, which keeps the files until emptied. You can also use Time Machine, which recovers older files from past backups. Lastly, try iCloud Web to recover deleted photos fast and safe from the cloud. Let’s explore these methods one by one.
Method 1: Restoring Deleted Photos from Trash
Apple has a built-in temporary holding zone called the Trash bin. When you delete a photo, your Mac doesn’t actually erase the data right away. It keeps the deleted photo safe in the Trash bin until you choose to empty the bin.
Here is how to get back deleted pics from Mac Trash:
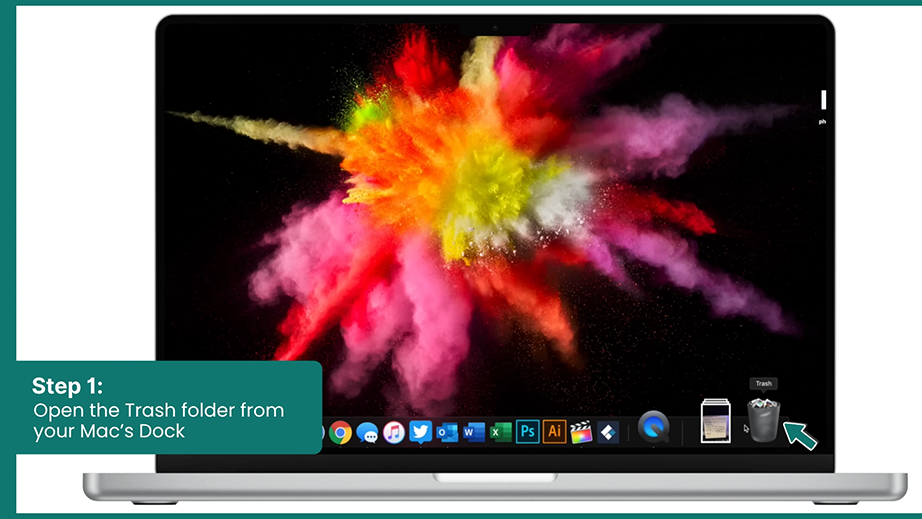
Step 1: Click on the Trash Can icon (🗑) on the far right side of your Mac’s Dock.
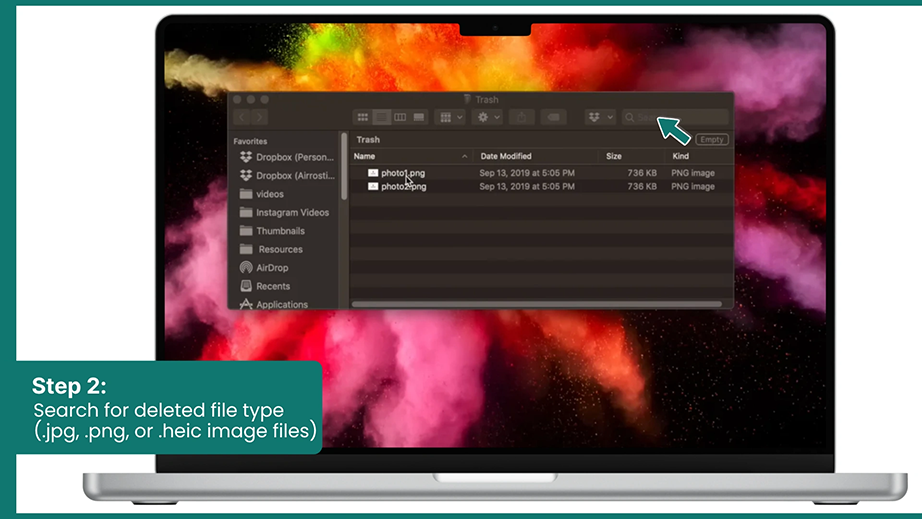
Step 2: Once the window opens up, you can sort everything by Date Added or Kind to easily sort your deleted .jpg, .png, or .heic image files.
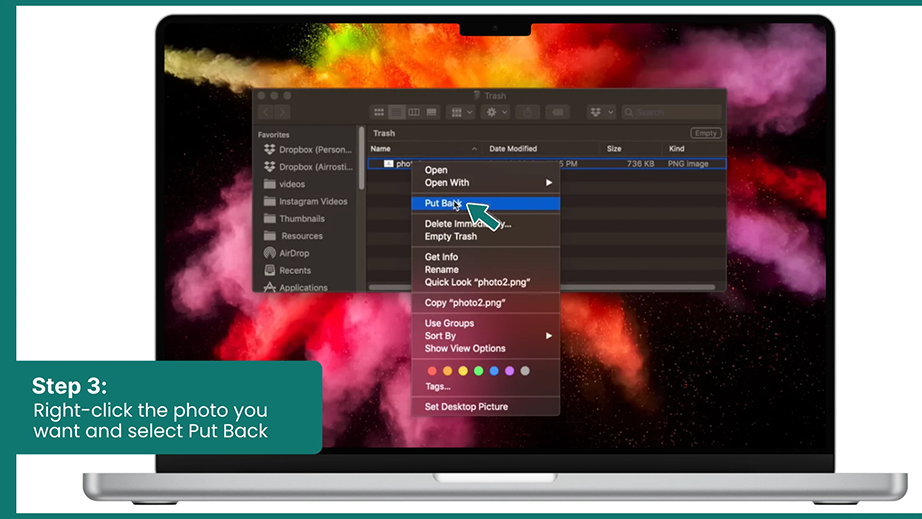
Step 3: Select the photos you want to restore. Right-click on them and choose Put Back from the menu.
Your photos will be instantly restored to the exact folder they were deleted from.
Method 2: Restoring with Time Machine
How to get back deleted pics when you have already emptied your trash? Using the automated backup Time Machine. It stores snapshots of your files every hour onto an external hard drive. You need to roll a folder back to get a look at the exact copy of your computer’s memory from the past.
Let’s see how to get erased pictures back using Time Machine.
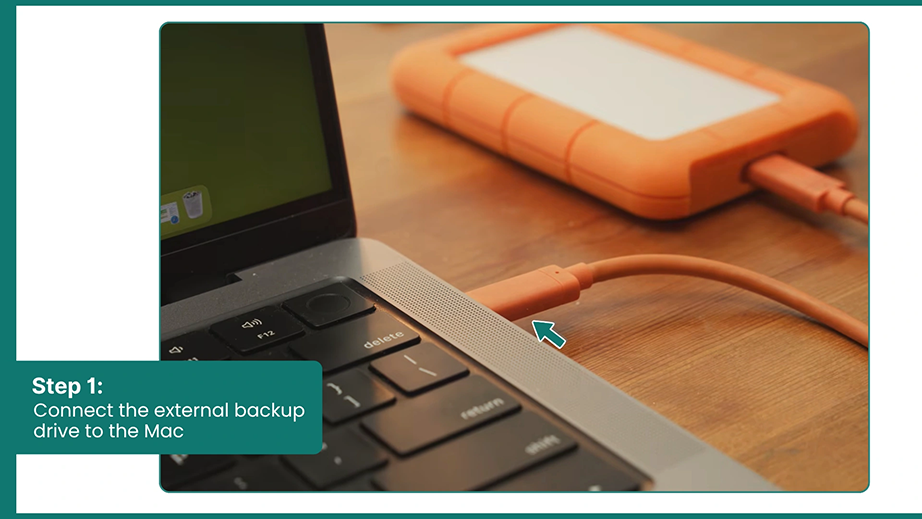
Step 1: Plug your external Time Machine hard drive or SSD into your Mac using a reliable cable.
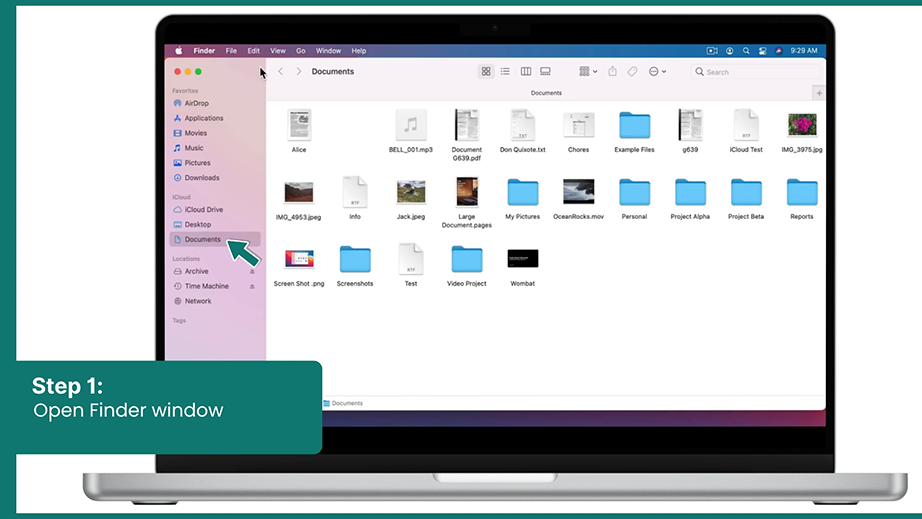
Step 2: Open a regular Finder window and open the exact folder where your pictures used to live before they were deleted.
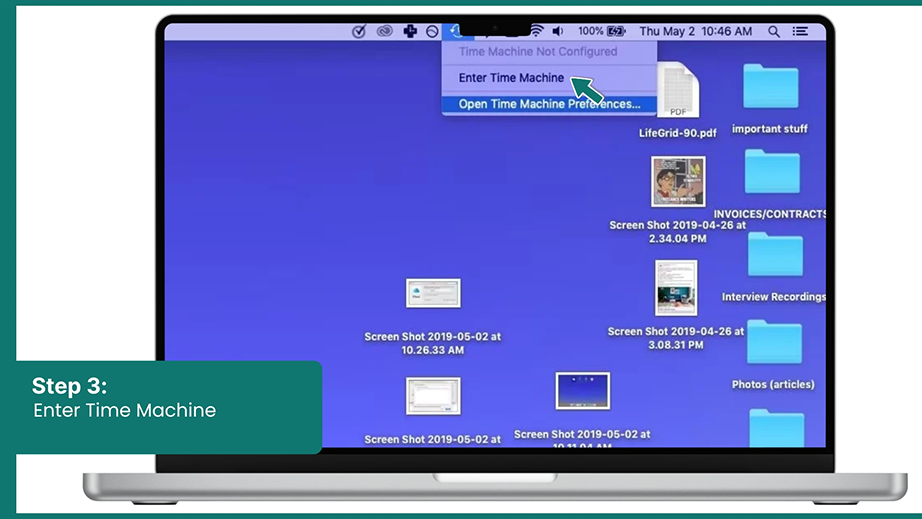
Step 3: From the menu bar on your screen, click on the little Time Machine icon and select Enter Time Machine.
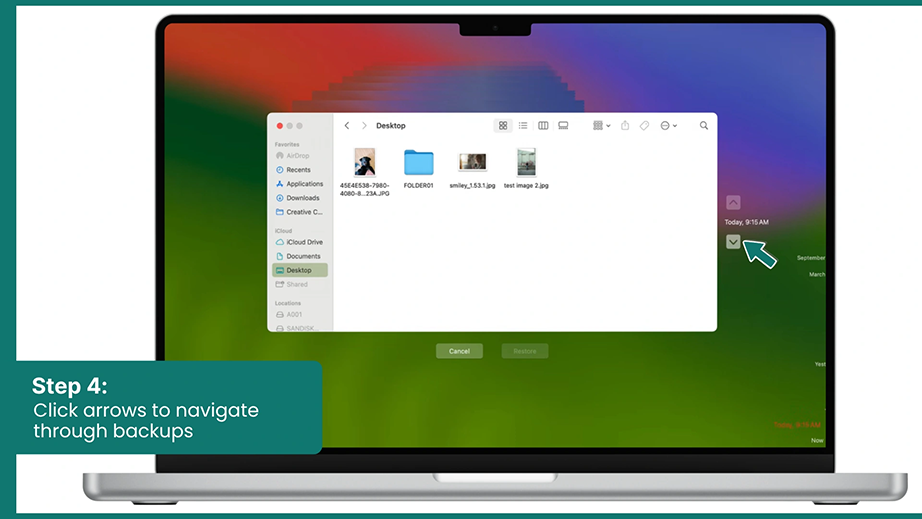
Step 4: Use the arrows on the right side of the screen to scroll back through your folder’s history.
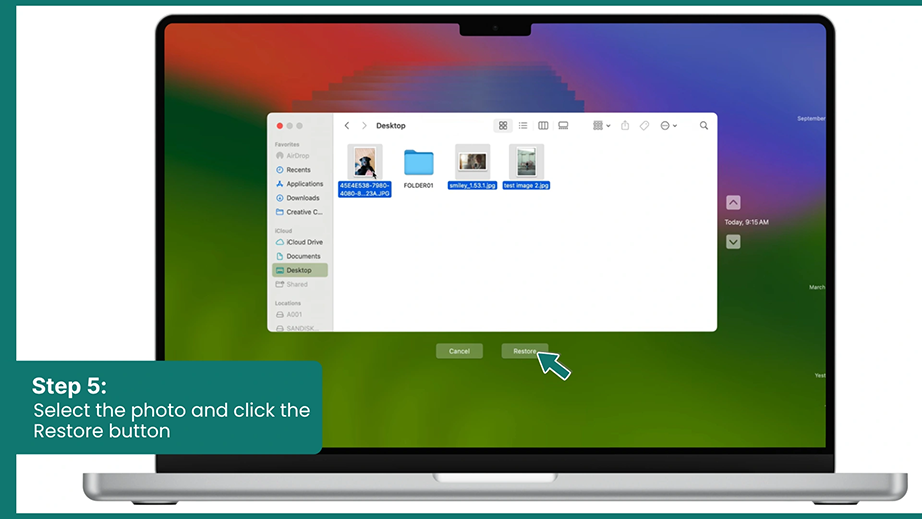
Step 5: Once you see your deleted photo, click on it and hit the Restore button.
Method 3: Reversing Accidental Erasure using the Undo Command
Did you just delete the photos a couple of seconds ago, and now you’re wondering how to recuperate deleted pictures? Yes, you might find them in the Trash bin. But there’s one more way to undo this action, the “Undo” command.
As long as you haven’t closed the active folder window or restarted your Mac, you can undo your last action and recover deleted photos fast and safely.
Step 1: Go to the Finder window or desktop from where you deleted the photo.
Step 2: Right-click and select “Undo Deletion” or press Command + Z.
The deleted photo(s) will be restored to the exact same location instantly.
Alternate way:
Step 1: Go to the Finder window or the desktop from where the photo was deleted.
Step 2: Click on the Edit menu at the top.
Step 3: Select Undo Move of “XYZ.png”.
Method 4: Downloading from iCloud
If you use Apple’s cloud system to keep your gadgets connected, your desktop gallery is linked with this web database. This is incredibly helpful because it means your files exist in two places at once. So, even if it is accidentally deleted from the Mac, you can access it through the cloud server.
Follow these steps to recover deleted photos from iCloud:
Step 1: Open any browser and go to iCloud.com and sign in with your Apple ID.
Step 2: Click on the Photos tile app on your main account dashboard.
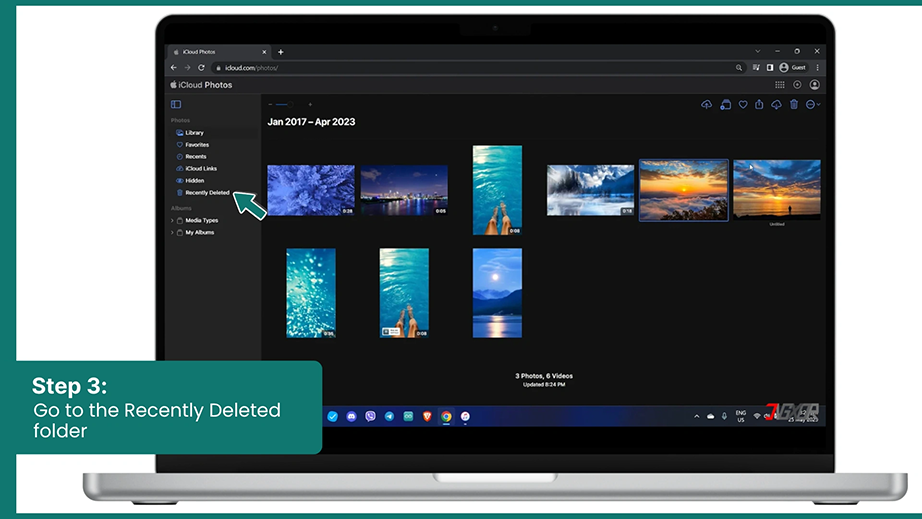
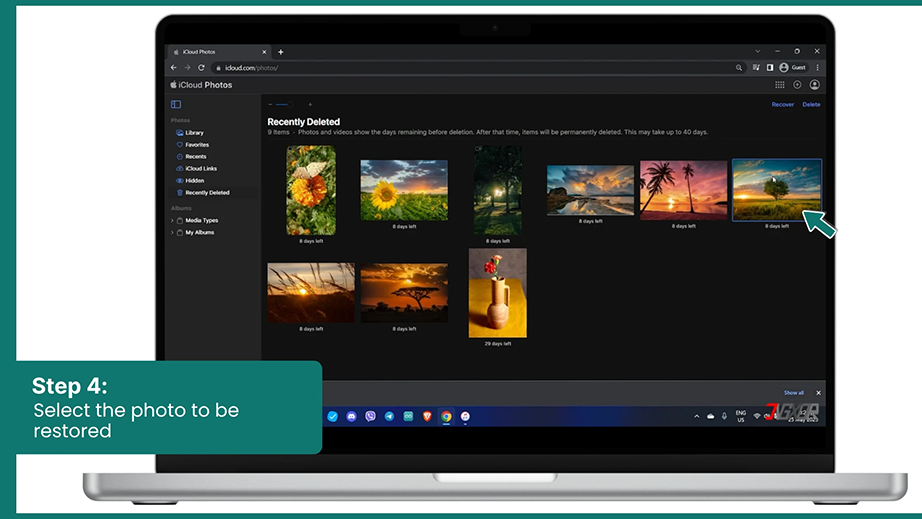
Step 3: Look at the left-hand side bar menu tree and click on the Recently Deleted folder.
Step 4: Select the photos you want to recover.
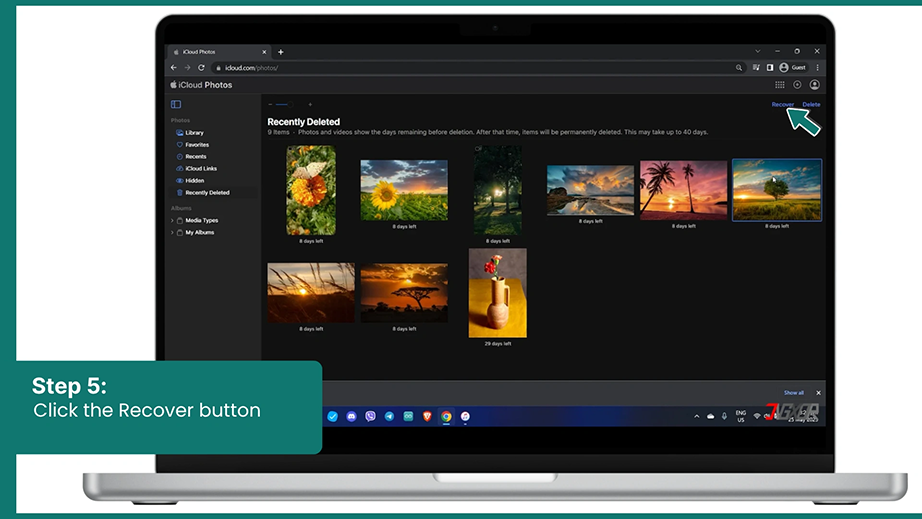
Step 5: Click the Recover button at the top of the page to sync them back to your Mac.
Windows PC Photo Recovery Methods
If you are a Windows user, don’t worry about how to recover deleted pictures on your Windows PC because your PC also has some safety tools built right into it. First, you can try the standard Windows desktop recycle bin retrieval. Next, you can use the Windows file recovery command-line utility and the cloud backups. Finally, we’ll also see Windows file history snapshots to roll your folder back into the past (just like Time Machine on Mac). Let’s look at these easy methods so you can recover deleted photos fast and safe.
Method 1: Using the Recycle Bin
Windows has a safety net that catches accidentally deleted data. It doesn’t delete the file permanently, but just routes it into a temporary holding zone called the Recycle Bin. Your deleted photos stay there until you permanently delete them.
Here’s how to recover deleted photos on Windows from the Recycle Bin.
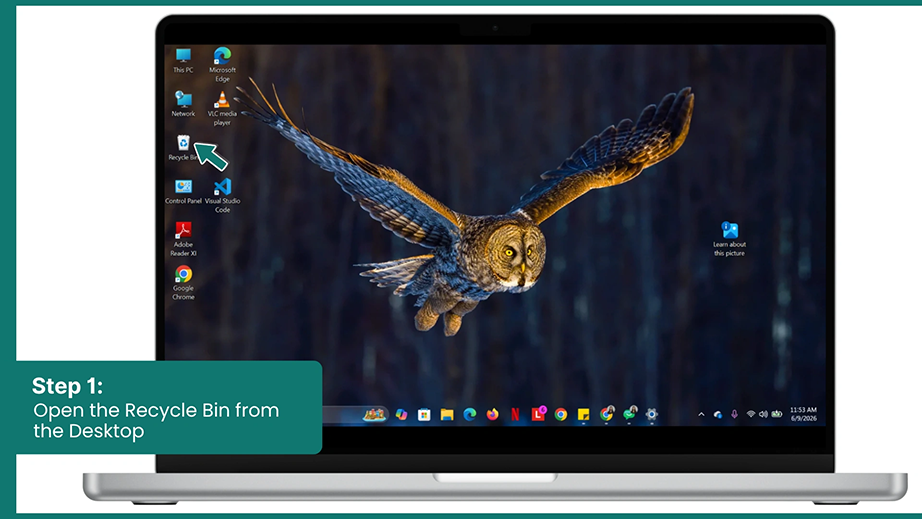
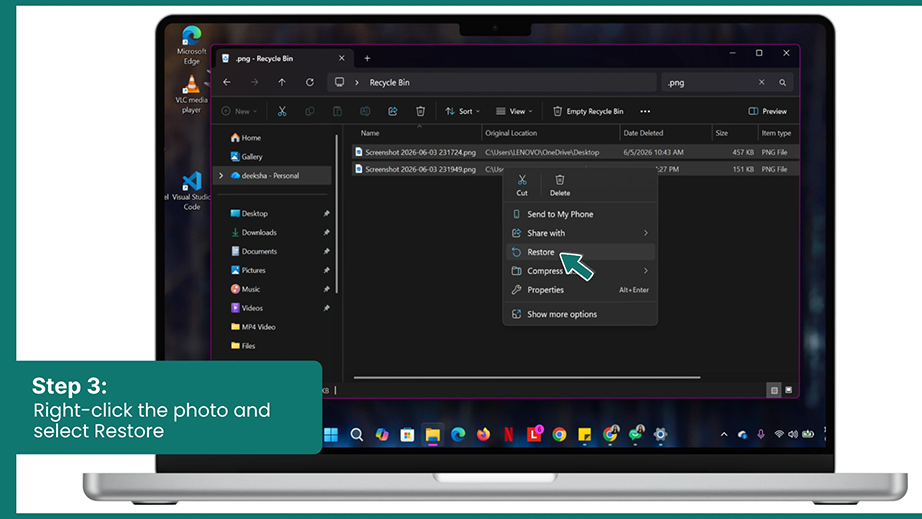
Step 1: Open the Recycle Bin. You can find it on the desktop. Double-click it to open the window.
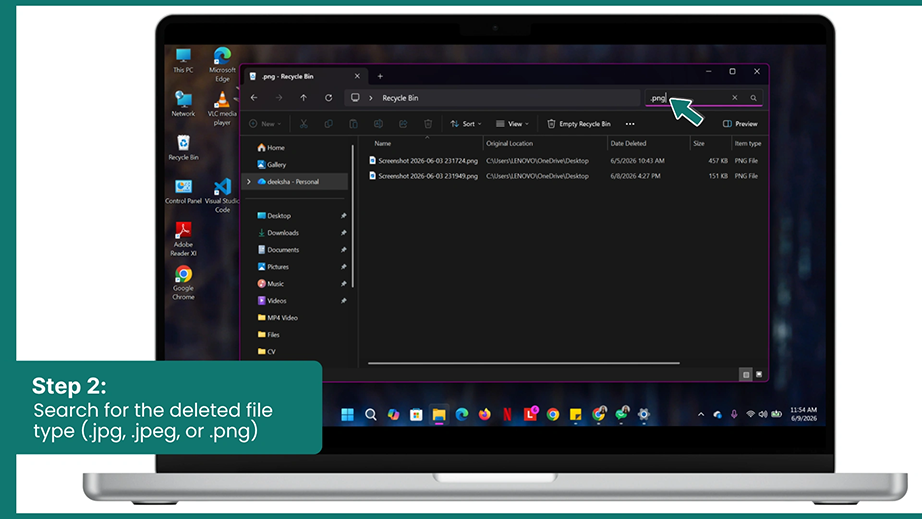
Step 2: Find your deleted photo. Use the search bar at the top right of the window and type .jpg, .jpeg, or .png to quickly filter through the bin and find your deleted photo.
Step 3: Select the photos, right-click on them, and select the Restore option from the context menu.
Windows will send your images back to the exact folder they were in before they were deleted.
Method 2: Using Microsoft’s Official File Recovery Feature
If you have already emptied your Recycle Bin and can’t find your deleted photos there, wait, because Windows has an official utility for you to recover your permanently deleted photos, the Windows File Recovery. It is a free tool that looks for your data and interacts directly with the file system to recover your photos before the operating system can overwrite them.
Let’s walk through how to recover permanently deleted photos using Windows File Recovery.
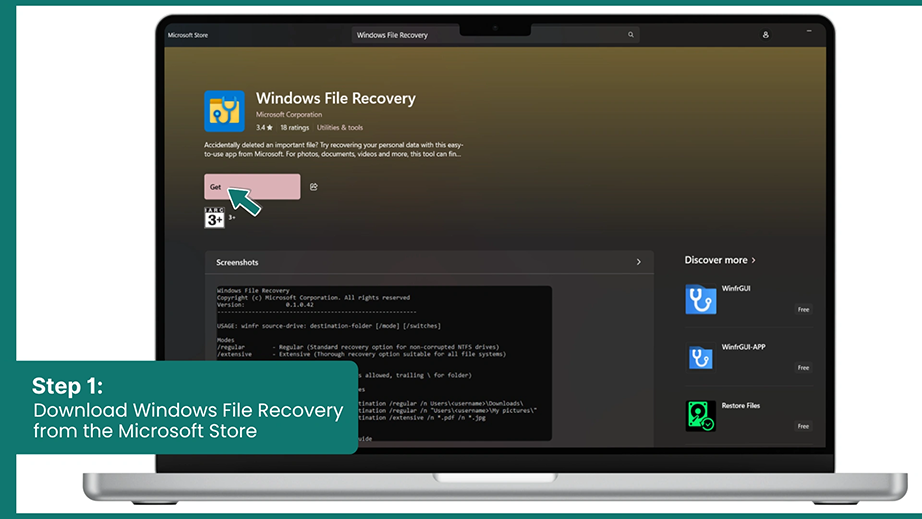
Step 1: Open the Microsoft Store, search for Windows File Recovery, and download the app.
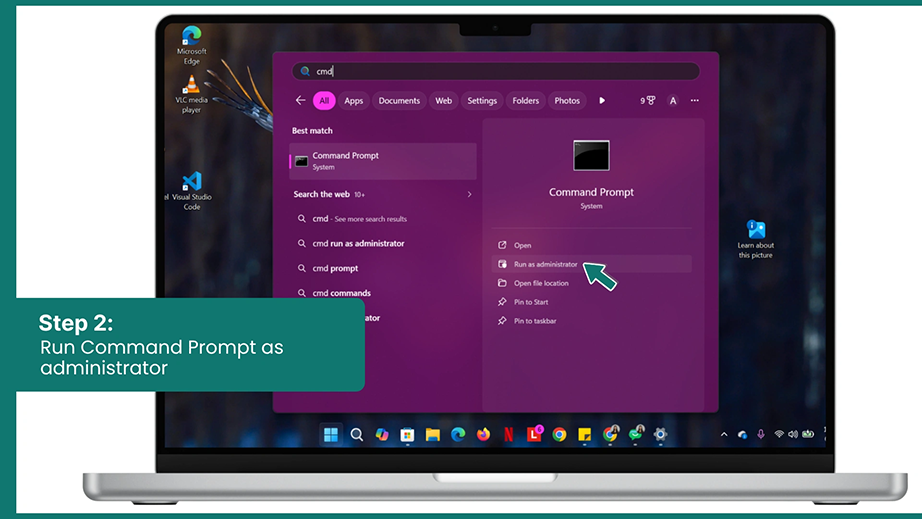
Step 2: Open your Windows Start menu and type cmd. You’ll see Command Prompt in the search results, click on Run as Administrator next to it.
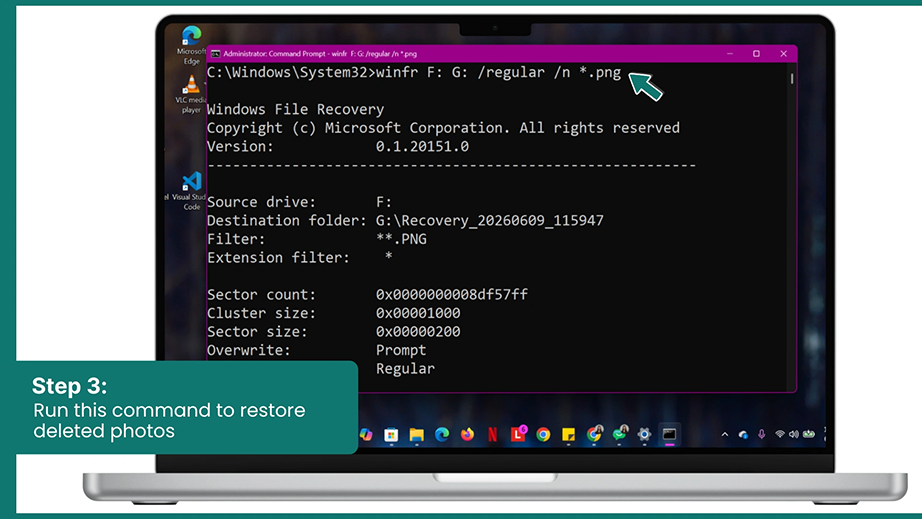
Step 3: Type in the recovery command and press Enter.
We will use the regular mode here. So suppose your JPG photos were in drive D and you want to save them to the RecoveredPhotos folder in the E drive, here’s the command you need to run:
winfr F: G: \RecoveredPhotos /regular /n *.jpg
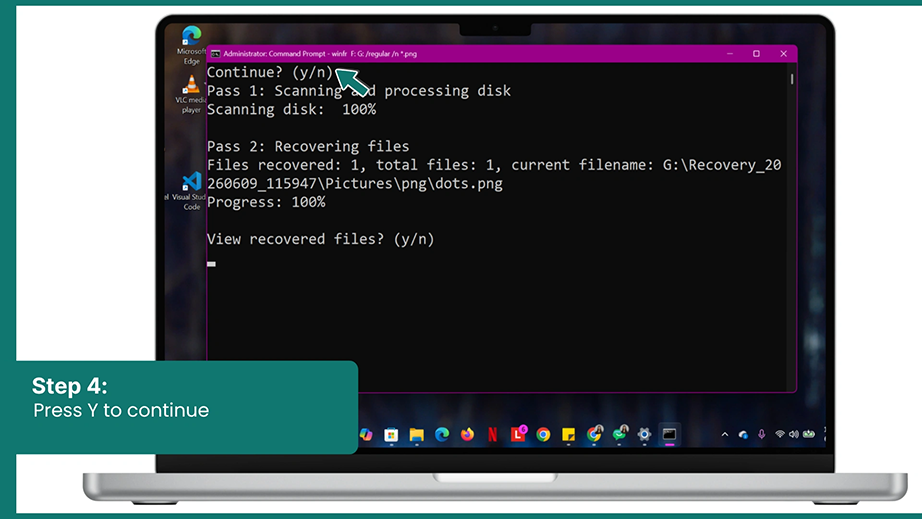
Step 4: Press Y on your keyboard when prompted to start the scan again and wait for the tool to build a new folder filled with your recovered images.
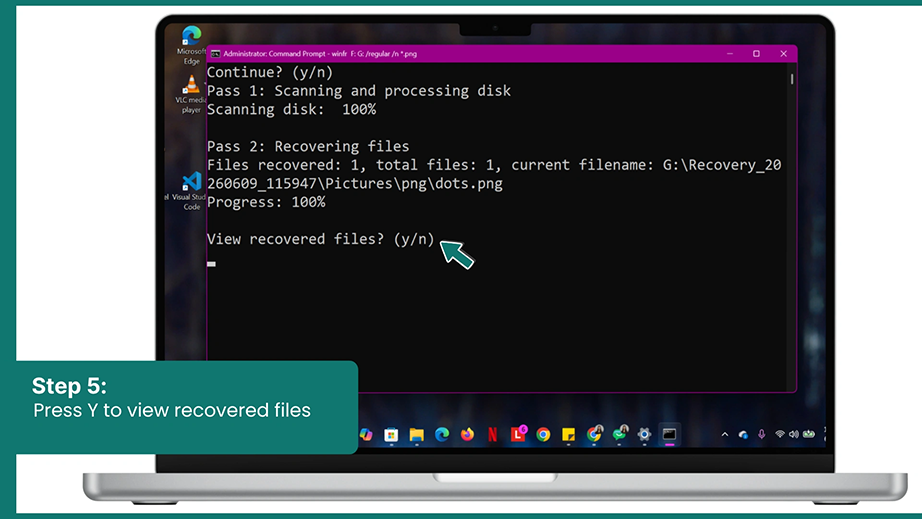
Step 5: To view recovered files, press Y.
Method 3: Downloading from Microsoft OneDrive
When your Windows computer is linked to a Microsoft account, it gives you an advantage. Microsoft OneDrive keeps a duplicate copy in its cloud trash when you remove it from your computer’s local storage. You can restore them without any third-party app using the following steps.
Step 2: Click on the Recycle Bin in the left sidebar.
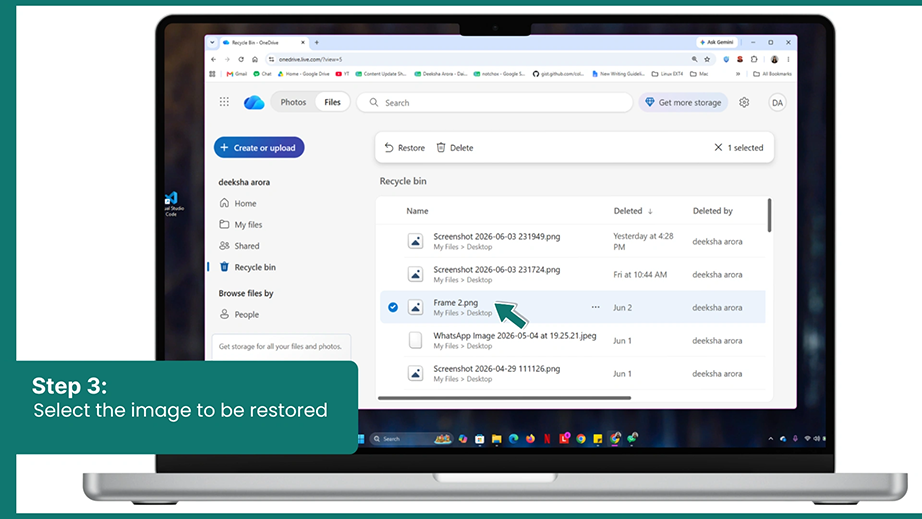
Step 3: Select the photos you want to restore by checking them.
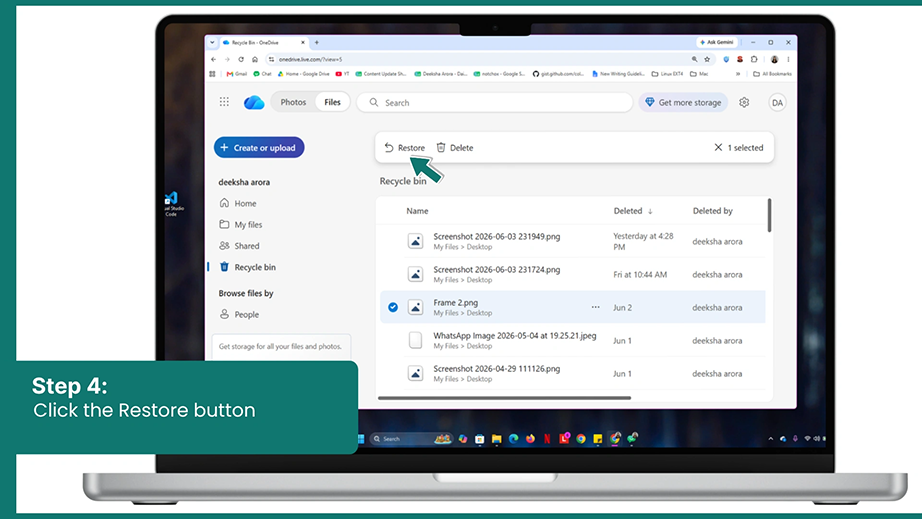
Step 4: Click the Restore button at the top of the page to sync them right back to your Windows PC.
Method 4: Using Windows File History
Did you accidentally save changes to an old photo or delete the photo itself? If you have Windows File History turned on, your computer has been quietly saving backup copies of your main drive.
Here is how you can use this timeline feature to recover deleted photos fast and safe:
Step 1: Press the Windows key, type File History into the search bar, and select the option that says Restore your files with File History.
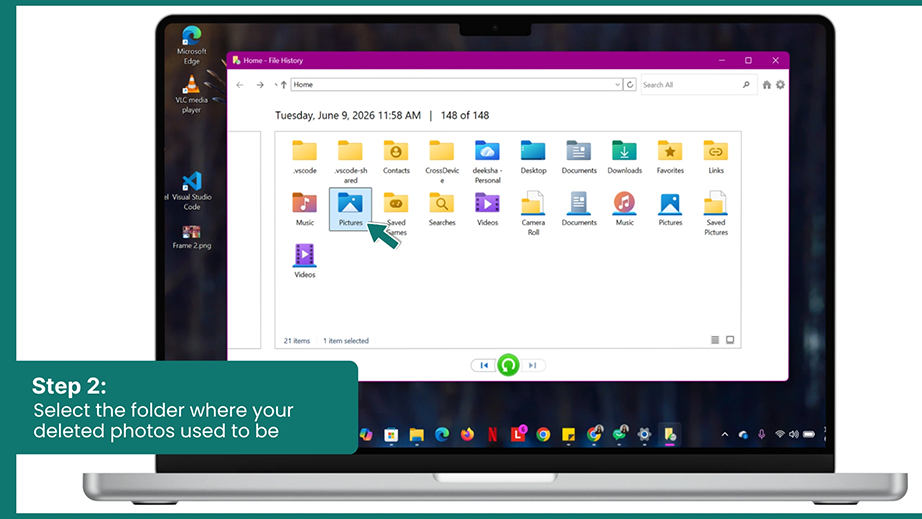
Step 2: Look through the backup window and go to the exact folder where your deleted photos used to be.
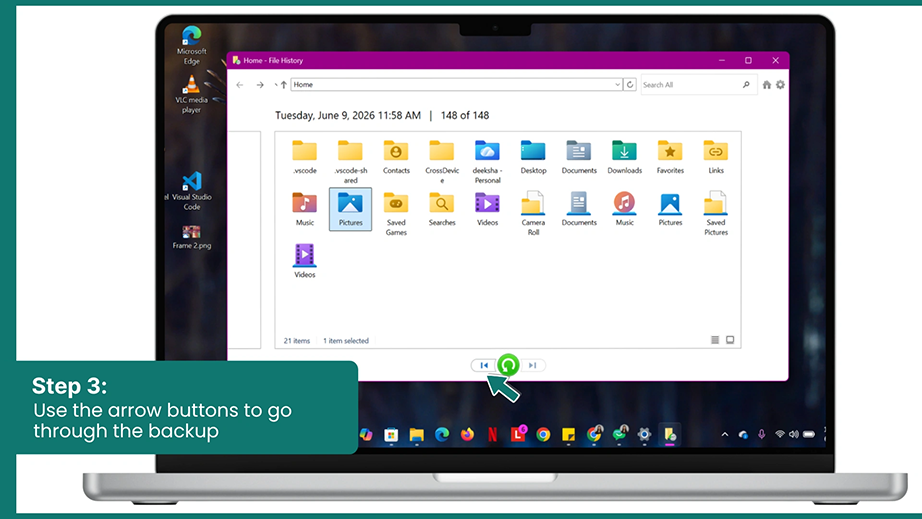
Step 3: Use the arrow buttons at the bottom to go backward through the timeline.
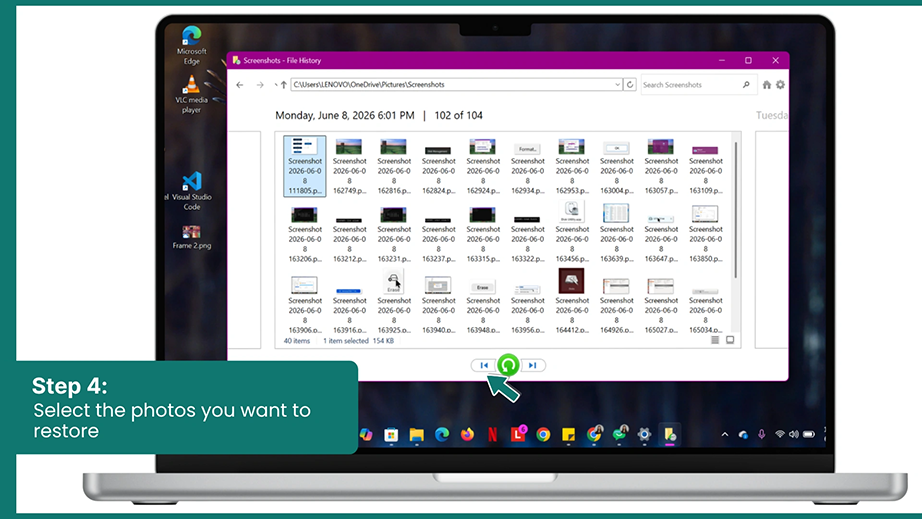
Step 4: Select the photo(s) you want to restore.
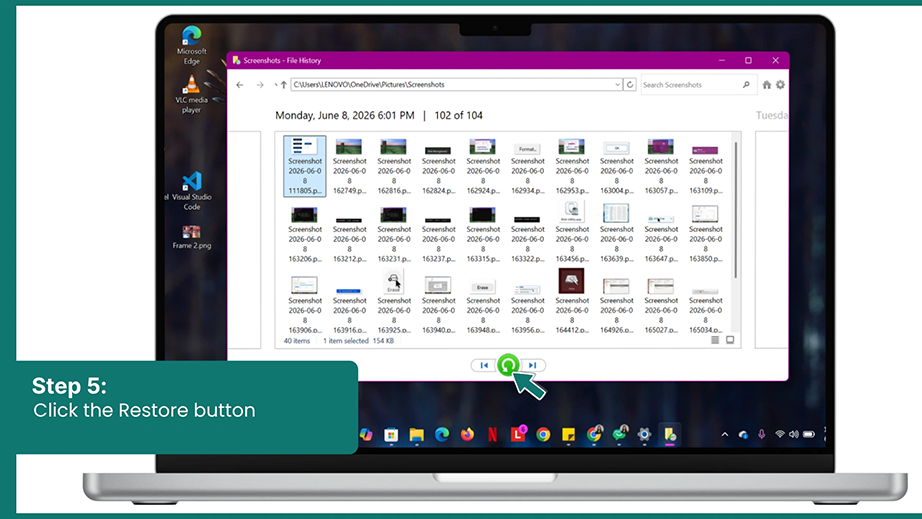
Step 5: Click the Restore button.
Summary
You can safely recover your deleted photos if you use the correct method. Always check your standard Recycle Bin or Trash or the cloud archives before trying anything else. If you still can’t find the deleted photos, use Notchox, the best photo recovery software, to scan your drive and safely restore the photos.
Remember not to save any new file or download apps or anything directly to the affected drive because any new data will lower the chances of recovering your old deleted photos.
Frequently Asked Questions (FAQs)
Q1: How to recover erased photos on Windows 11?
Ans: First, double-click the Recycle Bin icon on your desktop screen. Find your images, right-click them, and choose Restore. If you have already emptied your local trash, download the official Windows File Recovery tools from the Microsoft Store or run a deep drive scan using Notchox Photo Recovery Software to restore erased photos on Windows.
Q2: How to get back deleted pics on Mac?
Ans: Click the Trash icon on your macOS Sock. Find your deleted photos, right-click on them, and select Put Back. If the photo is recently deleted, try the undo command. You can also open Time Machine to roll your missing folder back to an older backup date. If these don’t work, launch Notchox to scan through your Mac’s storage and recover deleted photos.
Q3: Where do photos go when you delete them from Windows and Mac?
Ans: If you deleted photos on a Windows PC, go straight to the Recycle Bin to find your recently deleted photos. If you deleted a photo on a Mac, the deleted photo will go to the Mac Trash and remain there until you manually empty the Trash.
Q4: Can I recover photos after emptying the Recycle Bin?
Ans: Yes, you can still recover photos after emptying the Recycle Bin. Use a photo recovery software like Notchox to scan through your device and recover permanently deleted photos.
Kajal Singh is a Data Recovery Writer at Notchox, specializing in data recovery, storage systems, RAID, and digital forensics. She writes technical processes, tools, and cases into clear, engaging articles, blogs, and guides. Kajal does thorough research, deep analysis, and collaborates with experts to produce high-quality and engaging content that is easy to understand for every reader.