An HEIC is Apple’s modern image format. It keeps images high-quality, takes up half the storage of the standard JPEG image, and stores multiple images, i.e., helps capture Live Photos. But because this is a new format, you might face compatibility issues while opening or sharing files.
This article brings it all together. What is an HEIC file, and how to view, convert, and recover it, along with errors and their resolutions. So you do not get stuck mid-transfer.
Quick Answer: An HEIC file is a space-saving, high-quality photo format used by Apple. All photos by default on iPhone and iPad are created as .heic. You can use the native Photos app in Windows and save the image as .jpeg, or use the HEIF extension to view, edit, and share HEIC images. Similarly, on Android, you will be able to view the file in the Google Photos app.
Starting with what does HEIC stand for? HEIC stands for High Efficiency Image Container. It is the modern version of a file format introduced by Apple as a default image standard for iPhones and iPads. It is supported by default by iOS 11 and later.
This is built on High Efficiency Image File (HEIF) technology and uses advanced compression algorithms to store digital photos. An HEIC file type has crisp details, vibrant colors, and high-quality visuals. It is just like traditional JPEG/JPG but takes up roughly half the storage space.
Another good thing about HEIC is that it handles data pretty well. A single file can hold multiple images at once, and this is exactly how your iPhone captures a moving Live Photo.
What is the HEIC vs. JPEG Difference?
We all know JPEG is the traditional file format for images. Apple introduced HEIC, which represents the future of efficient mobile photography. Despite all of this, JPEG still remains the universal standard for sharing photographs across the web. Both formats handle compression differently and affect your storage space and image clarity.
HEIC and JPEG Comparison
Feature
HEIC
JPEG
Full Form
High Efficiency Image Container
Joint Photographic Experts Group
Introduced
2017 (By Apple in iOS 11)
1992 (as a tech industry standard)
File Extension
.heic
.jpg or .jpeg
Compression
Modern and advanced
Standard
File Size
Very Small (1 to 2 MB)
Standard (3 to 5 MB)
Image Quality
Excellent
Good
Image Detail
Supports 16-bit color for richer tones.
Limited to 8-bit color depth.
Compatibility
Not supported by older systems.
Works on every modern device.
How to Convert HEIC to JPEG?
By changing the file format using built-in computer tools/mobile apps or even free websites, you can convert HEIC to JPEG. You need this conversion when you need to upload them to a website or open them on non-Apple or older devices.
You do not need any additional software to convert the HEIC file format to JPEG.
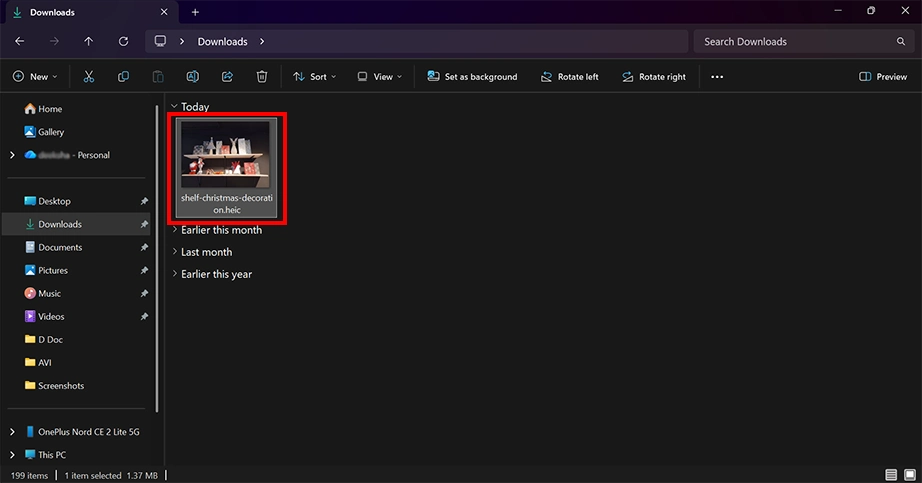
Converting HEIC to JPEG on Windows:
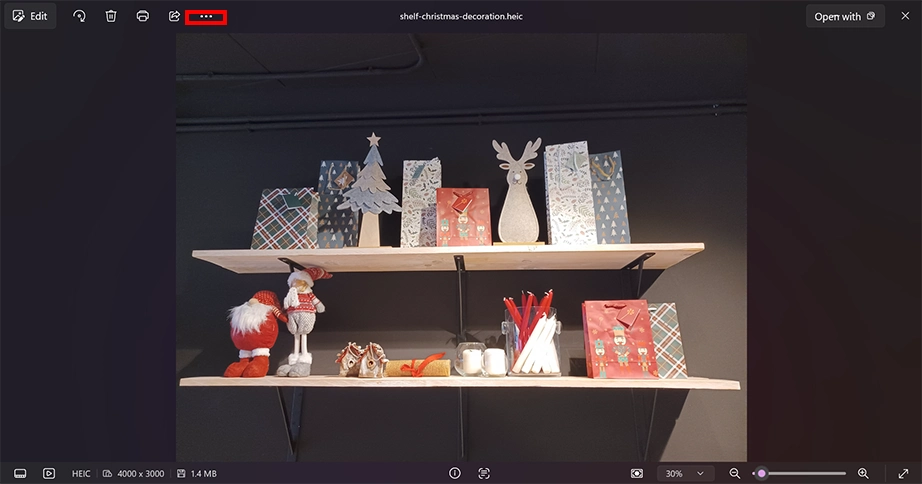
Windows’ native Photos app has the feature to convert file formats easily. You just need to:
Double-click your HEIC photo to open it in the built-in Photos app.
Click on the three dots (…)option at the top of the window.
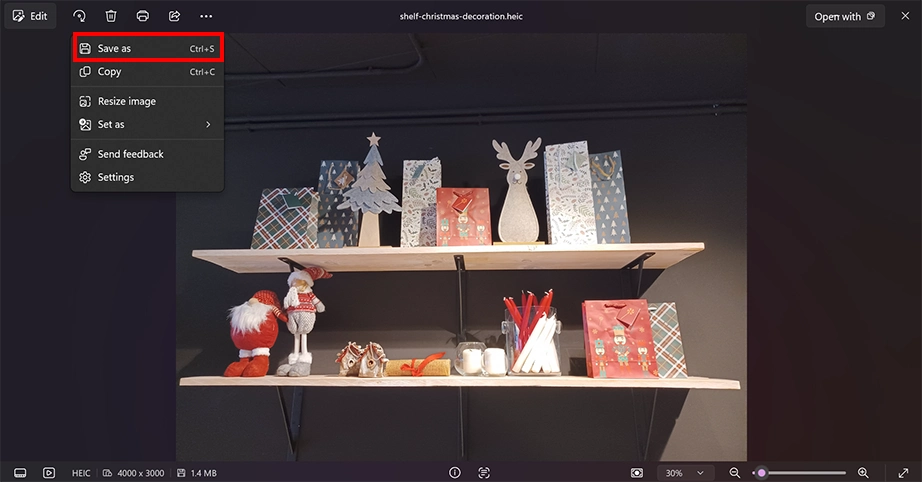
Click on Save As.
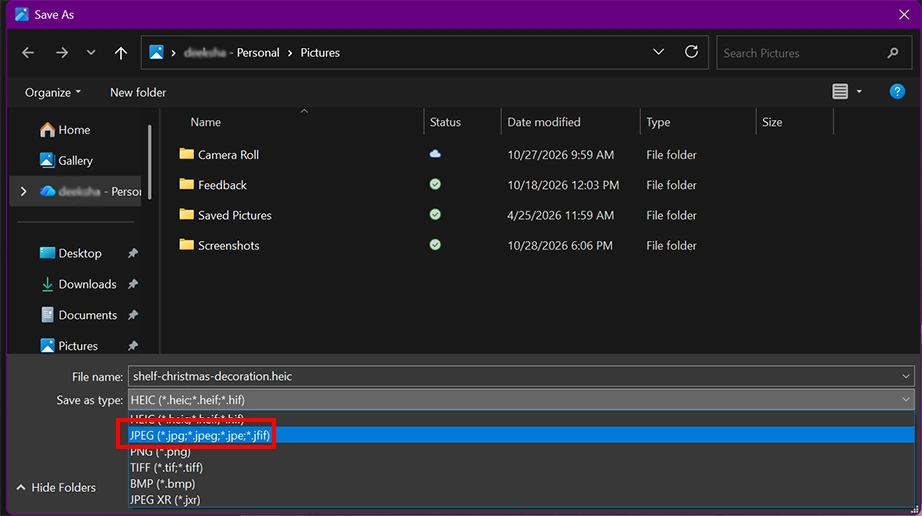
Now choose JPEG from the file type menu.
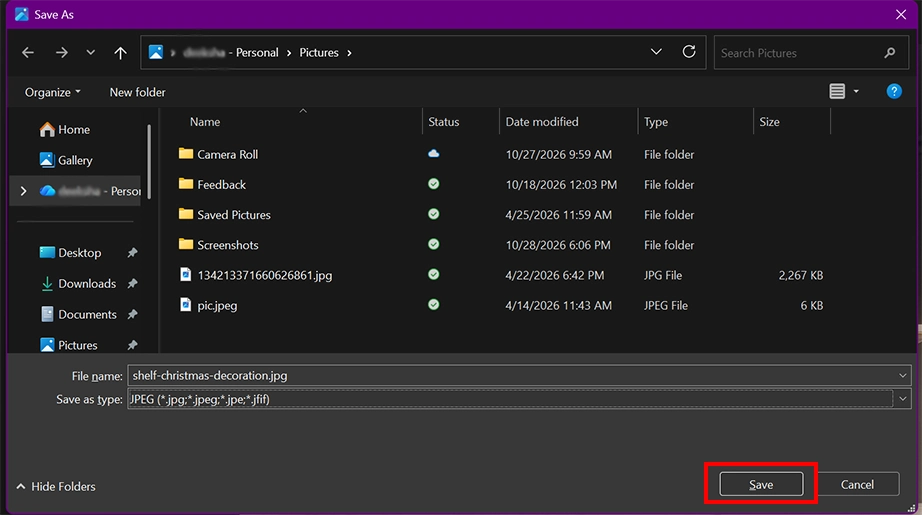
Click the Save button.
Convert HEIC to JPEG on Mac using the Preview app:
Just like Windows, Mac also allows converting photos from HEIC to JPEG without any third-party software installation.
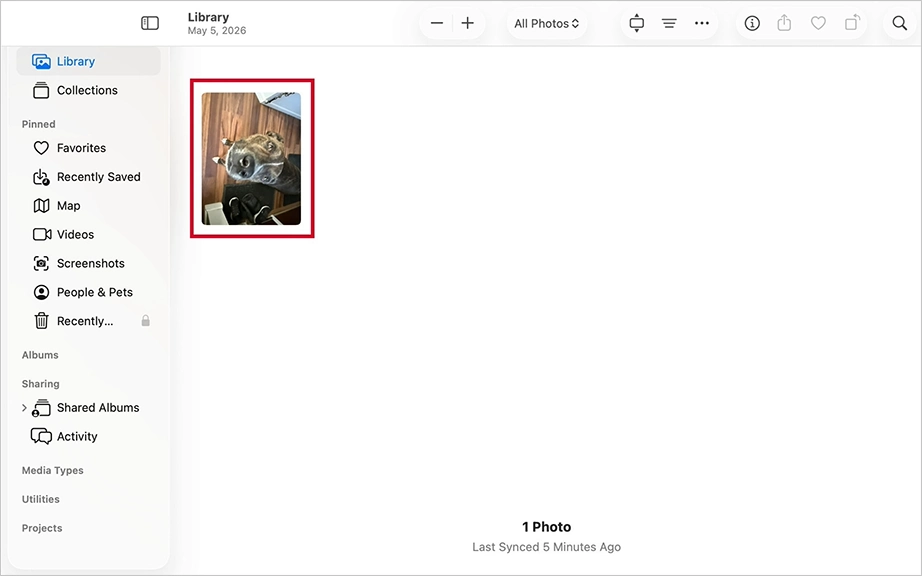
Double-click the picture to view it in the native Preview app.
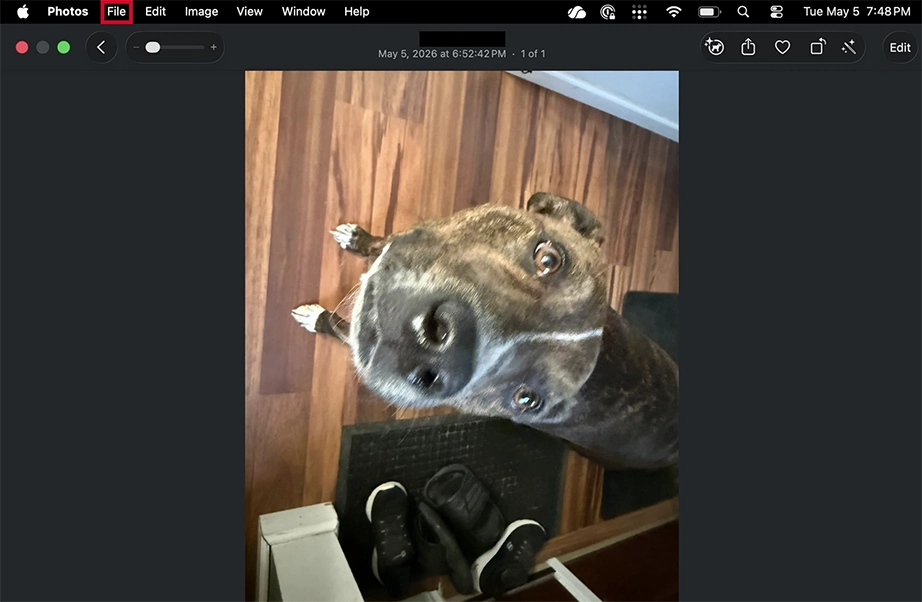
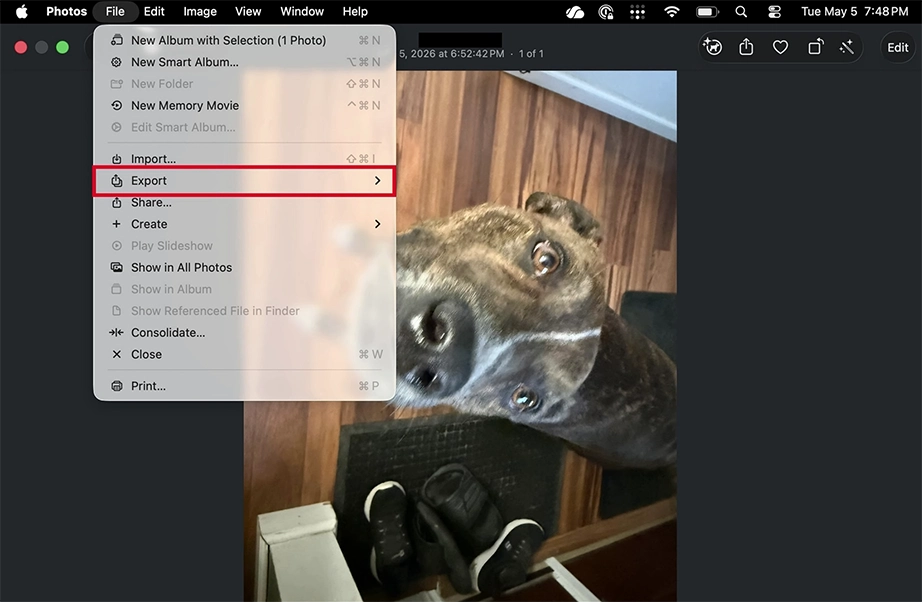
Click File in the top menu bar.
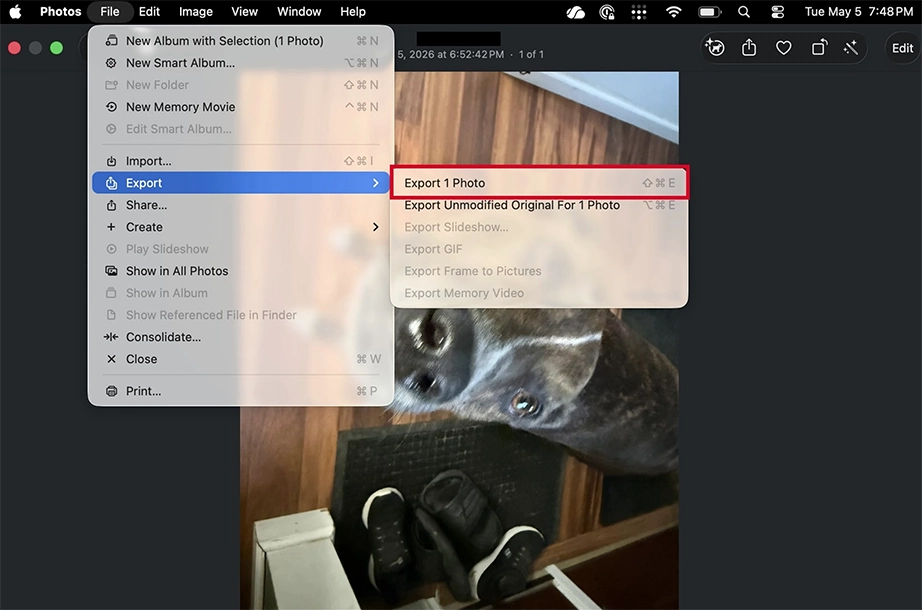
Select Export.
Select Export 1 Photo.
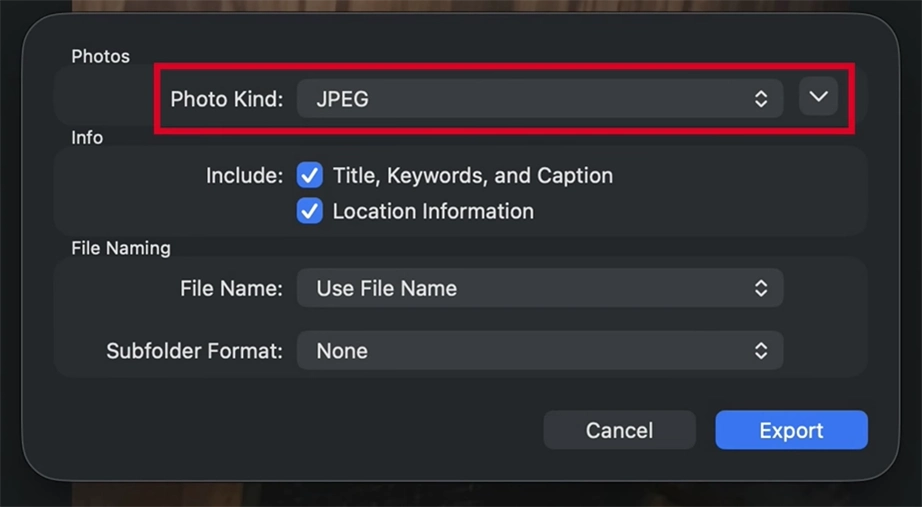
Change the format option to JPEG.
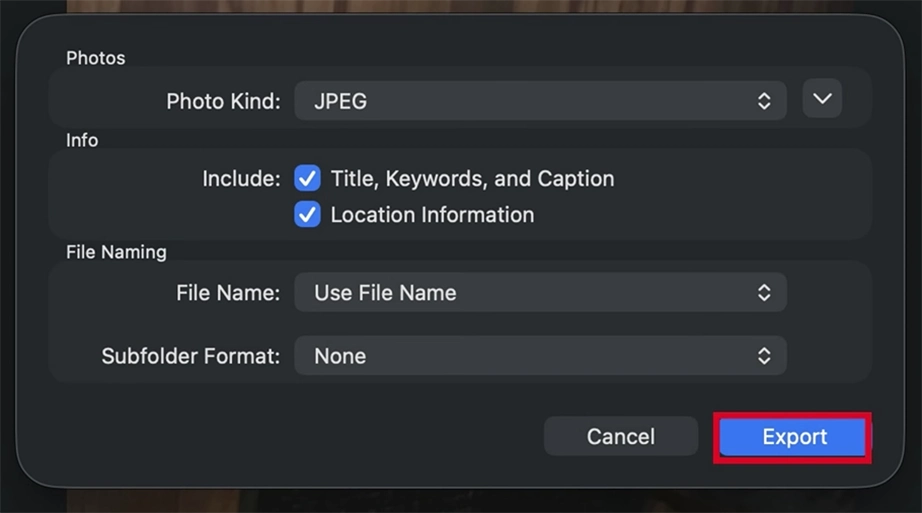
Click the Export button.
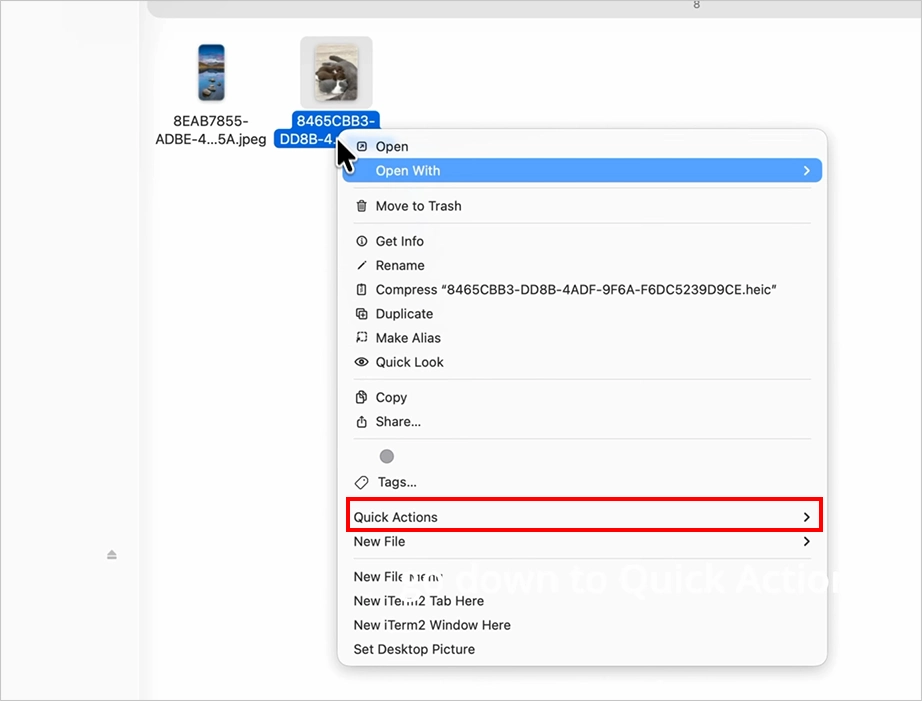
Convert HEIC to JPEG on Mac using Quick Actions:
This is the quick hack to convert the HEIC file format to JPEG within a few clicks on Mac.
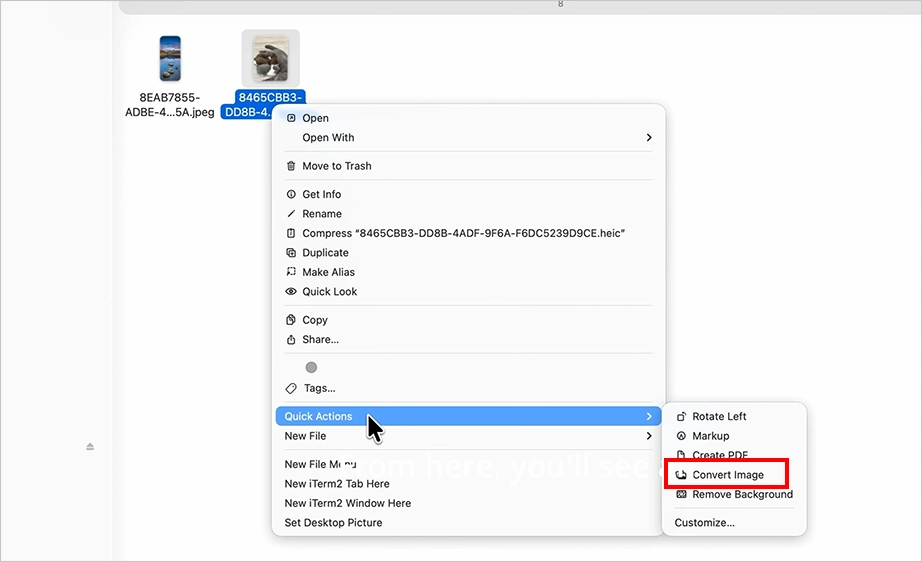
Right-click the HEIC image and hover over Quick Actions.
Click Convert Image.
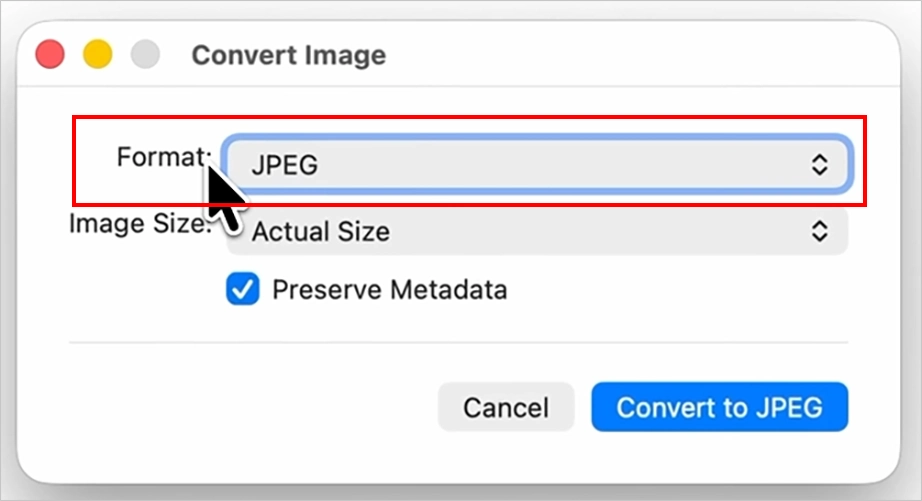
Select the JPEG formatfrom the dropdown.
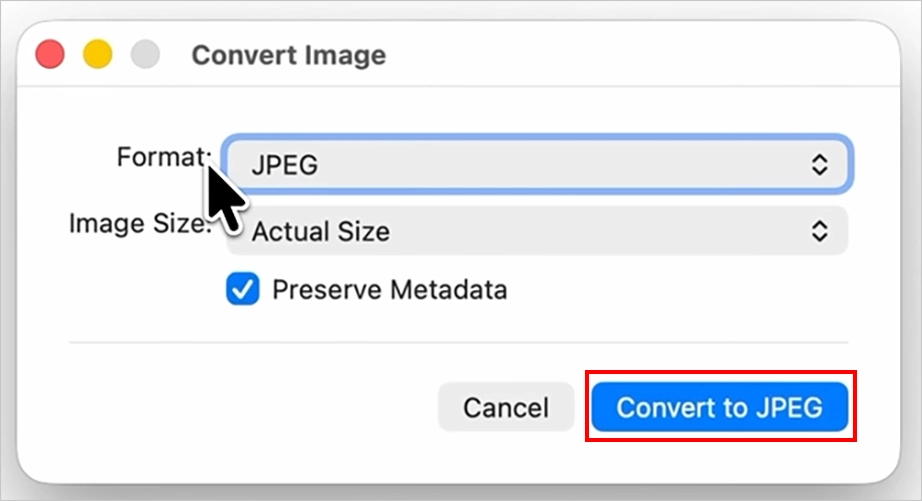
Click the Convert to JPEG button.
How to Open HEIC Files on Different Platforms?
You can open and edit HEIC files across different platforms using native support on Apple and Android devices. Also, you can install a free system extension if you are using a Windows PC. Because HEIC is Apple’s proprietary format, macOS and iOS accept and view these files automatically without any extra software. Google’s Android ecosystem handles them perfectly on newer updates.
Opening HEIC Files on Windows
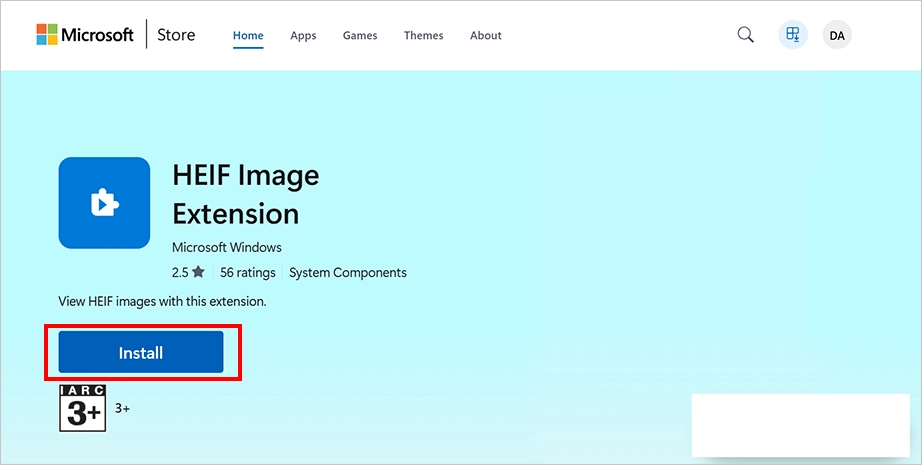
Though modern Windows 11 systems support HEIC files, older versions might need an official helper tool. This tool is HEIF Image Extensions, which recognizes and opens the HEIC format natively.
Double-click the .heic file to open it in the default Photos app.
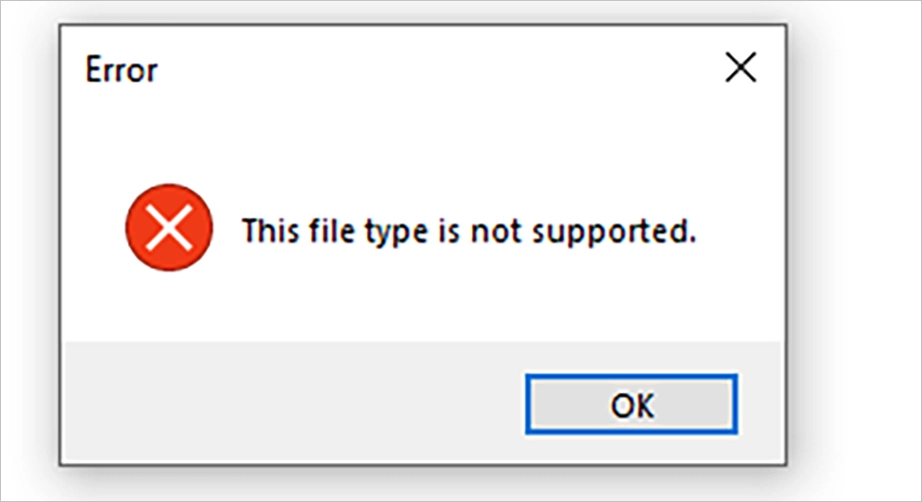
If it is not supported, an error pops up saying that the file format is not supported.
Go to the Microsoft Store.
Download and install the free HEIF Image Extensions package.
Once installed, double-click the image again to view it.
Opening HEIC Files on Android
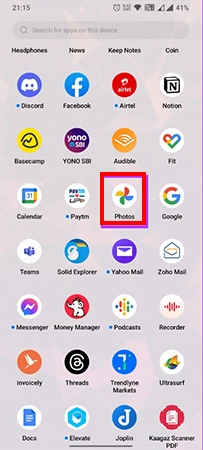
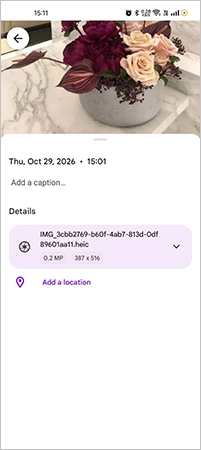
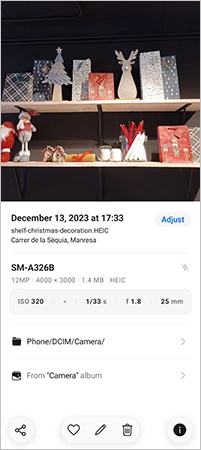
Androids can view these HEIC image files right out of the box without any third-party apps. On Android, Google Photos lets you view, edit, save, and share .heic files easily even if they cannot be opened in the gallery app.
Open the Google Photos app on your Android device.
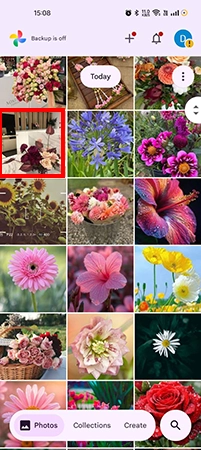
Go through your library or tap the .heic photo thumbnail.
You will be able to view the .heicimage.
Note: Your phone must be running Android 9 (Pie) or newer to open HEIC files natively. Most modern smartphones have this built in.
Opening HEIC Files on Mac and iOS
Since the HEIC format was introduced by Apple, it can be accessed easily on Apple devices without any configuration barriers.
Simply double click on any .heic image on a Mac or tap it on an iPhone or iPad to open it instantly. The image opens in the Preview or Photos app.
You can crop, edit, and share the files across Apple devices without needing to convert them.
Hack: Upload the photos to Google Drive or OneDrive to view HEIC images inside the browser tab.
How to Stop Your iPhone From Using HEIC?
The iPhone generates images in the HEIC file format by default because it saves space. To stop your iPhone from using HEIC, you just need to change a few options inside your phone’s camera settings.
Note: Even if your iPhone generates and stores images as .heic, it automatically switches them to JPEGs whenever you share photos through native apps like Mail or Messages.
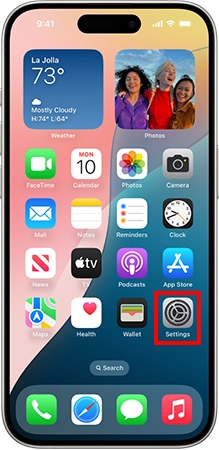
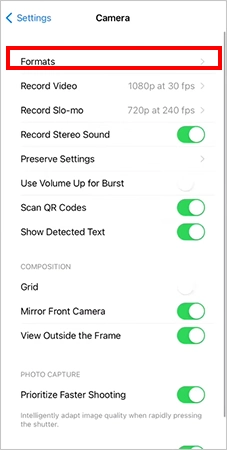
Follow these steps to completely turn off HEIC so your phone saves every photo as JPEG from the start:
Open the Settings app on your iPhone.
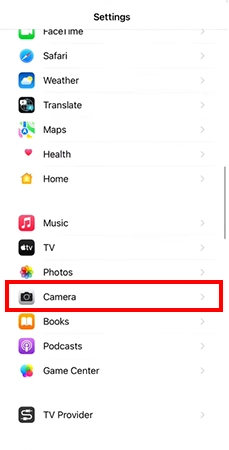
Scroll down the main menu and tap Camera.
Tap Formats at the top of the Camera settings screen.
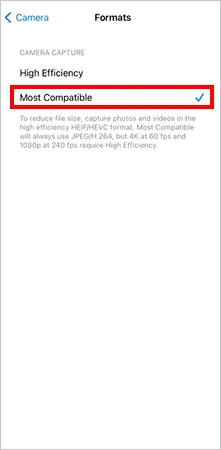
Select Most Compatible to switch away from HEIC.
Understanding HEIC Errors and Recovery
Users do face errors and warnings when accessing HEIC files because it is a relatively new and highly compressed file container. You may face errors while viewing, editing, or transferring these files.
Here are the most common HEIC issues you might face:
“File Format Not Supported” Errors
This error shows incompatibility between your system and the file type. It happens when an older Android or Windows system that lacks the needed system extension tries to view or share a .heic file.
Blank Thumbnails
When HEIC is unsupported, you might not be able to see the image thumbnails. A generic icon instead of the image preview would be seen because it cannot read .heic file data.
Transfer Failures
Moving HEIC photos to external hard drives, SD cards, memory cards, cloud, etc. may not be completed due to corruption or disruption. This causes the photos to be marked as missing or unreadable.
Recover HEIC Files with Notchox Data Recovery Software
Corrupted or missing HEIC files can be safely restored using Notchox Data Recovery Software. Notchox is a highly dependable specialised software designed to scan storage media and identify complex modern file containers like HEIC and rebuild them. It safely recovers deleted photos on iPhone and Mac, keeping their high-quality 16-bit color depth the same.
Follow these steps to recover HEIC files using Notchox:
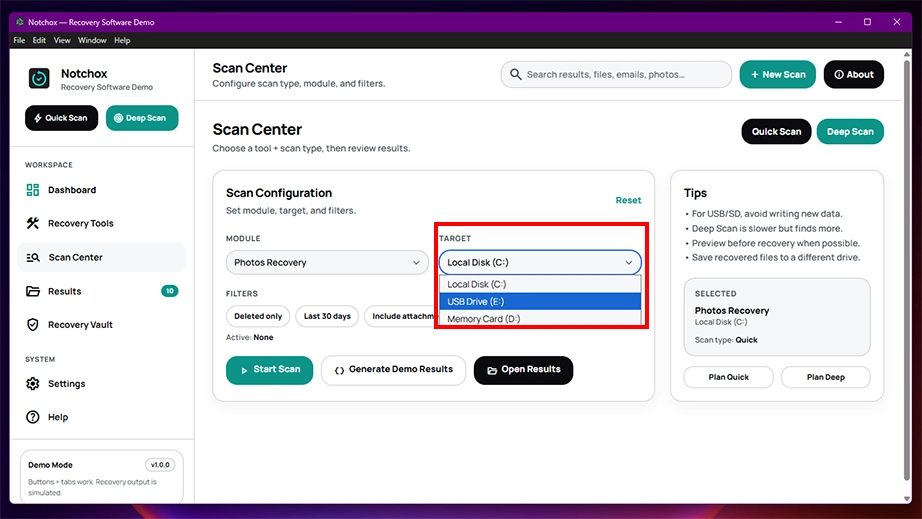
Select the target drive from the dropdown at the dashboard of Notchox.
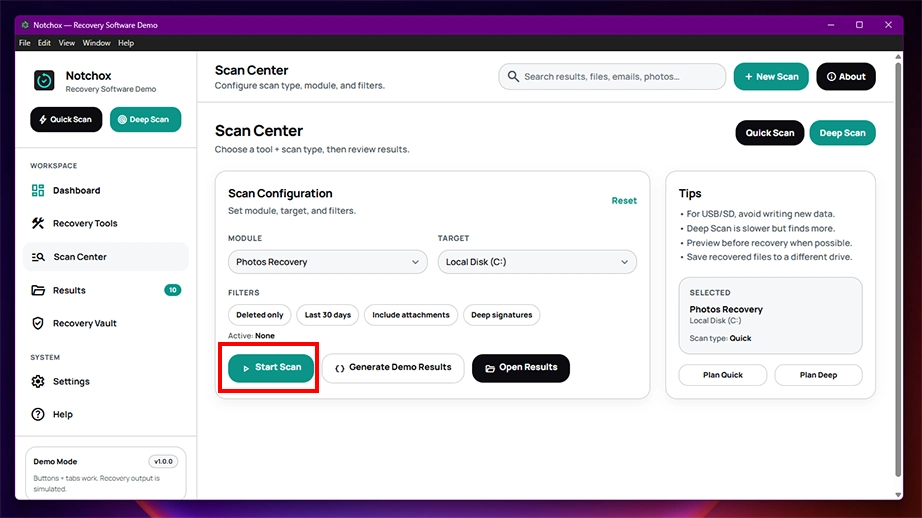
Click the Start Scan button to begin the recovery process.
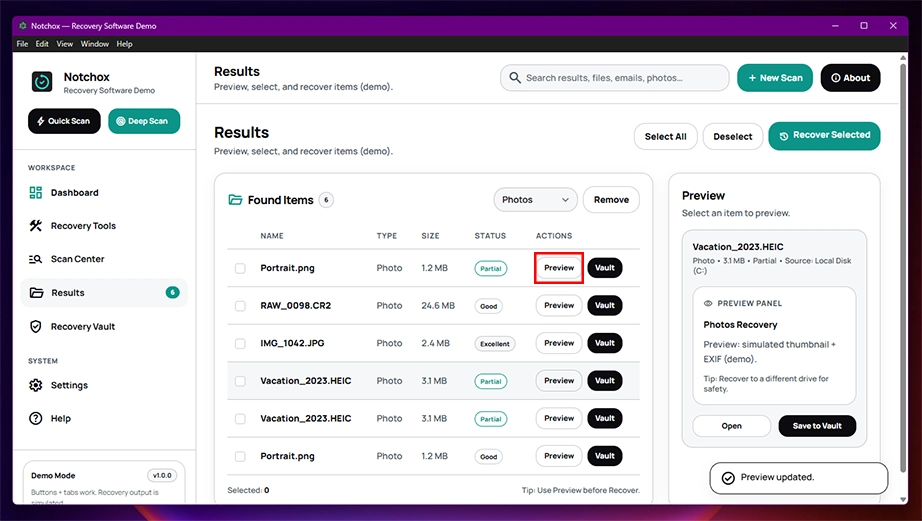
Once the scan is complete, sort the recovered files and click the Preview button to check the integrity of recoverable files.
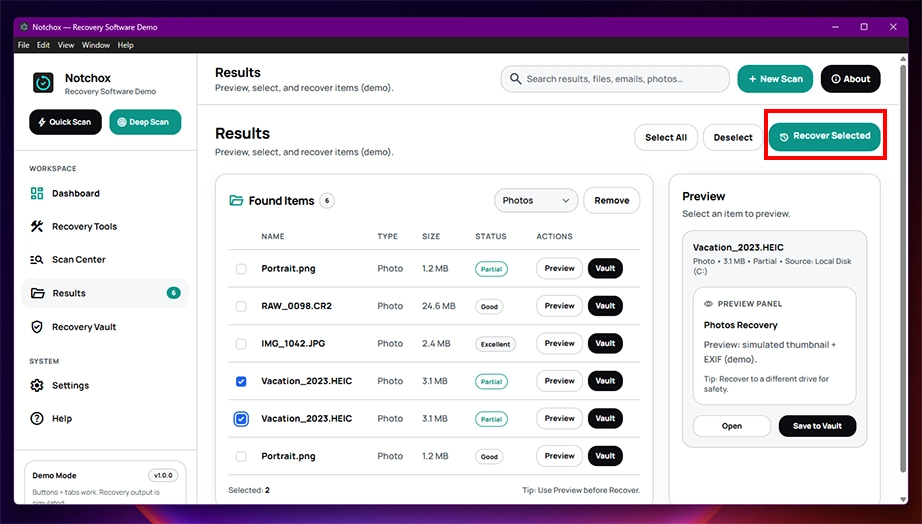
Select the files you want to restore and click on the Recover Selected button at the top. If you wish to restore a single file, simply click on the Save to vault button next to the file name and details.
Summary
What is an HEIC file? It is Apple’s space-saving photo format that gives high-quality images at half the file size of a standard JPEG. It is perfect for saving iPhone storage, but its limited compatibility makes it difficult to open on Windows, Android, and in browsers. You need to convert it first.
You can change your iPhone settings to shoot in standard JPEG mode by opening Camera settings and selecting “Most Compatible.” And if your HEIC photos ever go missing or become corrupted, use Notchox Data Recovery Software for secure restoration, maintaining the photos in high quality.
Frequently Asked Questions
What is an HEIC File?
An HEIC file (High Efficiency Image Container) is Apple’s modern photo format for iPhones and iPads. It uses advanced technology to save images at roughly half the file size of a standard JPEG and keeps the same high visual quality.
How do I convert a HEIC into JPEG?
To convert a HEIC into JPEG on Windows, open the image on your computer and select Save As or Export. Then choose JPEG as your format and save the file.
Similarly, on Mac, open the image, click the File menu, and select Export. Now, change the format to JPEG and Save.
How do I open an HEIC file on my computer?
HEIC files can be opened directly on Mac. For Windows, you might need HEIC support to open the files.
On a Mac, simply double-click the file to view it instantly in the Preview app.
On a Windows PC, you need to download the free HEIF Image Extensions from the Microsoft Store to view it in the Photos app.
Why are my photos saving as HEIC instead of JPG?
Apple saves all newly generated images as HEIC by default on all modern iPhones. This saves device and iCloud storage space. You can manually turn it off to save the image files in the traditional JPEG format.
Can I just rename HEIC to JPG?
No, you should not just rename the extension of the file if you want to convert from HEIC to JPEG. Changing it might work sometimes, but it might disrupt the inner data structures. Doing this will make the file corrupted and completely unreadable by your device.
How can I convert HEIC files to JPG in Windows 11?
To convert HEIC files to JPG in Windows 11:
Double-click the image to open it in the Photos app.
Click the three dots option at the top.
Select Save As.
Now select the file type from the dropdown and select .jpg.
Click the Save button.
How can I convert HEIC photos to JPG on my iPhone?
Select the photos in your Photos app.
Tap the Share button.
Tap Copy Photos.
Open the built-in Files app.
Press and hold an empty space and choose Paste.
The iPhone will automatically convert them to JPEGs during the paste.
Kajal Singh is a Data Recovery Writer at Notchox, specializing in data recovery, storage systems, RAID, and digital forensics. She writes technical processes, tools, and cases into clear, engaging articles, blogs, and guides. Kajal does thorough research, deep analysis, and collaborates with experts to produce high-quality and engaging content that is easy to understand for every reader.