Seagate’s record-breaking revenue shows they are one of the most widely deployed hard drive brands in the world, but they remain vulnerable to corruption and mechanical failure. According to Blackblaze Drive Stats, their reliability varies by model: while some enterprise drives like the 8TB (ST8000NM000A) have 0% annualized failure rate, others like 12TB (ST12000NMZ007) recorded 9.47%. To retrieve data from such drives, stop using the drive immediately to prevent overwriting, then use tools like Notchox or Seagate Rescue Services.
Here we provide a step-by-step workflow from running SeaTools diagnostics to performing deep scans with data recovery software to recover data from Seagate HDD safely. If your Seagate drive is hooked to a Mac, the process to recover deleted files on macOS differs slightly.
Quick Answer: To recover data from Seagate HDD, immediately stop using the drive to prevent overwriting of the files, then download Notchox data recovery software and follow the steps below:
Launch the software
Select your Seagate drive to run a deep scan
Preview the files
Restore them to a different healthy storage
How to Recover Data from Seagate HDD (Step-by-Step)
Because Seagate drives use advanced high-density storage technology like HAMR, it is important to follow the step-by-step recovery process. Below is the safe and proven workflow to recover data from Seagate HDD before a minor glitch turns into a permanent hardware failure.
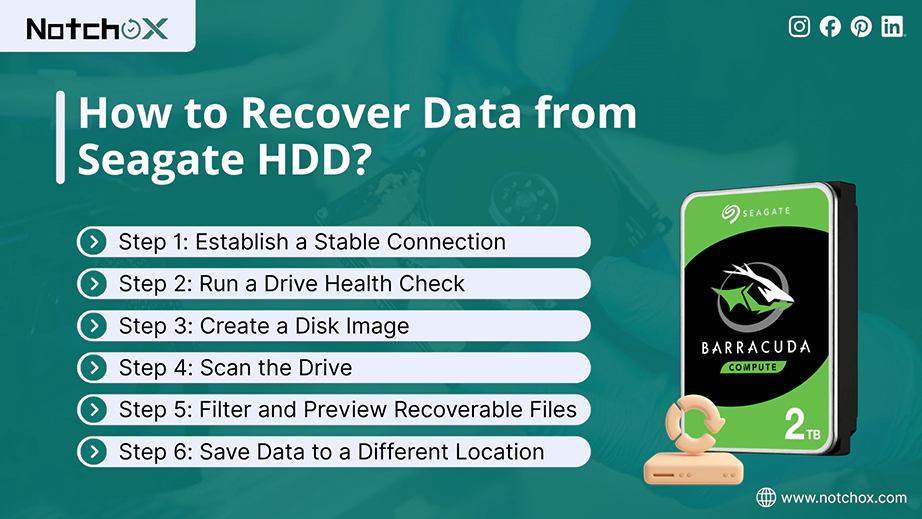
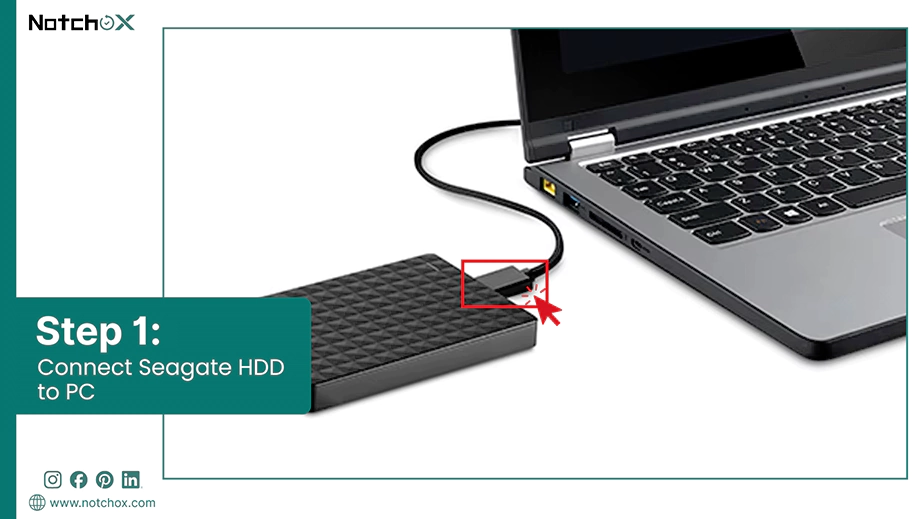
Step 1: Establish a Stable Connection
Make sure to connect the drive properly. If using a Seagate Expansion or Backup Plus, try a different USB 3.0 port or a powered USB hub.
Step 2: Run a Drive Health Check
Before attempting Seagate data recovery, use Seagate SeaTools to run a S.M.A.R.T. check. This confirms if the failure is Logical (software-based) or Physical (mechanical).
If the drive fails a Short Drive Self Test, skip software recovery and proceed to professional services to avoid further damage.
Step 3: Create a Disk Image
Prefer not to scan the original failing drive. Use a cloning utility to perform virtual Seagate data recovery on the clone while the original hardware remains powered down.
Step 4: Scan the Drive
Launch your chosen recovery tool and select the Seagate drive or the image created.
Choose a Deep Scan to locate files that have lost their directory structure or been marked as “RAW” by Windows or macOS.
Notchox is the best Seagate hard disk repair tool with deep scanning, free file preview and read-only recovery mode to securely recover your important files.
Step 5: Filter and Preview Recoverable Files
Remember to spend your money on the software that includes a free preview so that you can see your recoverable files and check their integrity before the complete recovery. Once the scan is complete, apply filters to find a specific file type (for example, you want to recover only the PDFs from the Seagate HDD). Always preview the files before saving to recover to make sure they are not corrupted or overwritten.
Step 6: Save Data to a Different Location
Never save recovered files back onto the same Seagate drive you are recovering from. Save them to a secondary internal drive or a different external drive to prevent permanent data loss.
Next, in this article, we will see the top 3 free and paid data recovery software options and learn how to recover data from Seagate DSS using the official Seagate Rescue Service.
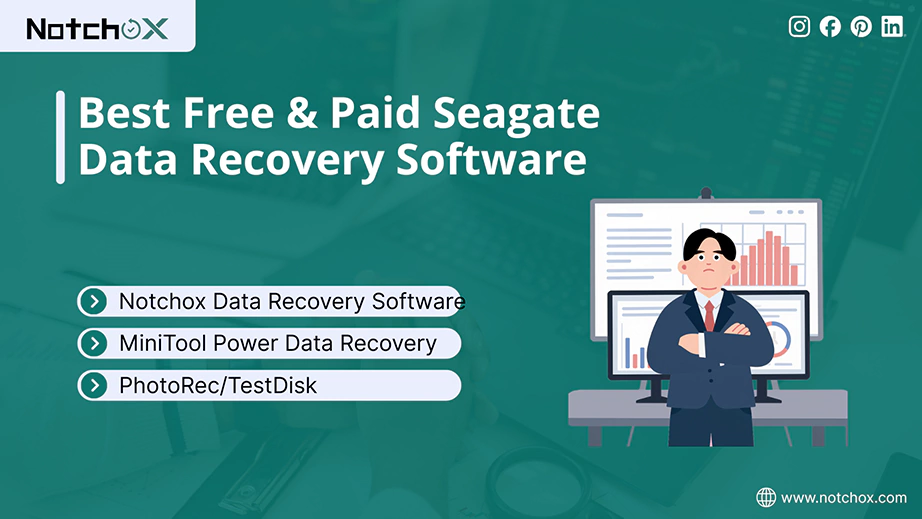
Best Free & Paid Seagate Data Recovery Software
Choosing the right tool is important for successful data recovery. While free software is ideal for accidental deletions and simple partition errors, paid professional tools are necessary for deep-level scanning to recover data from Seagate HDD.
To help you choose, we have listed the top-performing solutions based on their compatibility with Seagate’s proprietary file structure and their ability to recover the files.
1. Notchox – Best Data Recovery Software
Notchox is widely considered the top choice for Seagate users due to its sophisticated handling of RAW or unreadable drives. It excels in constructing the file system that Seagate drives lose due to sudden disconnection or corruption.
Its deep scan algorithm recognizes over 1000+ file formats.
It’s highly effective for recovering high-resolution photos and videos from Seagate HDDs.
Notchox has a safety-first approach, which scans in read-only mode, not overwriting your current files.
How to recover data from Seagate using Notchox’s 4-step recovery process?
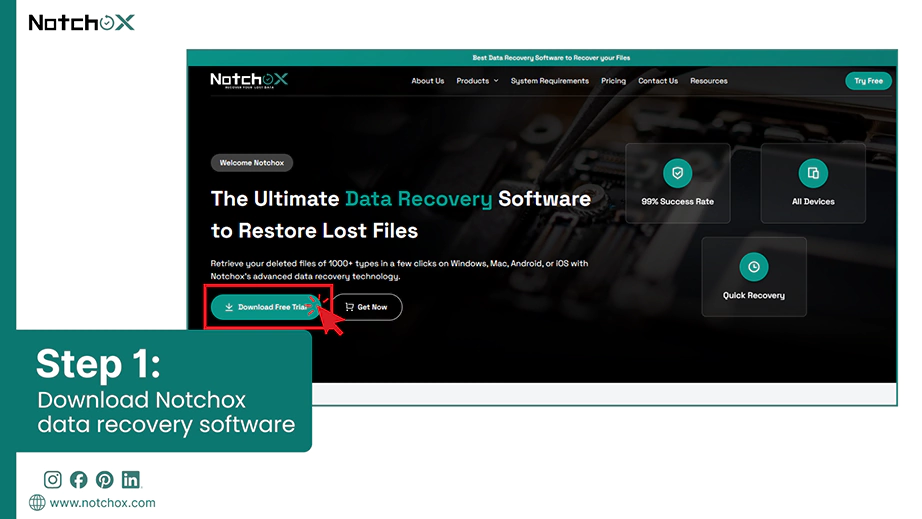
Download and Install
Download the Notchox recovery software from its official website and install it on a separate drive on your PC.
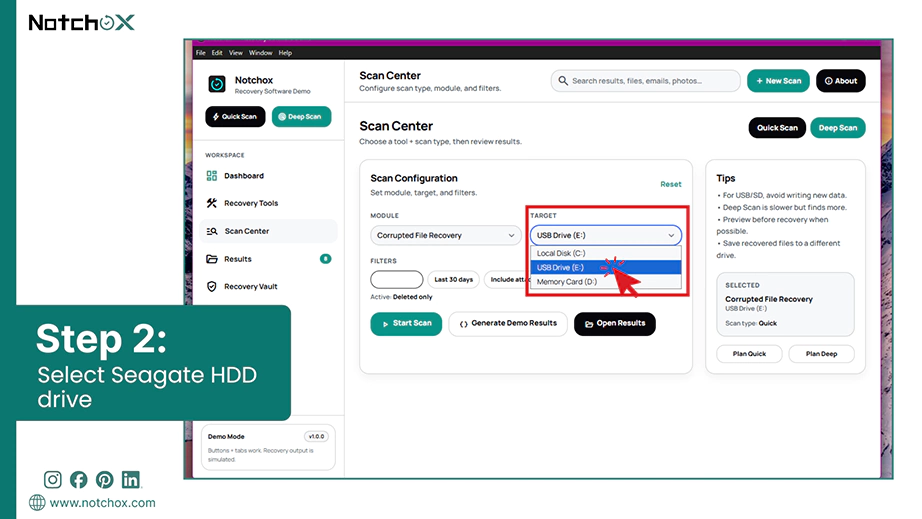
Select Storage Device
Next thing after Seagate file recovery software download is to select your Seagate drive for the software to scan.
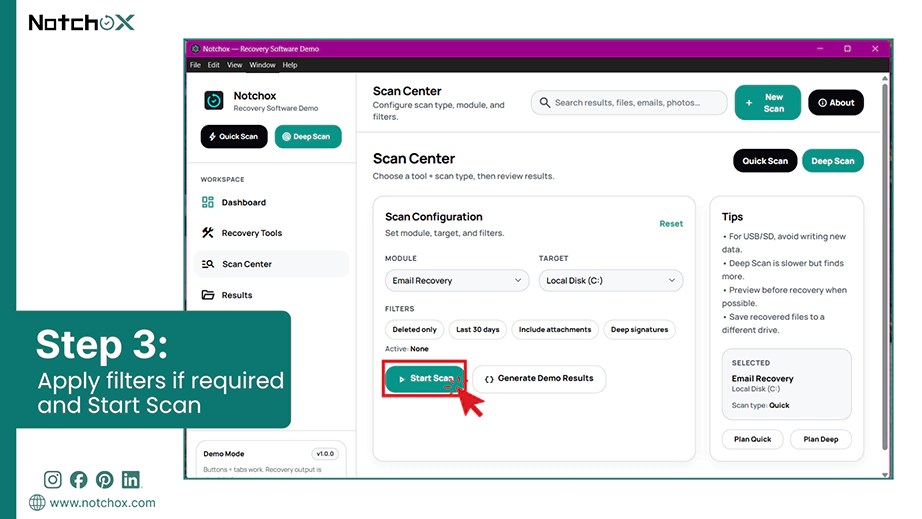
Start Scan
Apply filters if required and begin the deep scan to look for files to recover. The deep scan will reconstruct the file systems and bring back your files.
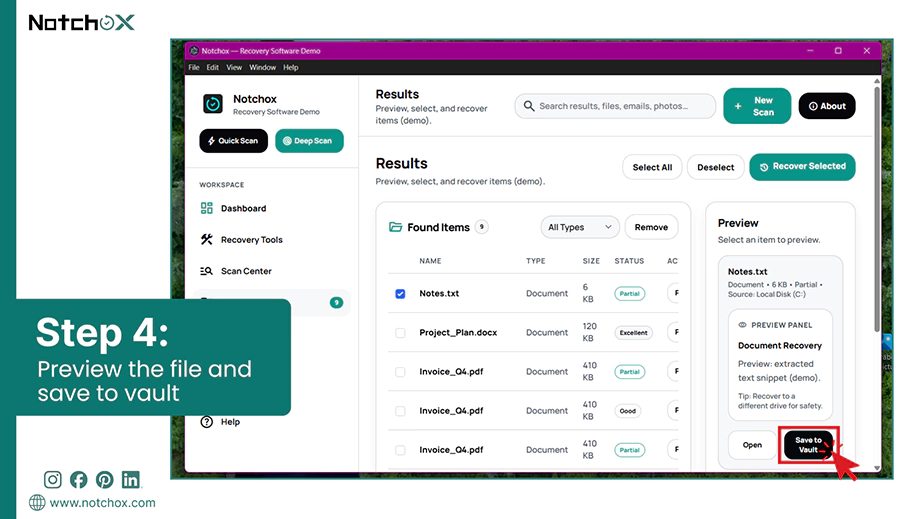
Preview and Recover
You can now check the recoverable files with the preview feature and select the files you want to recover. Now, recover the files and save them to a separate drive safely.
2. MiniTool Power Data Recovery
MiniTool is another data recovery software with specialized algorithms optimized for Windows. If your Seagate hard drive won’t open or suddenly says it needs to be formatted, MiniTool Power Data Recovery is a great choice for Seagate data recovery.
While Notchox remains the absolute best and most reliable software overall to recover data from Seagate HDD, MiniTool is a dependable alternative to recover files without complicated tech terms.
The recovery process in MiniTool is very similar to the standard steps found in Notchox data recovery software. Though you might notice a few minute differences in the layout of the buttons or naming of the drive scanning option.
3. PhotoRec/TestDisk
For users who are looking for a zero-dollar budget Seagate hard disk repair tool, the pairing of TestDisk and PhotoRec is the best option. TestDisk repairs partition tables and fixes boot sectors on Seagate drives that refuse to mount. PhotoRec is a companion tool that ignores the file system completely and goes straight for data by carving out files based on file signatures.
It is a command-line interface and does not preserve original file names.
PhotoRec/testDisk is completely free and unlimited.
How to recover data from Seagate HDD using PhotoRec/TestDisk?
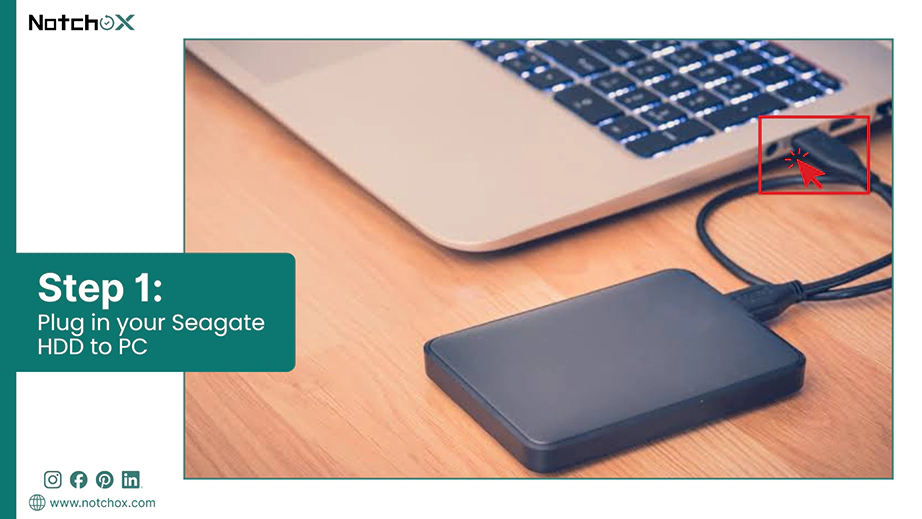
Plug in your Seagate drive to your PC.
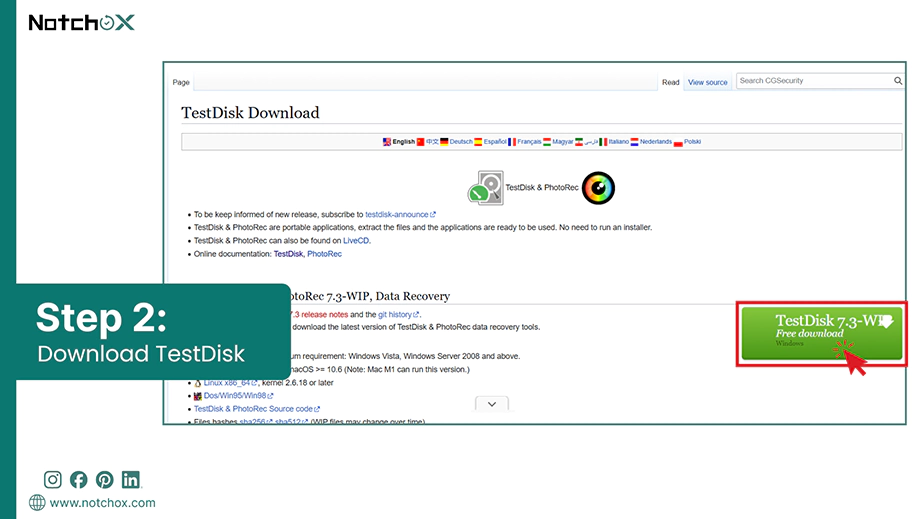
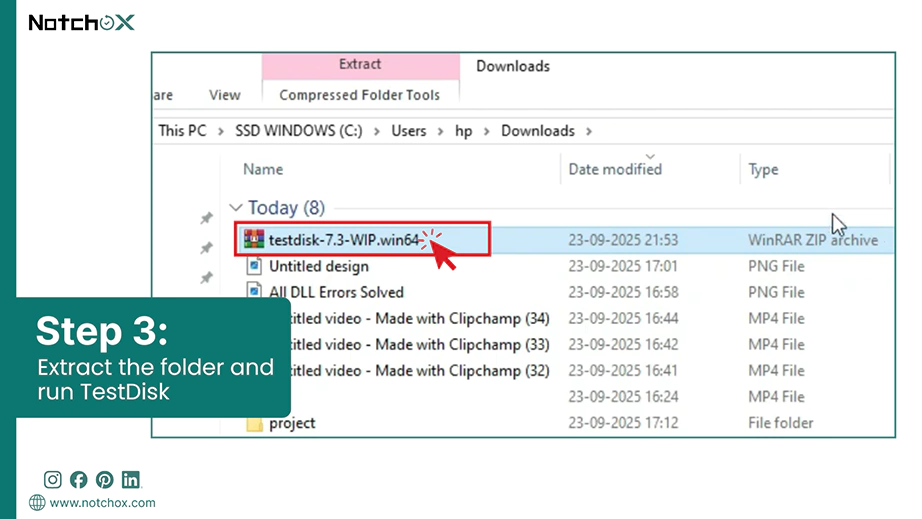
Download the TestDisk software package from its official website.
Extract the folder and open testdisk_win.exe from the folder.
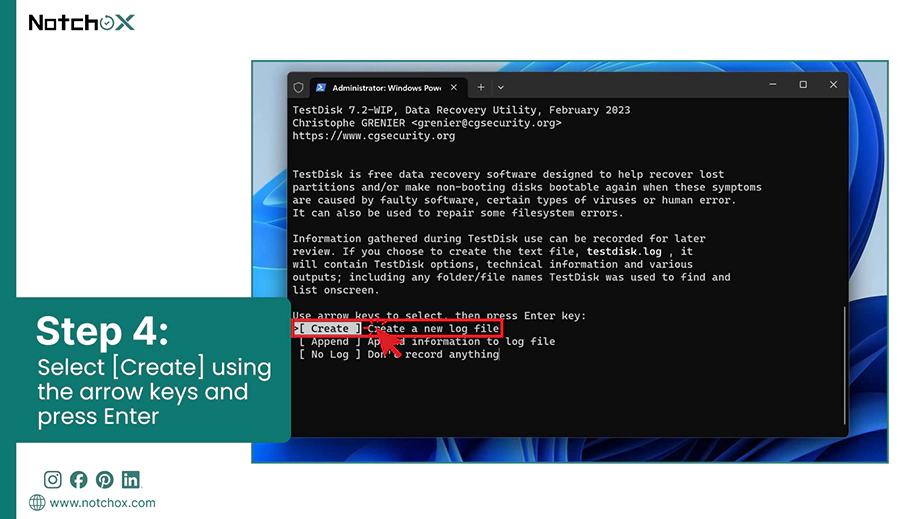
Once you launch the app, you will see Windows PowerShell. Select [Create] using the arrow keys and press Enter to start a new log.
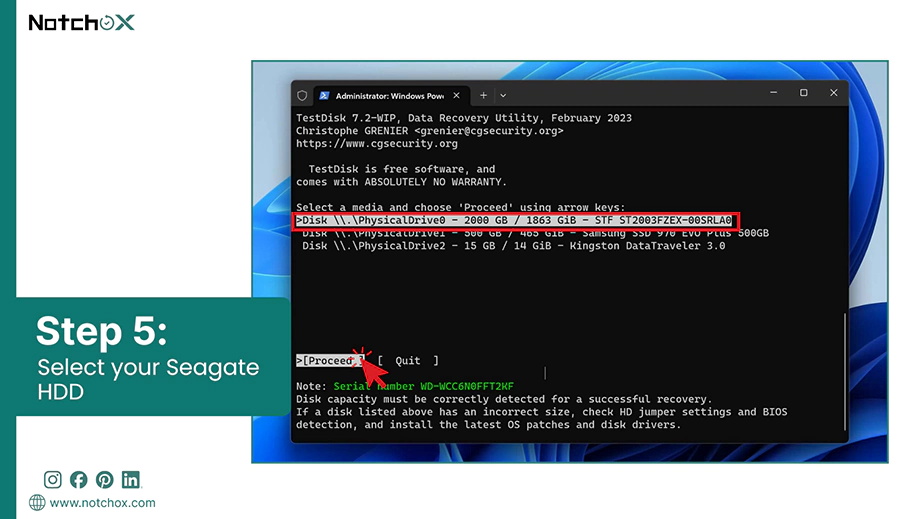
Highlight your Seagate drive using the arrow keys and press Enter.
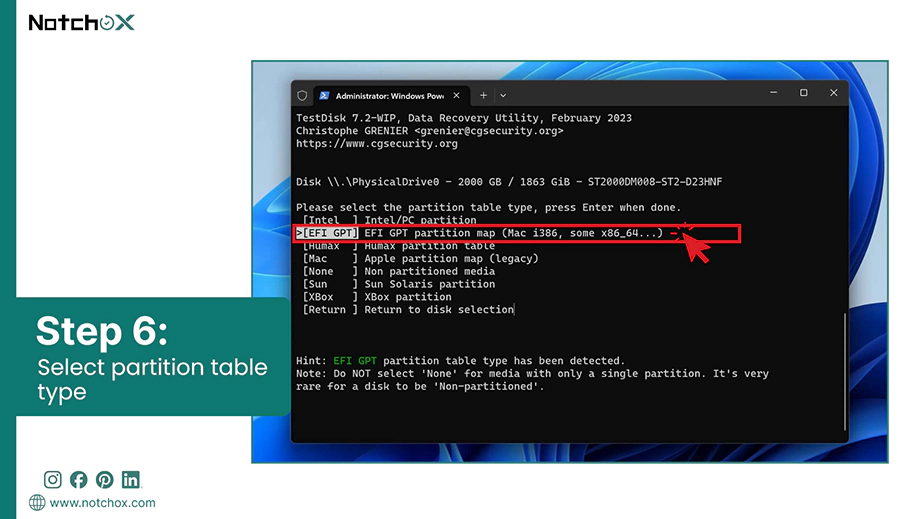
The program will auto-select your partition type (usually [Intel] or[EFI GPT]. Just press Enter.
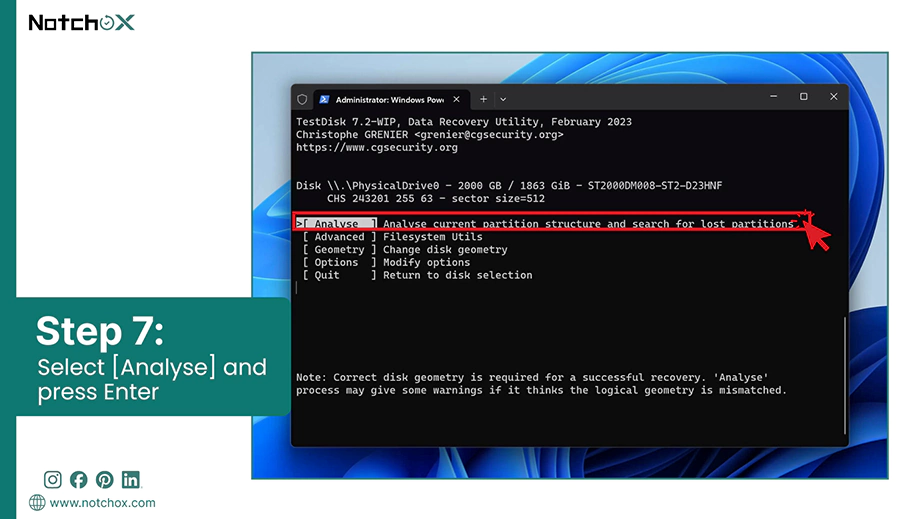
Select[Analyse] and pressEnter.
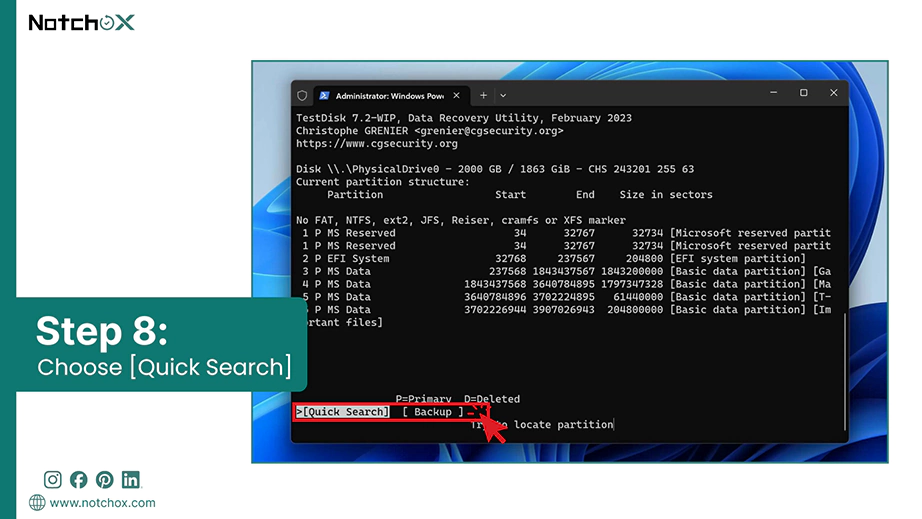
Choose [Quick Search] on the next screen.
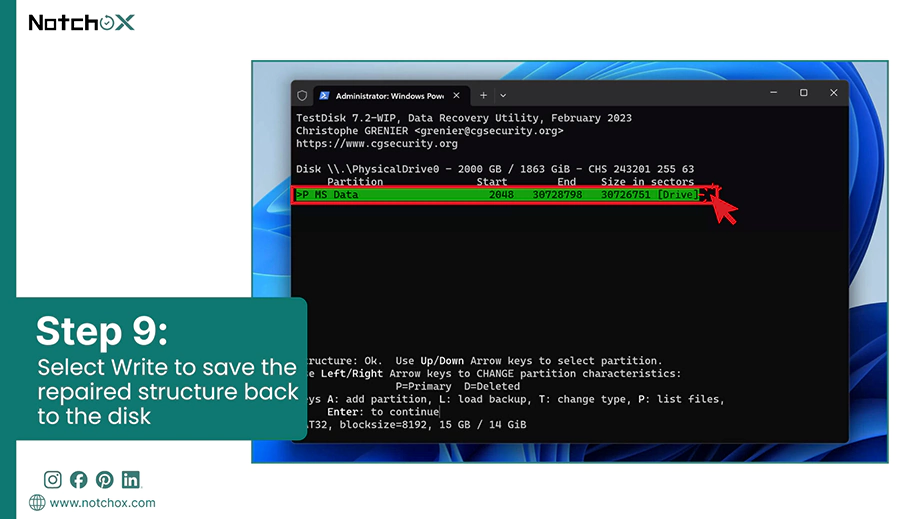
TestDisk will scan for your old healthy partition. If it finds your missing files/folder, highlight them and press Write to save the repaired structure back to the disk.
Restart your computer once the process finishes.
Steps to copy your data to safety using PhotoRec:
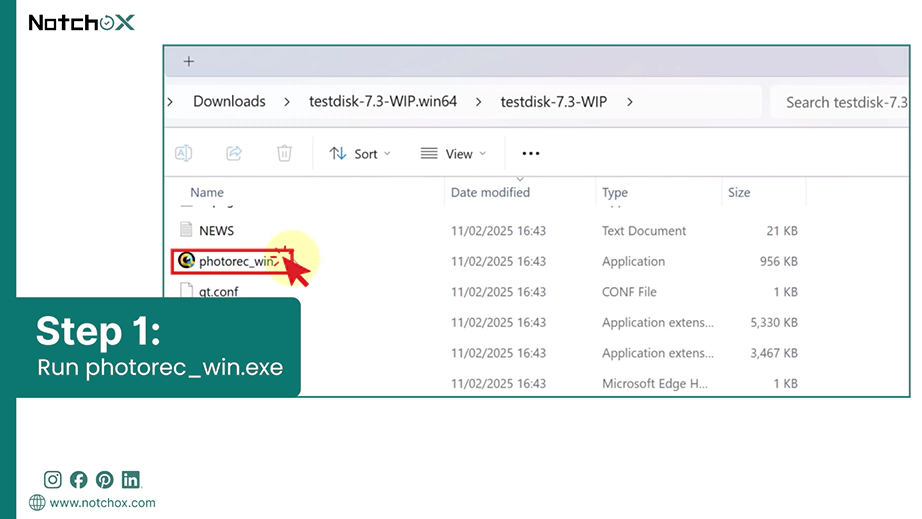
From the same software package folder, run photorec_win.exe.
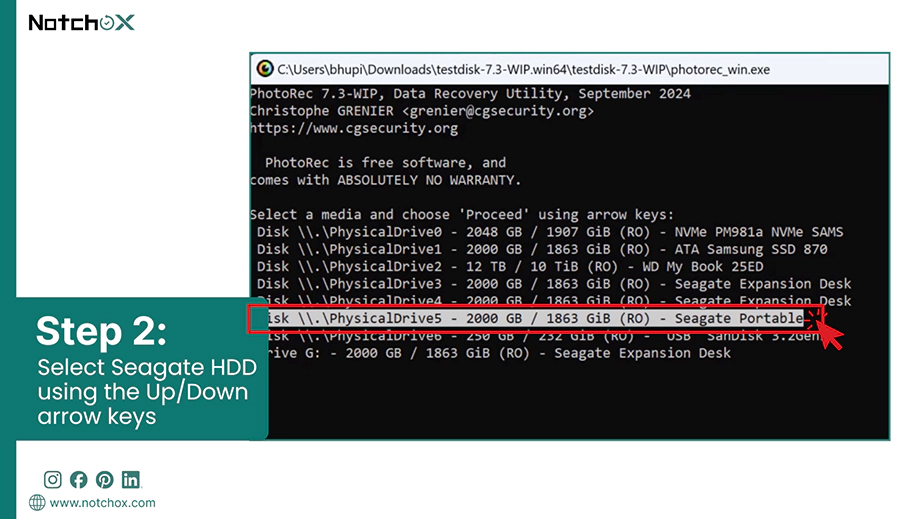
Use the Up/Down arrow keys to highlight your Seagate HDD from the list. Press Enter to select it.
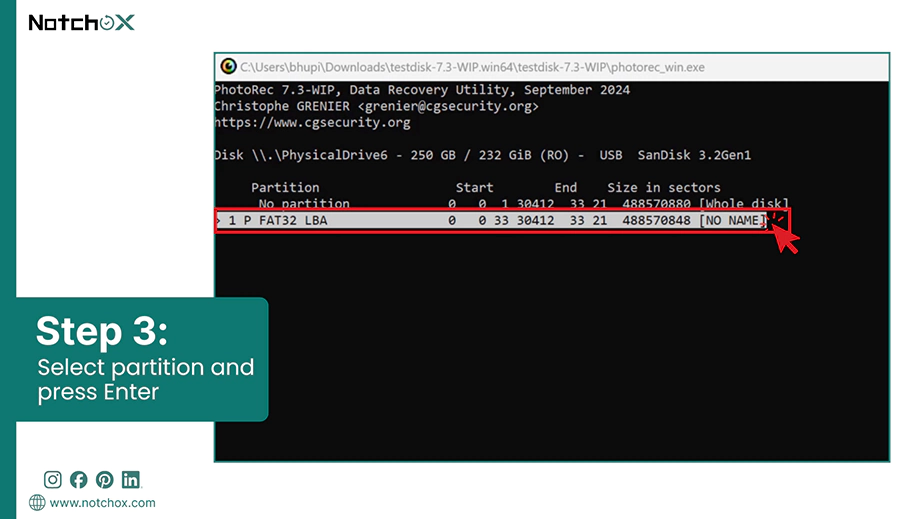
Highlight the main partition where your data used to be. Press Enter.
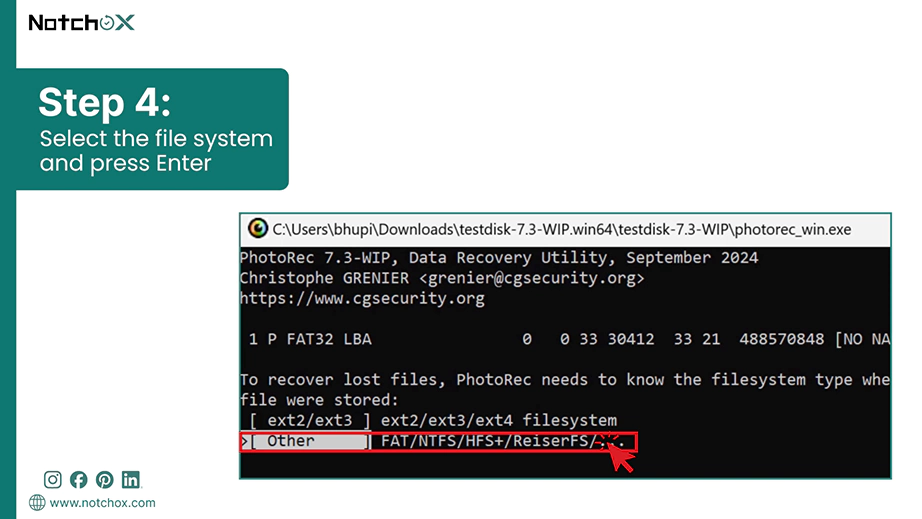
The program will ask about the file system type. If your drive was used on Windows or Mac, select[Other] and press Enter.
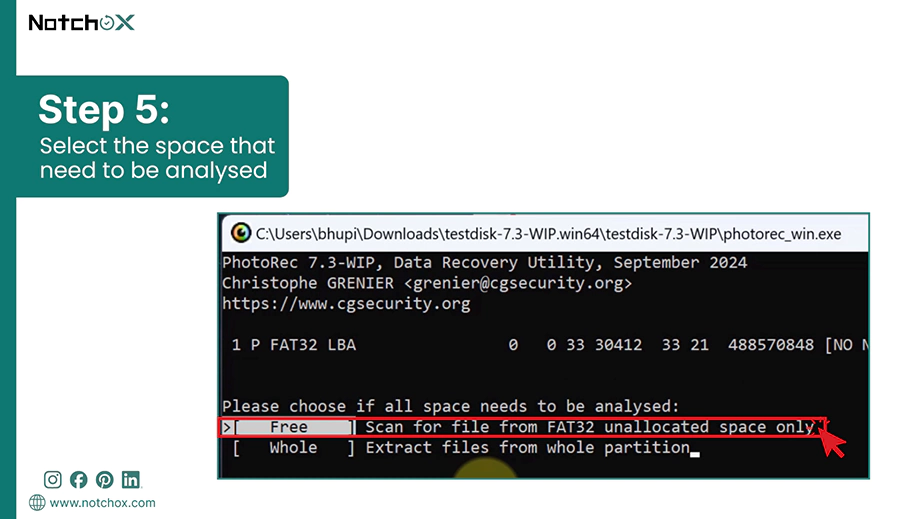
Select[Free] if you want to look for deleted files, or select [Whole] if the drive is corrupted or RAW. Press Enter.
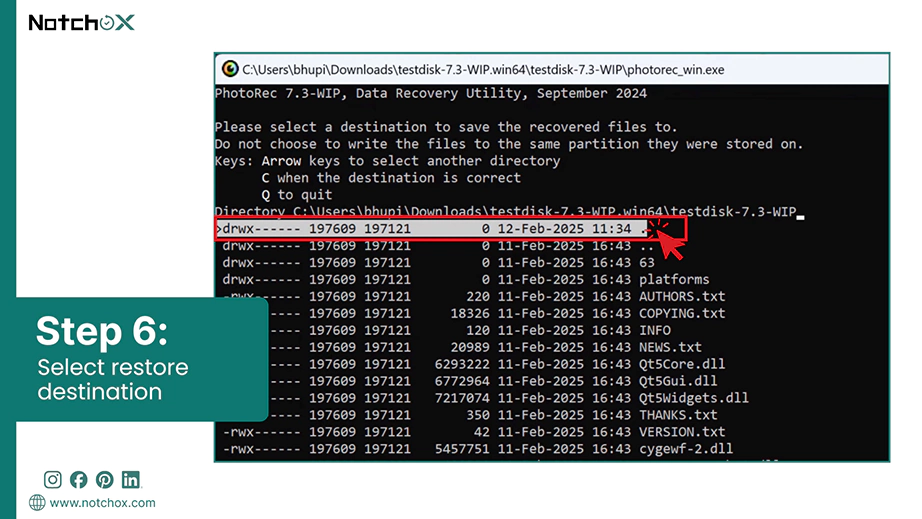
Use the arrow keys to browse and select a safe folder to store recovered items.
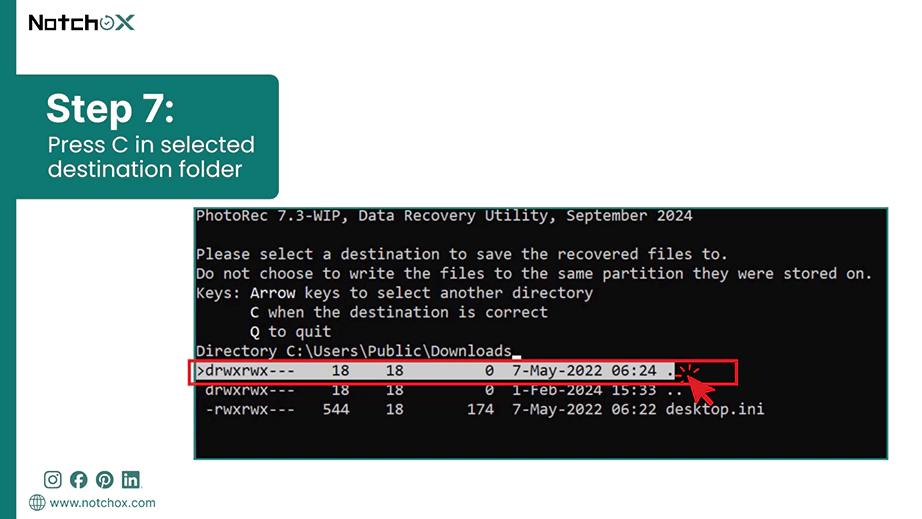
Once you are in a safe folder on your computer, press C on your keyboard. PhotoRec will start extracting your files and saving them.
Note: Don’t select a folder inside the same Seagate drive that you are trying to recover deleted files from.
How to Recover Data Using Official Seagate Rescue Data Recovery Services
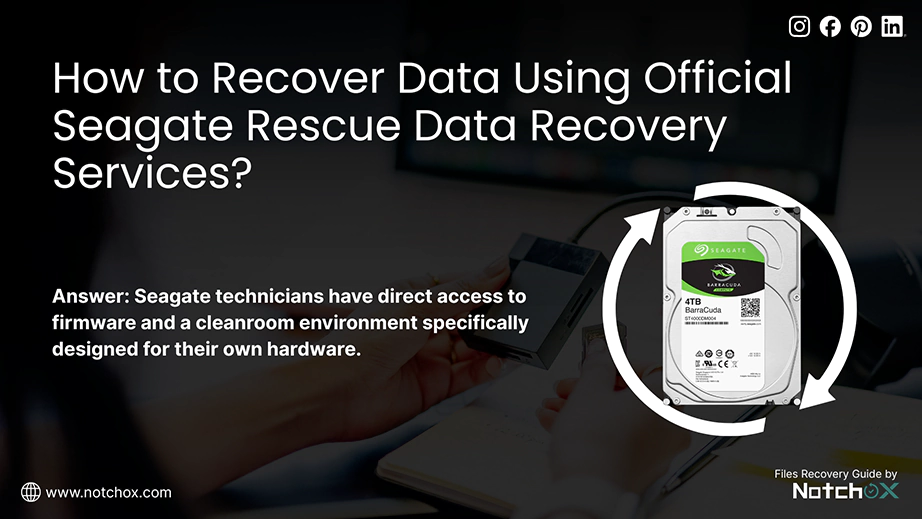
When software fails or your drive is making physical noises, Seagate’s in-house experts can help you fix your drive. Seagate technicians have direct access to firmware and a cleanroom environment specifically designed for their own hardware.
When to Use Seagate Rescue Services?
Professional lab recovery is mandatory if your driver is making unwanted sounds or has suffered a head crash. This means your drive is physically damaged, that software can not fix. Most Seagate drives come with free Seagate rescue services. You can see the list of devices with free services here.
How the Seagate Data Recovery Process Works?
Initiate a claim for your Seagate drive data loss. Contact Seagate support with the details of your data loss. They will verify your warranty or service plan status.
Once approved, Seagate will send you a prepaid shipping label. You can send your damaged drive to the lab at no additional shipping cost.
Experts will begin the process. The estimated turnaround time is 30 business days, which can vary based on the severity of damage.
You will receive your recovered data on a brand-new, encrypted storage device. But if the data cannot be recovered, your original damaged drive will be returned to you via mail.
Seagate Hard Drive Manager
For everyday drive health and basic management, Seagate provides the Seagate Hard Drive Manager (also known as Seagate Toolkit or Dashboard). It is not a deep scan recovery tool. This is a backup software that helps you to restore files when needed.
It lets you set up a sync folder that keeps a copy of your data in real time. So that you don’t need to recover at any point.
You can initiate your service claims directly through the software if the drive fails.
If you have used the software to create a backup plan, you can restore data to a new drive with a single click.
How to recover data from Seagate HDD using Seagate Drive Manager?
If you have a pre-existing backup, the Seagate Drive Manager is the fastest way to get your files back. Follow these steps for Seagate data recovery:
Double-click the Drive Manager icon on your desktop. If a Windows User Account Controller (UAC) prompt appears, click Yes.
Click the autobackup icon located on the main dashboard of the Drive Manager.
Click the backup data button and select the specific one containing the data you need to retrieve.
Choose the files you wish to restore.
Select the restore settings:
Decide if you want to restore files to their original location or a new destination.
Select a specific date or version of the file you need.
Apply filters if you want to restore only specific file types (like photos or PDFs).
Click OK. If the backup was encrypted, you will be prompted to enter the SafetyKey password at this stage.
Once authenticated, the restore process begins automatically.
Seagate HDD Data Recovery and Protection Checklist
After learning about Seagate HDD data rescue methods, it is important to know why data loss happens to avoid permanent failures. To protect your HDD data, just keep a few simple things in mind, like setting up automatic backups and routine drive health monitoring. In this section, we will see what causes these data losses, the needed steps to take before recovery, and how to keep your drive safe.
Top Reasons for Seagate HDD Data Loss
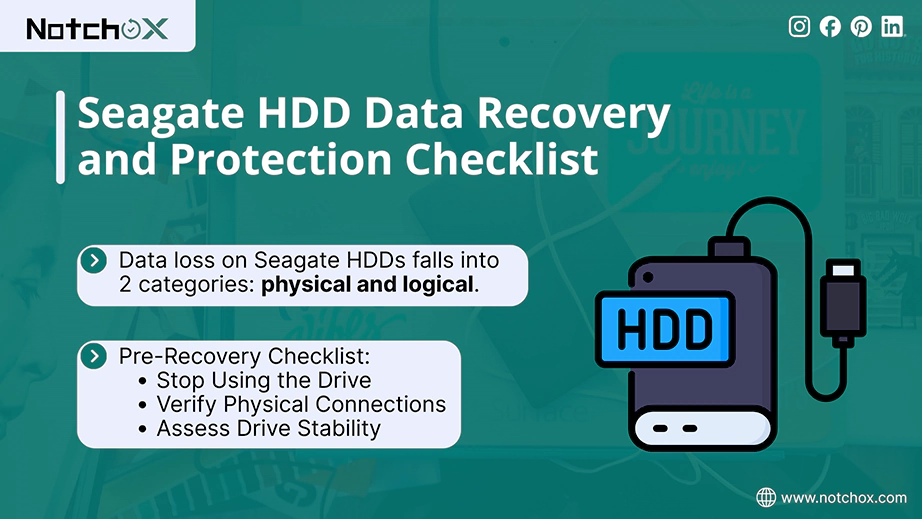
Data loss on Seagate HDDs falls into 2 categories: physical and logical. You must identify the cause before selecting the recovery path.
Physical Causes:
Mechanical Wear
Water Damage
Overheating
Logical Causes:
File System corruption
Accidental Human Error
Software Conflicts
Partition Loss
Pre-Recovery Checklist
Before beginning any recovery attempts, you must know exactly what happened to your drive. Perform these safety checks to prevent permanent data destruction:
Stop Using the Drive: Stop all read/write operations. Continued use of the drive increases the risk of overwriting the data you are trying to retrieve.
Verify Physical Connections: Check the drive with a different USB port and cable, and also on a different computer.
Assess Drive Stability: If the drive is making unusual noises, avoid using recovery software, as this might be an indication of physical failure.
How to Prevent Future Seagate Hard Drive Data Loss?
Routine Health Monitoring: Use Seagate SeaTools to perform regular tests to catch hardware failure early.
Safe Drive Ejection: Always use the “Safely Remove Hardware” or “Eject” function. This will write all the cached data to disk before the power is cut.
Automate Backups: Utilize the Seagate Toolkit to schedule automatic backups. With this, you get a second copy of your data saved, in case you lose one copy.
Power Protection: Use a surge protector to protect your Seagate internal or external drives from unexpected power disruptions.
Use Antivirus Software: Using a reliable antivirus will block viruses and ransomware from attacking and deleting your Seagate file system.
Avoid Physical Damage: Keep the drive on a flat and non-vibrant surface while in use. The area must be well ventilated and dry to prevent any overheating or water damage to drive.
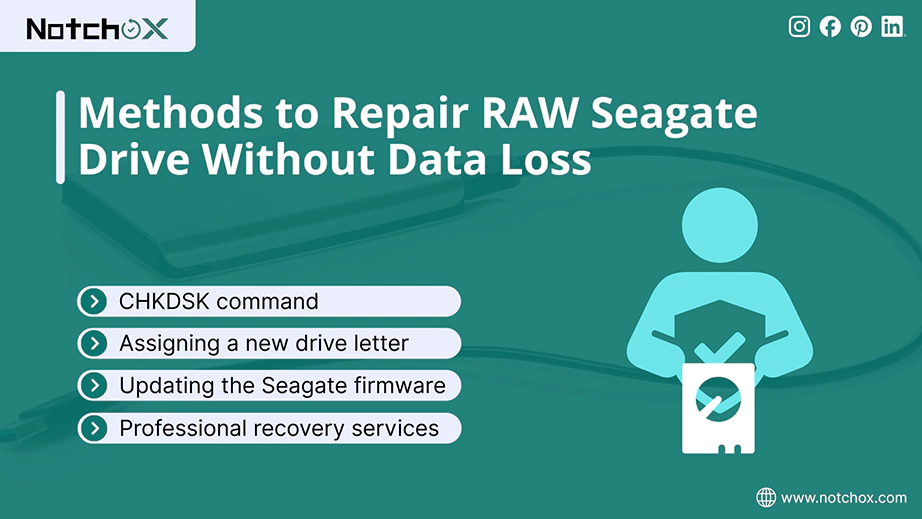
5 Primary Methods to Repair RAW Seagate Drive Without Data Loss
To repair a Seagate drive without losing data, the most effective method is to fix the file system error using the CHKDSK command rather than clicking Format. If your computer recognizes the drive but won’t open it, assigning a new drive letter or updating the Seagate firmware through the Toolkit can establish a connection instantly. To repair an external hard disk that is not detecting or the Seagate external hard drive not working no light, try professional recovery services.
We will see the methods that assess “logical” damage. Using these, you can bypass RAW drive errors and regain access to your files.
Diagnose Using SeaTools
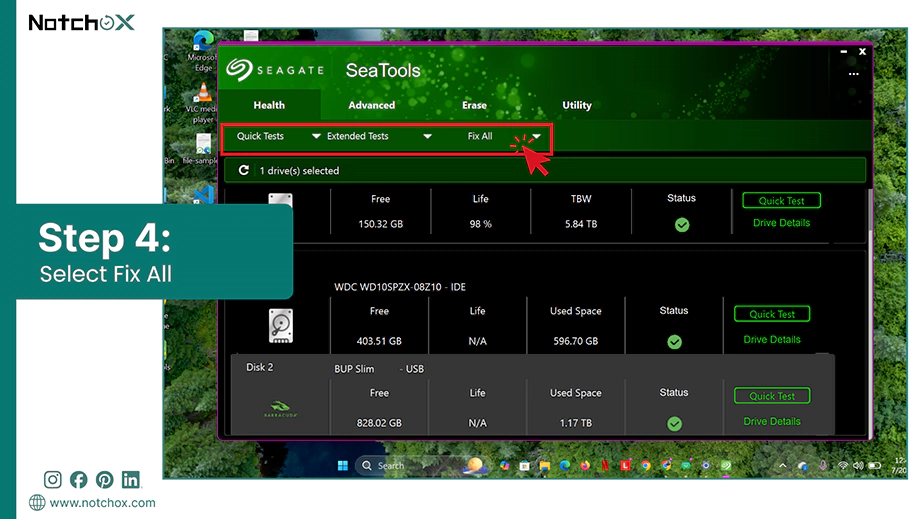
Seagate provides SeaTools, which is made specifically to diagnose and manage Seagate firmware. The “Fix All” feature identifies the corrupted sectors and repairs them by reallocating them to a healthy part of the disk.
How to fix a Seagate HDD using SeaTools?
Connect your Seagate drive to the PC.
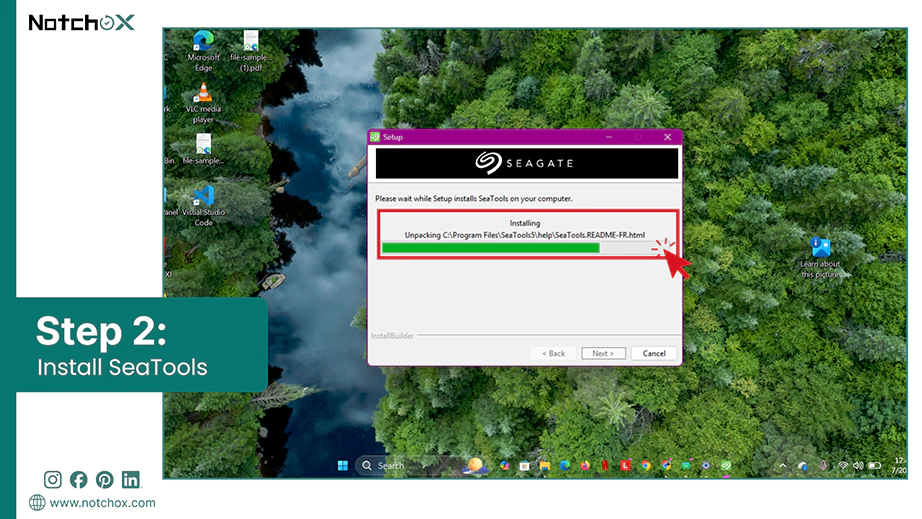
Download and install SeaTools on your PC.
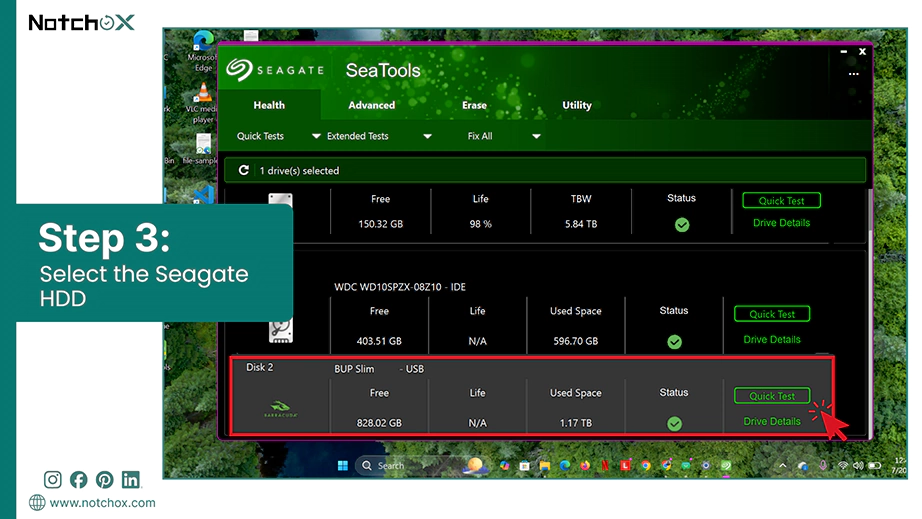
Check the box next to the Seagate HDD you want to fix from the devices list.
Click on the Basic Tests tab and select Fix All Long from the list of tests available.
This process performs a thorough scan and repair of the entire disk. It can take several hours to complete.
Once the test shows a green Pass status, the drive is fixed.
Uninstall and Reinstall Driver
A corrupted driver can prevent Windows/Mac from communicating with the Seagate firmware. Reinstalling it refreshes the hardware-to-OS handshake.
Steps to uninstall and reinstall the driver:
Connect your Seagate HDD to the PC.
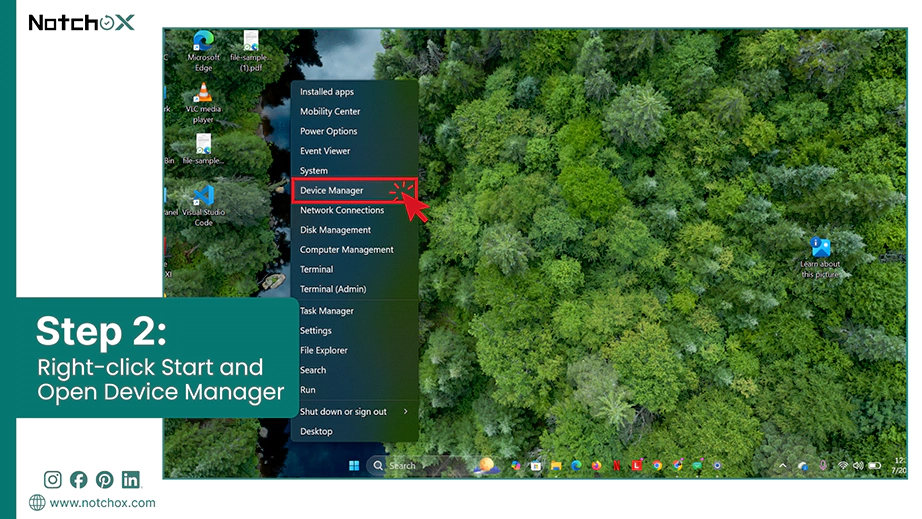
Right-click Start and select Device Manager.
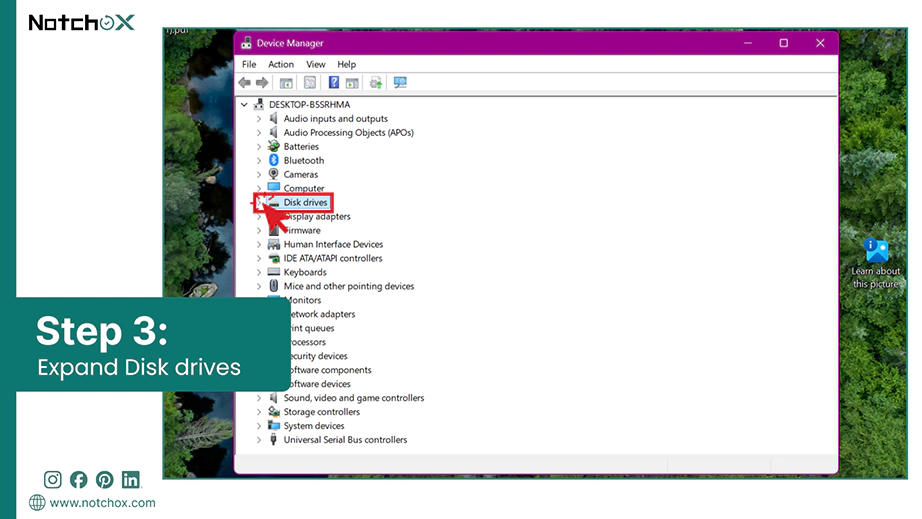
Click the arrow adjacent to Disk drives to expand.
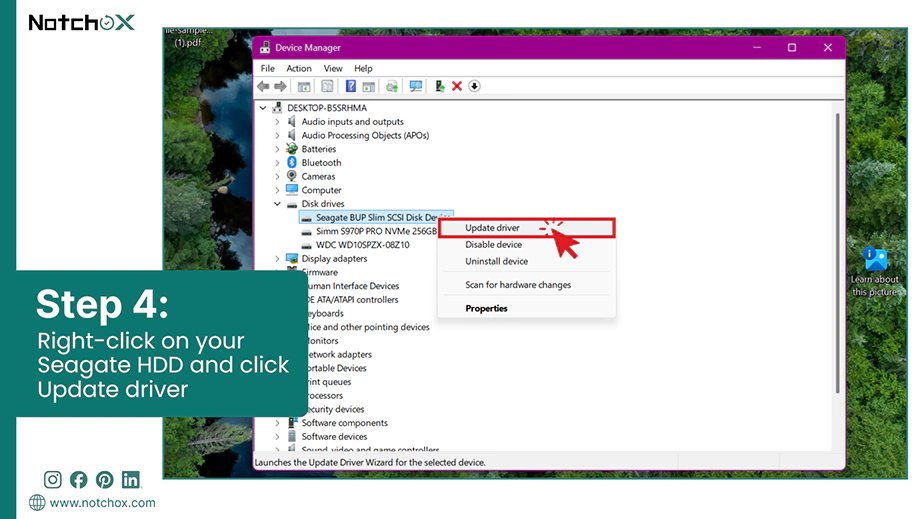
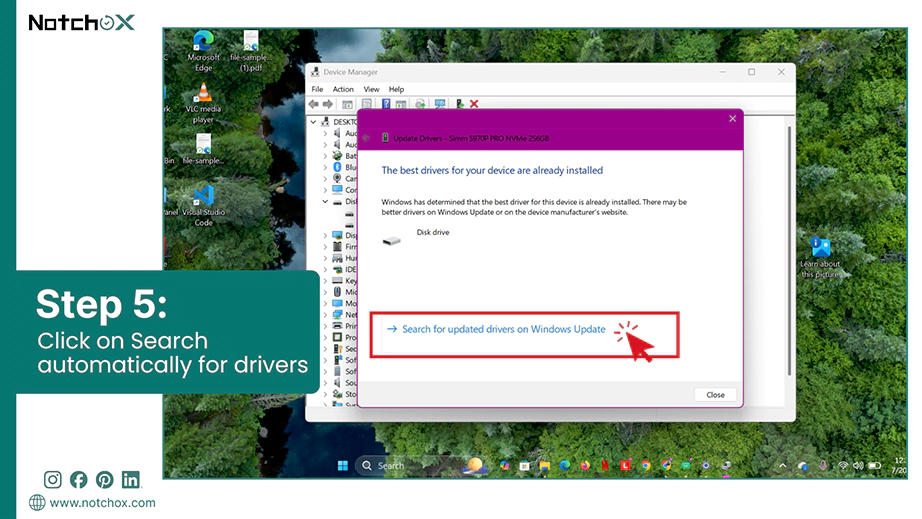
Right-click on your Seagate HDD and select the Update driver.
Select Search automatically for drivers.
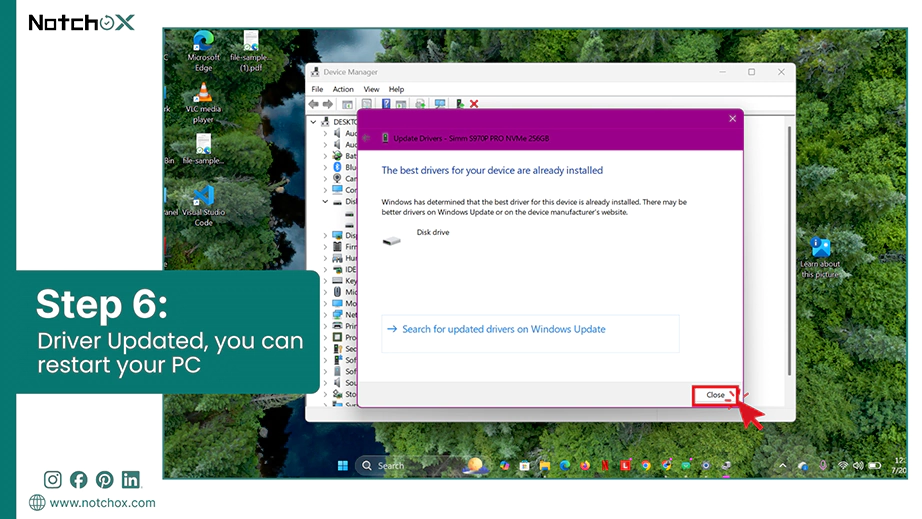
Once the Device Manager has done updating your Seagate hard drive, restart your PC.
Change Drive Letter
Assigning a fresh, unique drive letter to your Seagate HDD can fix it, and you can easily access the drive and its files. This works when you want to recover data from an external hard disk that is not detected in the File Explorer/ Finder.
The steps to change the Seagate drive letter:
Connect your external Seagate HDD to your PC.
Right-click Start and select Disk Management.
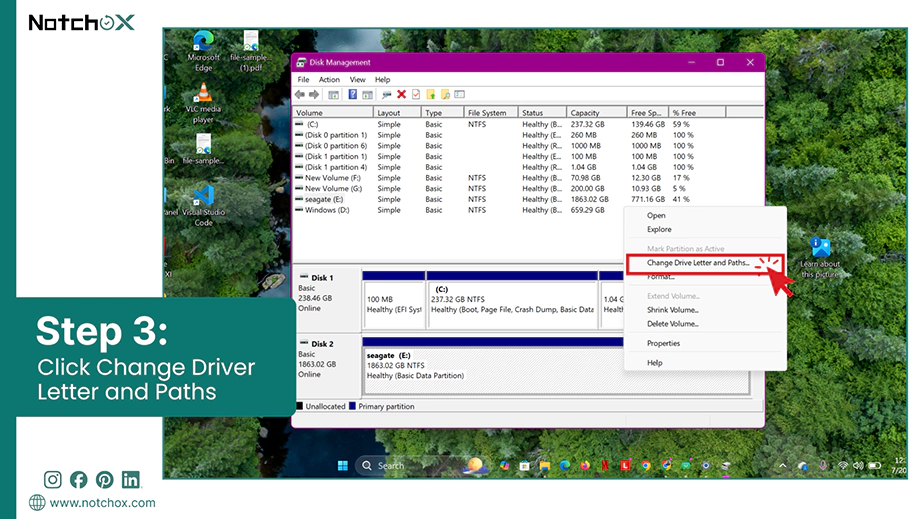
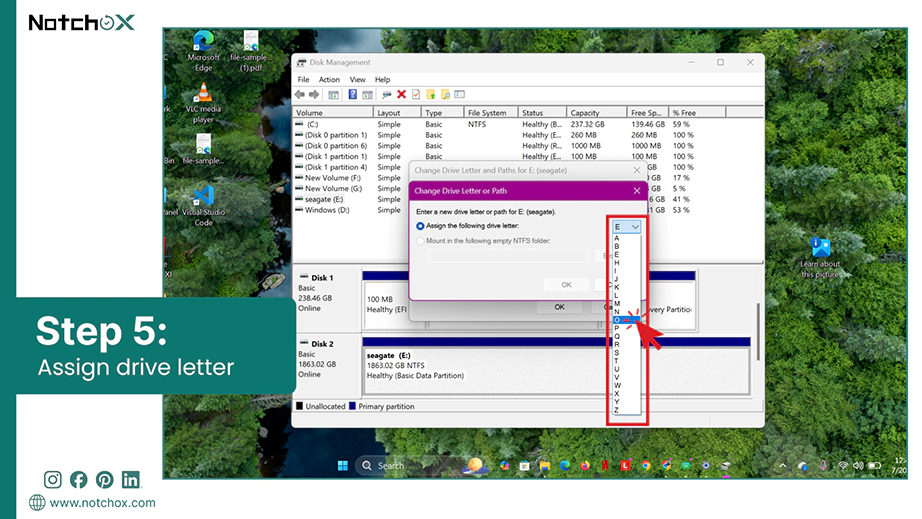
Locate your Seagate drive. Right-click on it and select Change Drive Letter and Paths….
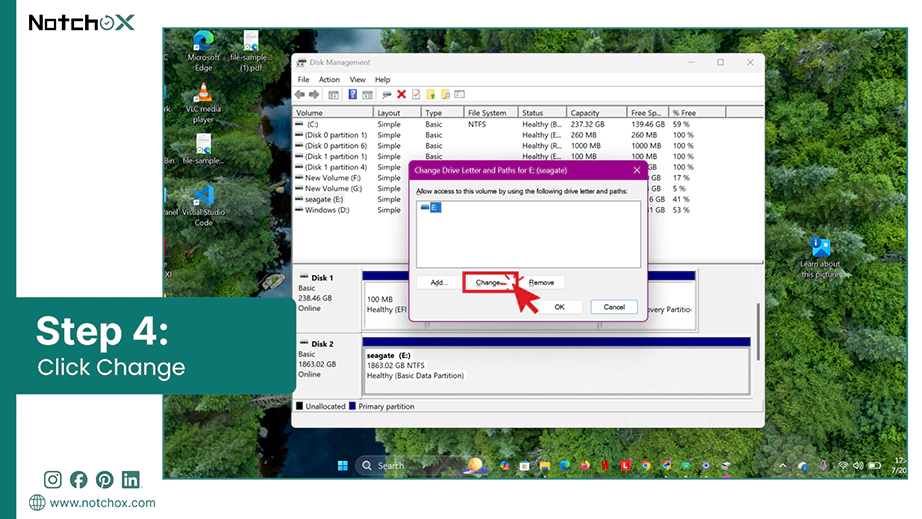
Click the Change button.
Choose a letter for the drive from the drop-down.
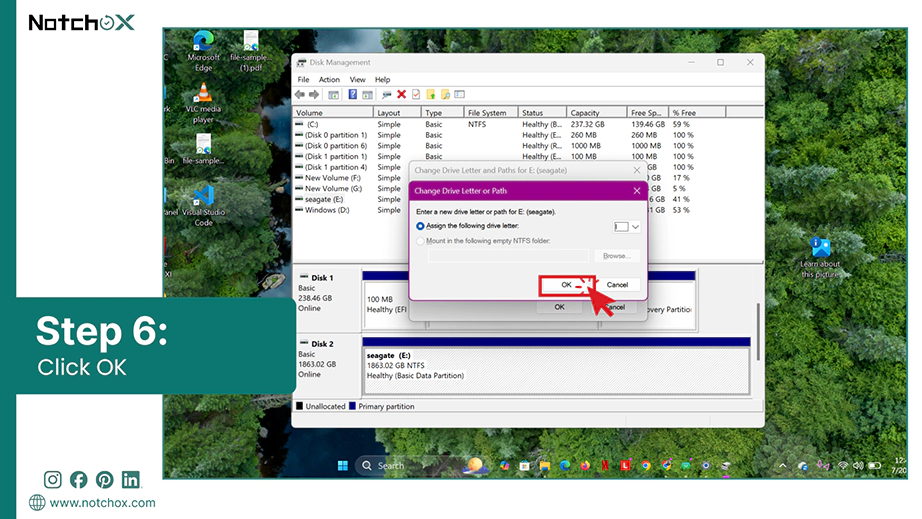
Click OK and check File Explorer to see if your data has reappeared.
The CMD CHKDSK Repair
The CHKDSK is the command prompt utility for Windows. It scans the directory structure and fixes cross-linked files that are causing RAW.
The steps to run the CHKDSK command:
Make sure your Seagate HDD is connected to the PC.
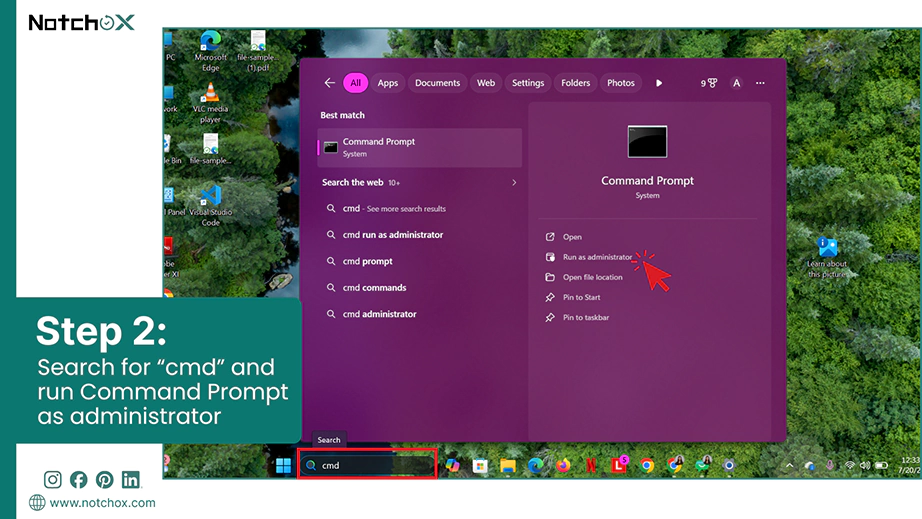
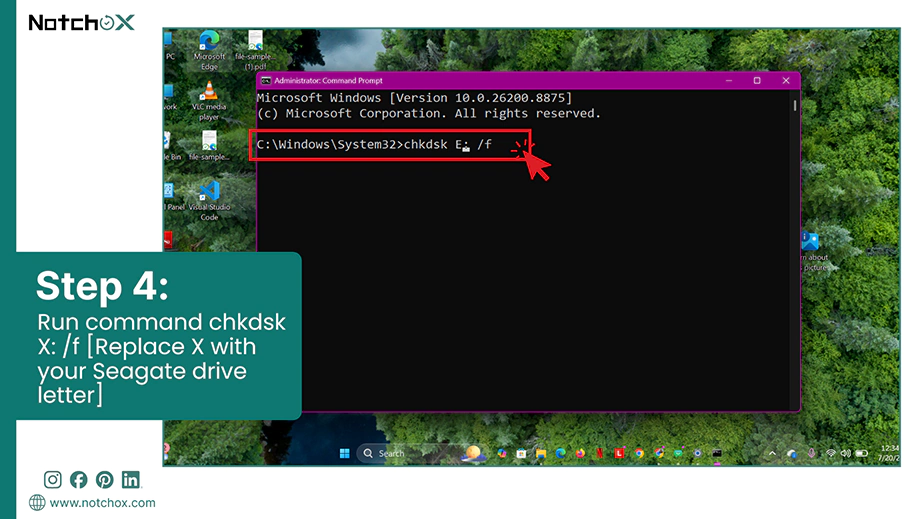
Open the command prompt as administrator. Search for “cmd” in the Start search bar and click Run as Administrator against the command prompt.
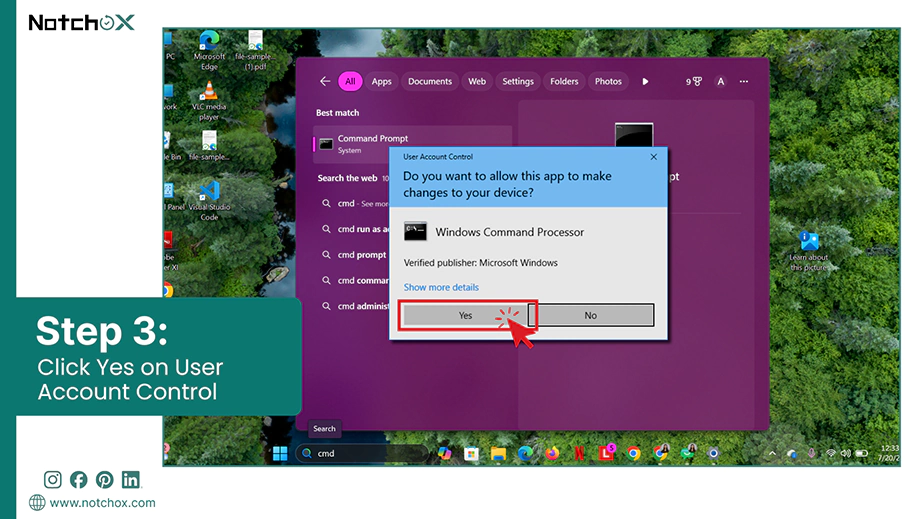
Click on Yes on the User Account Control to confirm.
Enter the command to run CHKDSK in the command prompt and press Enter.
chkdsk X: /f [Replace X with your Seagate drive letter]
The command will try to fix the drive by scanning throughout and repairing disk errors.
Format
Formatting should only be used as the last option once you have already used recovery software (like Notchox, TestDisk/Photorec, etc.) to save your files. This method wipes the drive and creates a brand new, healthy file system.
How to format a Seagate drive:
Connect the Seagate HDD to your PC.
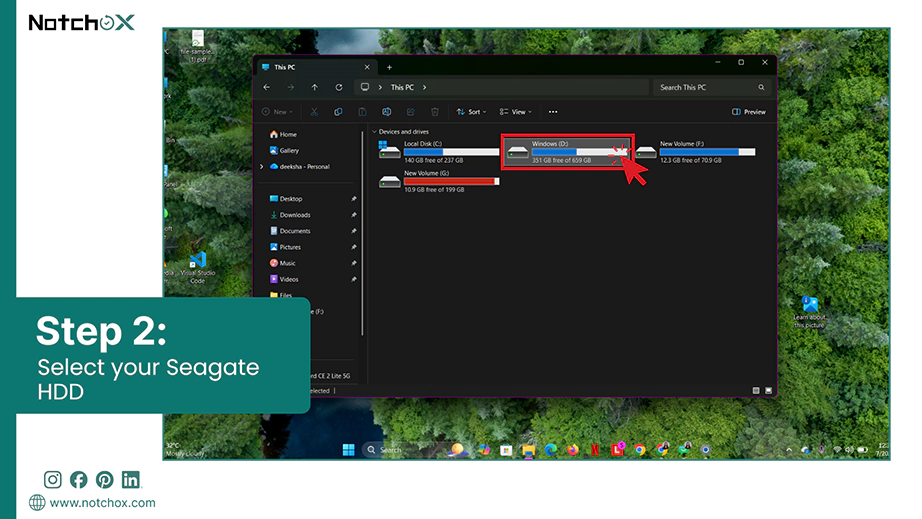
Open File Explorer and select your Seagate HDD.
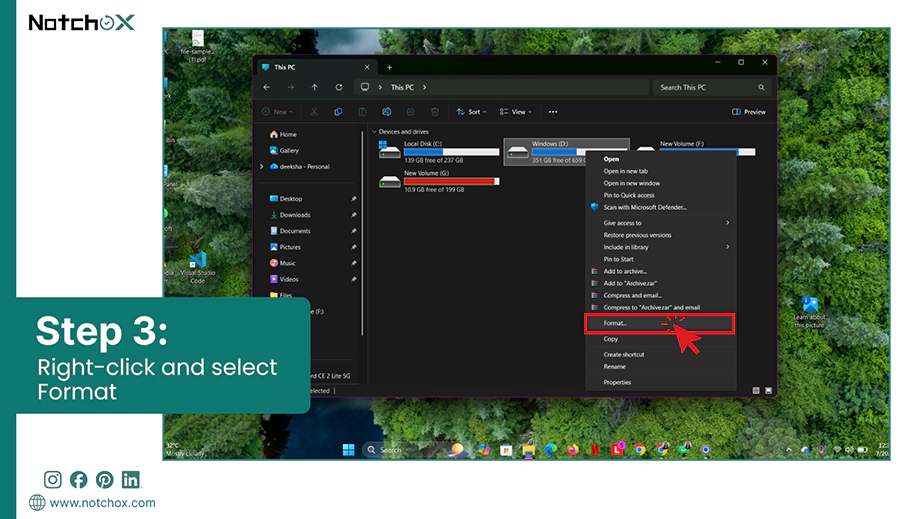
Right-click on the HDD, click Show more options,and Select Format….
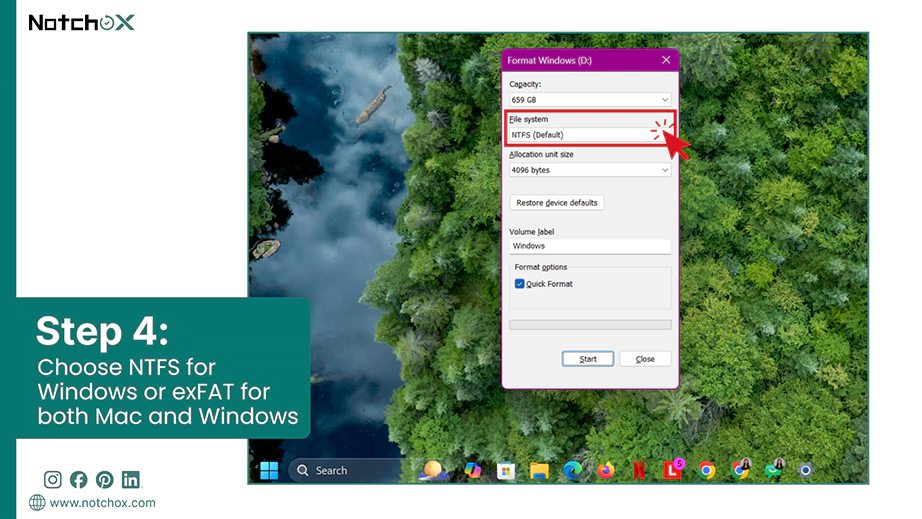
Select the file system:
Choose NTFS for Windows only.
Choose exFAT for both Mac and Windows.
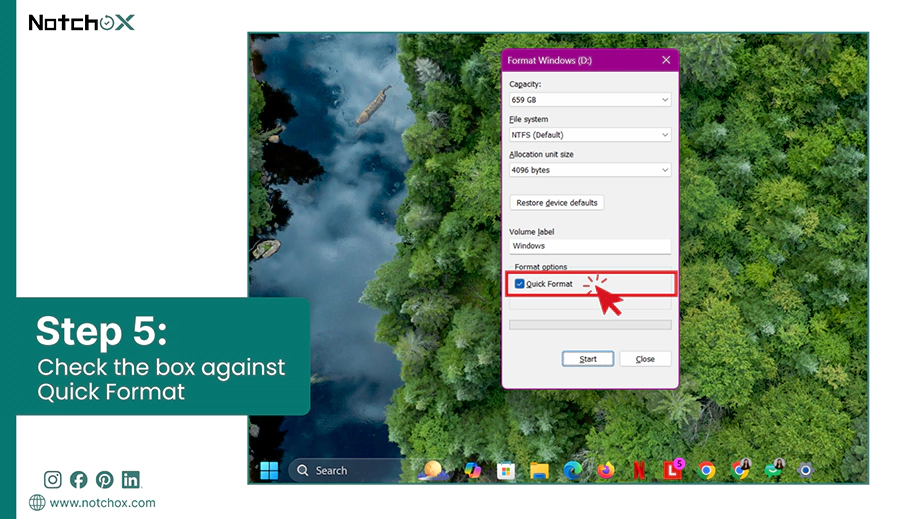
Ensure Quick format is ticked to save time.
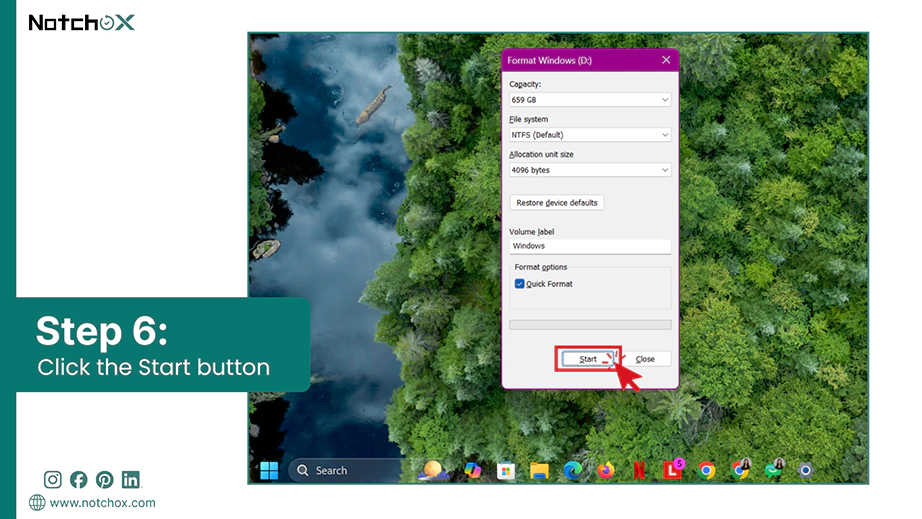
Click the Start button to reset the drive.
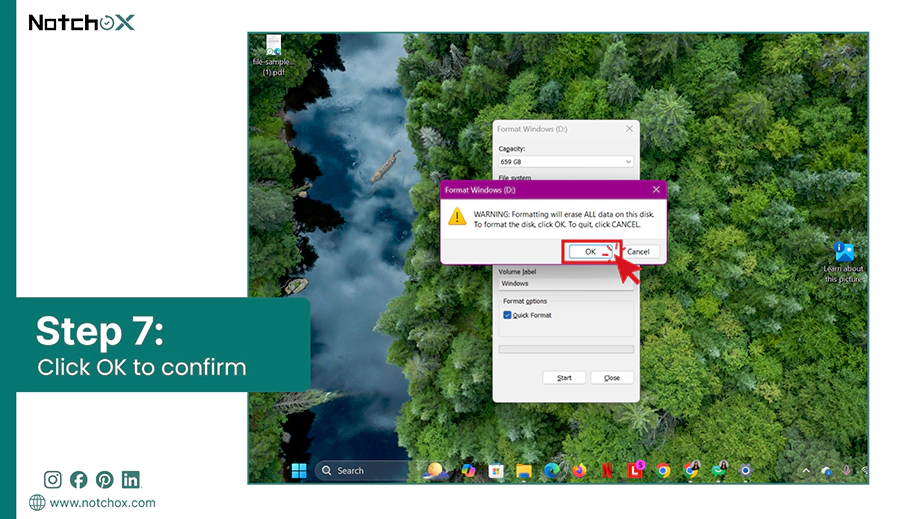
Click on OK to confirm the format.
Conclusion
There could be many reasons for losing data from your Seagate drive, but as we have explored, there are various ways to fix and recover data from Seagate HDD. By following the right pre-recovery steps and using tools like Seagate SeaTools to stabilize your hardware, you are already halfway to success. For hassle-free data recovery, Notchox data recovery software stands out, giving a user-friendly way to bring your data back with just a few clicks.
Frequently Asked Questions (FAQs)
Q1: How to recover data from Seagate HDD?
Ans: To recover data from Seagate HDD:
Stop Writing Data: Disconnect the drive immediately to avoid overwriting files.
Scan with Software: Use an authorised tool like Notchox to scan and extract files.
Save Elsewhere: Save your recovered files to a separate and healthy storage drive.
Q2: What to do with an external hard disk which is not detecting?
Ans: If your external hard disk is not detecting, first swap the USB cable and plug it into a different port or computer. If it still fails to show up, open Windows Device Manager to uninstall and reinstall the disk driver or check Disk Management to see if you need to assign a new drive letter.
Q3: Is it possible to recover data from a hard disk?
Ans: Yes, it is highly possible to recover data from a hard disk as the file has not been overwritten by new data. Deleted, formatted, or RAW files can be easily retrieved using specialised data recovery software such as Notchox.
Q4: Does Seagate provide recovery service?
Ans: Yes, Seagate provides a dedicated professional laboratory service called Seagate Rescue Data Recovery Services. This service is designed to handle complex mechanical failures and physical drive damage. Many Seagate drives come with a free 2-3 year rescue plan.
Q5: Is Seagate recovery good?
Ans: Yes, Seagate’s official recovery services are excellent. They operate on a “no data, no fee” policy so you don’t pay if recovery fails. If the official recovery plan has expired, you can use third party data recovery softwares (like Notchox) to recover data from a Seagate HDD.
Q6: What is the best Seagate file recovery software?
Ans: The best all-around recovery software for a Seagate HDD is Notchox because of its user-friendly interface and deep scan capabilities. It is compatible with both Windows and macOS, giving you easy recovery across devices.
Kajal Singh is a Data Recovery Writer at Notchox, specializing in data recovery, storage systems, RAID, and digital forensics. She writes technical processes, tools, and cases into clear, engaging articles, blogs, and guides. Kajal does thorough research, deep analysis, and collaborates with experts to produce high-quality and engaging content that is easy to understand for every reader.