Whether your drive is completely invisible, appearing only in Disk Management, or showing a RAW file system, this article covers essential recovery scenarios to safely restore your files. Usually, the solution lies in reassigning a drive letter, a few quick fixes, updating drivers, or using professional recovery software that can scan the space that File Explorer can’t see.
We will walk through every scenario, from drives that are invisible in File Explorer to those that are nowhere visible. Most importantly, I’m providing expert-guided, step-by-step instructions for every method.
Quick Answer: To recover data from external hard drive not showing up:
Use Notchox data recovery software that can detect and recover files from drives that are missing from the File Explorer.
Try Initial Quick Fixes:
Switch to a different USB port
Try a new USB cable
Connect the drive to a different computer
Rule out connection/power issues
How to Recover Data From External Hard Drive Not Showing Up?
Even though external hardware makes up around 5% of total backup usage, a single “not recognised” error can mean the difference between a quick recovery and permanent data loss.
When your computer fails to recognise a drive, professional data recovery software becomes your most powerful saviour. Because these tools are designed to bypass the operating system’s limitations, they scan raw sectors of your hardware and find the files that File Explorer can’t see.
Before you pick a tool, keep these expert pointers in mind for a successful recovery:
Stop Writing New Data: As soon as you realise the drive is failing (not currently recognised), stop using it to prevent further damage.
The “Disk Management” Rule: For software to work, the drive must at least be visible in Disk Management (whether it says “No Media” or “Unallocated”); otherwise, it’s likely a hardware issue.
Preview Before Paying: Most software allows you to preview files before final recovery. Never pay for software until you’ve confirmed the software can actually recover your lost files.
Deep Scan Technology: A quick scan fixes simple directory issues, but for this drive not showing up, you will need a deep scan to recover the files.
Notchox Data Recovery Software:
If you are wondering, “Can we recover data from an undetected hard disk?” Yes, you can!
When a critical external hard drive suddenly vanishes from your system, the gap between data loss and recovery is often defined by tools you trust. Notchox data recovery software bridges this gap as a premium multi-platform solution designed to reconstruct data in any scenario. Originally established as a specialist in file restoration, Notchox has evolved through years of experience into a global leader in data restoration and is trusted by tech giants and forensic experts worldwide.
External hard drive not showing up data recovery using Notchox:
Recovering your data with Notchox is a simple 4-step process that bypasses the complexities of manual system repairs. Because the software interacts directly with the driver’s hardware signature, it can often see and extract files even when your operating system’s File Explorer or Finder shows nothing at all.
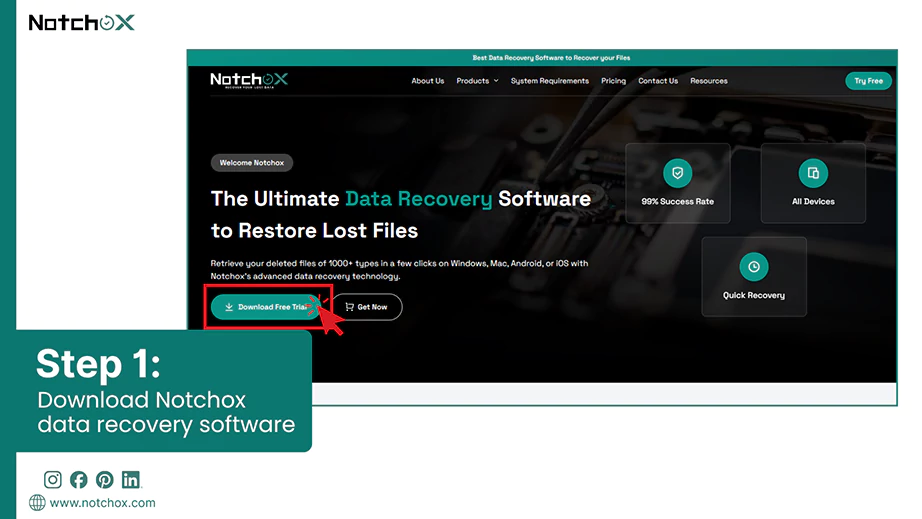
Visit the official Notchox website to download the installer compatible with your OS (Windows or macOS).
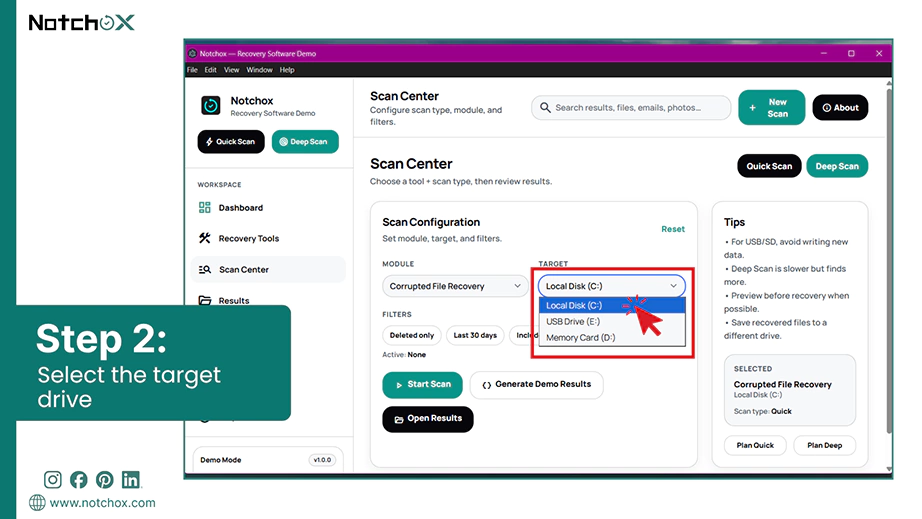
Launch the Software. You will see a list of all connected storage drives. Select the drive to target.
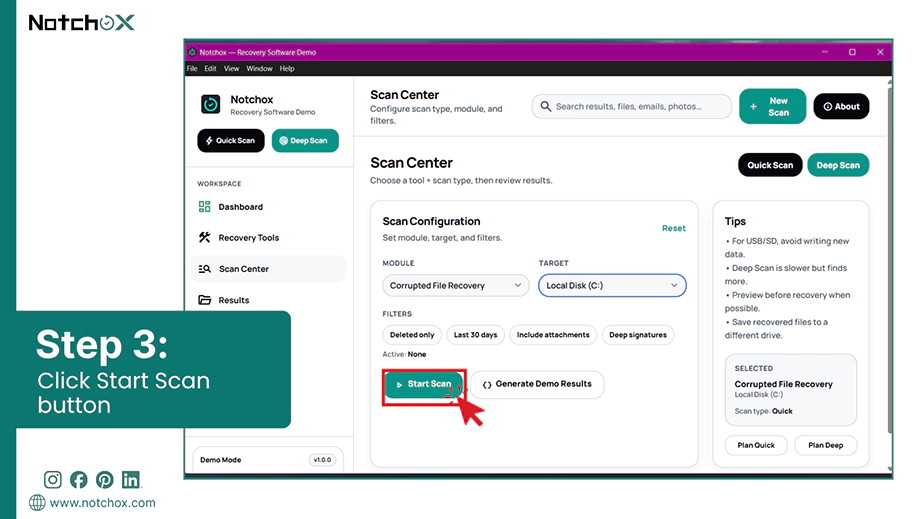
Click the Scan Now button to perform a deep sector-by-sector analysis of the drive.
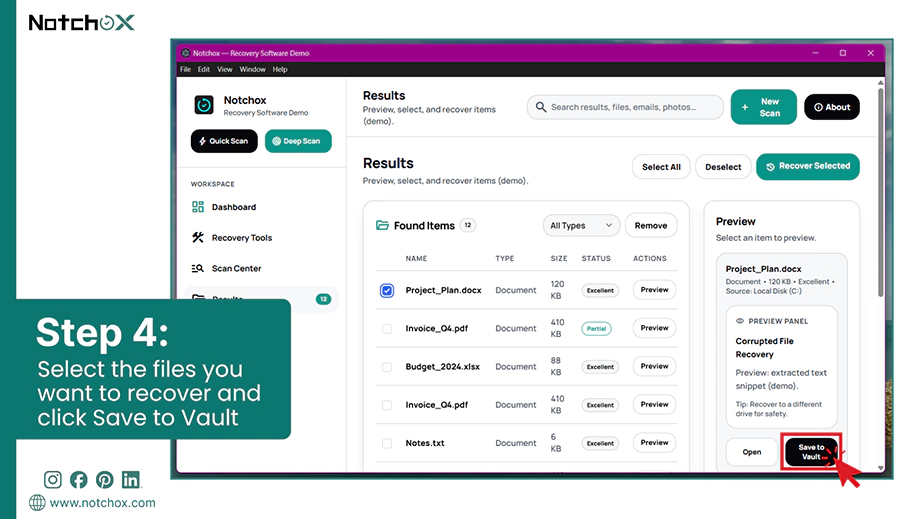
Once the scan is complete, use the built-in preview feature to click on files and verify them. Select the files you want to recover and click Save to Vault.
How to Recover External Hard Drive that is Not Detected in File Explorer but Shows Up in Disk Management/Utility?
You open your external hard drive and either the folders appear empty or you don’t see the files at all but when you check the drive’s properties, you notice that the storage space is still being used. This shows that your files still exist. They are just not showing up properly.
Your computer acknowledges that something is plugged in via Device Management yet not recognised by File Explorer. This usually happens because of the hardware and the operating system’s file cabinet. Technically, it means the physical connection is successful but the drive lacks a valid path or partition that the OS can understand.
The reasons could be:
The drive might be missing a drive letter
It could have a conflicting file system
The partition table might be corrupted
Physically damaged drive
Let’s see methods to fix this problem so that you can recover data from external hard drive not showing up in the File Manager.
Assign or Change Drive Letter
To get your files back, we will start with the most common fix. If your drive is visible in the Disk Management but not in File Explorer, it needs a pathway to communicate with the computer.
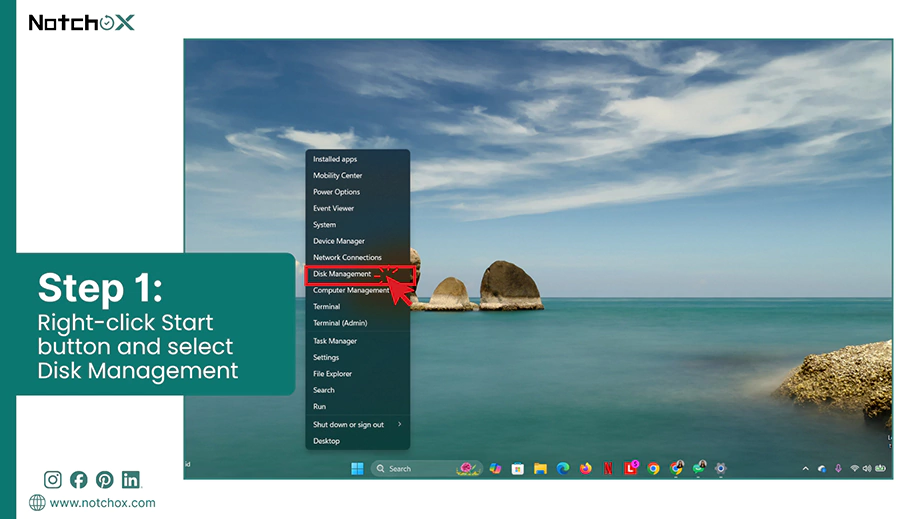
Right-click the Start button and select Disk Management from the list.
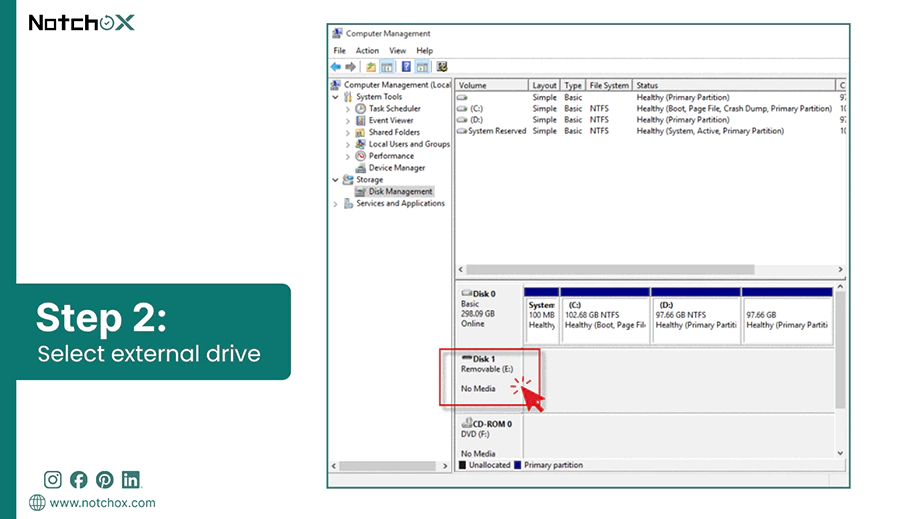
Look for a disk that matches your external drive’s size. It will likely show “Removable” or have a bar that is marked as “Healthy” but lacks a letter.
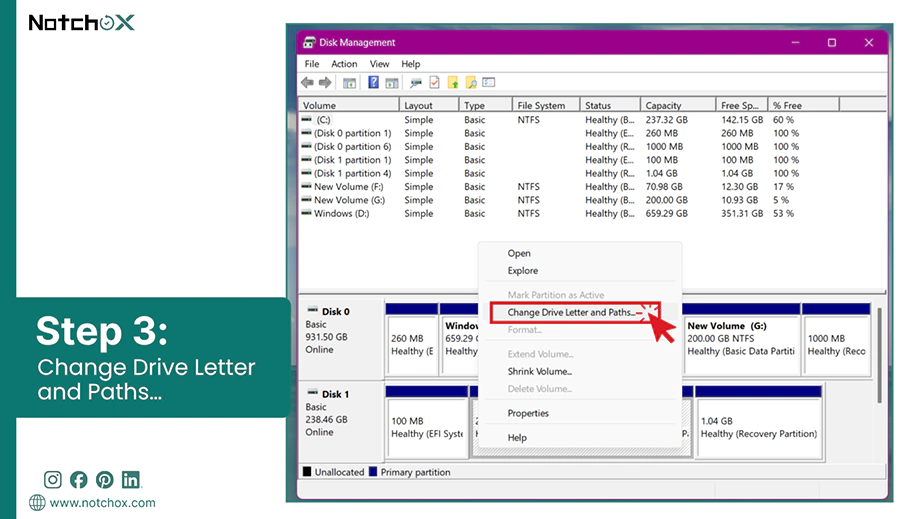
Right-click on the partition and select “Change Drive Letter and Paths…”.
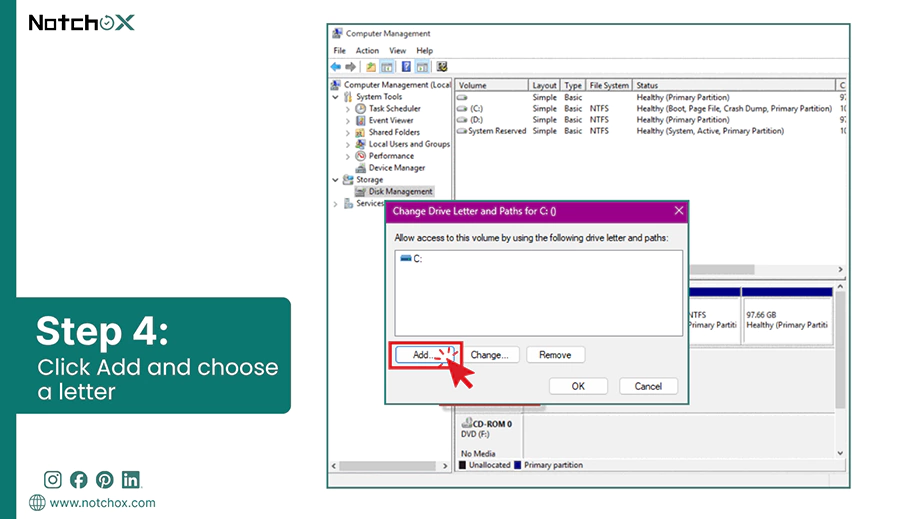
Click Add and choose a letter from the dropdown menu.
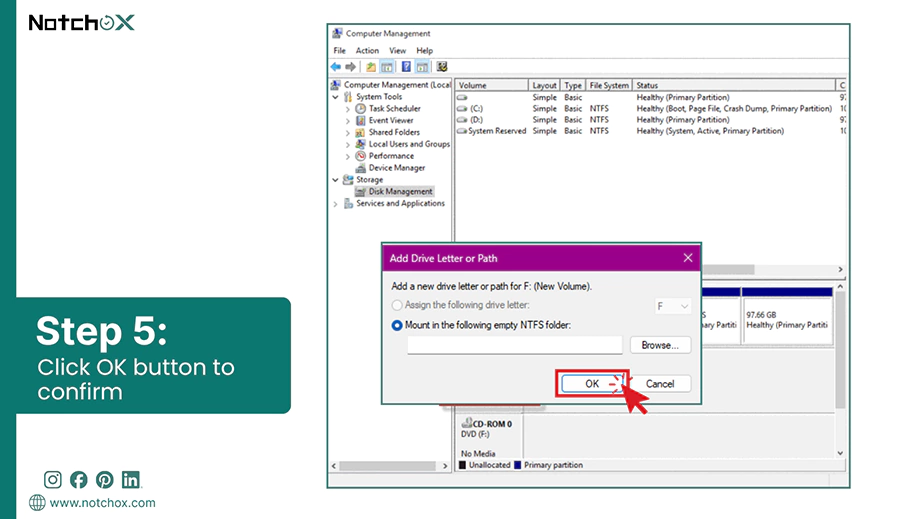
Click OK to confirm. The drive should immediately pop up in your File Explorer.
Initialise the Disk
When a drive appears in Disk Management as “Not initialised” or “Unknown”, it means the operating system can see the hardware but can’t access the partition table. This is caused by a corrupted Master Boot Record (MBR) or GUID Partition Table (GPT).
Here is the step-by-step process to safely initialise the disk for recovery:
Right-click the Start button and select Disk Management.
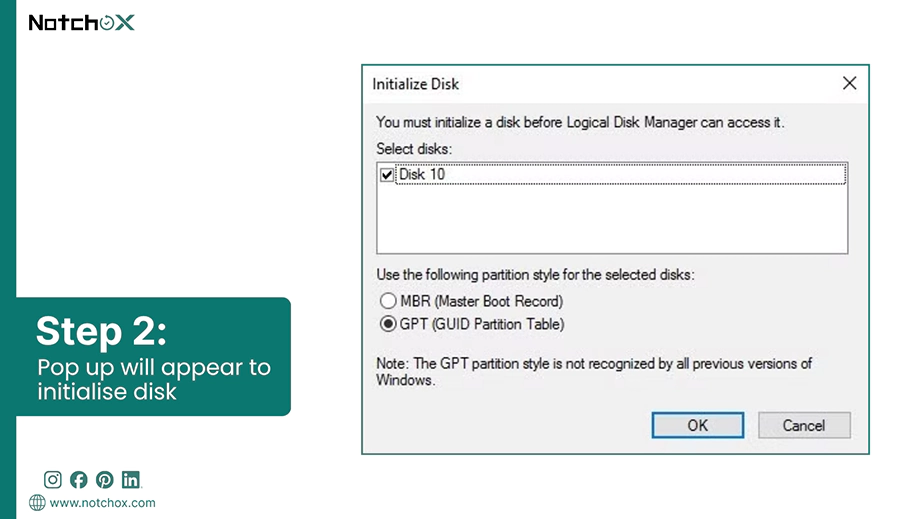
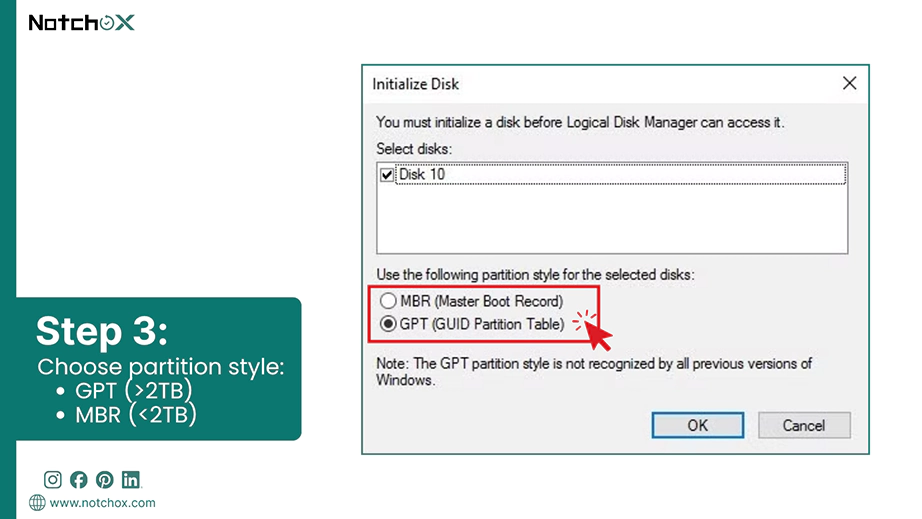
A pop-up may automatically appear saying “You must initialise the disk before Logical Disk Manager can access it.”
Select the correct partition style:
Choose GPT if your drive is larger than 2TB or if you are using a modern Windows 11 system.
Choose MBR only if you are using a very old (under 2TB) or legacy hardware.
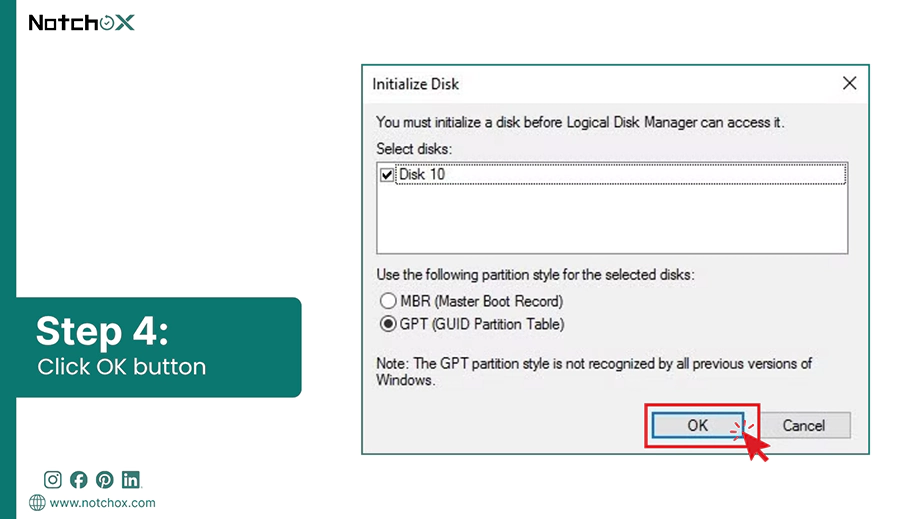
Click OK. This writes a new partition table to the drive. You will see the status change from “Not Initialised” to “Online.”
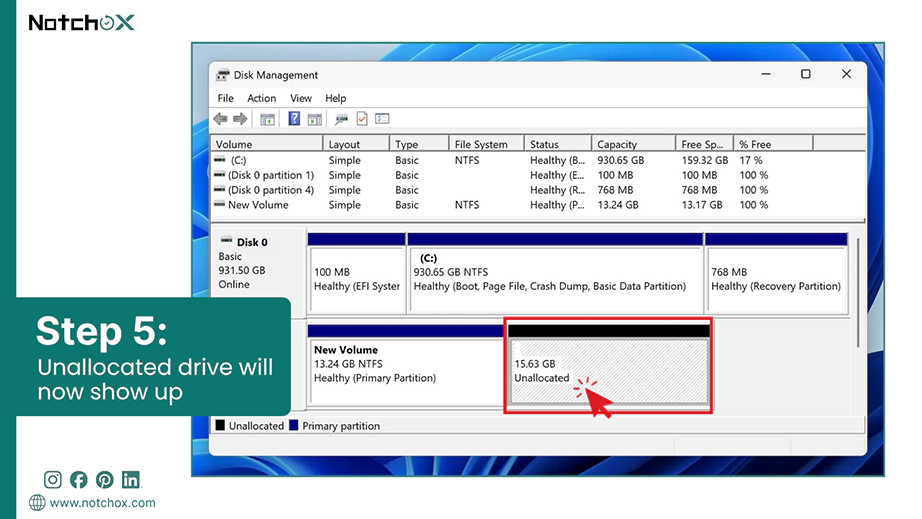
The drive will now likely show “Unallocated.” A prompt will ask if you want to “New Simple Volume” or “Format,” select Cancel. Formatting will wipe the actual data we are trying to save.
Now that the disk is “Online”, use a tool like Notchox data recoveryto scan the unallocated space and recover your files.
Next, we will see how to create a New Simple Volume.
Create a New Simple Volume (After Recovery)
Once you have already recovered your important files or if the drive is completely empty, create a new Simple Volume. This involves formatting, which means your current data will be wiped off.
If you’re ready to reset the drive and make it show up in File Explorer again, follow these expert-guided steps:
Right-click on the Start button and select Disk Management.
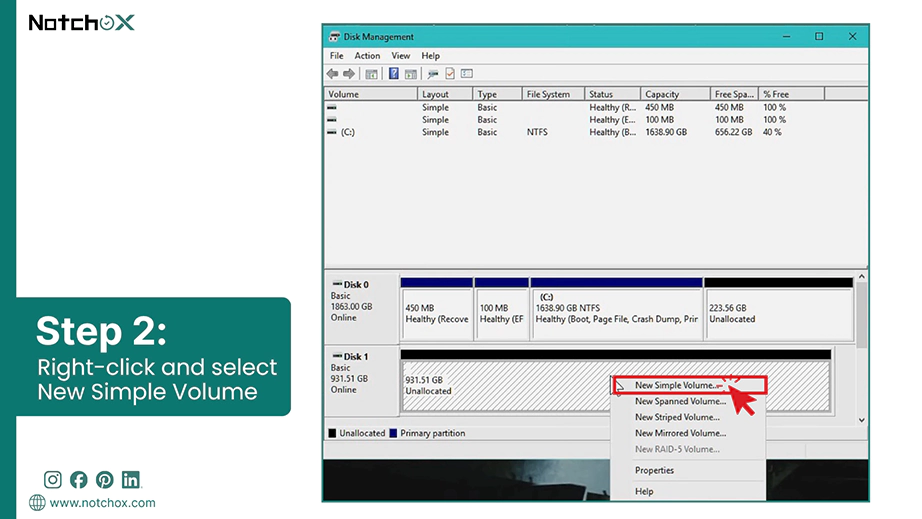
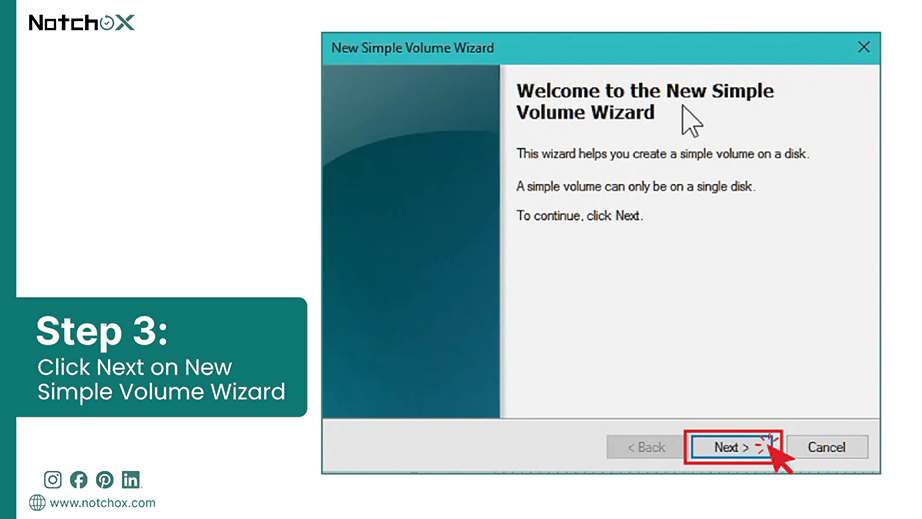
Locate the unallocated drive and right-click on it. Select New Simple Volume.
The wizard will open up. Click Next.
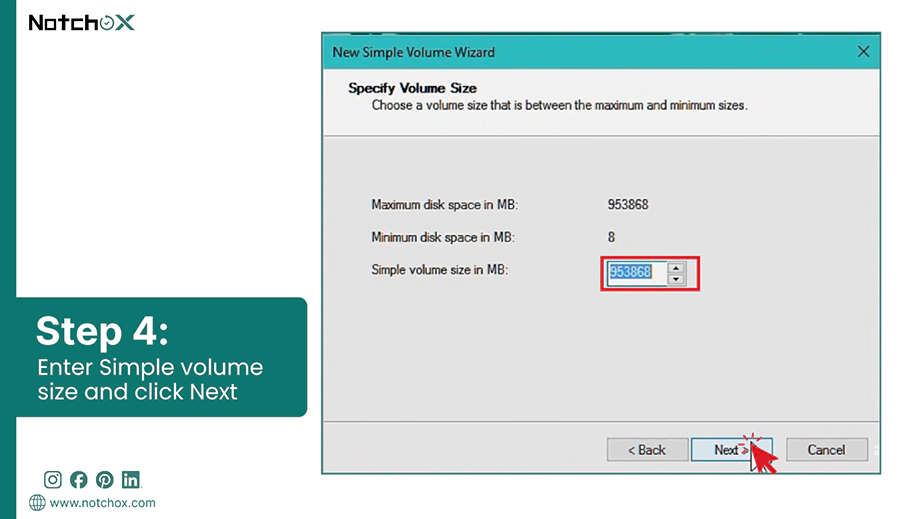
It will default to the maximum space available. Enter the size of volume you want to create in megabytes (MB) or accept the maximum default size and click Next.
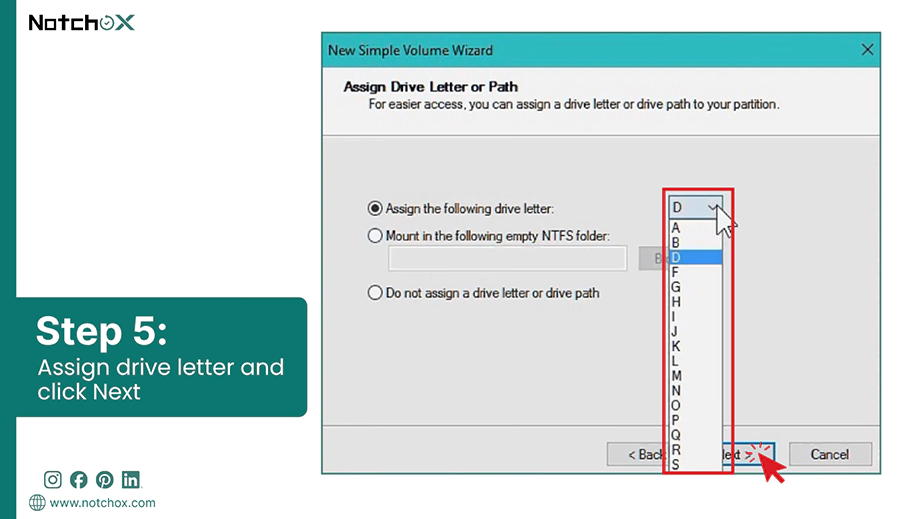
Choose a drive letter from the dropdown menu and click Next.
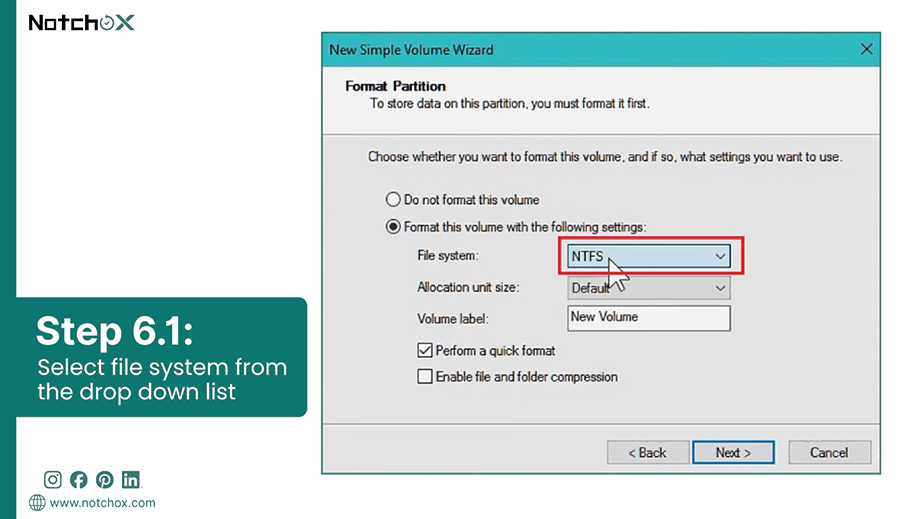
In the format partition box:
Select NTFS (best for Windows) or exFAT (for both Mac and Windows).
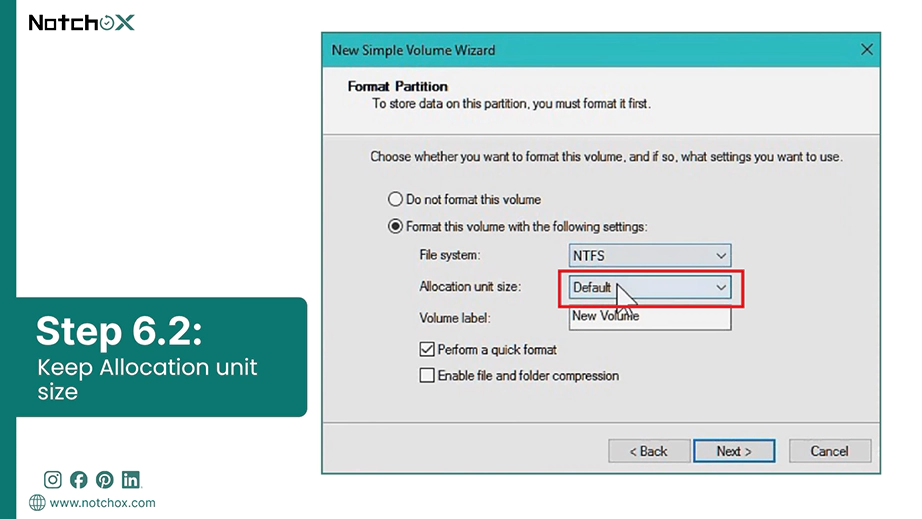
Keep the Allocation Unit Size the same.
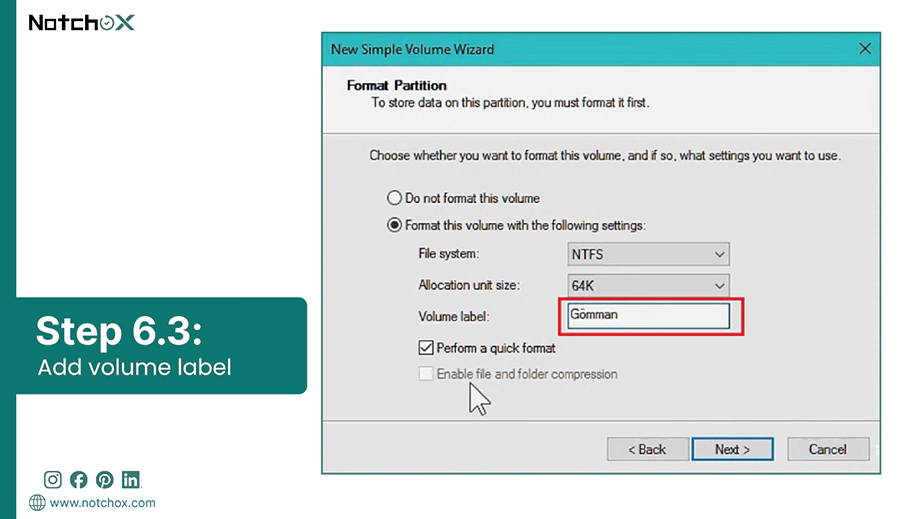
Give your drive a Label.
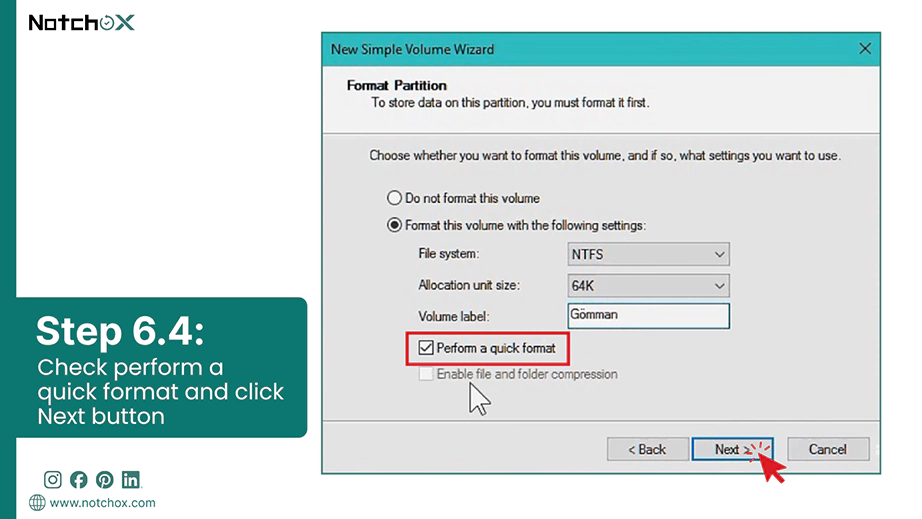
Check “Perform a quick format,” and click Next.
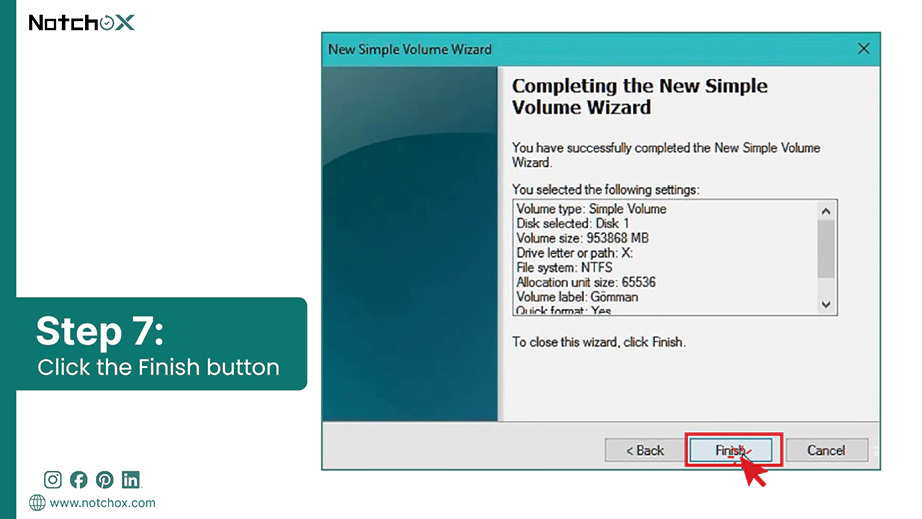
Click the Finish button.
The bar will turn blue, and your drive will instantly pop up in the File Explorer, ready for use.
How to Recover Missing Drive?
Whether you are running Windows or macOS, a drive that fails to appear in your file manager is not necessarily dead. It is often just hidden due to software conflicts, power issues, etc.
Here we will provide step-by–step methods to recover your missing drive.
So if you’re wondering, can we recover data from an undetected hard disk? The answer is yes.
We will start with universal quick hardware fixes before moving into specialised system methods such as Disk Management for Windows and Disk Utility for Mac, covering all scenarios to make sure you have a safe path to recover your files.
Initial Quick Fixes:
Before going into the complex software, most “missing” drives can be revived with a few simple hardware and system resets.
These quick fixes target the most common connection and power glitches:
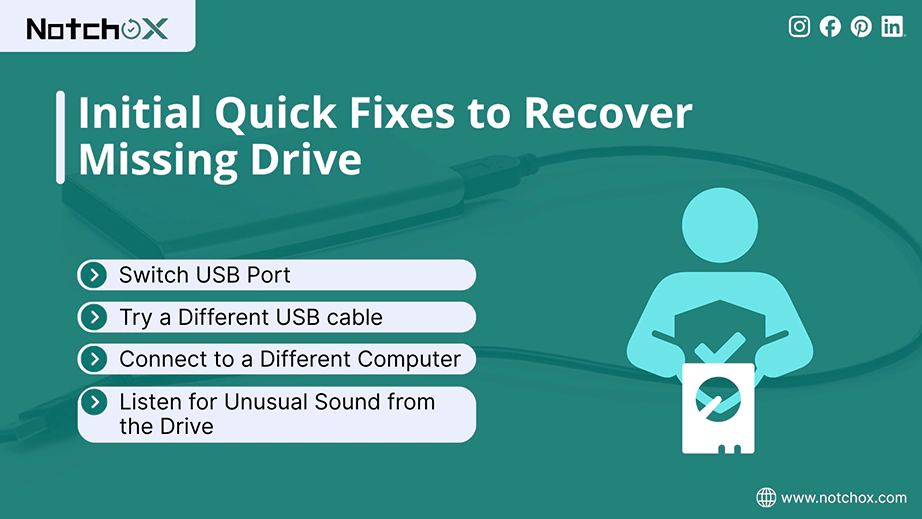
Switch USB Port: The issue might be in your device’s port. Try switching to another port. If needed, plug your drive directly into the motherboard ports.
Try a Different USB cable: Cables are another point of failure. Use reliable and high-speed cables to rule out a faulty connection.
Connect to a Different Computer: If the drive shows up on another PC or Mac, the issue lies within your computer’s drivers or operating system and not the hardware.
Listen for Unusual Sound from the Drive: Hold the drive close to your ear as you plug it in. Listen for any sound the drive makes. If you are able to hear any unusual sound, the drive might be physically damaged.
Windows Methods
After trying the quick fixes, if your drive still doesn’t appear in your Windows system, the Operating system provides built-in diagnostic tools that can be used. So, to recover your data, we must move beyond the surface of File Explorer and use the deep system tools built into the Windows kernel. These methods are designed to force a reconnection and repair the file system.
If your drive has a letter but won’t open or shows as RAW, the file system might be corrupted.
Here’s how to fix an external drive that is not showing up in Windows because it is recognised as RAW:
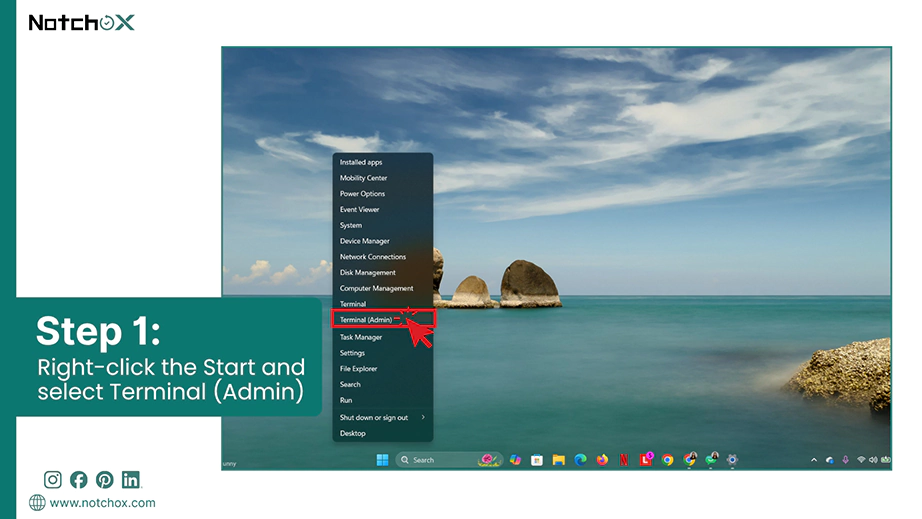
Open the Terminal with administrative access by right-clicking the Start and selecting Terminal (admin).
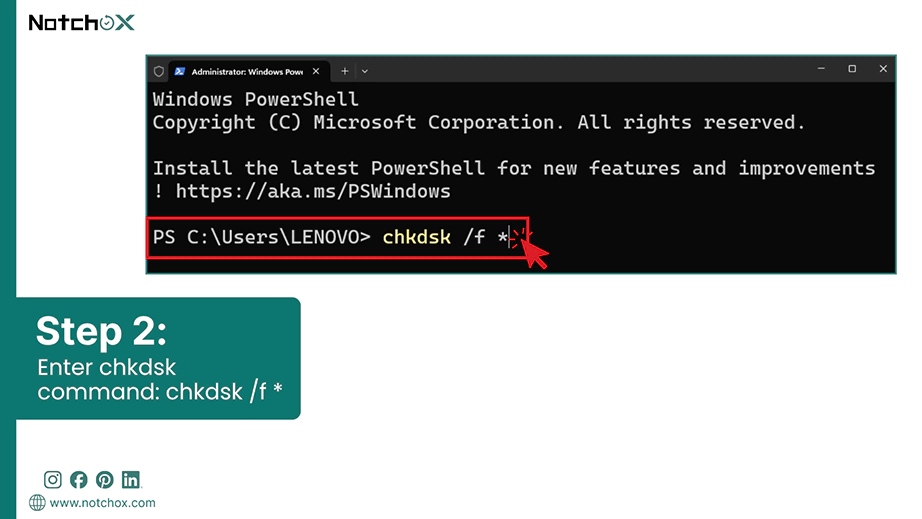
The command prompt will open. Run the following command:
chkdsk /f *
Windows will scan for and automatically fix logical errors.
Disable USP Selective Suspend
Your drive is not recognisable, not due to any system or hardware issue; it can happen because of the USP Selective Suspend. Windows often cuts power to “idle” USB ports to save energy. This can cause external drives to disconnect and stay hidden. You will need to disable it for the PC to access your external drive.
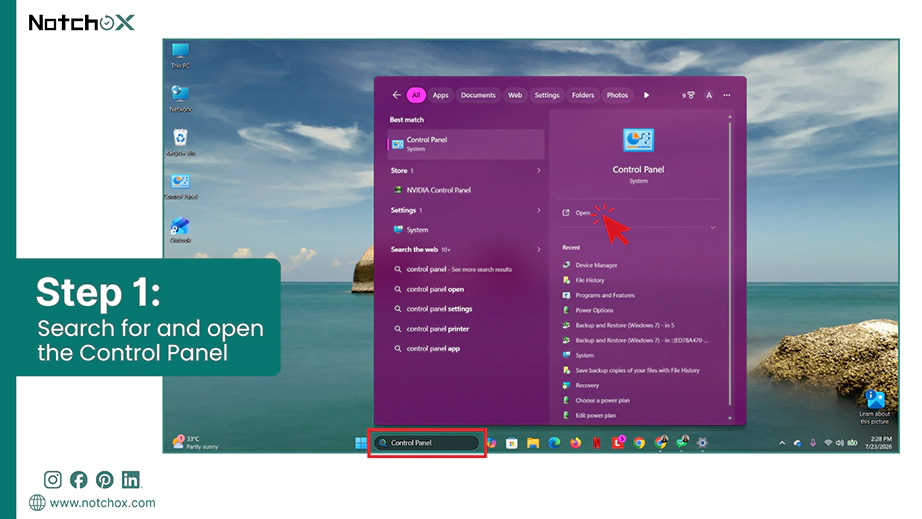
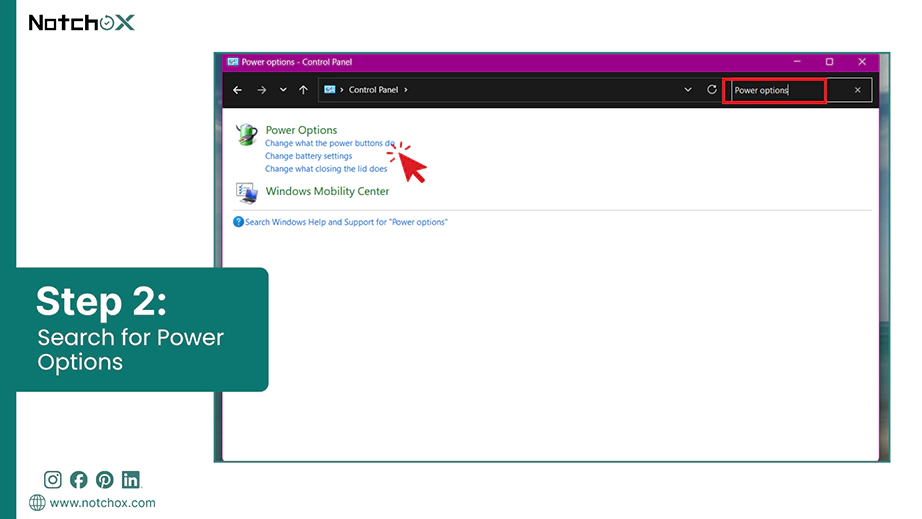
Search for and open the Control Panel using the Start Search bar.
In the Control Panel, search for Power Options.
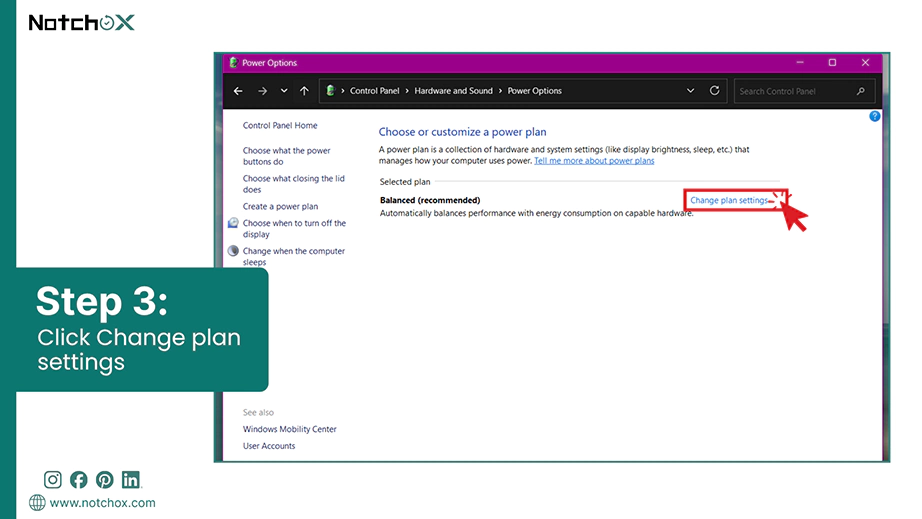
Under Select plan, click on Change plan settings.
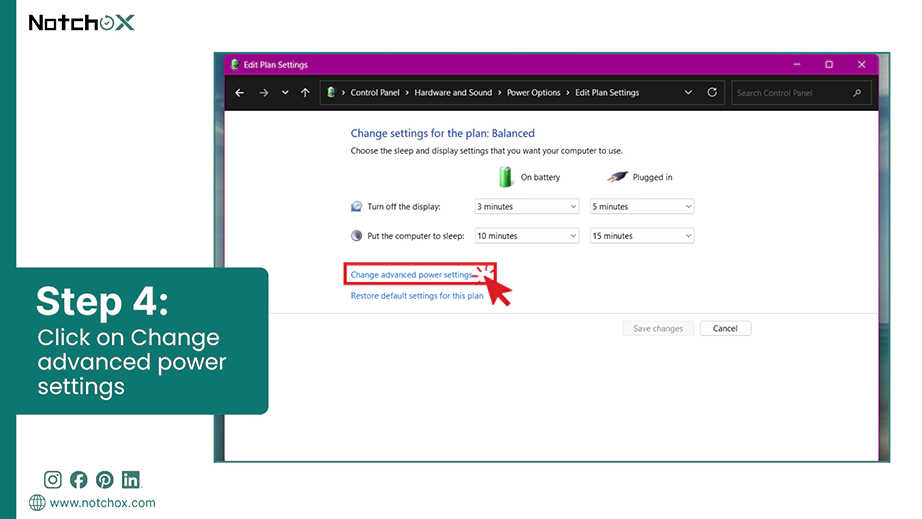
Click Change advanced power settings.
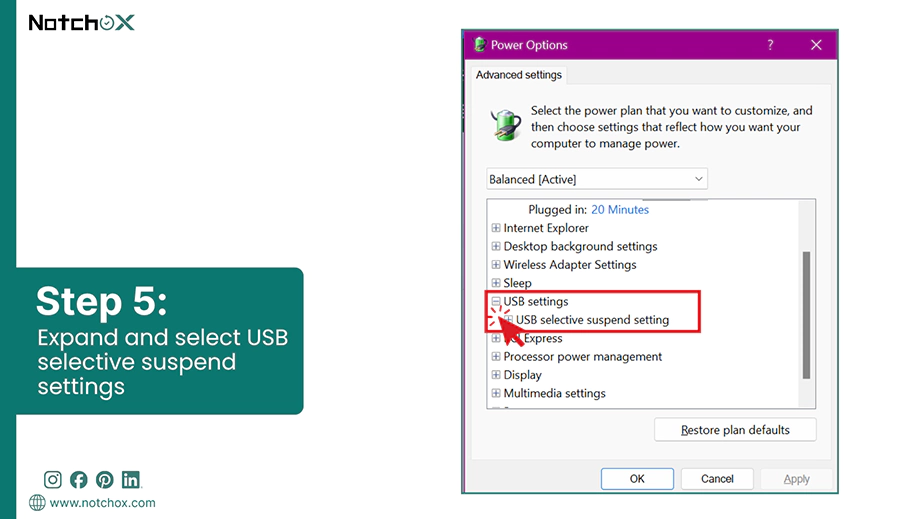
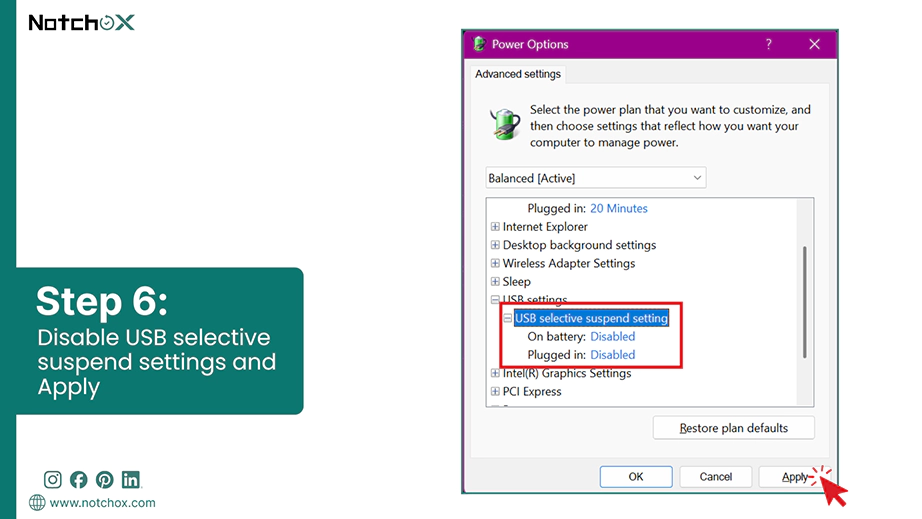
Click on the expand icon (+) before USB settings, and click USB selective suspend settings.
Change the settings to Disabled for both “On battery” and “Plugged in,” and click Apply.
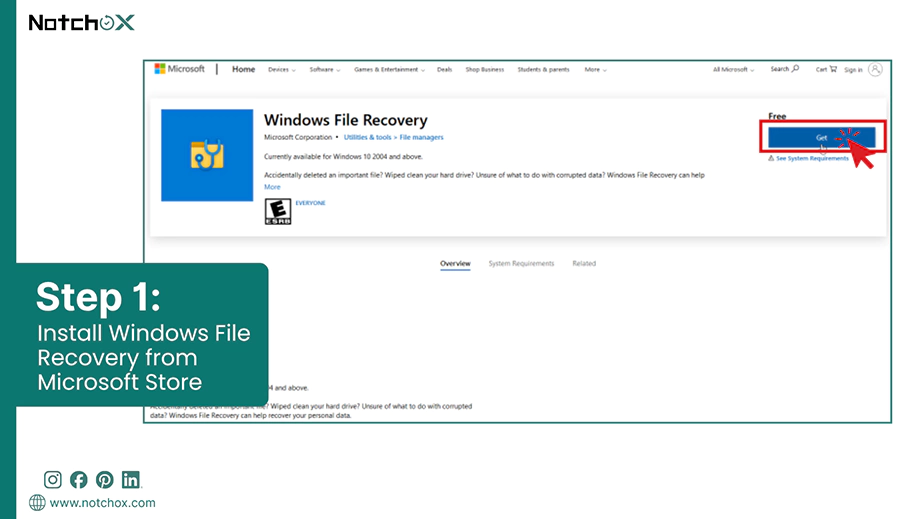
If the drive is detected but the files are gone, or the partition is “RAW”, you can use the Windows File Recovery app from the Microsoft Store. USB flash drives use FAT32 or exFAT. For these file systems, you must use Signature mode (/x).
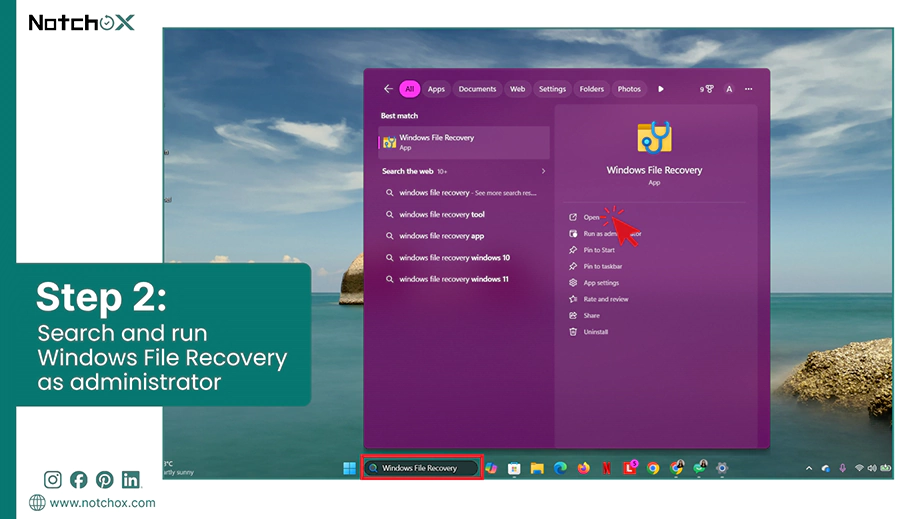
Search for “Windows File Recovery” in the Start menu and select Run as administrator.
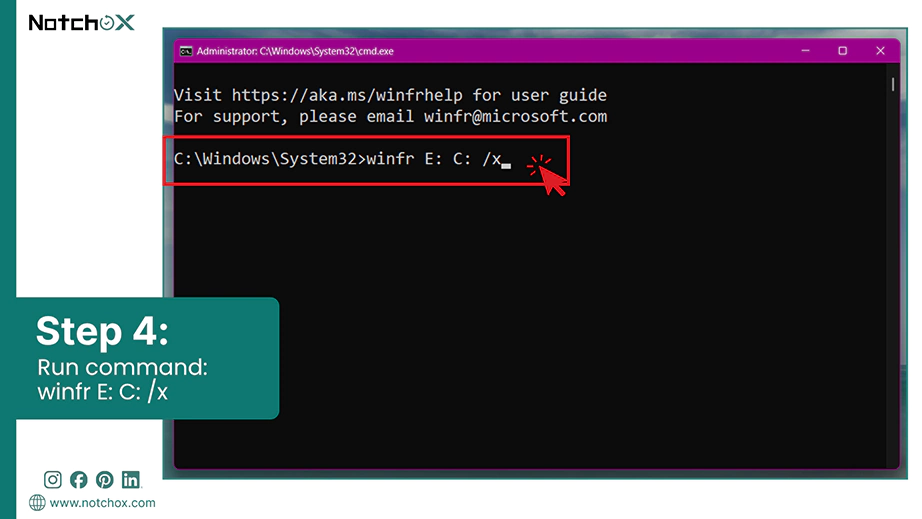
Note your USB’s drive letter (e.g., E:) and a different destination drive for the files (e.g., C:).
Run the command to deep scan all files.
winfr E: C: /x
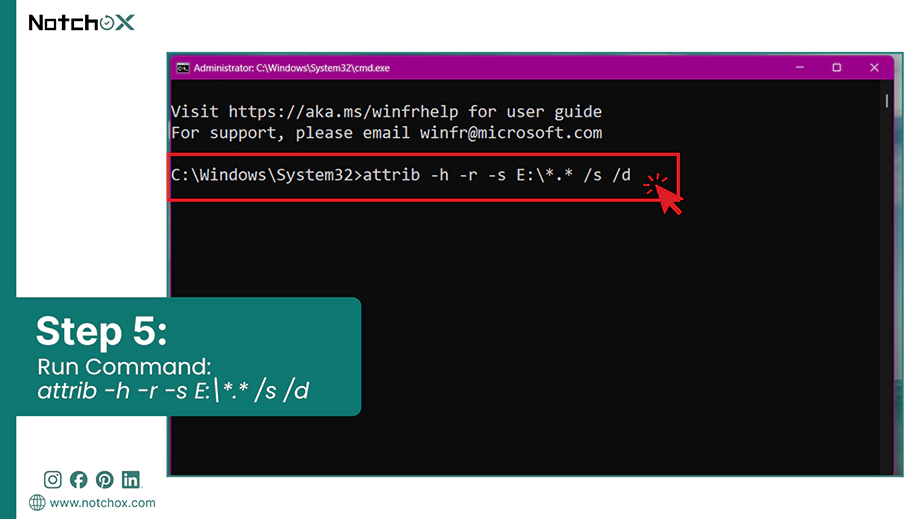
If the USB appears empty but the space is used, first try this CMD command to reveal hidden files.
attrib -h -r -s E:\*.* /s /d (replace E with your USB letter)
Mac Methods
When an external drive doesn’t show up on a Mac, it typically indicates a communication failure between the hardware and the operating system’s mounting process. Unlike Windows, which may assign a drive letter even to corrupted volumes, macOS requires a successful “mount” to make a drive visible in Finder.
Let’s move forward and answer your query on how to recover external hard drive that is not detected in Mac.
Fix Finder Sidebar
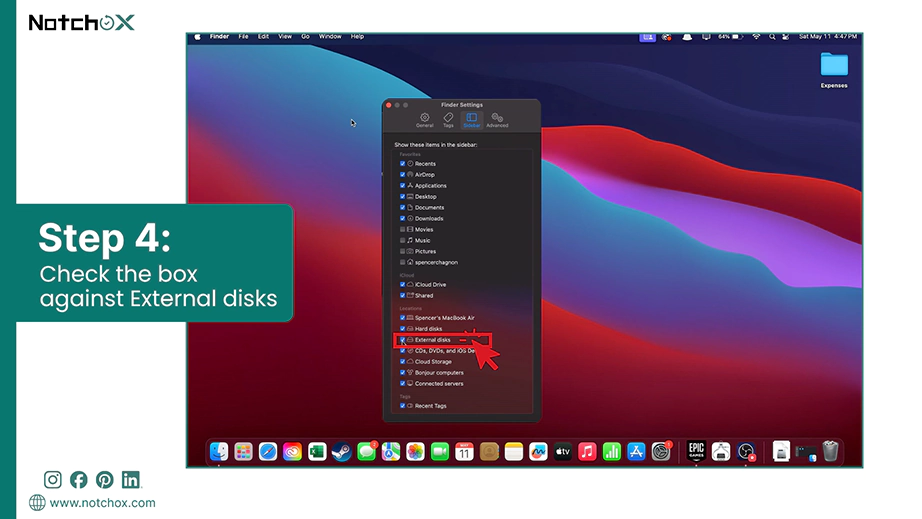
When an external drive is not showing up in Finder, fixing the Finder sidebar is the first solution. It troubleshoots the visibility settings, which show connected devices displayed in your file browser. It may not appear in the sidebar due to Finder’s specific sidebar preferences being disabled.
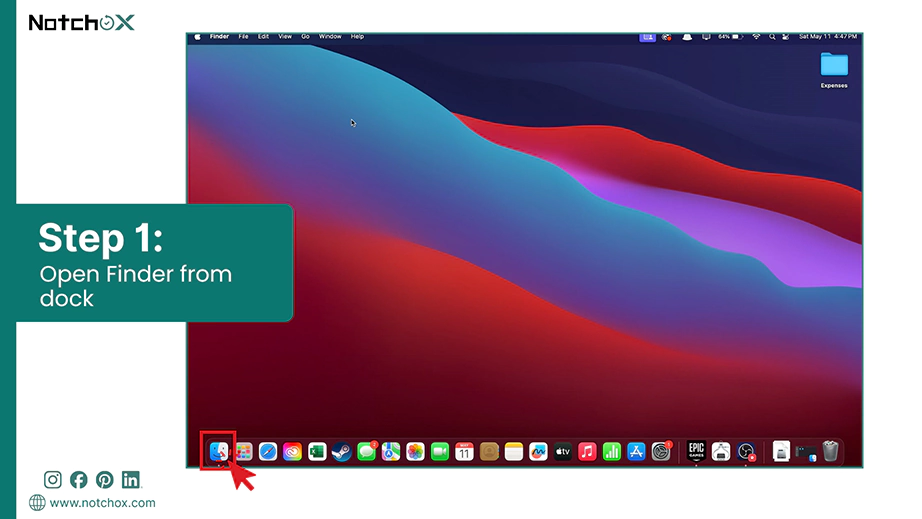
Open a new Finder window by clicking the blue smiley face icon in your Dock.
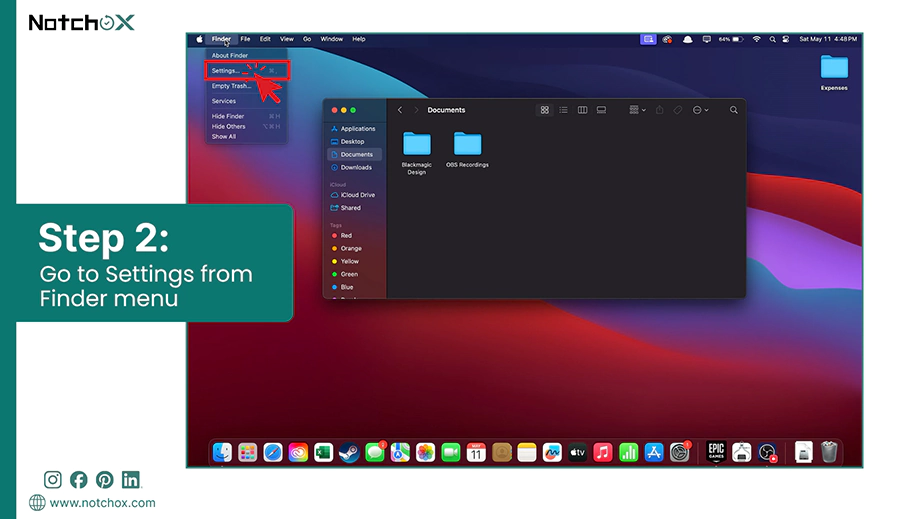
Click Finder in the top menu bar and select Settings.
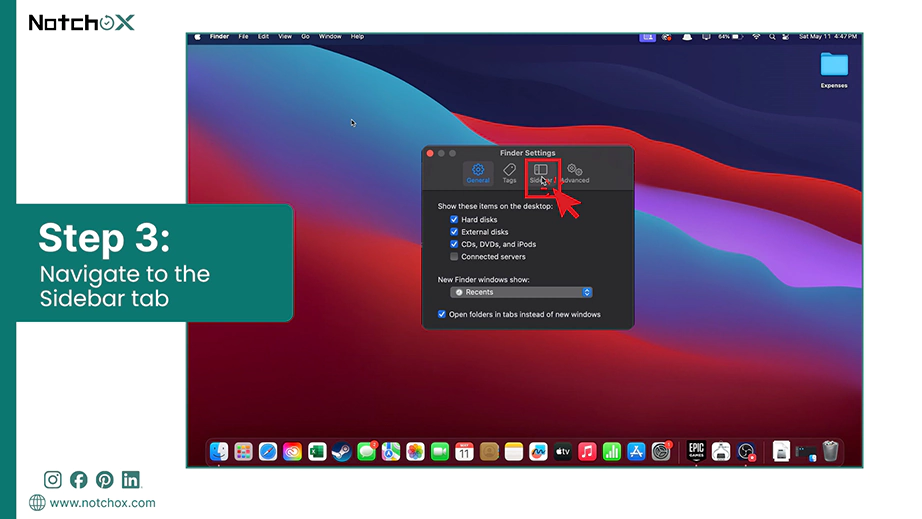
Go to the Sidebar tab at the top of the settings window.
Check the box next to External disks under the Locations section.
This will immediately show your external hard drive in the Finder’s sidebar, and you can easily access your files from it.
Disk Utility
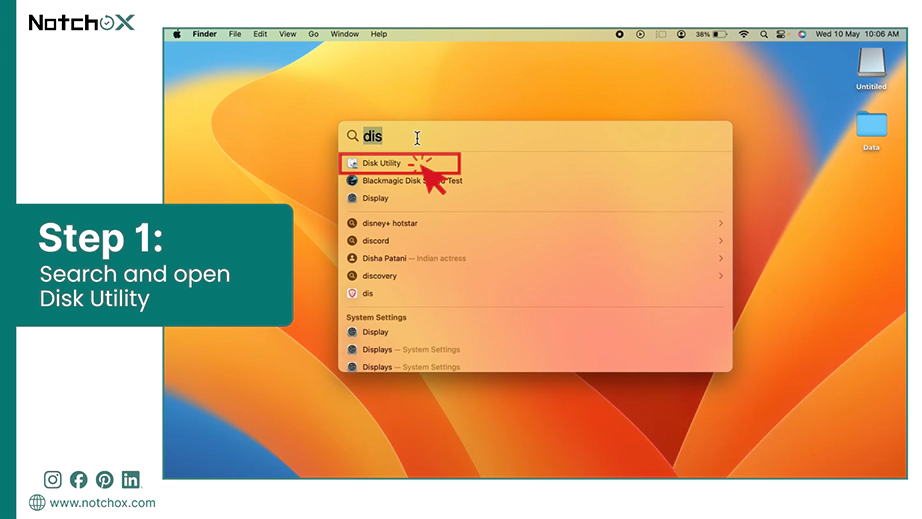
Disk Utility is macOS’s primary system tool for managing internal and external storage devices. It serves as a low-level diagnostic and management hub, allowing you to interact with drivers that the Finder might ignore due to errors or mounting issues.
Shortcut: To open Disk Utility, simply press Command (⌘) + Spacebar, type “Disk Utility” and hit Enter.
Show in Finder
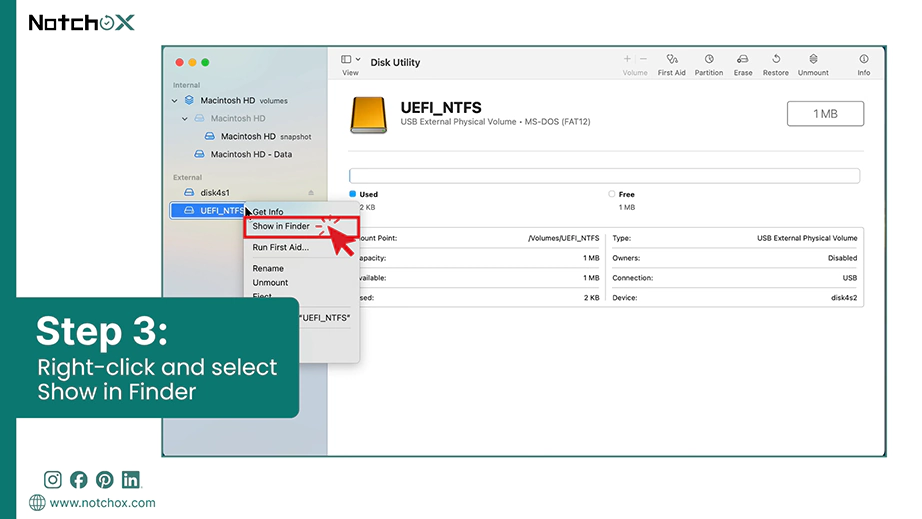
Sometimes the drive is actually mounted and healthy, but for some reason it fails to appear on your Finder. The Show in Finder feature in Disk Utility acts as a direct shortcut which you can use to bypass the sidebar and desktop glitches.
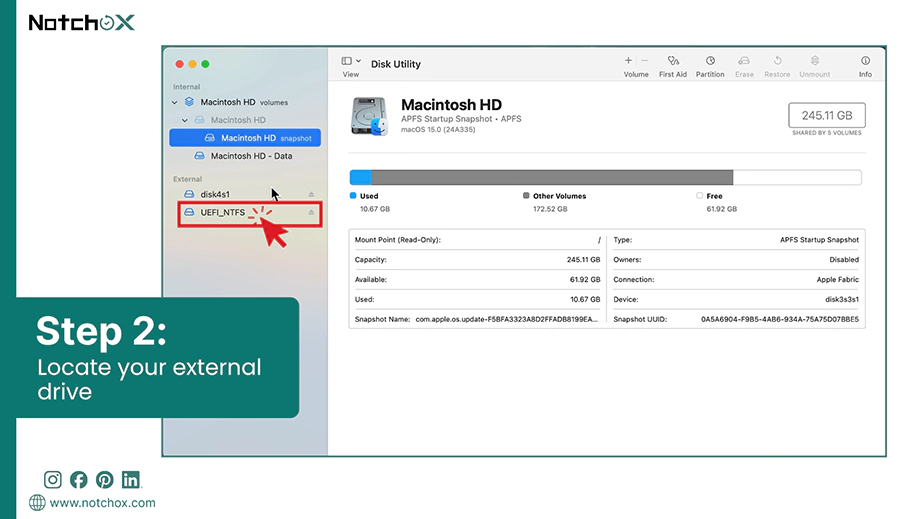
Open Disk Utility on your Mac.
From the list of drives on the left, locate your external drive. If the drive icon is solid (not greyed), it is successfully mounted.
Right-click on the volume name and select Show in Finder from the context menu.
This will automatically show your drive in the Finder sidebar.
Manual Mount
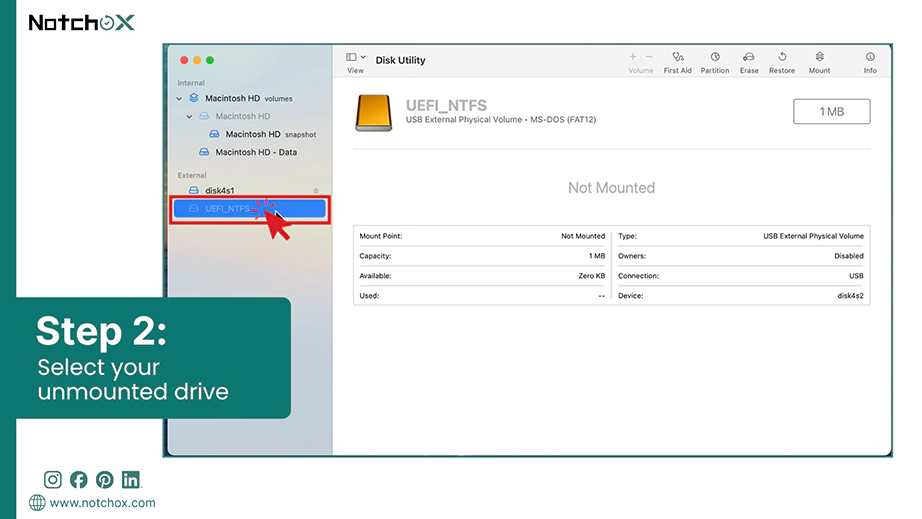
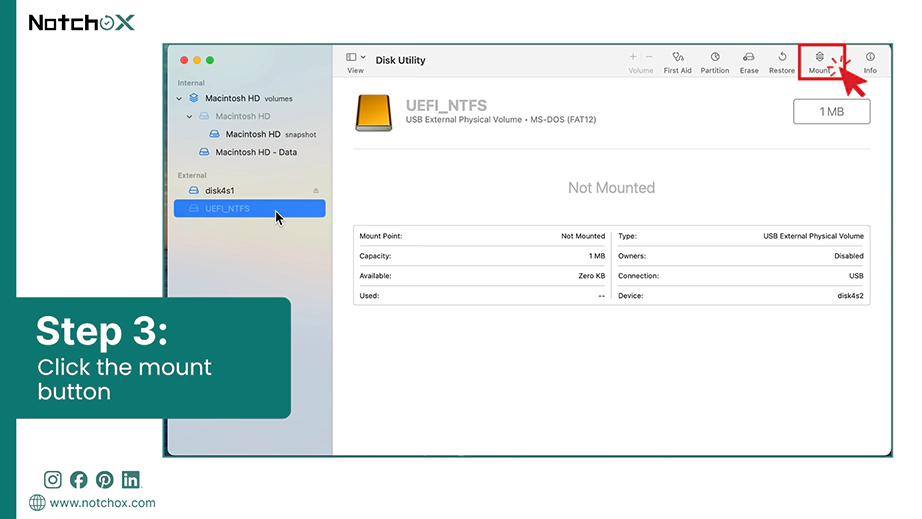
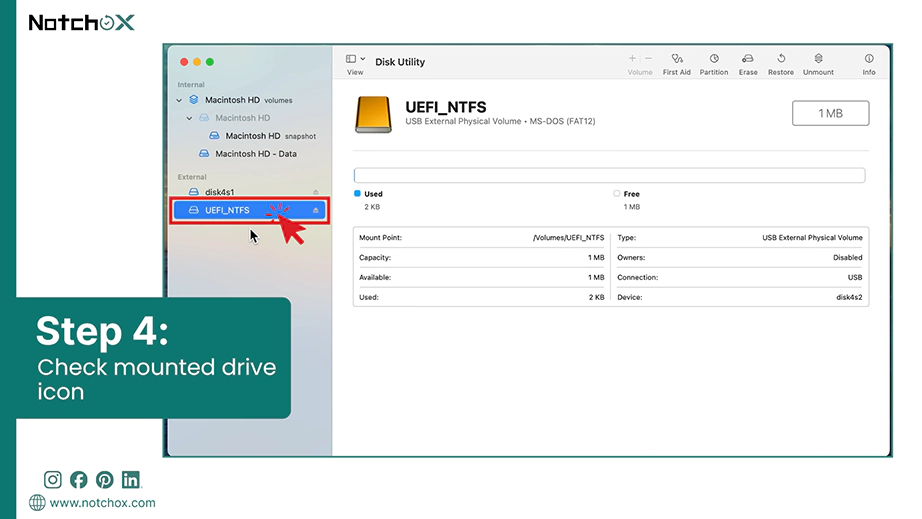
If Show in Finder doesn’t work, the issue might be in the mounting drive. Mounting is the final bridge between your physical hardware and the operating system. When a drive is unmounted, the Mac knows it is physically there, but it refuses to open its data. Using the manual mount feature forces the system to attempt this connection.
Open Disk Utility on your Mac.
Look at the left sidebar and select your unmounted drive (typically greyed out).
From the top toolbar, click the Mount button.
Once mounted, the icon will turn solid black/blue, and the Mount button will change to Unmount.
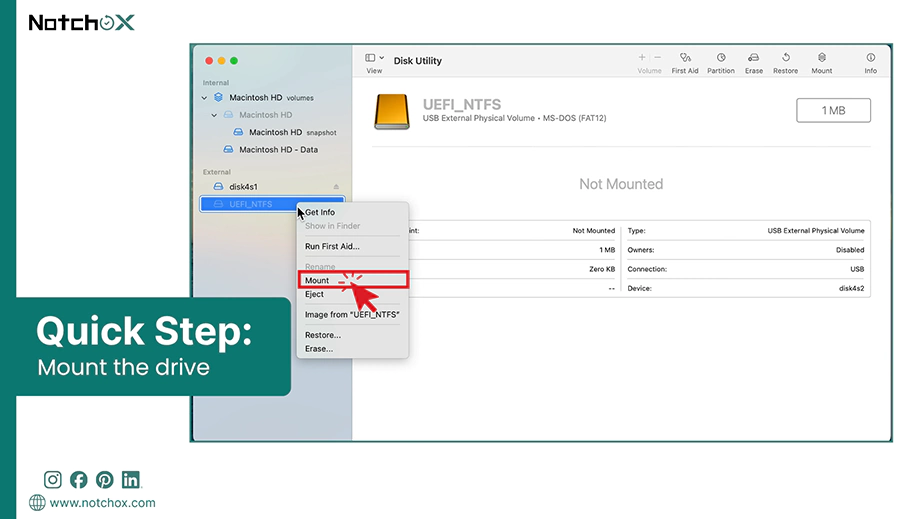
Hack: If your drive is not visible in Finder but shows mounted in Disk Utility, open Disk Utility > right-click the drive > select Unmount > then again right-click the drive > select Mount.
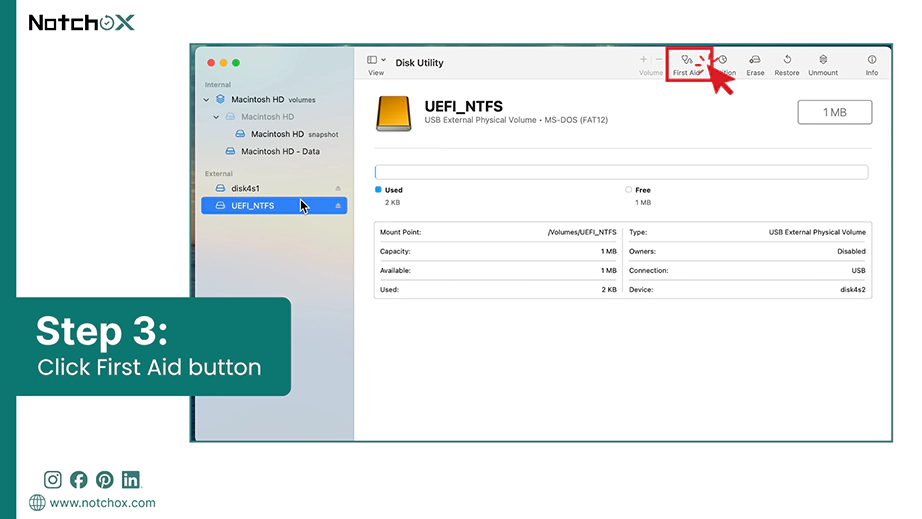
First Aid
If none of the above methods works, it’s because the file system is corrupted. Use this First Aid feature in Disk Utility to fix the drive not showing up.
Open Disk Utility on your Mac.
Select the disk/volume that is not showing up in the Finder.
Click the First Aid button in the top toolbar.
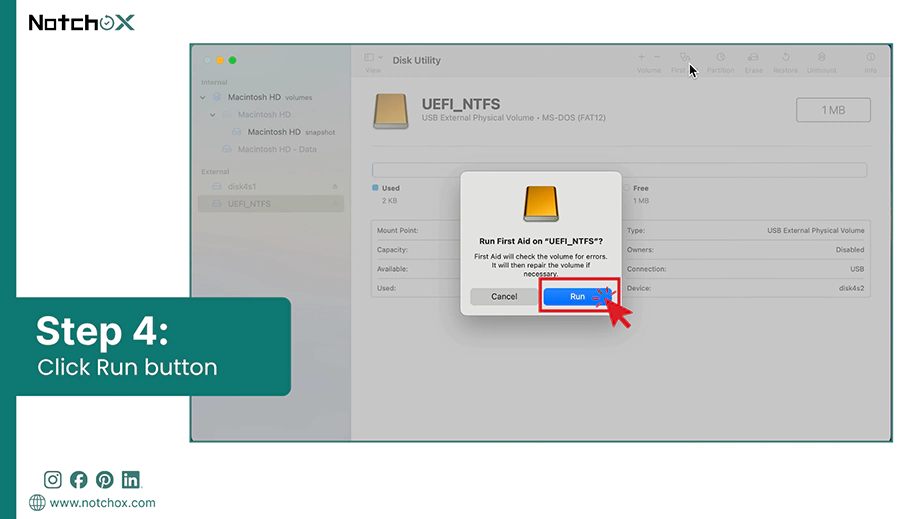
Click Run. Disk Utility will scan the driver’s directory structure and attempt to repair any nodes or catalogues that are preventing it from showing up.
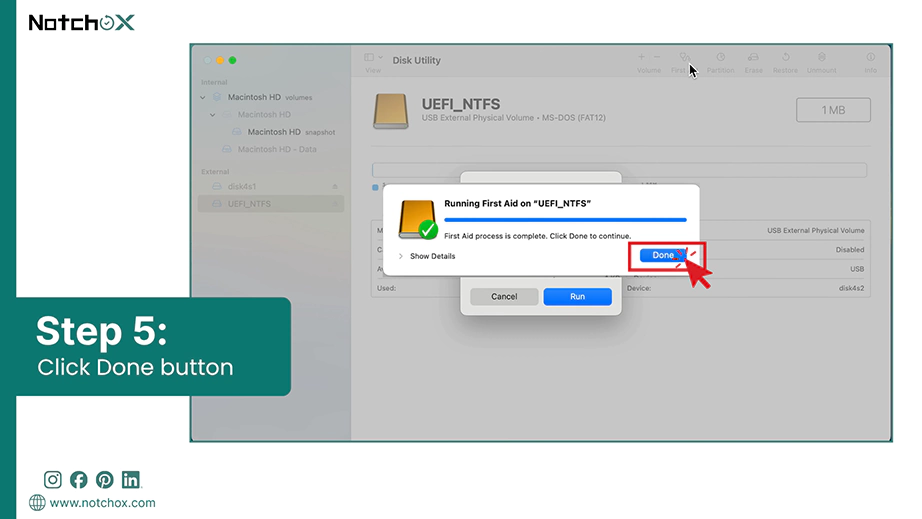
Once finished, click Done.
Go back to your Finder and see your volume is now visible and accessible from there.
Terminal Command
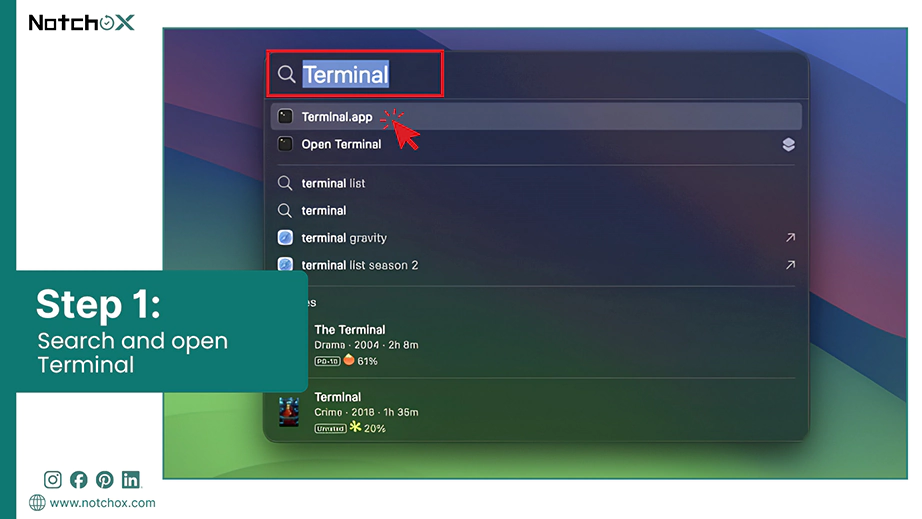
If your external hard drive isn’t appearing in the Finder or Disk Utility, you can use Terminal to bypass the GUI and interact directly with the macOS disk management system.
Press Cmd + Space and type “Terminal.” Click and open the Terminal.
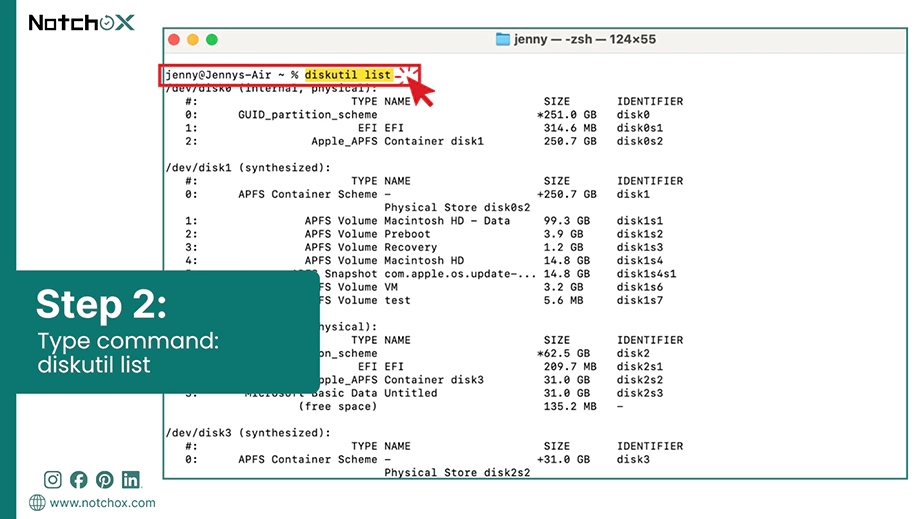
Type diskutil list and press Enter.
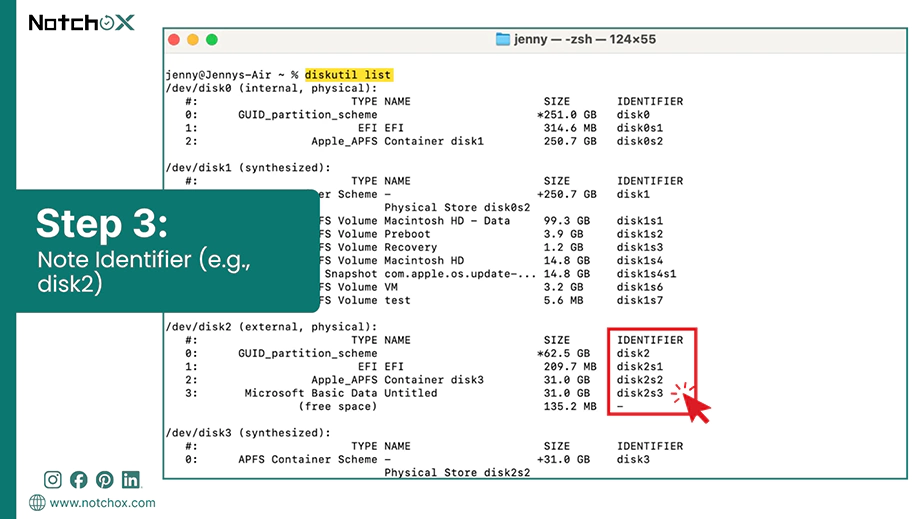
Look for your external drive’s name and size in the list. Note the identifiers in the IDENTIFIER column (e.g., disk2).
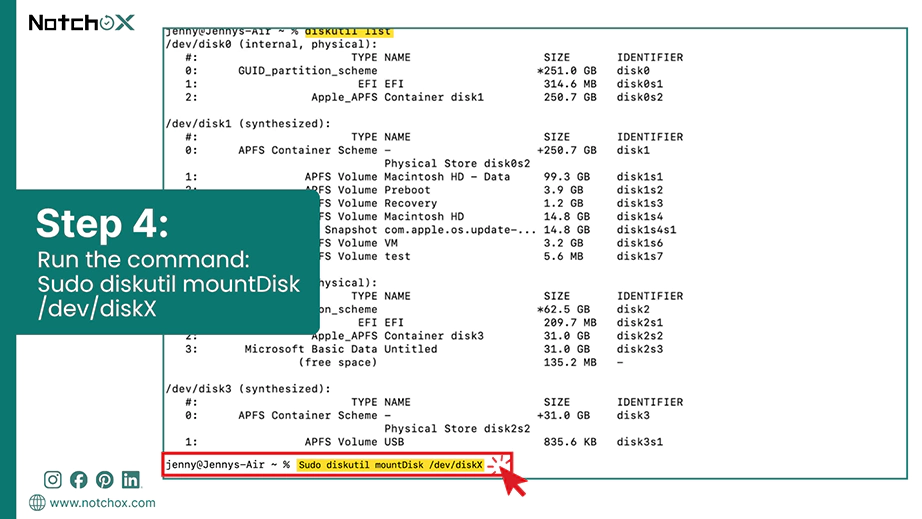
If the drive is detected but won’t open, you need to mount the drive to recover data from external hard drive not showing up.
Run the command to mount the disk:
Sudo diskutil mountDisk /dev/diskX (replace X with your drive number).
Enter your password and wait for the process to complete.
Warning: If Terminal does not list your drive after running diskutil list, it may have a physical hardware failure or a faulty cable that software commands can not fix.
Reset NVRAM
Resetting NVRAM (Non-Volatile Random-Access Memory) is a deep refresh for Mac’s internal settings. When an external drive isn’t showing up, the NVRAM may be holding on to a glitch or incorrect configurations for your USB ports, which is preventing the hardware from being recognised.
For Intel-Based Macs:
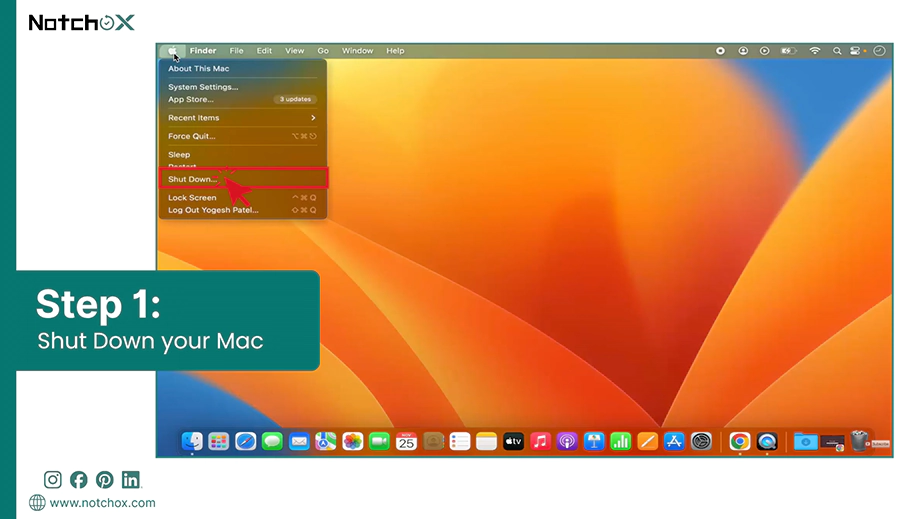
Go to the Apple menu and select Shut Down.
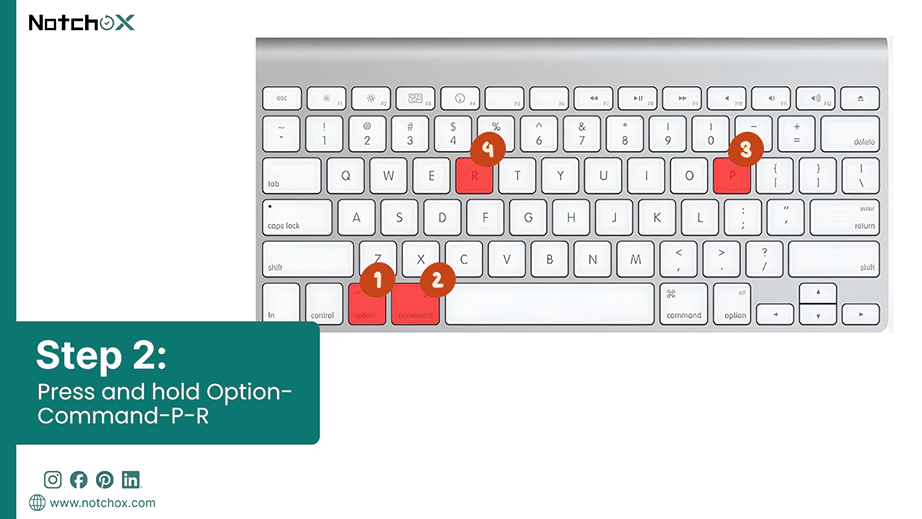
Press the key combo: Option-Command-P-R for at least 20 seconds.
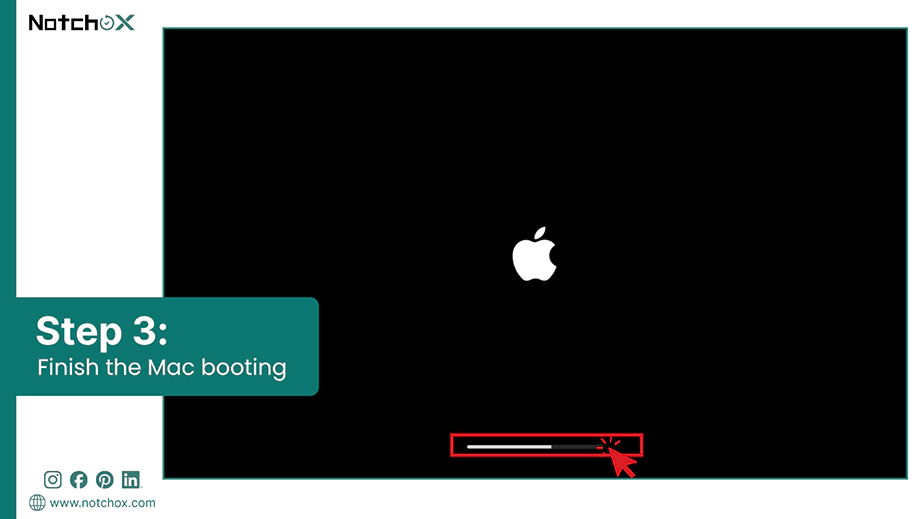
Let go of the keys when you see the Apple logo and allow the Mac to finish booting normally.
For Apple Silicon Macs, simply restart your Mac from the Apple menu; they automatically test the NVRAM during startup.
Wrapping Up
It is clear that a “missing” drive isn’t always a dead one — though if yours has truly failed, you can still recover files from a crashed hard drive. More often, it is just a communication breakdown between your hardware and software. Whether you are able to recover data from external hard drive not showing up using the Windows File Recovery tool or Mac Disk utility, you have now got the ultimate toolkit to recover data from an external hard drive not showing up in 2026.
Remember, the golden rule of data recovery is to act fast, stop writing new data to the drive and start with non-destructive quick fixes we discussed before moving to deeper system repairs.
Frequently Asked Questions (FAQs)
Q1: How to recover data from an external hard drive not showing up?
Ans: To recover data from an external hard drive not showing up, check Disk Management (Windows) or Disk Utility (Mac). If the drive is listed there but not in your folders, use data recovery software like Notchox to scan and recover the data.
Q2: How to recover external hard drive that is not detected?
Ans: Try the initial quick fixes to recover external hard drive that is not detected:
Switch USB port
Try a different USB cable
Connect to a different computer
Listen for an unusual sound from the Drive
If still not detected, use Windows built-in tools (chkdsk, disable USB selective suspend, or Windows file recovery) or Mac tools (fix Finder sidebar, disk utility, terminal commands, or reset NVRAM).
Q3: Can we recover data from an undetected hard disk?
Ans: Yes, provided the computer’s Disk Management can still see the hardware. If the drive is not shown there, too, first fix the drive, then use data recovery software to recover data.
Q4: How to recover lost data from an external hard disk?
Ans: To recover lost data from an external hard disk, connect it to your computer and run a specialised data recovery software such as Notchox to scan for deleted or lost data.
Try plugging it into a different USB port or computer.
Update the USB drivers in Device Manager on Windows.
Check the USB drive in Disk Utility on Mac.
Q6: How to access undetected hard drive?
Ans: To access an undetected hard drive:
On Windows – Check if it needs a drive letter assigned in Disk Management
On Mac – Use Disk Utility to manually mount the drive if it hasn’t appeared automatically.
Q7: How do I recover my external hard drive that is not detected by Mac?
Ans: Methods to recover an external hard drive that is not detected by Mac:
Fix Finder sidebar
Disk Utility to Show in Finder, Manual Mount, and First Ad
Terminal Commands
Reset NVRAM
Q8: Is my hard drive dead or just not detected?
Ans: If the external drive spins and lights up, it’s likely just a detection issue you can fix. If it’s silent or clicking, the hardware has likely failed.
Kajal Singh is a Data Recovery Writer at Notchox, specializing in data recovery, storage systems, RAID, and digital forensics. She writes technical processes, tools, and cases into clear, engaging articles, blogs, and guides. Kajal does thorough research, deep analysis, and collaborates with experts to produce high-quality and engaging content that is easy to understand for every reader.