Recovering an unsaved Word document using the built-in AutoRecover pane is the easiest and most direct way. Other methods include the Manage Document menu, searching hidden system folders for backup .asd and .tmp files, checking the Recycle Bin, and OneDrive backup. Microsoft Word is a tool used by millions worldwide to create documents. It includes these background safety features that prevent data loss from sudden closure or crashes.
This recovery guide details every official recovery method for both Windows and Mac users. You will learn how to access the Microsoft document recovery panel, temporary files, the managed document feature, and more to get back your unsaved Word document.
Quick Answer: To quickly recover an unsaved Word document, open Microsoft Word, go to File, and click Info. Click Manage Document and select Recover Unsaved Documents.Apart from this, you can also recover the unsaved document from the Document Recovery pane, manually searching hidden system paths for AutoRecover (.asd) files or the Temporary Files. For accidentally deleted files, check the Windows Recycle Bin or macOS Trash, or OneDrive; for complex scenarios, Notchox Data Recovery Software can help recover Word files.
How to Recover Unsaved Word Document: Official Microsoft Methods
Microsoft Word provides built-in recovery systems designed to recover lost text after an unexpected shutdown or accidental closure. When a document is interrupted before a manual save is executed, the application saves the background backup state.
The common ways for how to recover unsaved Word document include: automated recovery panes, the localised Word application root directory, system temporary folders, and the local system recycle bin. Since these are the native tools, they are completely safe to use on Windows or Mac.
This section covers structural methods to extract, convert, and restore unsaved .docx, .asd, and .tmp files across both Windows and macOS using the official Microsoft documentation protocols.
Method 1: Searching for AutoRecover Files Automatically
When Microsoft Word closes abruptly due to power loss or an unexpected software glitch, you can use Microsoft Word’s AutoRecover feature. It recovers the system-saved snapshot of the active document. Using this, Word can automatically scan internal backup directories and restore your unsaved session.
For Windows:
If you are running Microsoft Word on a Windows PC, the software relies on its startup routine to immediately bring back any abruptly closed sessions. Follow these steps to restore your document directly from the native application layout:
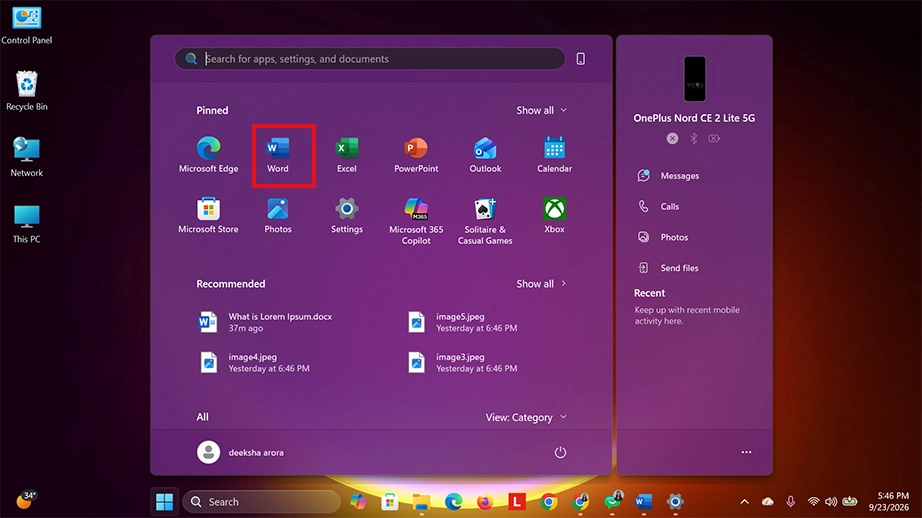
Relaunch Microsoft Word from your Windows Start menu or Desktop.
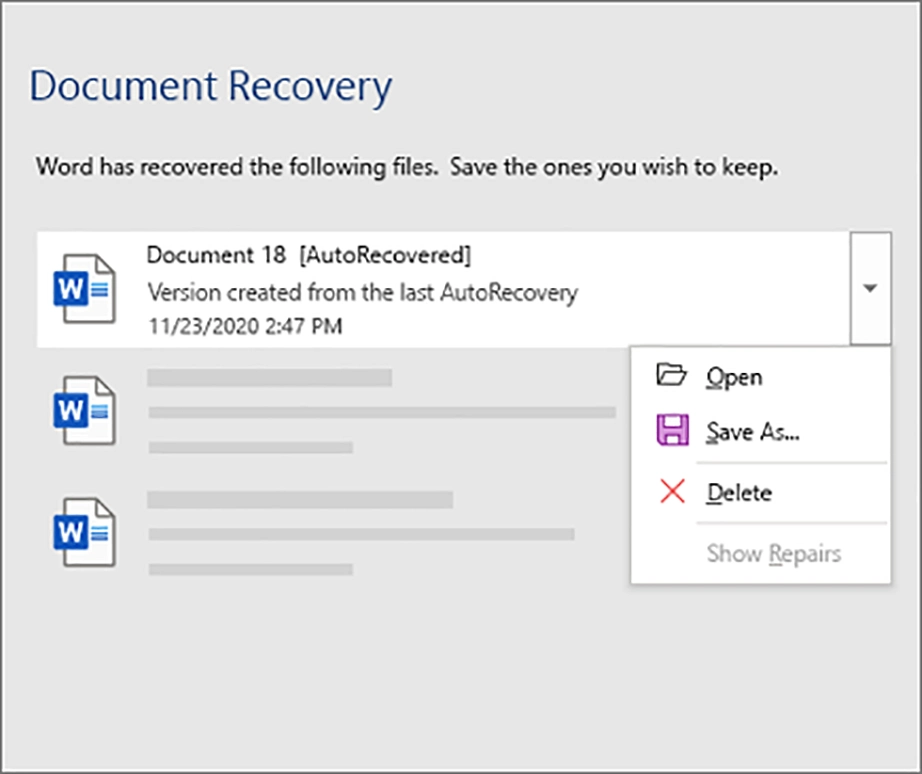
Look for the Document Recovery pane on the left side of your screen.
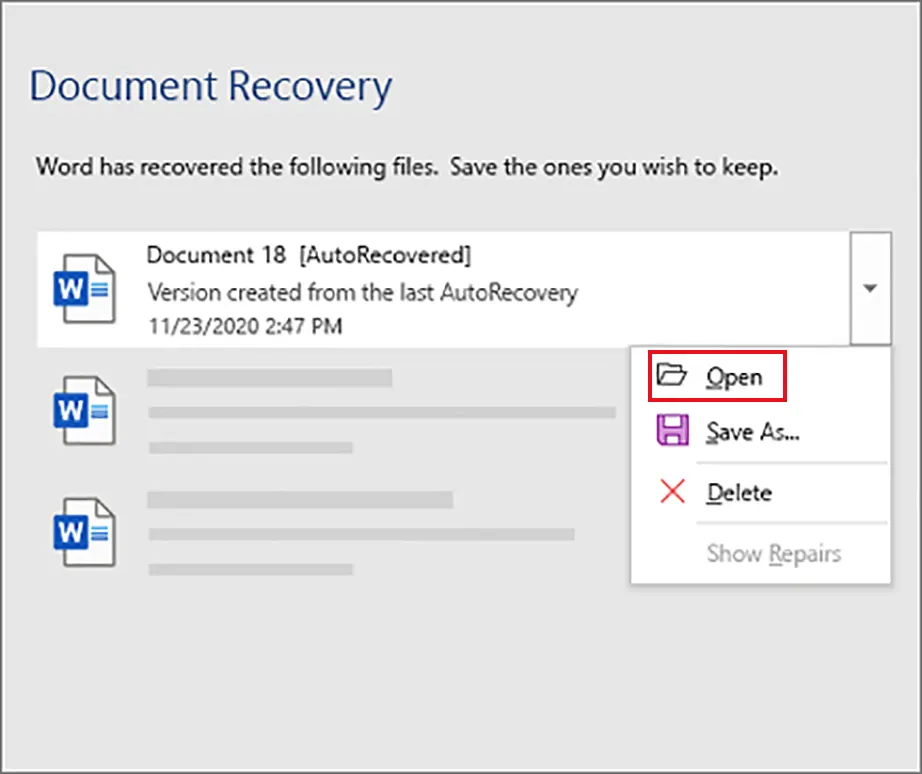
Review the time and file. Right-click on the specific document labeled [AutoRecover] and select Open.
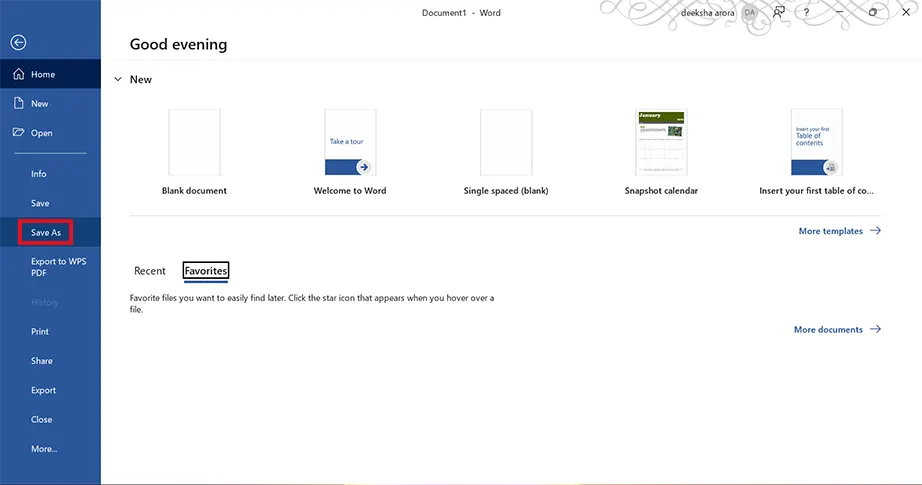
The unsaved Word document will open. Go to File > Save As (or press Ctrl + S) to save the file.
For macOS:
For Apple users, Word for Mac uses its own recovery methods to protect active documents during sudden app closures. It’s slightly the same as how Word works in Windows. Use these steps to reopen your automated cloud or local draft files:
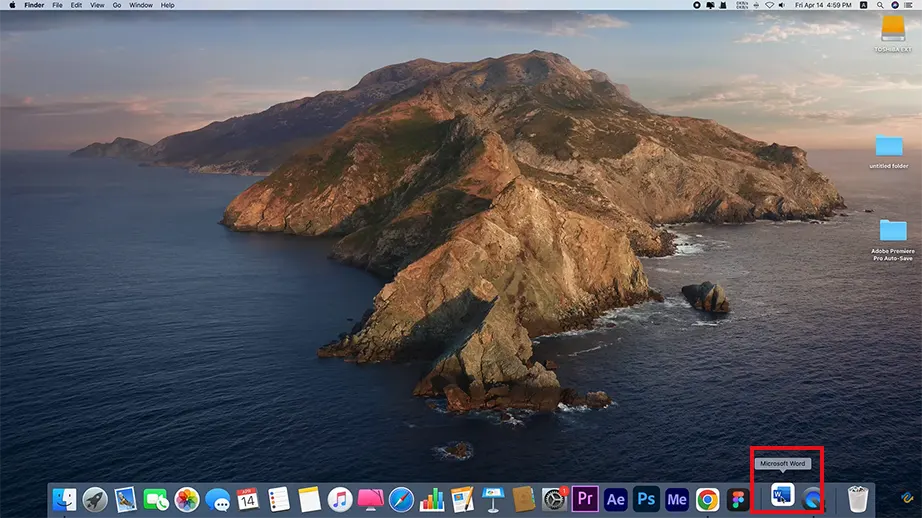
Relaunch Word for Mac after an unexpected shutdown or system crash.
Look at the screen for any background crash logs. Word will immediately open your last unsaved document.
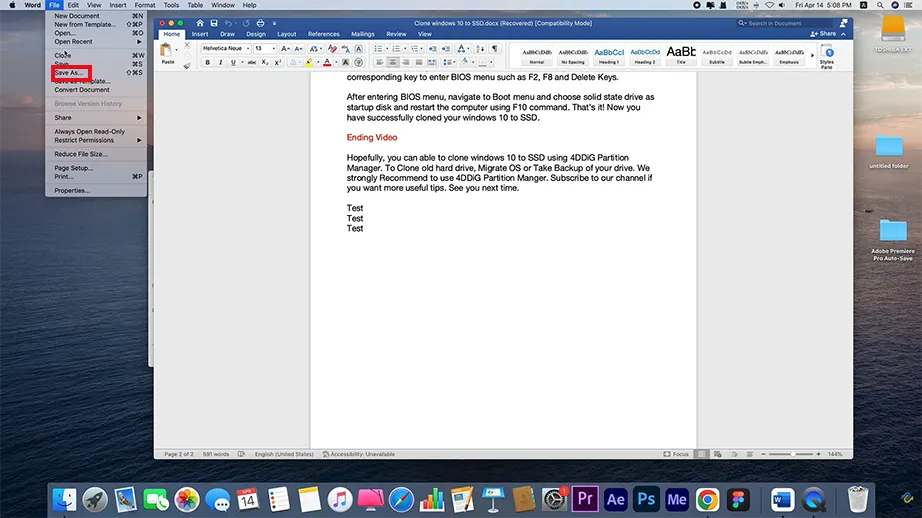
Click File > Save As right away to name your files and securely save them.
Fun Fact: The default document font changed from Times New Roman to Calibri in 2007.
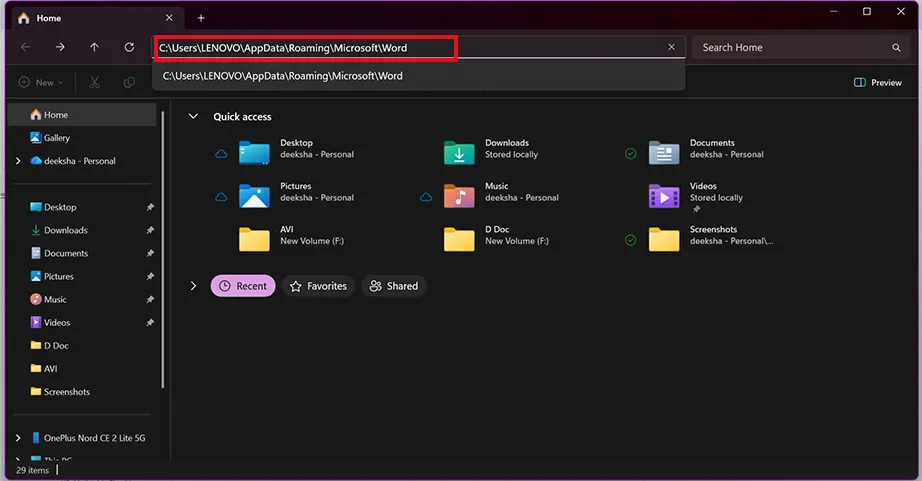
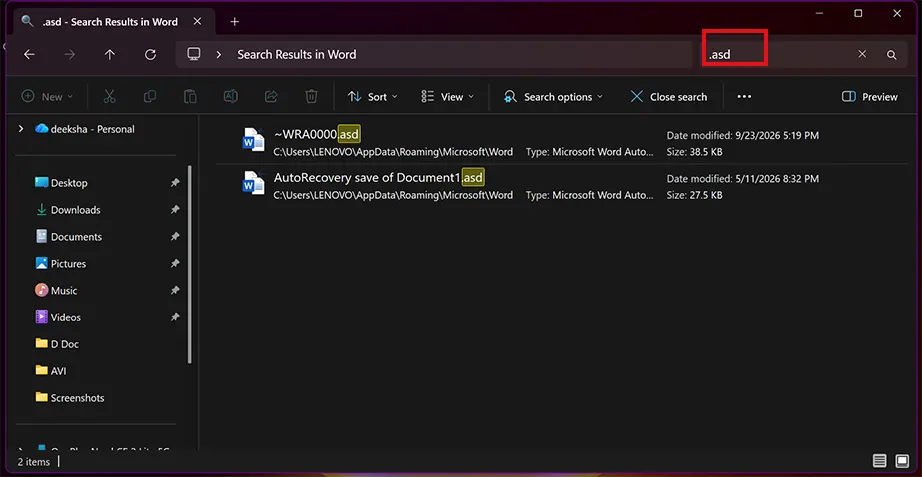
If Word did not automatically detect the unsaved Word document, you need to manually check the AutoRecover files. Word creates backup snapshots using the .asd (AutoRecover Storage Document) file extension and saves them in hidden directory paths. By manually locating these files, you can recover unsaved Word document directly from the hard drive.
For Windows:
So, if the last unsaved document didn’t open automatically, you can bypass the traditional Explorer search and go to the .asd data states. Use these steps to access the directory containing the .asd files of your Word document.
Open File Explorer on your PC.
Check these file locations for backup files (replace <UserName> with your username):
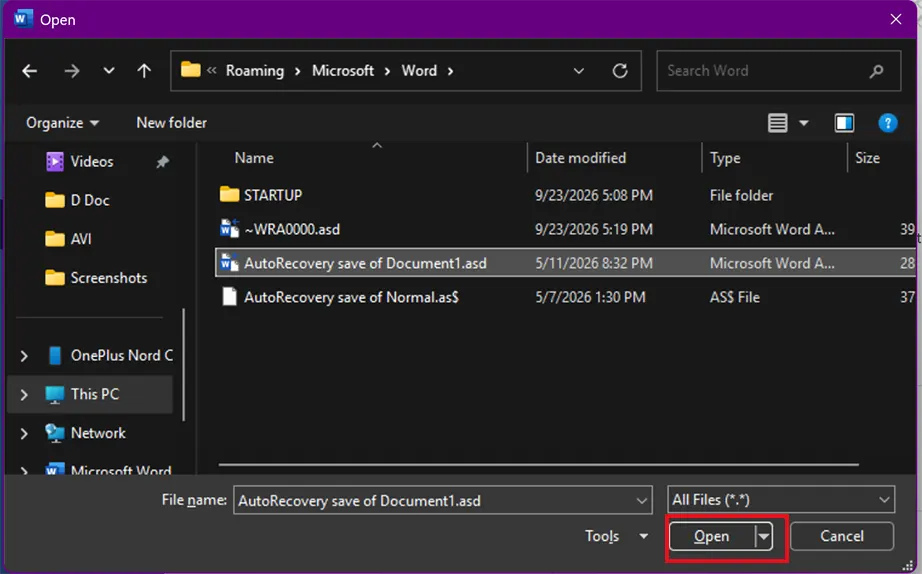
Search through the folder for any files that end with the.asd file extension.
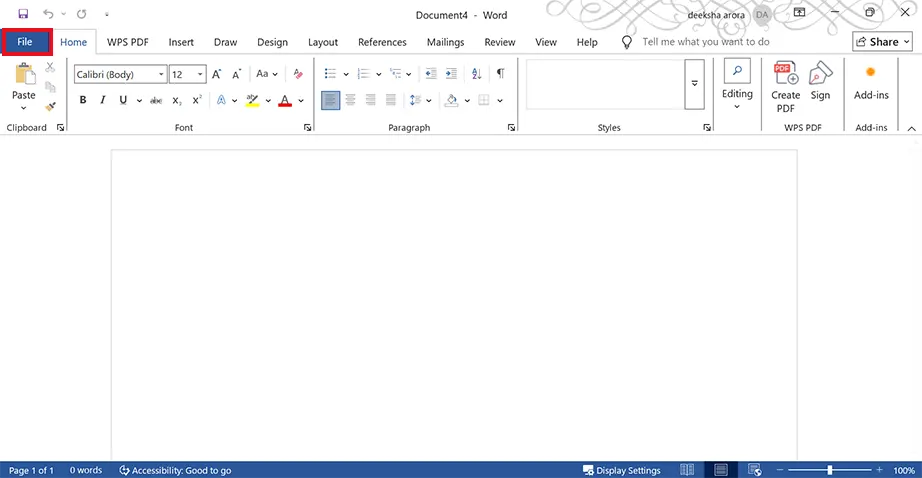
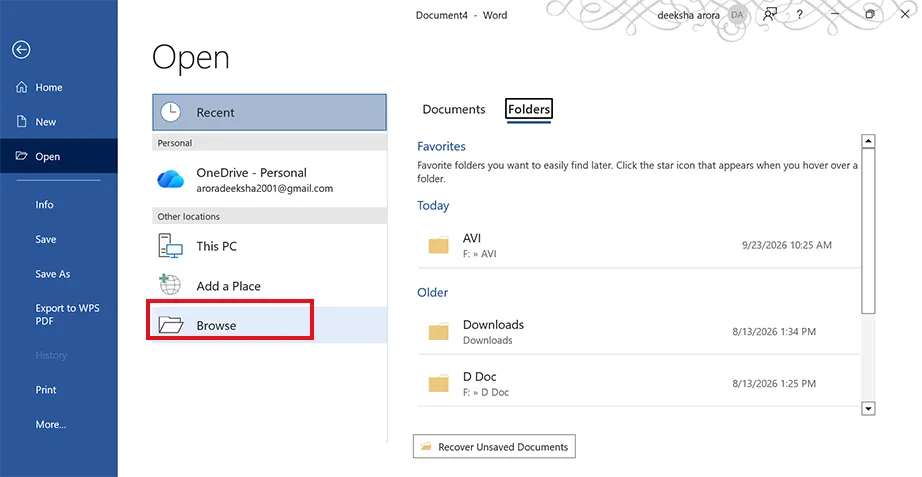
Launch Microsoft Word, go to the File menu.
Click on Open and select Browse.
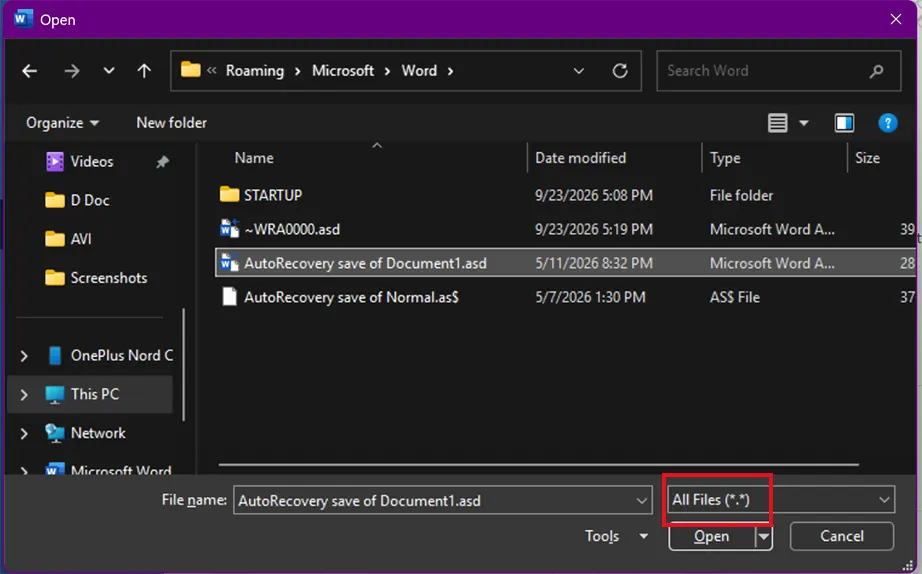
Select All Files (.) from the drop-down menu and select your.asd file.
Click the Open button to recover unsaved Word document.
For macOS:
On macOS, these hidden files are difficult to find. They are held inside a secure folder library that needs direct path navigation to access. Here’s how you can access the missing unsaved document’s directory:
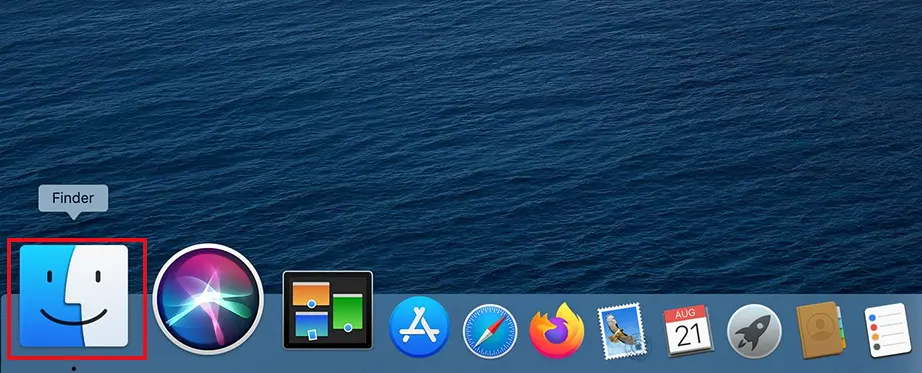
Click on the Finder icon in your Mac dock.
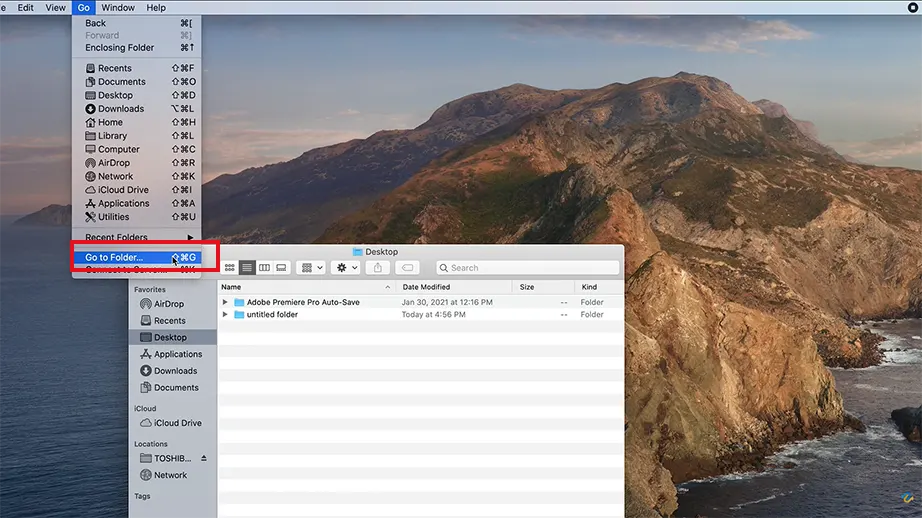
Go to File and select Go to Folder… or press the Command (⌘) + Shift (⇧) + G keys simultaneously to open the path navigation bar.
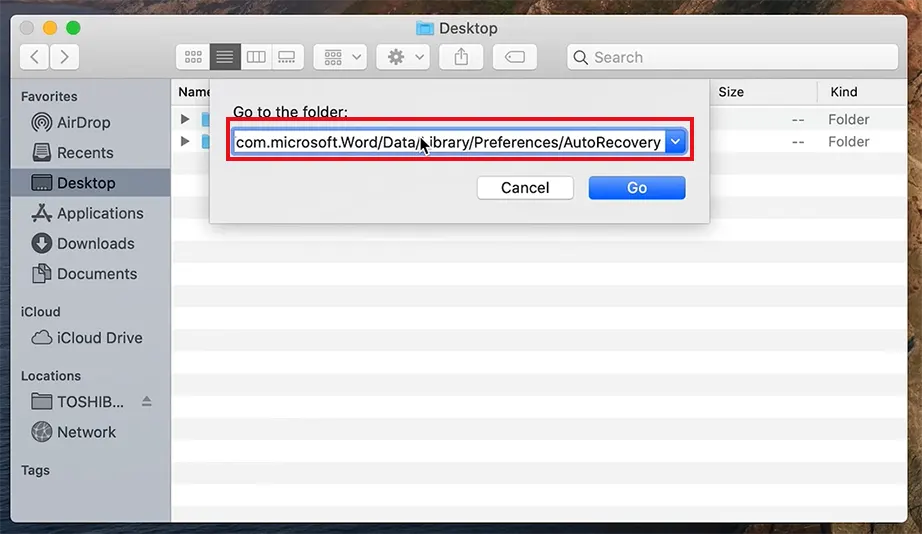
Copy and paste the direct file path (replace <username> with your username):
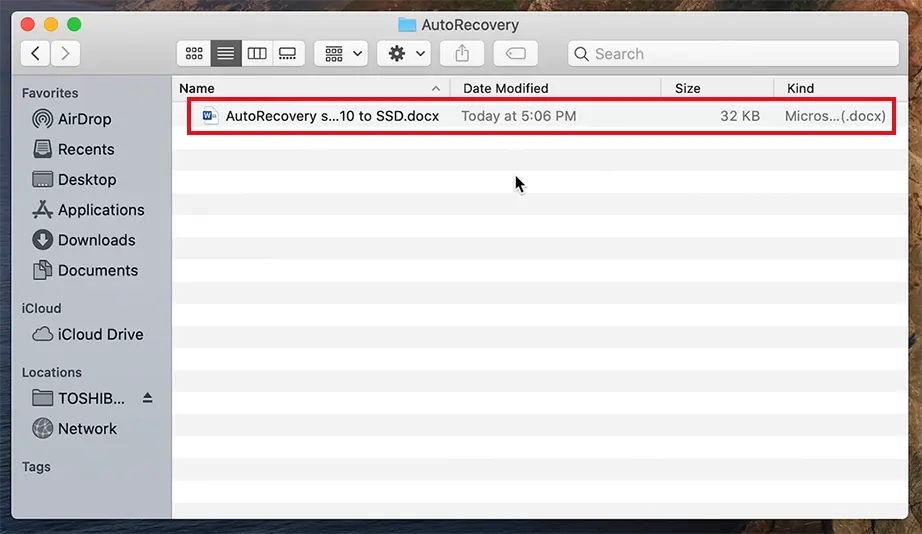
Look through the window for files containing the word AutoRecovery or matching the approximate time of your document loss.
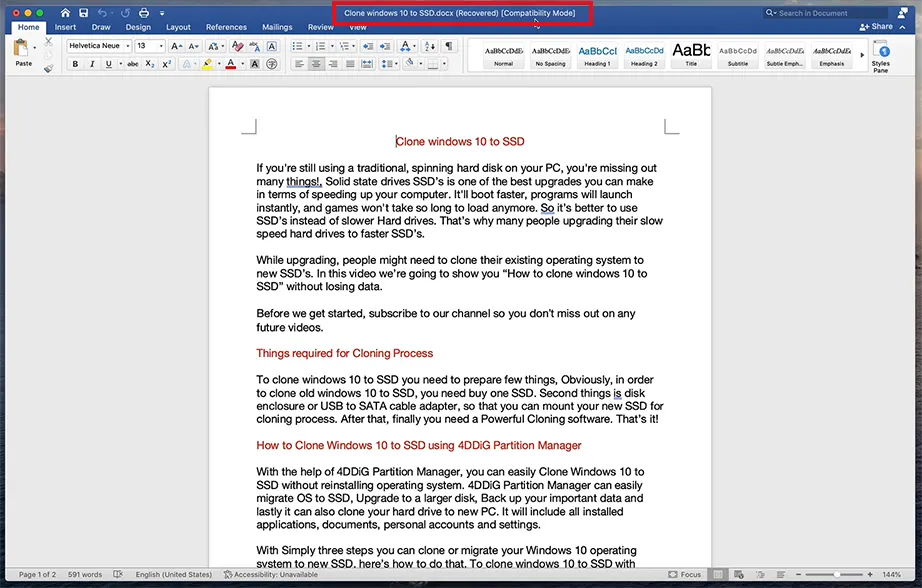
Copy the file to your desktop and add the.docx file extension to the end of the file name, and double-click to open it in Word.
Method 3: Searching for the Windows Temporary Files Directory
Temporary files are the local cache items that Windows creates when you are editing a document. This is managed by the operating system, not the Word application, so even if the application itself crashed, you can use these temporary Microsoft Word recover unsaved document.
For Windows:
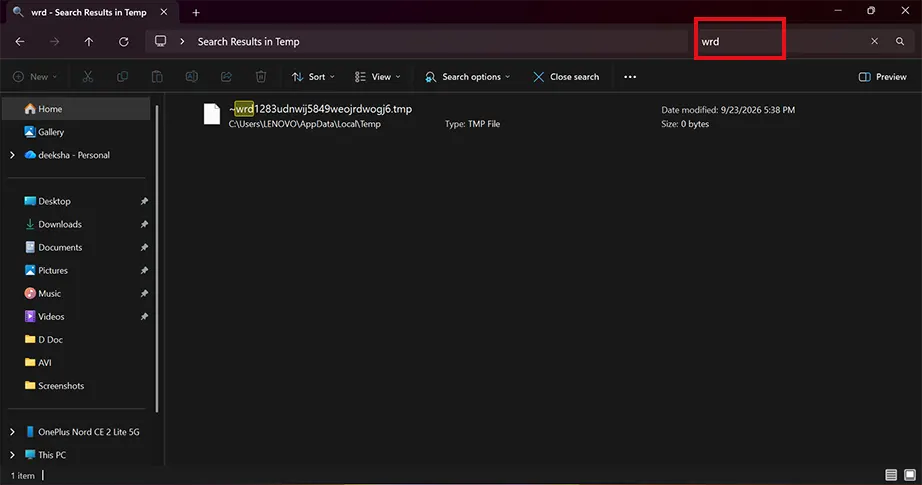
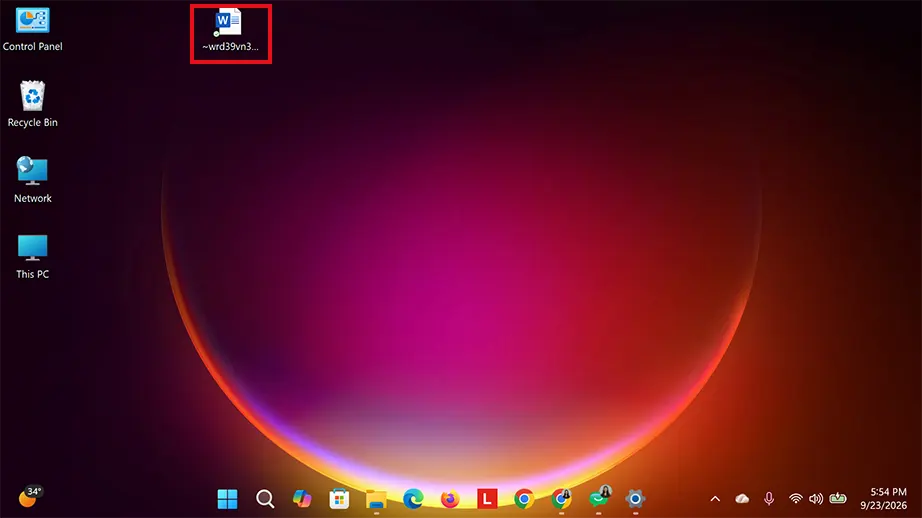
The system leaves behind unique string parameters (~wrd) inside your user profile cache data folders when files are open. These can be used to access your unsaved Word documents on Windows.
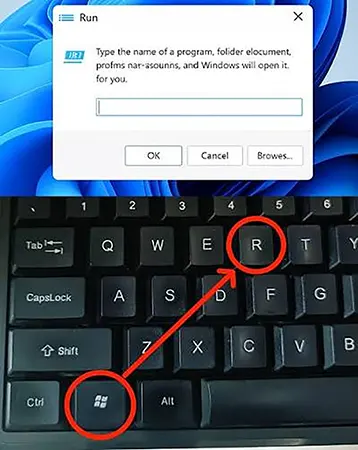
Press the Windows Key + R shortcut to open the Run dialog box.
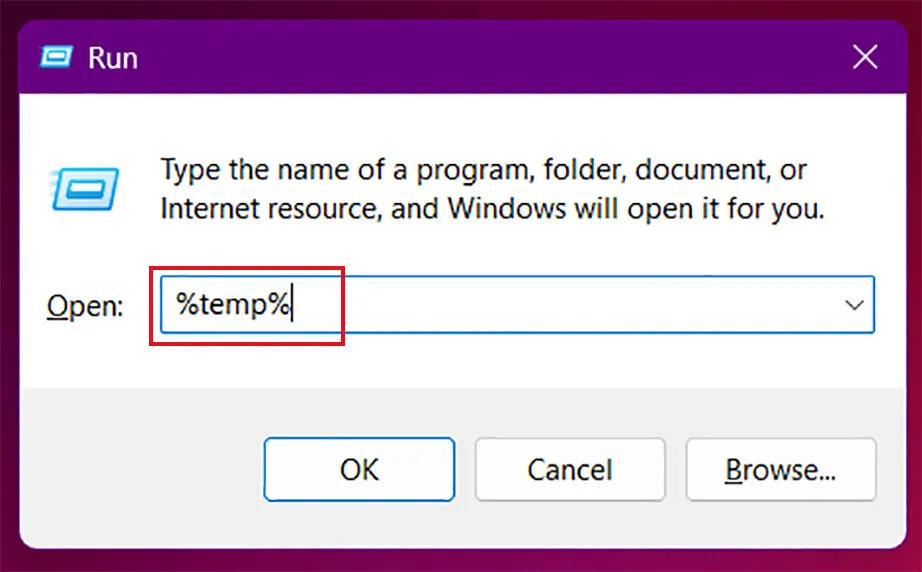
Type %temp% into the text box and press Enter to instantly open your temporary files folder.
Type ~wrd into the search bar in the top-right corner of the window.
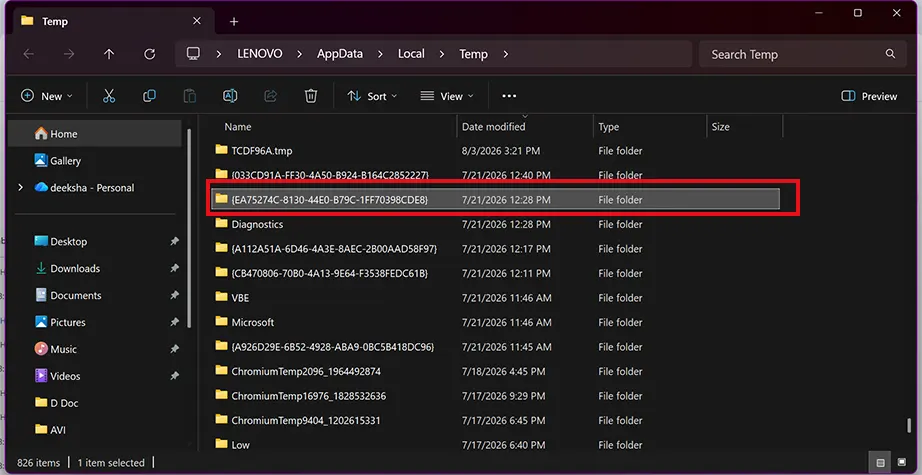
Select the folder name to open the folder’s content pane.
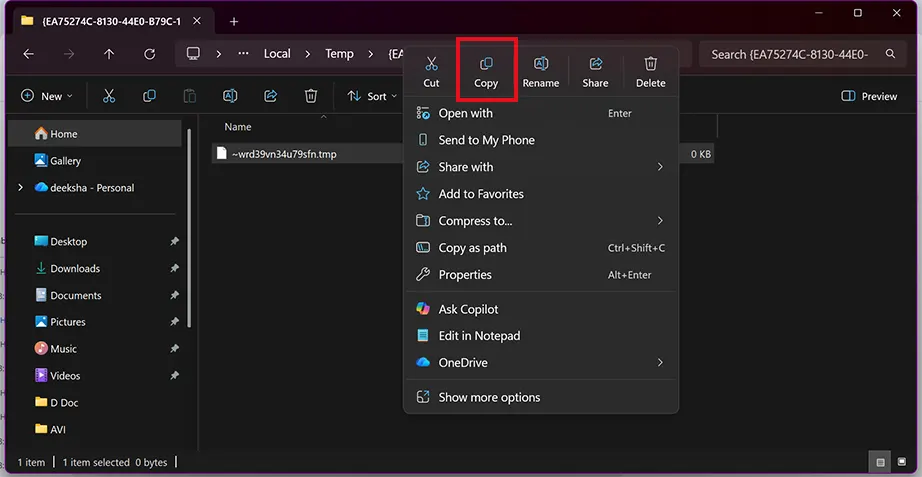
Now select the file, right-click on it, click Copy, and paste it on the Desktop for now.
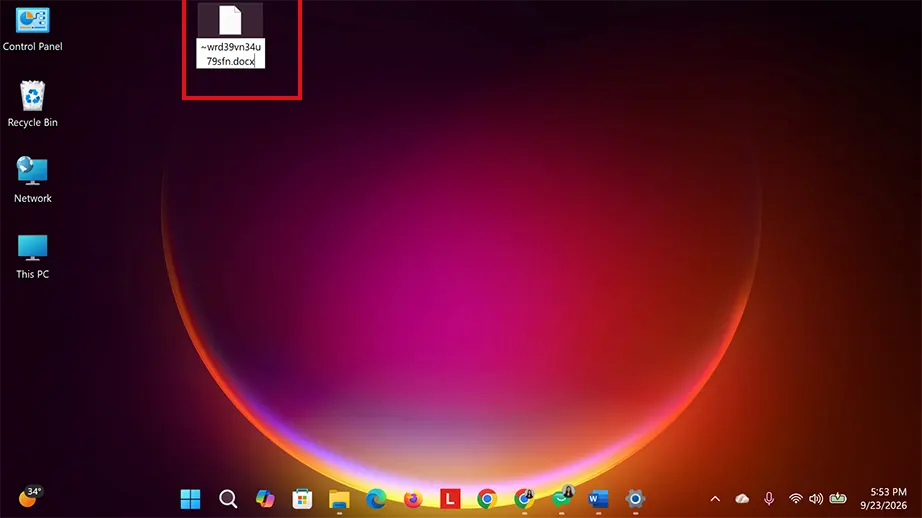
Change the .tmp extension at the end of the filename to.docx.
Double-click the newly renamed .docx file to open it in Microsoft Word and save it immediately.
For macOS:
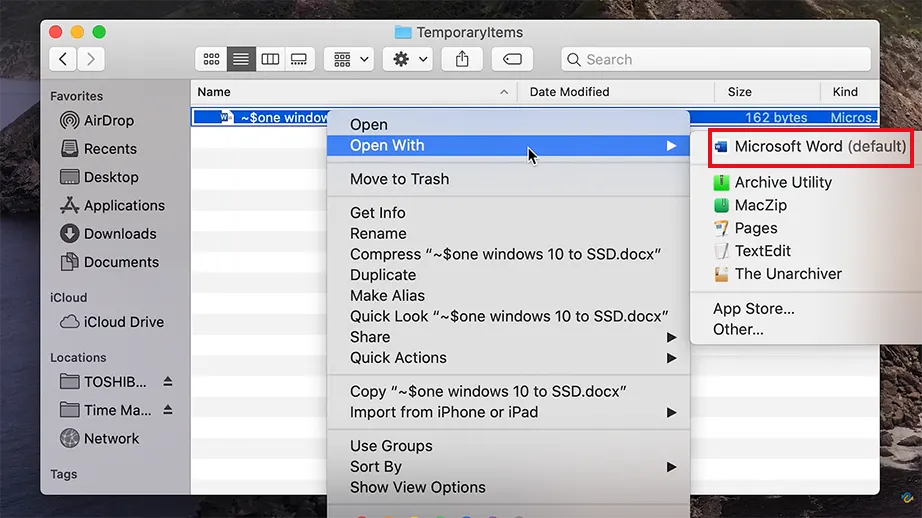
Mac computers also store temporary session caches inside environment directories. The chances are that you might find the one for your unsaved Word document there. Just follow these instructions to run the command through Terminal to access the files:
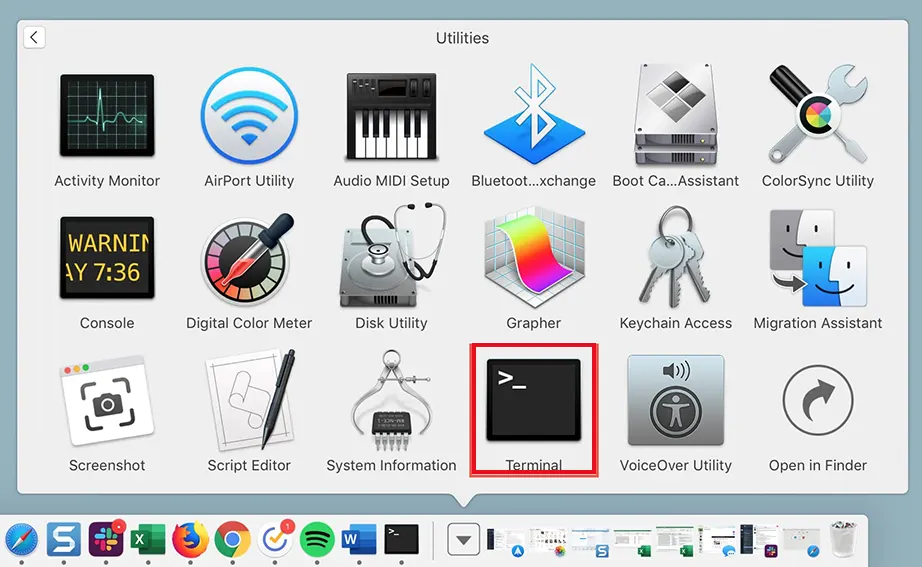
Go to Applications, select Utilities, and click Terminal to open.
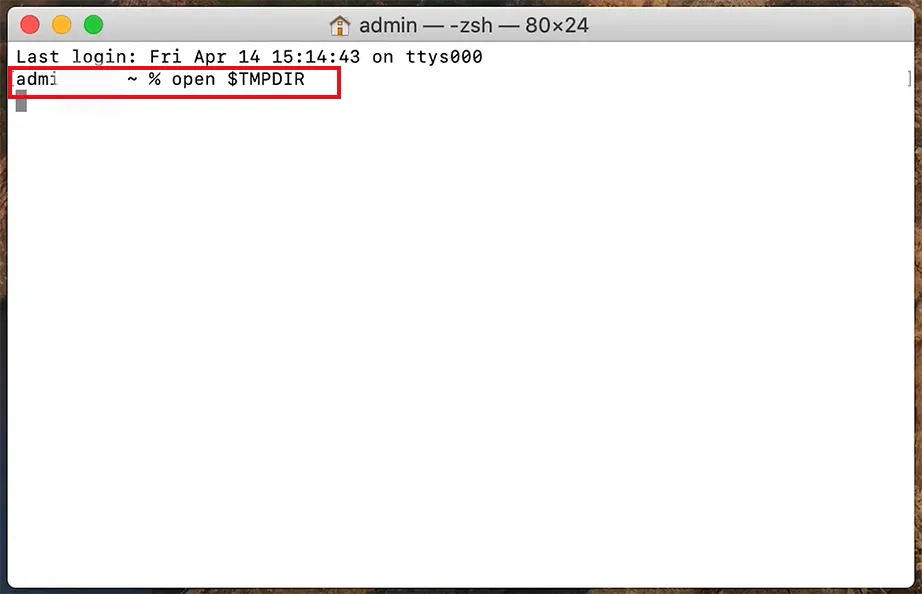
Type open $TMPDIR into the Terminal window and press Return.
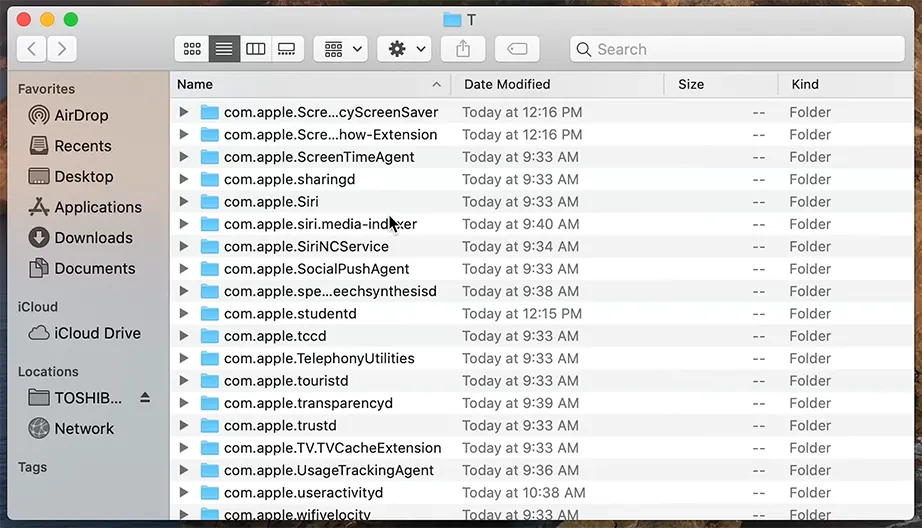
Search for a folder named TemporaryItems or look inside a directory labeled com.microsoft.Word in the opened Finder window.
Look for any temporary Word files, right-click to open them with Microsoft Word, and save them.
Method 4: Checking the Windows Recycle Bin/ Mac Trash
Sometimes, an unsaved or cached document isn’t missing because of an application error; instead, it may have been accidentally deleted. You may find these recently deleted Word documents in the Recycle Bin or Trash folder. It stays there until manually deleted.
For Windows:
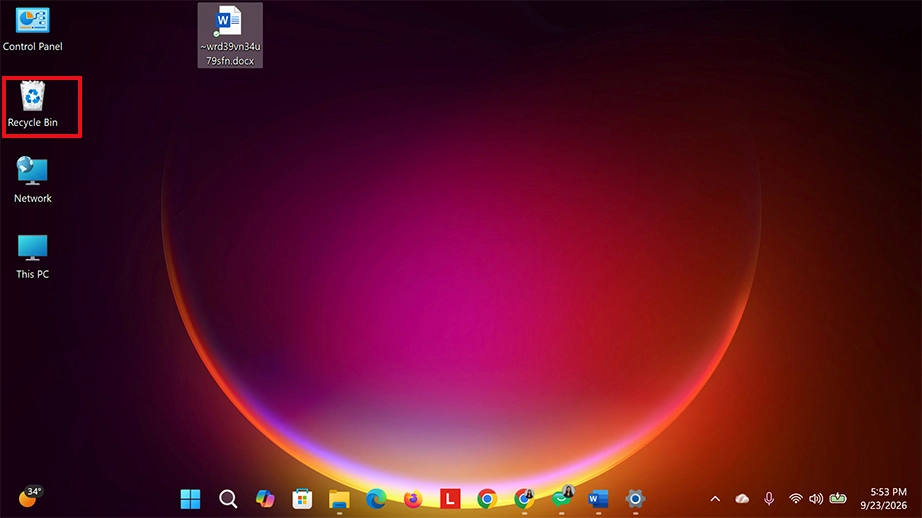
All deleted files, whether it’s an actual document or temporary files, go to the Recycle Bin first when deleted. So, check the Recycle Bin on Windows for your lost unsaved Word document.
Double-click the Recycle Bin icon located on your Windows Desktop.
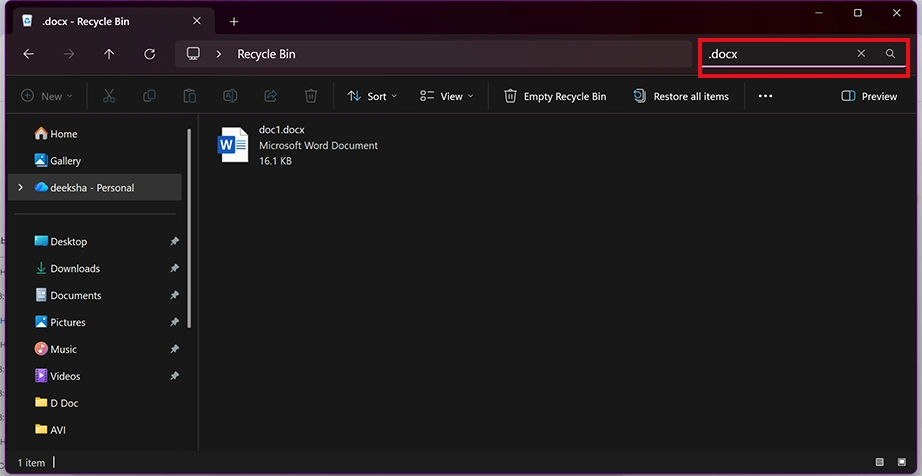
Type .docx, .asd, or.tmp into the search bar in the top right corner of the window to filter out the files.
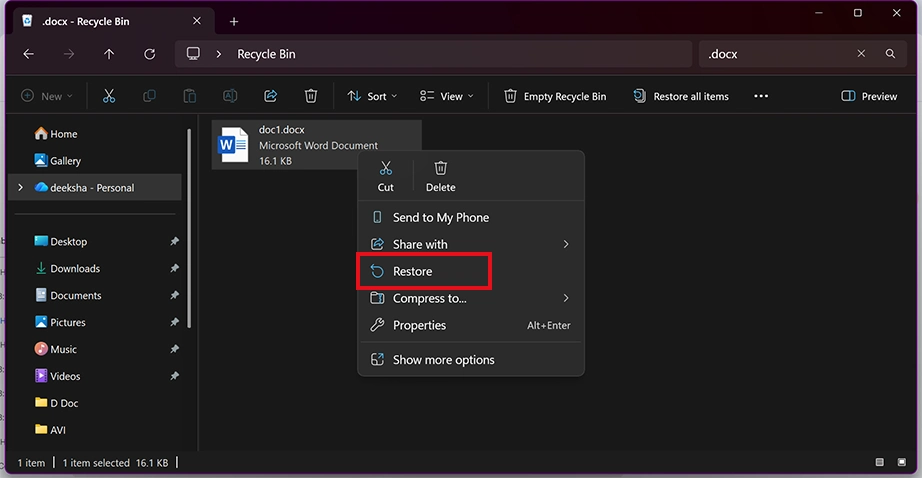
Find a file matching your missing document, right-click on it, and select Restore from the context menu.
For macOS:
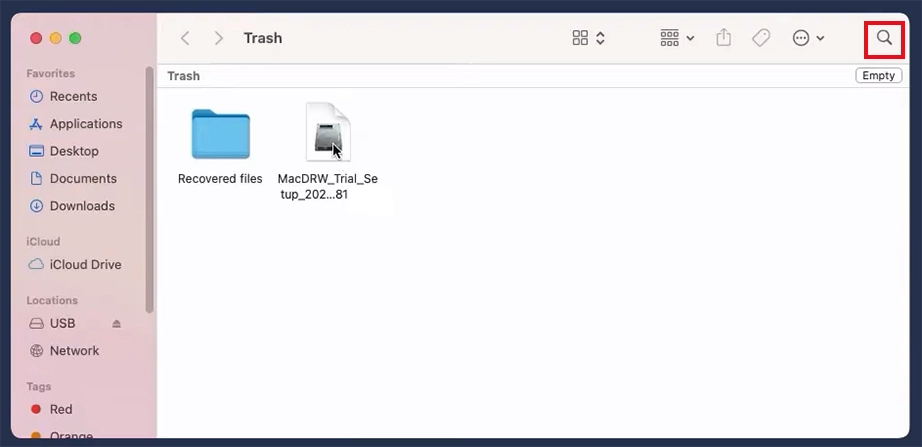
Similarly, any item dragged away or dropped by automated app updates goes into the Trash on Mac. You can easily access the Trash from your dock and check out the items deleted.
Click the Trash icon located on the right side of your dock.
Use the search bar in the top right corner and type your original document name or .docx.
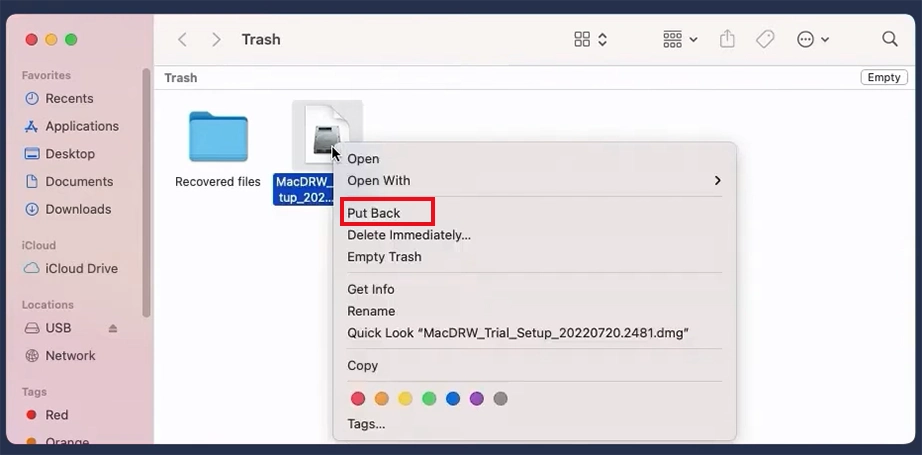
Right-click the file and select the Put Back option from the dropdown menu.
Method 5: Using the Manage Document Feature
You can also manually see the application’s hidden directory using the Manage Document tool. This is for when you relaunched Microsoft Word, but it didn’t show up with your previously edited unsaved document. It’s a manual way to recover unsaved documents.
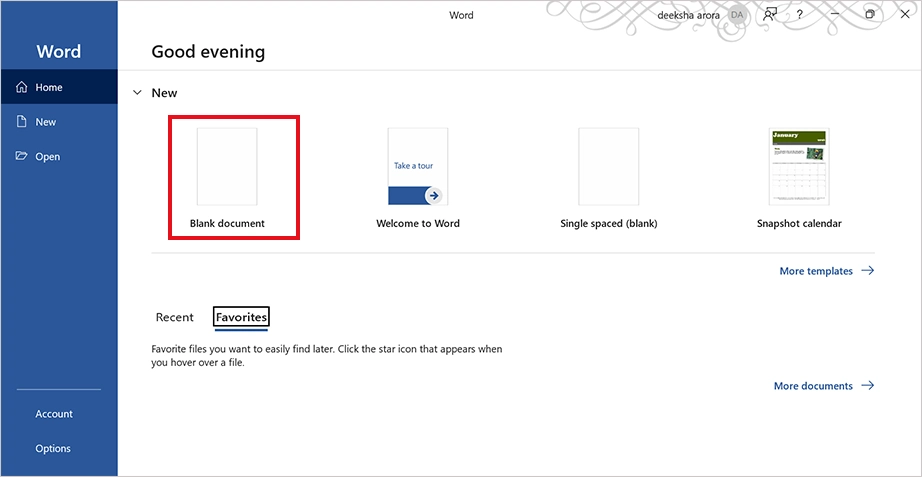
Open Microsoft Word and open a completely new blank file.
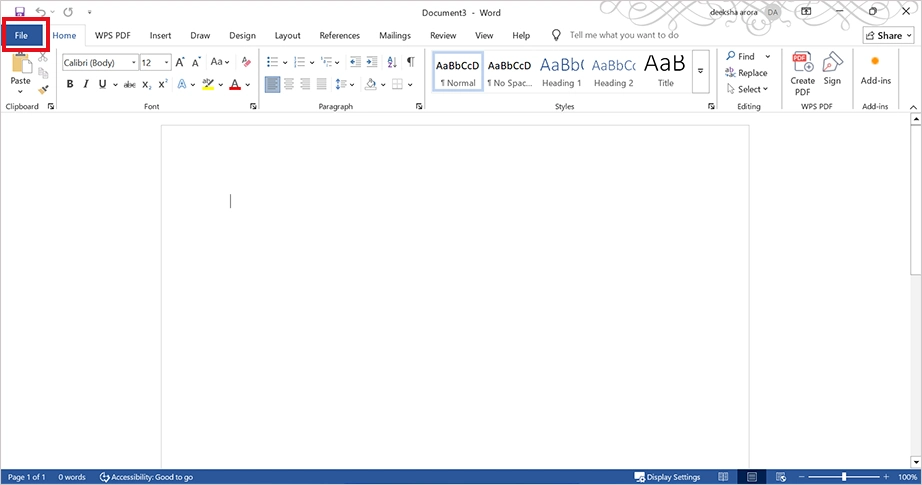
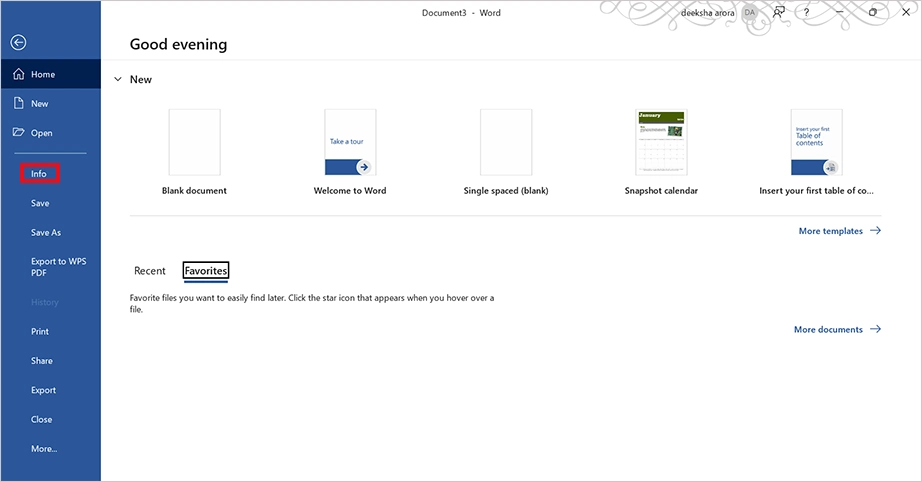
Click on File in the top-left corner of the window.
Click Info from the sidebar menu.
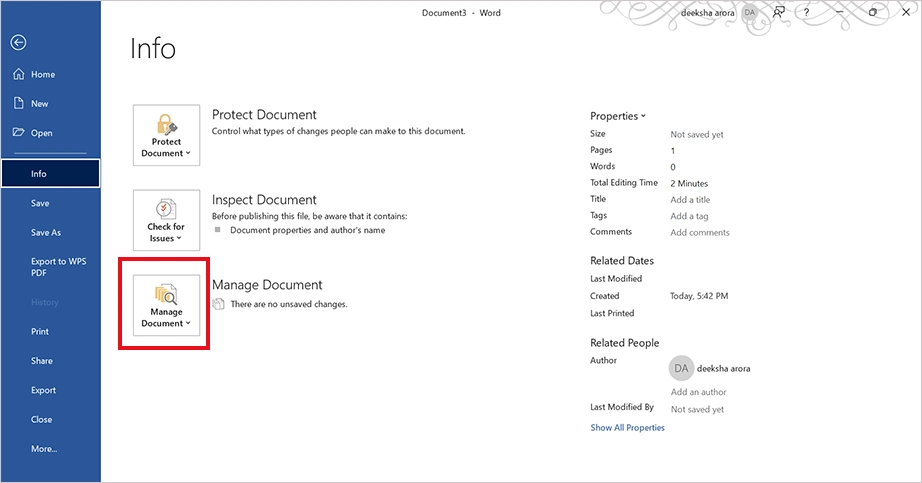
Click on the ManageDocument box.
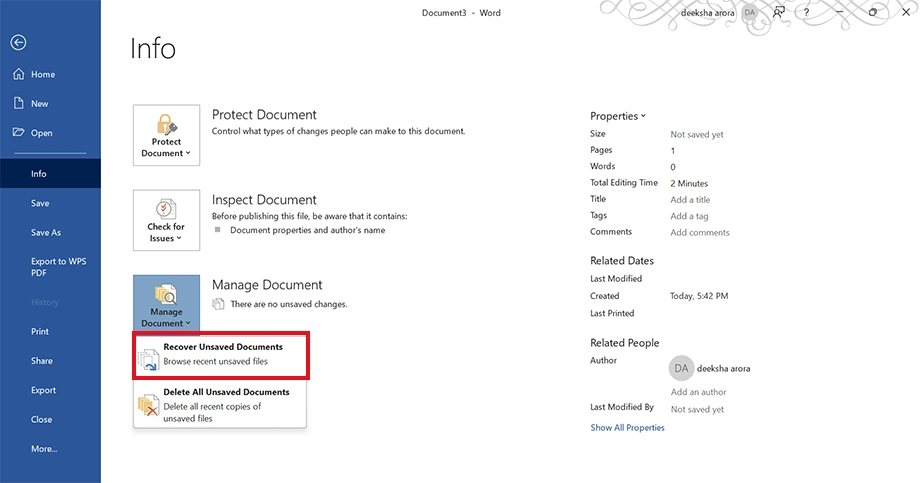
Click on the Recover Unsaved Document option that appears in the small drop-down menu.
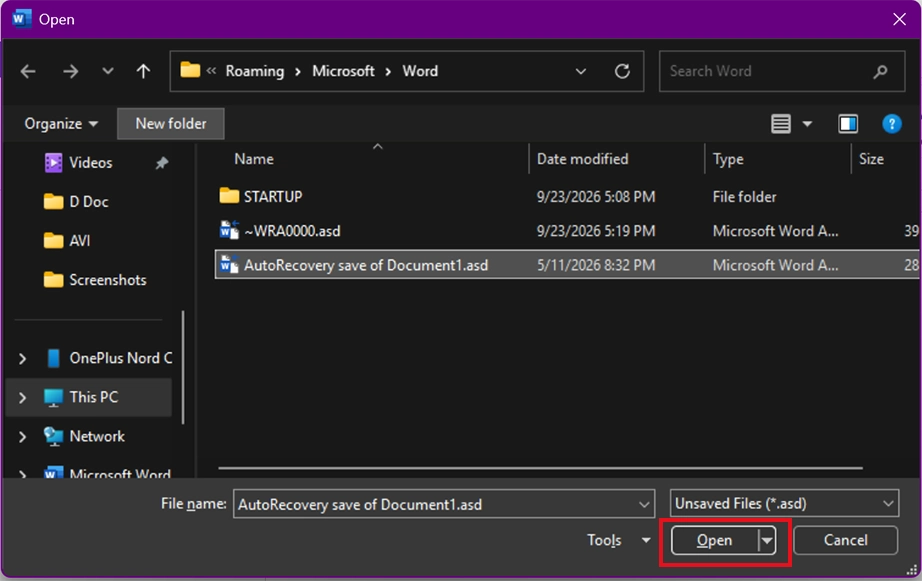
A file explorer window will open directly into Word’s hidden backup folder. Select your file and click the Open button.
Method 6: Checking OneDrive
When your Microsoft Word application is linked to a cloud account, your work is continuously synchronized to the web. If your local storage deletes a file, or if you accidentally click “Don’t Save” on a document that was previously saved to your cloud workspace, OneDrive retains the document. The cloud keeps the live cloud copies, backups, and a web recycle bin that is separate from your computer’s drive. This means you can recover unsaved Word document from any web browser on any device.
Here is how to recover unsaved word document using OneDrive:
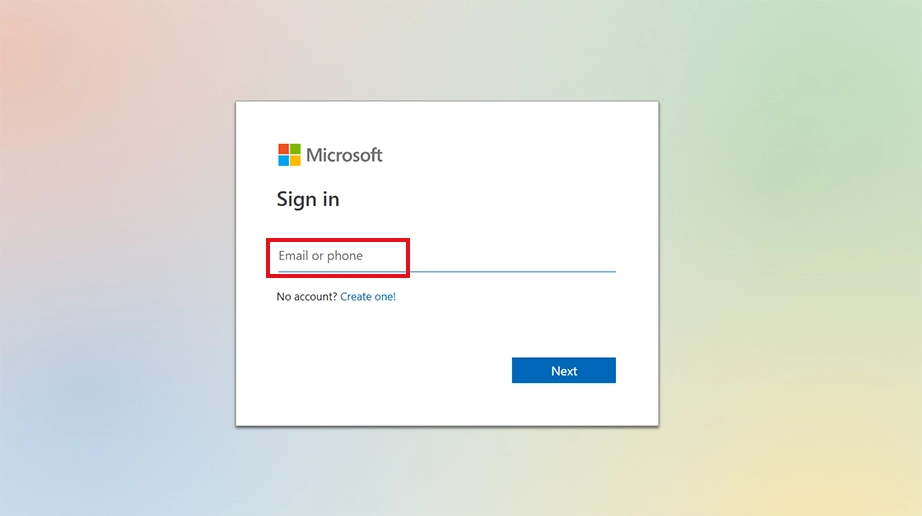
Open your web browser, go to the official OneDrive website, and sign in using your Microsoft account credentials.
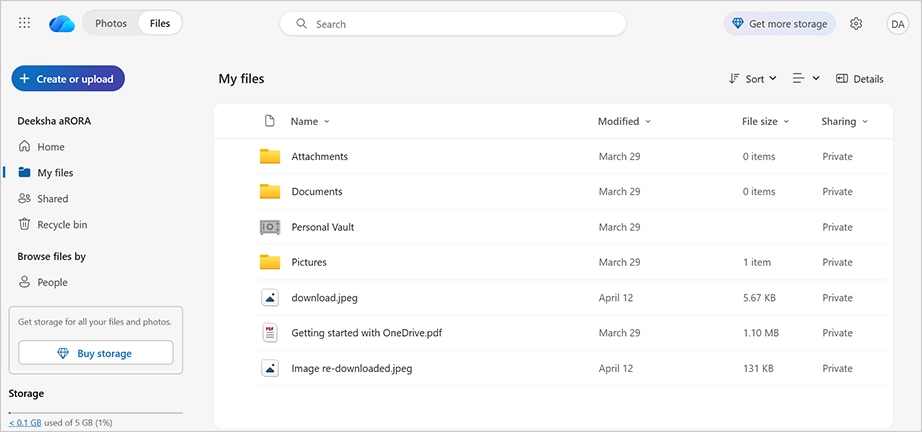
Scroll through the online storage file folders to find your Word document.
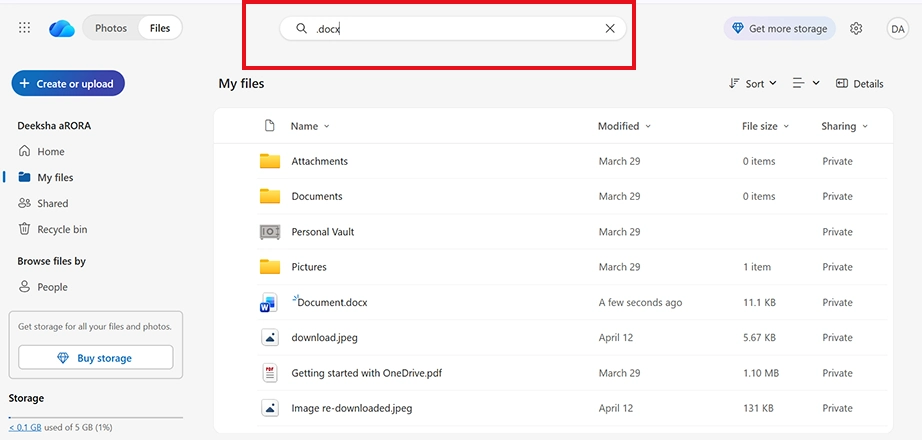
You can use the search bar at the top of the OneDrive page to search.
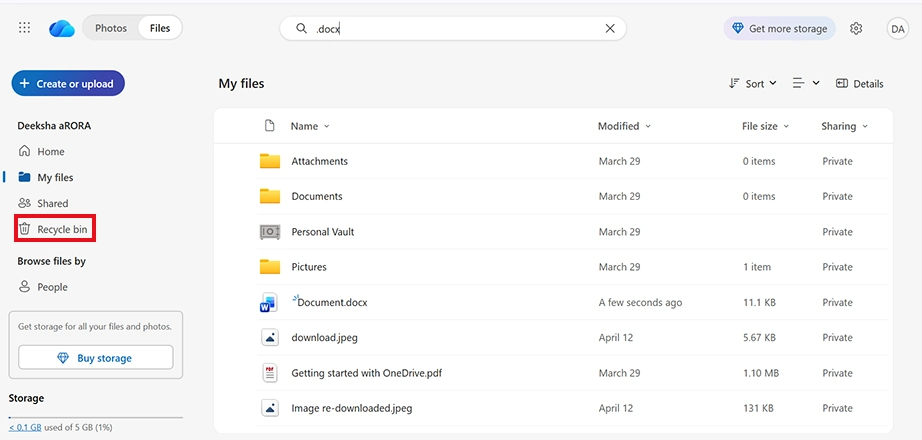
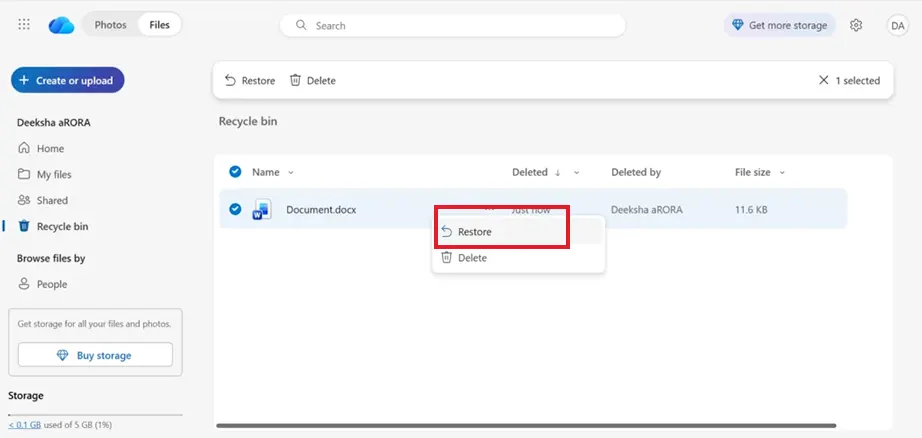
If the file was entirely deleted, look at the left-hand navigation panel and click on the Recycle Bin icon to see a list of deleted items.
Right-click your unsaved or accidentally deleted Word file from the list and click the Restore button.
Note: If you have already saved your file at least once but need to recover lost content to roll back changes, you can use these methods:
Microsoft Word File Version History
Windows File History
Windows Backup and Restore
Advanced Recovery Tool for Complex Situations
This is for when built-in operating system tools and features cannot recover unsaved Word document. The raw data still resides on your drive partition until it is overwritten by new computer activity. Advanced document recovery software bypasses file path logic to scan the hard drive at a block level. This specialised process reconstructs lost structural footprints and rebuilds your data.
Using Notchox Data Recovery Software
Dedicated file recovery software gives you a second chance to restore your files. Tools like Notchox Data Recovery Software specialise in parsing a drive’s physical storage sectors and can even help recover deleted Word files. Even if you accidentally clicked “Don’t Save” and Windows erased the temporary index path, the raw text footprint remains written on your drive blocks.
Here’s how to use Notchox Data Recovery Software to restore your files:
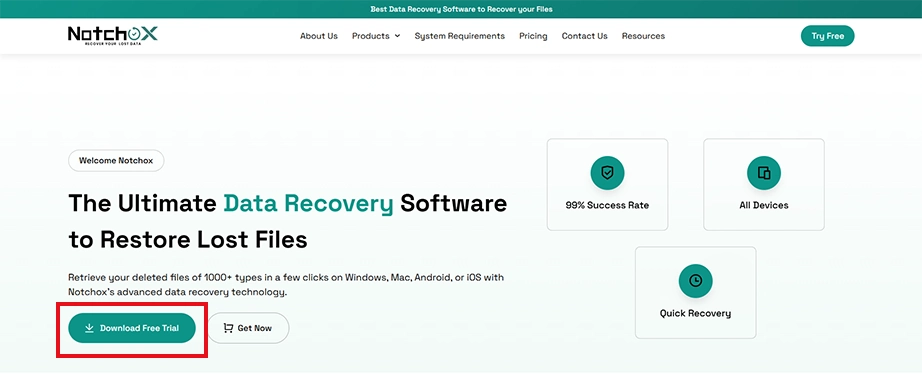
Visit the official Notchox website and download the Notchox Data Recovery Software.
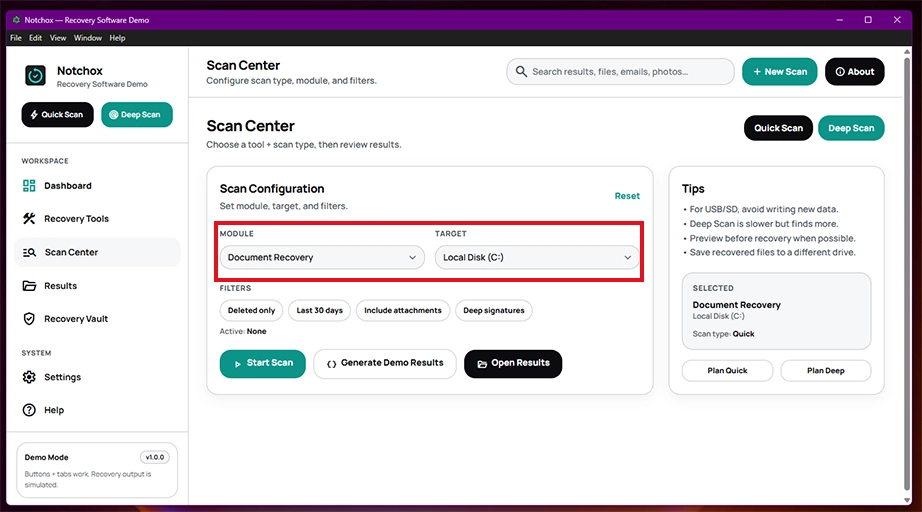
Launch the software. Go to the main dashboard interface, select the Recovery Module, and select the Target Drive you wish to scan.
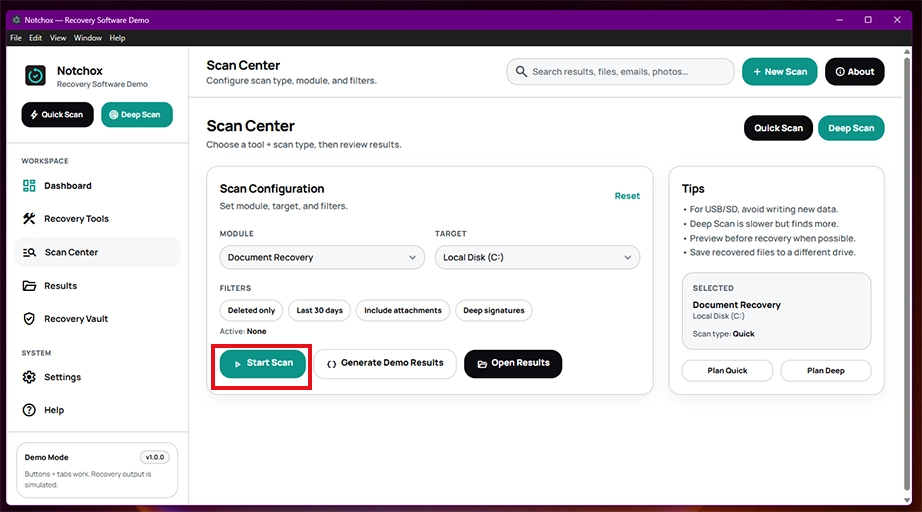
Let the tracking algorithm read the raw bits of your storage drive. Click the Start Scan button to begin the recovery scan.
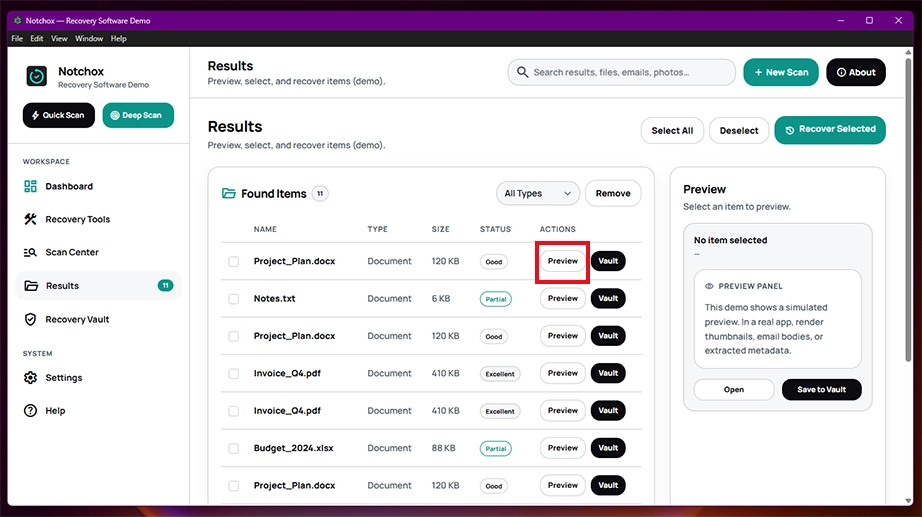
Once the storage block evaluation is complete, click on the Preview button and check the file names and contents before finalizing the recovery.
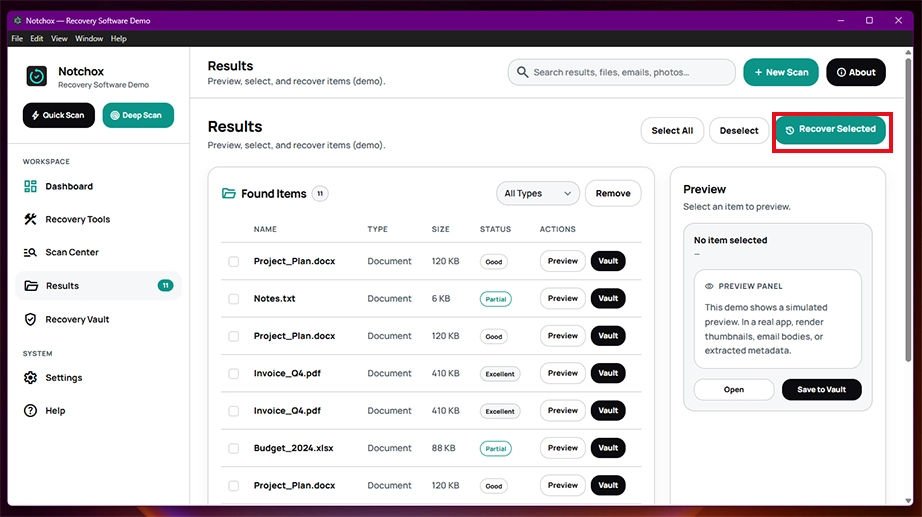
Select the checkbox next to your recovered.docx or .asd file and click the Recover Selected button at the top.
Conclusion
Looking for how to recover unsaved Word document? Your first line of defence is checking the built-in AutoRecover pane or going to the Manage Document menu. If those still fail, you can still search your system’s hidden AppData and Temporary directories for .asd or .tmp files.
For extreme scenarios, where files are accidentally deleted or overwritten, advanced tools like Notchox Data Recovery Software can scan your hard drive blocks to restore your deleted Word files. Act quickly, check your folders, and enable AutoSave to prevent future data loss.
Frequently Asked Questions
Can I recover a Word document if I clicked “Don’t Save”?
Yes, recovery is highly possible despite clicking “Don’t Save.” Though Microsoft Word immediately wipes the active AutoRecover backup when you click “Don’t Save,” a local copy remains within your operating system directories. You can recover those by using Word’s built-in Manage Document utility or by manually extracting the temporary files.
How to recover unsaved Word document?
To recover unsaved Word documents:
Relaunch the Word application; this will automatically recover the last unsaved Word document using the AutoRecover feature.
Go to the File menu, select Info, and click Manage Document. Select Recover Unsaved Documents.
Search for the document in the temporary files saved.
What are the ways to recover unsaved Word document Mac?
On Mac, you can recover unsaved Word document using the following methods:
Searching for AutoRecover files
Manually locating the AutoRecover folder
Searching for temporary files
Checking the Mac Trash
What is Microsoft Word AutoRecover?
AutoRecover is an internal safety tool to recover unsaved Word document. It works in the background to record temporary data snapshots at regular intervals. You can use this to reload your unsaved changes the moment the application is restarted.
What is the Microsoft Word AutoSave feature?
AutoSave is a real-time cloud synchronization engine that removes the need for manually pressing the save button. This is available exclusively for active Microsoft 365 subscribers. It automatically commits every keystroke directly to OneDrive or SharePoint cloud storage, helping you to review and roll back at any time.
What are AutoRecover (.asd) files?
AutoRecover (.asd) files are application-specific binary files that contain snapshot logs of active Microsoft Word sessions. Word uses the .asd format to preserve raw text structures when documents are left open without a manual save. You can manually force the program to read them by selecting the file via the Recover Unsaved Documents window.
Where are unsaved Word files saved?
Unsaved Word files are stored in hidden system locations on your computer’s hard drive. On a standard Windows system, default AutoRecover files are saved directly inside the path: C:\Users\<UserName>\AppData\Roaming\Microsoft\Word.
How to find temporary Word files?
To locate temporary files on Windows:
Press Windows Key + R.
Type %temp% into the Run box, and hit Enter.
Once inside the folder, search for ~wrd or .tmp files.
To locate temporary files on Mac:
Launch Mac Terminal.
Type open $TMPDIR and press Return.
Copy the target file to your Desktop.
Rename the extension to .docx to open it.
How long do temporary Word files stay on my computer?
Temporary files remain until overwritten or cleared. Windows may permanently clear these cache files during routine restarts or software updates. Also, continuing to use your computer writes new data to your hard drive, which can permanently overwrite the physical storage blocks.
Deeksha Arora is a Data Protection & Recovery Writer focusing on writing accurate, informative, and easy-to-understand technical articles for Notchox’s readers. Her content on the prevention of data loss, understanding risks of device failures, and guides to fix problems helps readers make the right decisions and understand the technical terms easily. She works closely with Subject Matter Experts to ensure high usability and accuracy of her writing.