Kajal Singh Jul 27, 2026
Ans: Yes, TRIM can run automatically, too. Windows, macOS, and Linux are designed to spot your solid-state drive and run TRIM schedules quietly in the background.
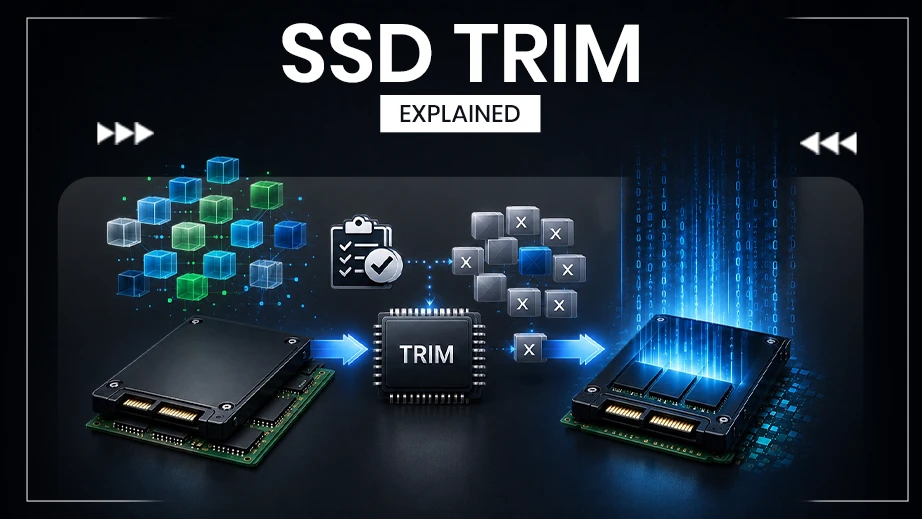
Solid-state drives are fast, but they can slow down as they fill up with files. Understanding how SSD TRIM command works can fix this problem completely. SSDs cannot write new data until they wipe out old data first. The TRIM command handles this cleanup. It tells your drive which deleted files are no longer needed. The drive then cleans out those empty spaces in the background.
This learning guide will give you a clear look at how SSD TRIM works and its importance, as well as how you can check and enable TRIM for SSD on your computer.
Quick Answer: An SSD TRIM works by telling your drive exactly which deleted data blocks are no longer needed, so it can remove them permanently ahead of time. This background cleanup prevents severe lag and stops performance drops by 50%, keeping your SSD running at top speed.
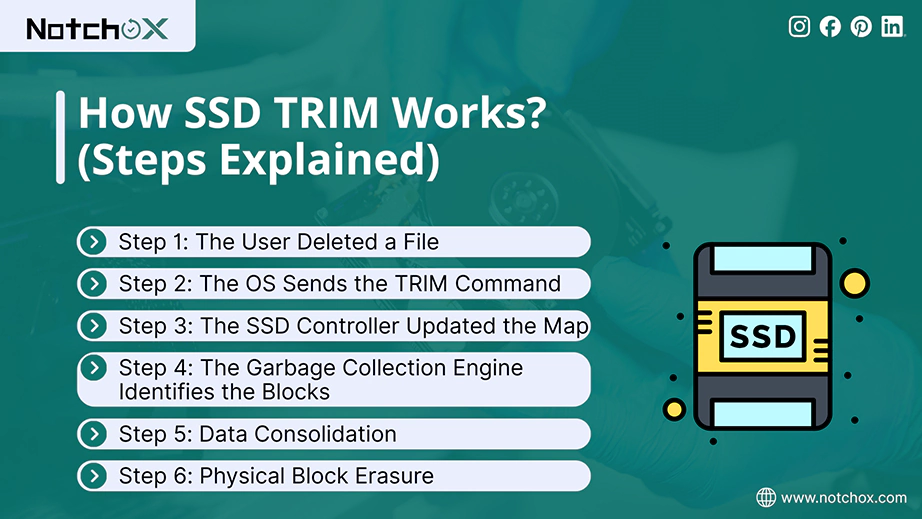
The SSD disk TRIM command works by having your operating system tell your drive exactly which data blocks are no longer needed so that they can be wiped clean.
Here is SSD TRIM technology explained. Let’s understand each step of how SSD TRIM works.
Step 1: The User Deleted a File
Action: You delete a file or format a partition on your computer.
Result: The operating system marks that specific file space as “free” in its file allocation table (like NFS or APFS), but it does not instantly clear the physical drive chips.
Step 2: The OS Sends the TRIM Command
Action: The operating system instantly triggers a special background signal.
Result: It sends an entry list of Logical Block Addresses (LBAs) directly to the drive controller, telling it that these sectors have dead and useless data.
Step 3: The SSD Controller Updated the Map
Action: The drive controller receives the command and opens its internal Flash Translational Layer (FTL) map.
Result: It updates the internal mapping table and marks those physical flash pages as “invalid” or “stale data.”
Step 4: The Garbage Collection Engine Identifies the Blocks
Action: The drive’s built-in Garbage Collection routine scans the storage chips during system idle time.
Result: It spots blocks that contain a mix of “valid” active data and the “invalid” data that TRIM previously marked.
Step 5: Data Consolidation
Action: The controller reads the valid data from the block.
Result: It writes good files to a completely empty block. Thanks to the TRIM command, the controller knows it can completely ignore the dead data. Saves time and reduces drive wear.
Step 6: Physical Block Erasure
Action: The drive controller performs a high-voltage electrical erase on the old block.
Result: The entire block is instantly wiped clean at once. The space is now ready for your next write operation.
When you click “delete” on a file and empty your recycle bin, it feels like that data is permanently deleted. But on a physical level, your computer still holds the data somewhere on your drive.
SSD disk TRIM is an official operating system signal that tells a solid-state drive exactly which data blocks are no longer needed. This might sound simple, but it’s important for your SSD to be fast and durable.
Originally developed in the late 2000s as SSDs gained mass popularity, the command was standardized by the T13 technical committee as a part of the ATA interface specifications to solve early problems of the drive.
Because NAND flash memory cannot overwrite existing data without physically erasing a whole block of cells first, early SSDs had a heavy performance drop during write operations. By passing a list of deleted logical block addresses from the file system (such as NTFS) to the SSD controller, TRIM lets the drive clear garbage data beforehand. The TRIM command is important to prevent write speed degradation.
Solid state drives need a constant cleanup system to stay fast, which is where Garbage collection and TRIM come into play. Many people think these two features do the same job, but they actually are completely different in managing your storage.
Garbage collection works inside the drive hardware to move files and clear out space. But TRIM is a software signal from your operating system that flags which files are deleted and ready for permanent removal.
| Feature | SSD Garbage Collection | TRIM Command |
| Where It Runs? | Inside the drive hardware controller | Inside the operating system software |
| Main Job | Moves good data to clear out old blocks | Flags that deleted files are ready to wipe |
| Drive Impact | Can cause extra wear if running alone | Lowers drive wear by stopping useless data moves |
TRIM is essential for SSD because it removes the massive bottleneck of simultaneous erasing and writing, so that your SSD can write new data instantly into clean blocks. Without this command, your SSD is forced to perform a slow multi-step process: read, clean, and save, every single time you save new data. The TRIM command prevents the lag caused by this.
Fact: The Enterprise SSD Market Analysis shows that over 45% of all global enterprise SSD installations are heavily concentrated right inside the United States. It is supported by a massive network of more than 2,700 active hyperscale data centers.
Here are reasons why this TRIM command is essential and how TRIM improves SSD lifespan.
Windows and Apple macOS offer full support for the TRIM command, but handled differently depending on your chosen platform.
Windows has included official built-in support for the TRIM command starting with Windows 7, which was carried over through every subsequent version till Windows 11. The OS is designed to identify flash storage devices upon installation and immediately activate the command without requiring any extra configuration.
macOS initially introduced native TRIM support for Apple’s own factory-installed SSDs starting with Mac OS X 10.6 Snow Leopard. But if you upgraded your Mac with an aftermarket storage drive, the system would block the TRIM command by default. Apple finally resolved this restriction starting with OS X 10.10.4 Yosemite by introducing a built-in terminal utility called trimforce. It is used for manual unlocking of TRIM for any third-party SSD across all modern versions.
Note: Linux fully supports the TRIM command. Most modern Linux distros handle this automatically out of the box using a system tool called fstrim.
Now that you know which OSes support this feature, the next step is checking if it is actually running on your machine. Let’s move ahead and see how to check and enable TRIM on SSD drives.
To verify if your system is actively sending cleanup commands to your SSD, you will need to use the Windows Command Prompt.
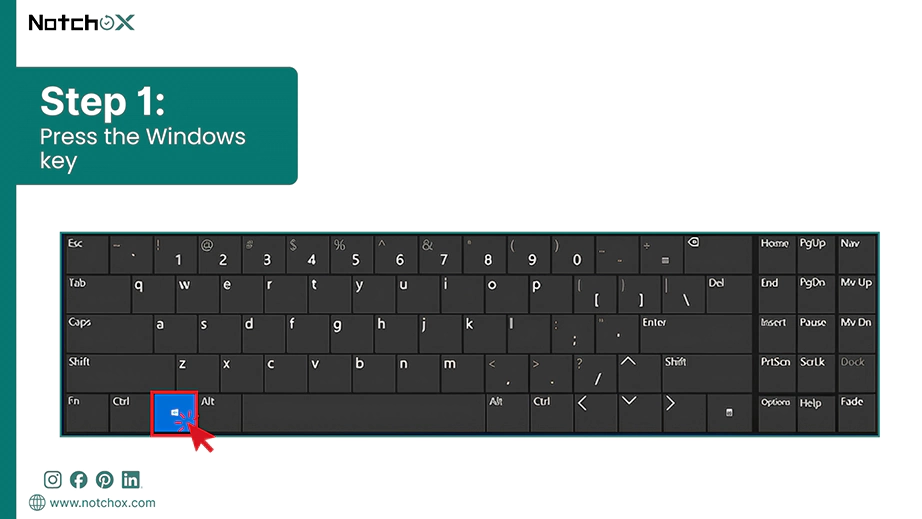
Step 1: Click your Start menu or press the Windows Key.
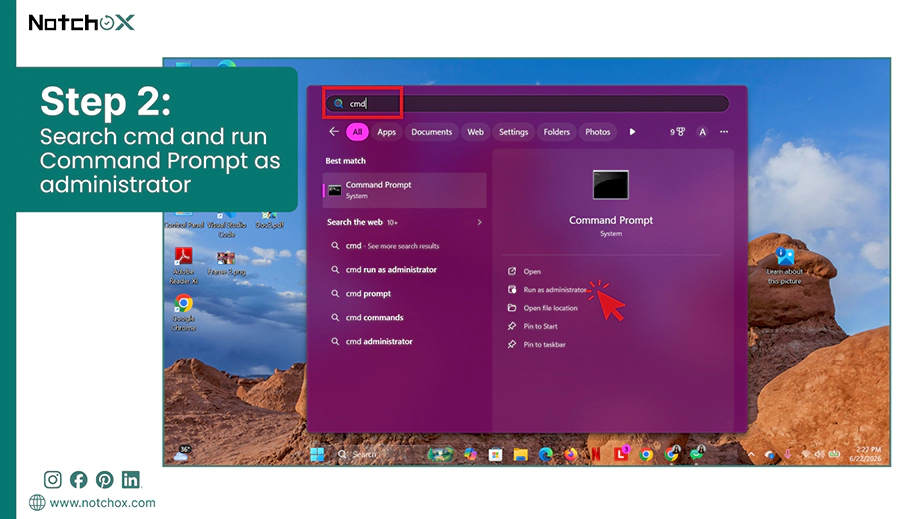
Step 2: Type “cmd,” select Command Prompt, and click on Run as Administrator.
Step 3: Type the following command exactly into the window and press Enter:
fsutil behavior query DisableDeleteNotify
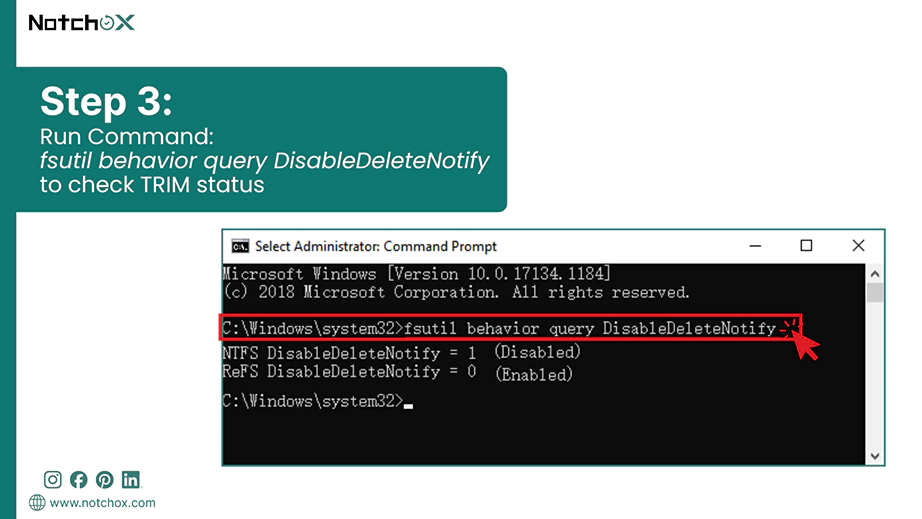
Note: If it says DisableDeleteNotify = 0:
TRIM is Enabled and working perfectly.
If it says DisableDeleteNotify = 1:
TRIM is Disabled, meaning Windows is not telling your drive to clean up empty space.
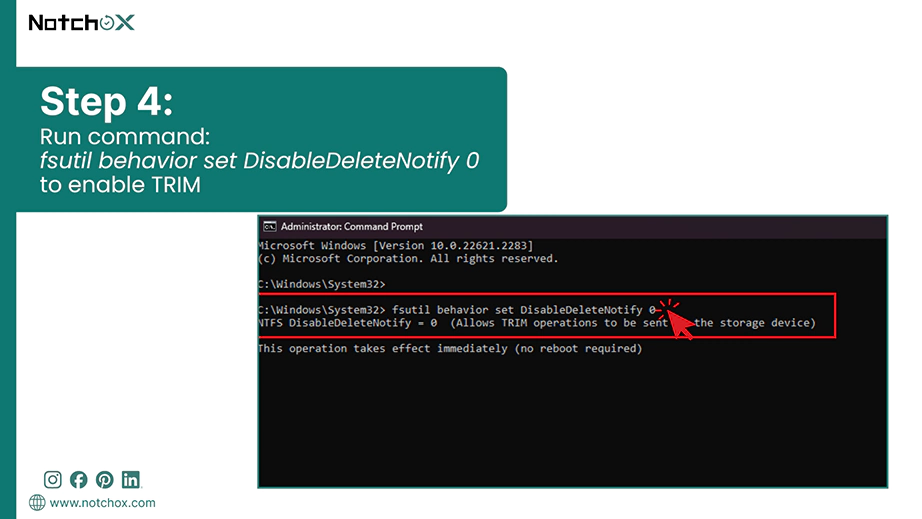
Step 4: How to Enable It (If Needed)
If your result showed a 1, you can instantly force Windows to turn the feature on. Type this command and press Enter:
fsutil behavior set DisableDeleteNotify 0
Run a Manual Optimization Loop
- Open your Start Menu and type Defragment and Optimize Drives.
- Select your SSD from the list, and click Optimize.
This forces Windows to run a complete manual TRIM sweep across your entire drive right away.
Similarly, macOS handles storage verification directly through the built-in system profiler. Checking your drive status takes less than a minute.
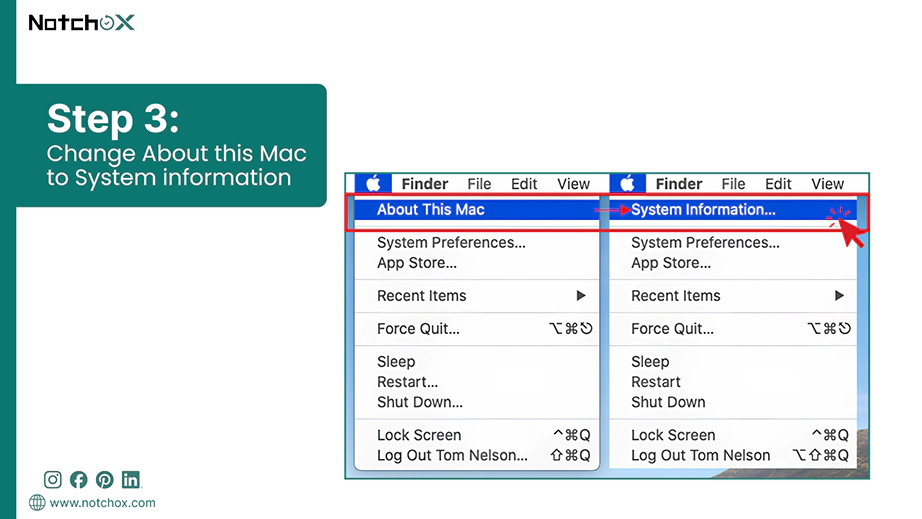
Step 1: Click the Apple logo in the top-left corner of your screen.

Step 2: Hold down the Option key on your keyboard.
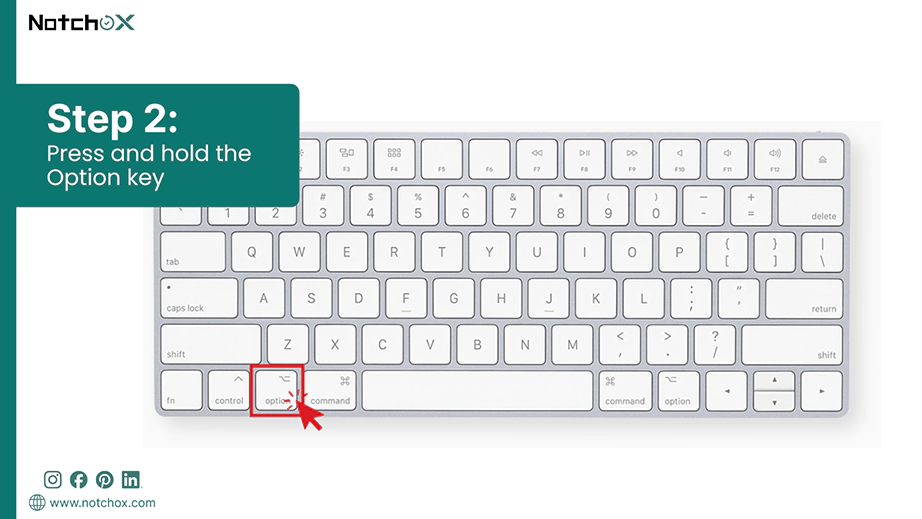
Step 3: Click the top option, which will change from “About This Mac” to “System Information”.
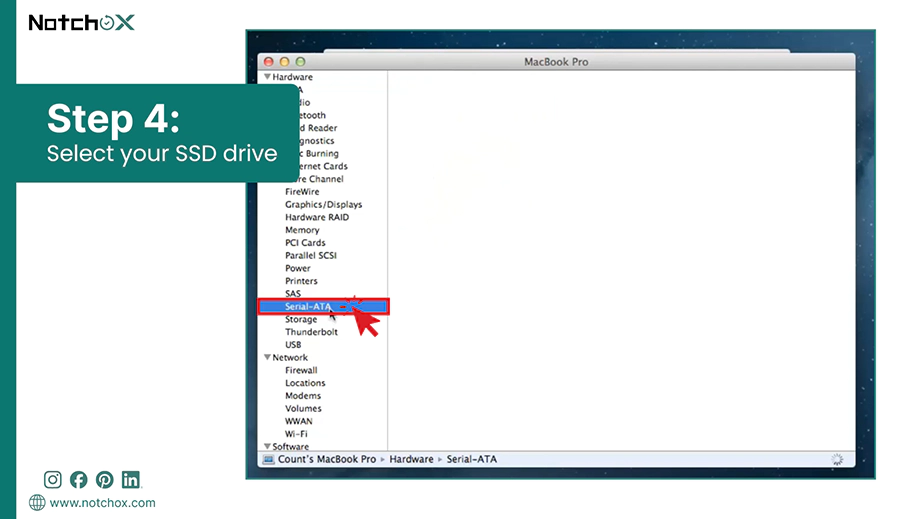
Step 4: In the left-hand sidebar, under Hardware category, click on NVMExpress if your Mac uses a modern NVMe drive or select SATA if you are using an older SATA-based SSD.
Remember: Despite aggressive background cleaning features, it is still sometimes possible to recover data from SATA SSD drives or newer NVMe storage if you act fast enough.
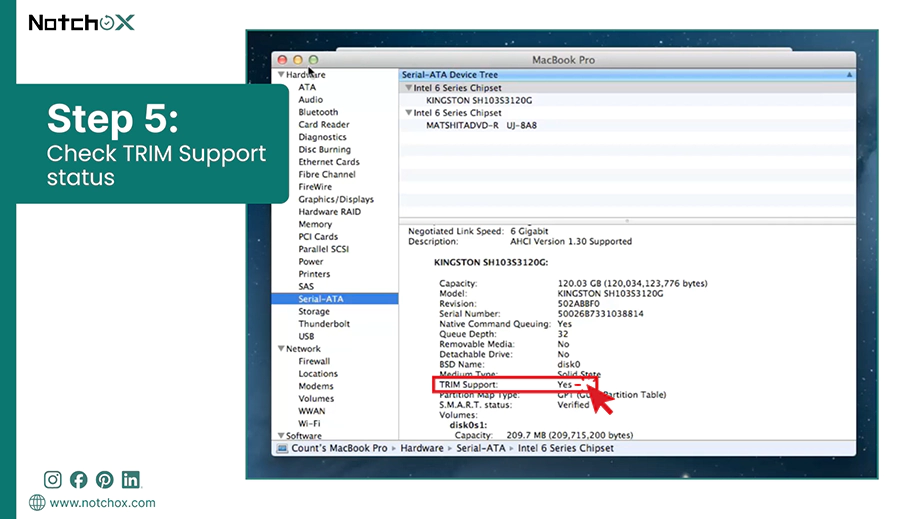
Step 5: Scroll through the bottom specifications lists until you see TRIM Support.
If it says “Yes”: TRIM is active.
If it says “No”: TRIM is currently disabled on your system.
How to Enable TRIM for Third-Party SSDs on Mac?
In case you upgraded your Mac with an aftermarket drive and the status shows “No,” you can force macOS to enable it using the terminal app.
Step 1: Open your Applications folder, and go to Utilities.
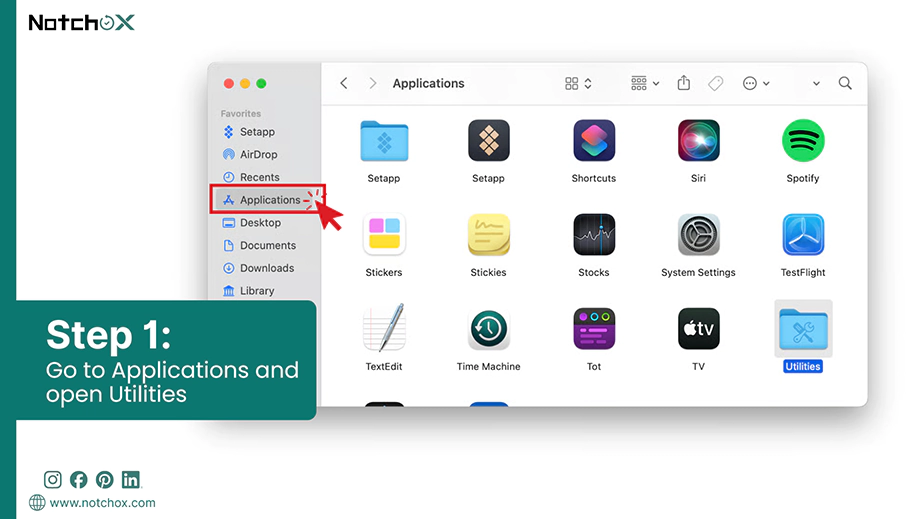
Step 2: Click Terminal to launch.
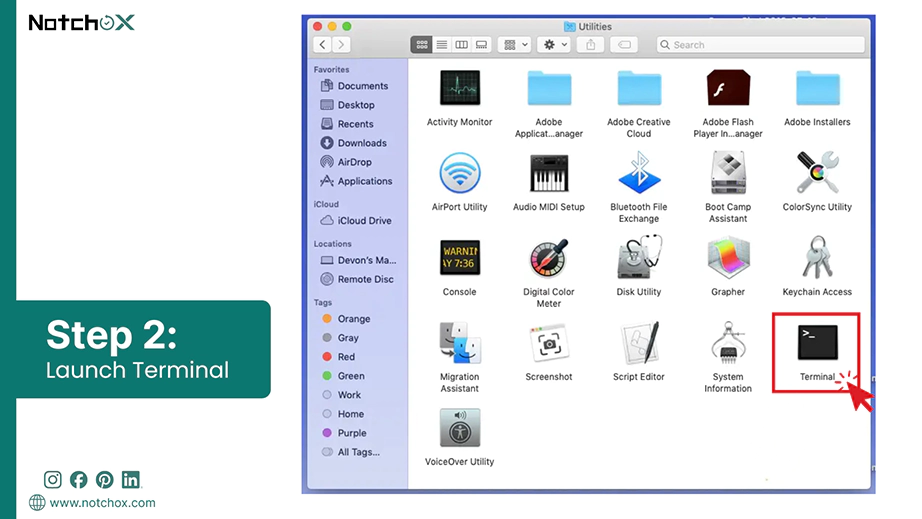
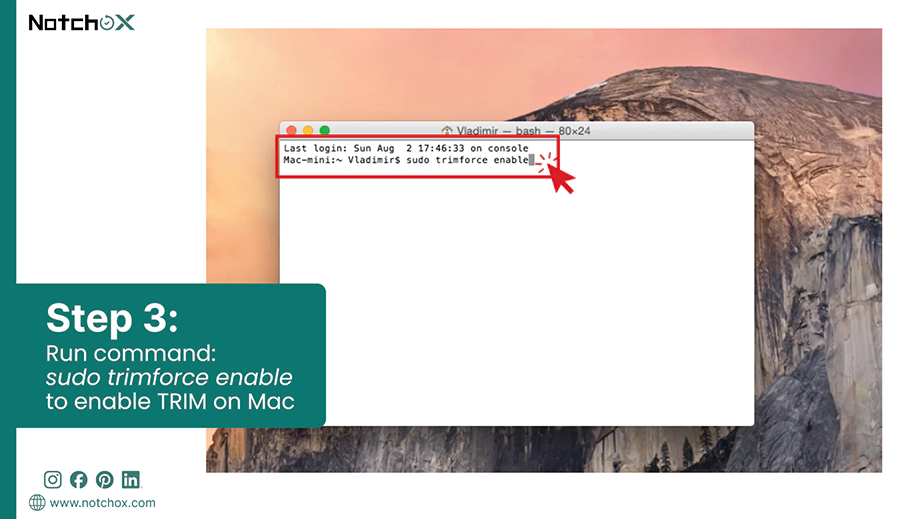
Step 3: Type the following command and press Return:
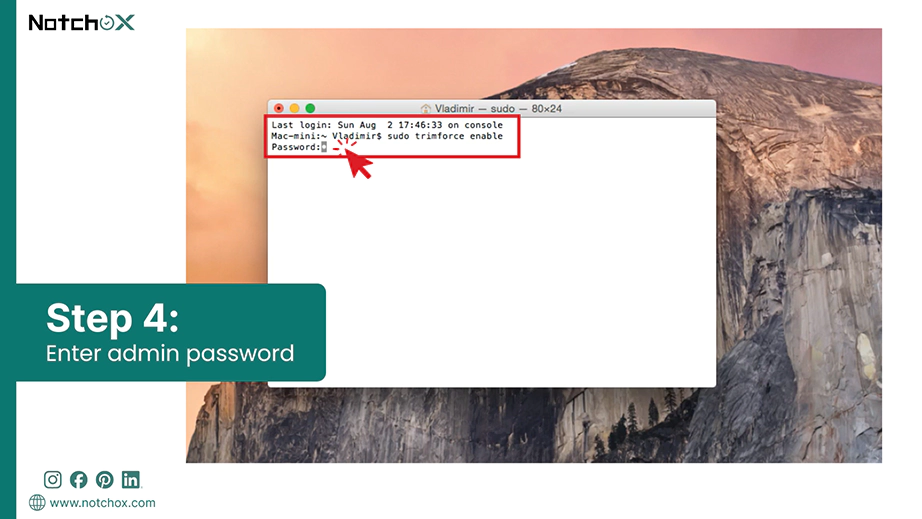
sudo trimforce enable
Step 4: Enter your Mac’s administrative password when prompted.
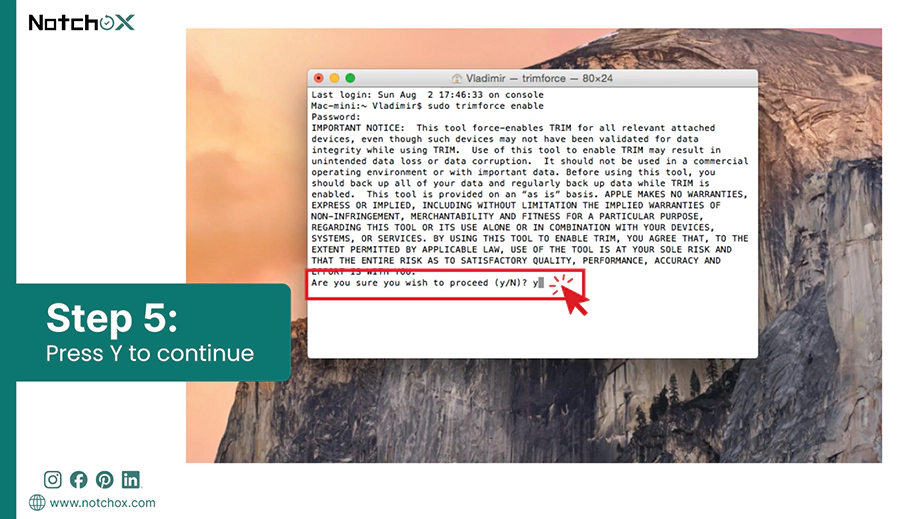
Step 5: Type “Y” and press Return to agree to the system warnings.
Step 6: Press “Y” and hit Return to allow a restart. Your Mac will automatically restart to finish the setup.
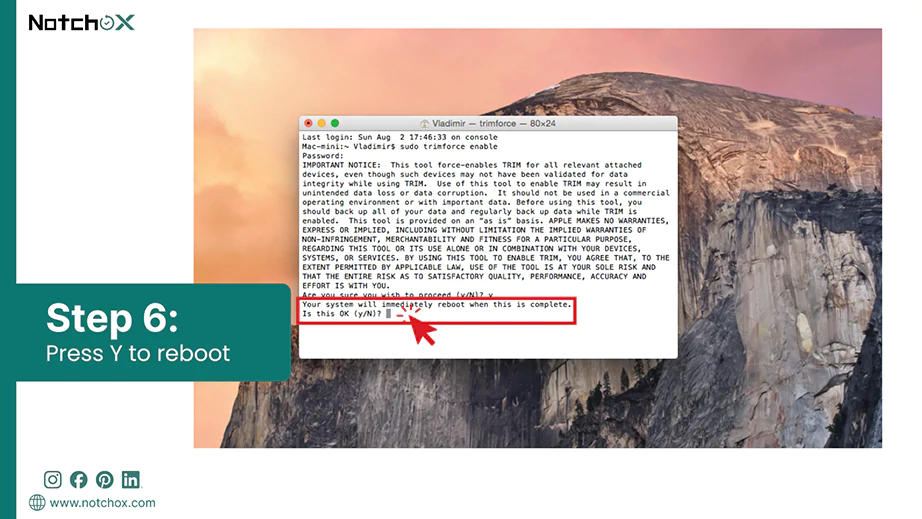
Linux distributions use a system tool called fstrim to manage drive optimisation. You can check your configuration and trigger a manual clean through the command-line interface.
Step 1: Press Ctrl + Alt + I on your keyboard to launch your terminal window.
Note: Test if your hardware supports TRIM. Type the command and press Enter:
sudo lsblk –discard
Look at the DISC-GRAM and DISC-MAX columns for your main drive. If the values are greater than zero, your drive supports TRIM.
If they show 0B, your drive or connection does not support it.
Step 2: Run a manual TRIM operation. Type this command and press Enter.
sudo fstrim -av
The terminal will analyse your mounted storage drives. After a brief pause, it will display a success message showing exactly how many megabytes or gigabytes of stale data were cleared out.
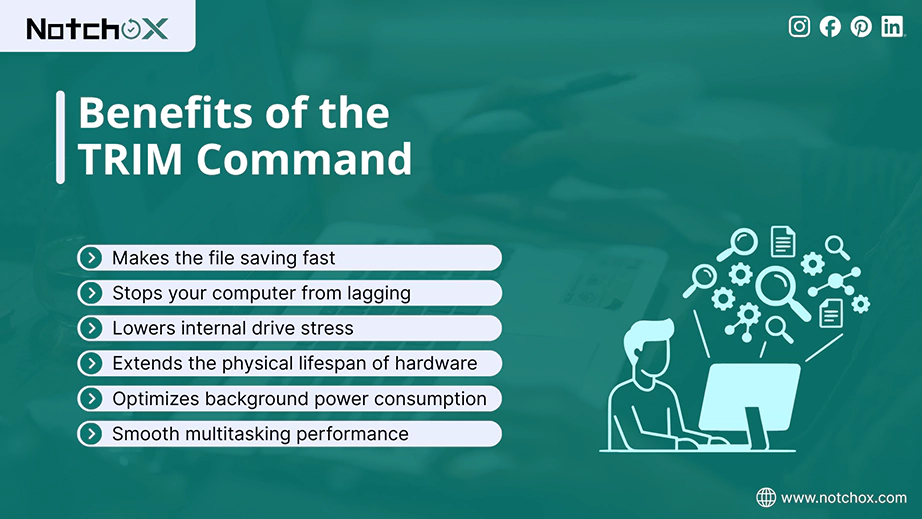
The benefits of the TRIM command go far beyond just keeping your storage clean; they directly improve how your computer performs every single day. As a constant link between your operating system and drive controller, it makes sure that your hardware does not suffer from bottlenecks during heavy tasks. See the benefits below to find out how this quick progress upgrades your daily computing experience.
So, there you have it! At the end of the day, your solid-state drives need the TRIM command to stay fast and healthy. By actively wiping away your deleted junk files in the background, it completely stops your computer from slowing down. Make sure it is turned on, and your storage will thank you with top-tier speeds for years! The one trade-off: since TRIM wipes deleted blocks permanently, data recovery becomes much harder on an SSD — so act fast if you ever delete something important.
Ans: Yes, TRIM can run automatically, too. Windows, macOS, and Linux are designed to spot your solid-state drive and run TRIM schedules quietly in the background.
Ans: Your computer handles this timing dynamically on its own. For example, Windows sends TRIM signals right when you delete a file and runs a deep drive optimization check once a week to keep everything working.
Ans: No, you cannot use TRIM on an old mechanical HDD. Traditional hard drives have moving parts and can instantly overwrite old data without erasing it first, so they do not need this specialized memory cleanup process.
Ans: Yes, you should definitely enable TRIM on your SSD because it stops your drive from getting clogged with old data and prevents it from wearing out early.
Ans: Yes, TRIM improves performance by a huge margin. By cleaning out empty blocks ahead of time, it stops your drive’s write speed from dropping by 50% during heavy use.
Ans: You do not need to do anything special to use it. Modern operating systems like Windows and macOS automatically turn it on and manage schedules in the background for you.
Ans: Yes, it is completely safe and highly recommended by drive makers. It is a built-in feature designed specifically to keep the flash memory healthy and running smoothly for years.

Deeksha Arora is a Data Protection & Recovery Writer focusing on writing accurate, informative, and easy-to-understand technical articles for Notchox’s readers. Her content on the prevention of data loss, understanding risks of device failures, and guides to fix problems helps readers make the right decisions and understand the technical terms easily. She works closely with Subject Matter Experts to ensure high usability and accuracy of her writing.