Resolving this image cannot currently be displayed Word error requires correcting a layout conflict or toggling advanced document content settings. Misconfigured text wrapping, active memory-saving picture placeholders, draft views, etc., cause Word’s rendering engine to suppress graphics. To fix this immediately, right-click the blank frame, select Wrap Text, and choose In Line with Text to reset the image layer. Also, turning off Picture Placeholder by navigating to Advanced settings forces the application to retrieve your visuals.
This troubleshooting article serves as your emergency manual to repair corrupted Word file architectures and rescue vanished images and graphics in Microsoft Word. Inside, you will get eight expert-verified methods detailing how to fix this image cannot currently be displayed error.
Quick Answer: To fix this image cannot currently be displayed Word error, right-click the blank image box, hover over Wrap Text, and choose In Line with Text to force the engine to re-render the file. Another way to fix this is: go to File > Options > Advanced, scroll down to the document content settings, and uncheck Show picture placeholders while checking Show drawings and text boxes on screen. Finally, go to the View tab and make sure you are in Print Layout, since Draft mode completely strips away images.
8 Ways to Fix This Image Cannot Currently Be Displayed Word
Adjust how Word handles image previews and document layouts to fix the “This Image Cannot Currently Be Displayed” error. This error means Word’s rendering path has been interrupted by hidden display settings, hardware acceleration conflicts, minor file corruption, etc. This fix is essential for business formatting, especially since millions of companies using Office 365 worldwide rely on Word for daily documentation.
Below are eight proven methods to restore your images. We will cover how to change text wrapping styles and application views, toggle advanced display properties (like placeholders and draft quality), update your graphics drivers, and use Word’s native Open and Repair feature to fix corrupted files.
Method 1: Use the “In Line with Text” Wrapping Style Option
Incorrect text wrapping can cause images to conflict with document margins or hide entirely behind text layers. Setting your image layout to In Line with Text forces Microsoft Word or Google Docs to treat the image as a standard character. This resets the layout engine and immediately resolves formatting bugs that trigger this picture can’t be displayed word error.
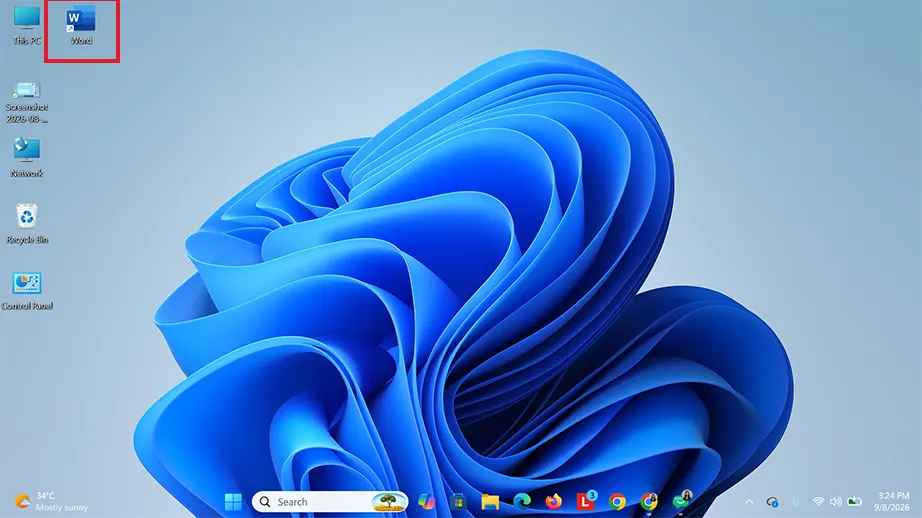
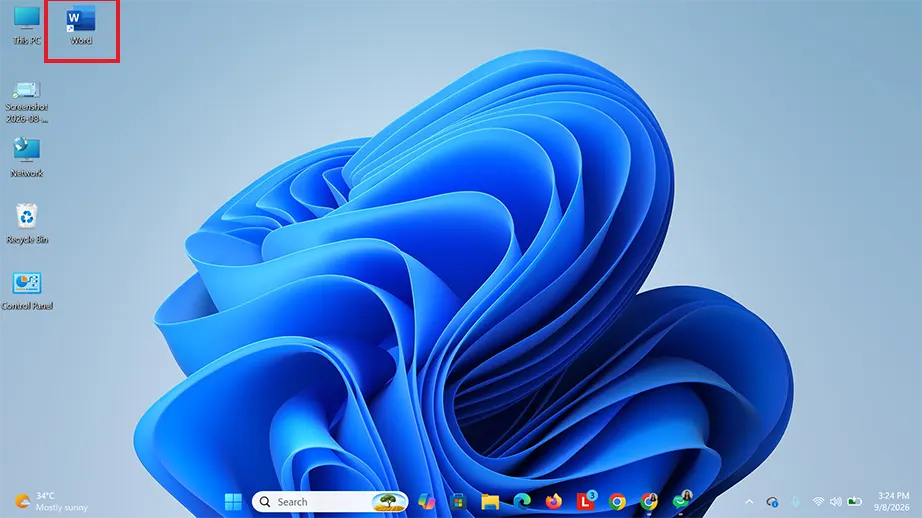
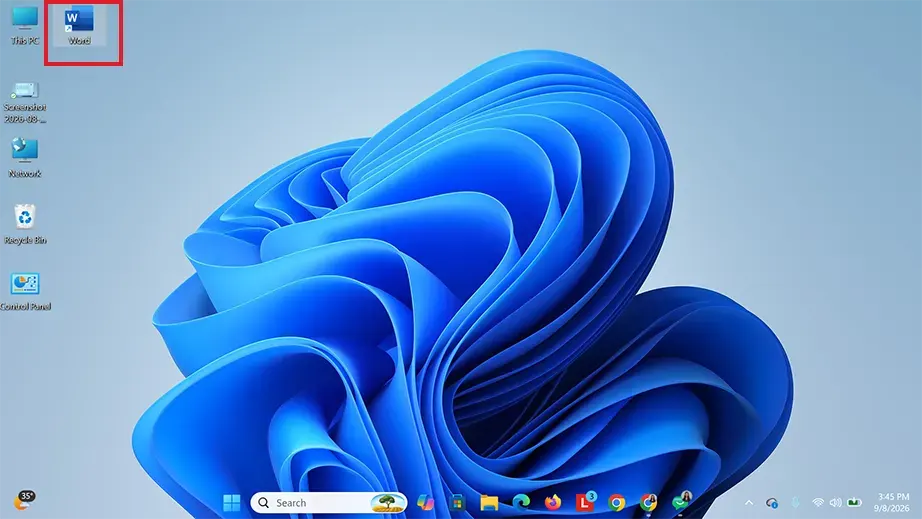
Open Microsoft Word on your PC.
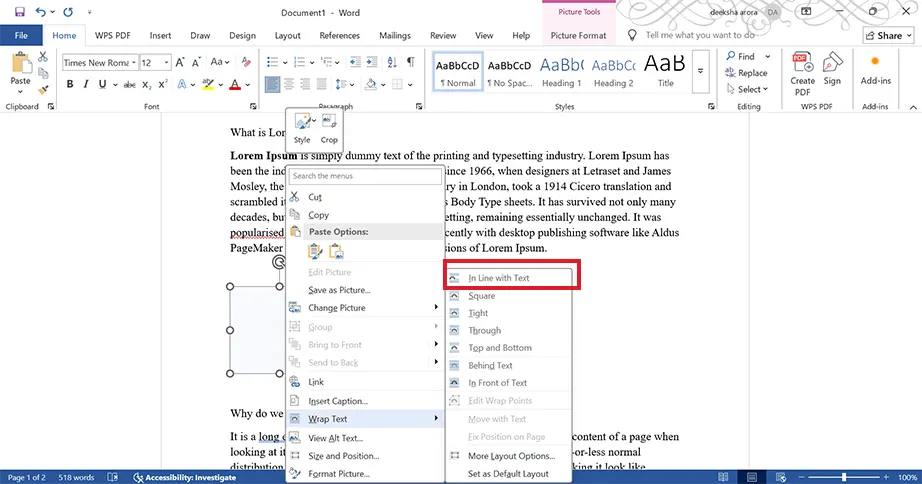
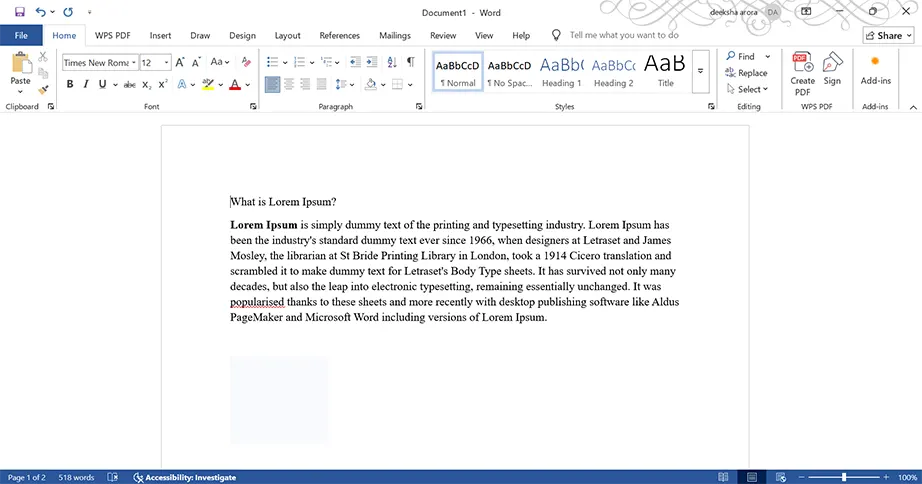
Right-click on the image box showing the error, click on Wrap Text, and select In Line with Text from the submenu.
On Google Docs:
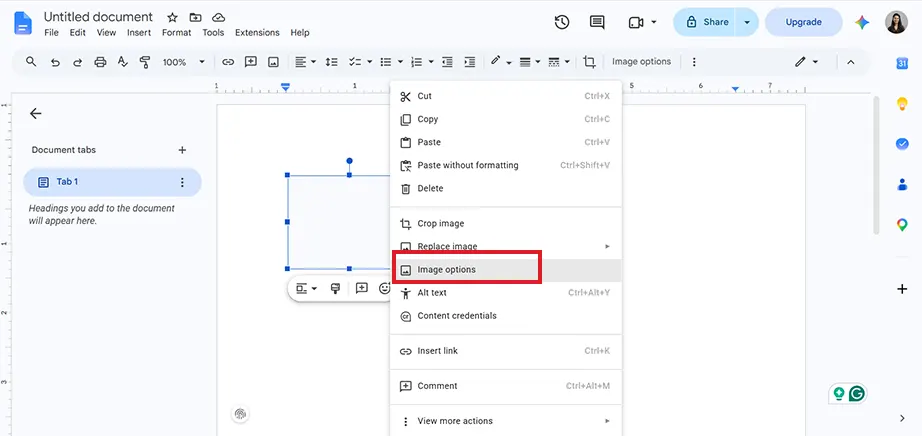
Right-click on the image box showing the error and select Image options.
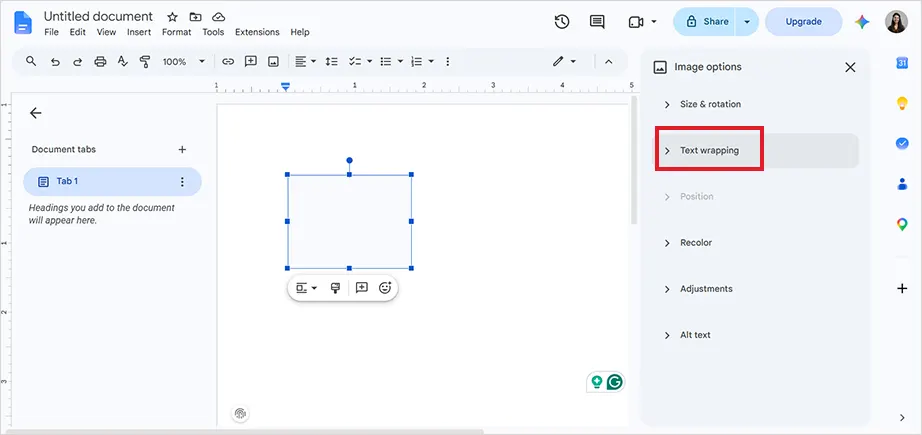
From the right-side Image options panel, click on Text wrapping to expand the option.
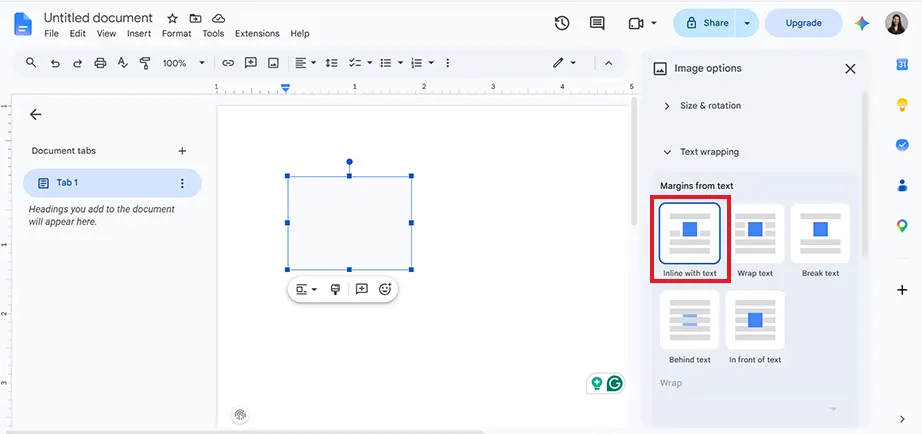
Click on the “Inline with Text” box to select it.
Method 2: Change the View of the MS Word Application
Microsoft Word features multiple document view modes designed to optimize different workflows. Low-overhead layouts like Draft or Online view intentionally strip out images, shapes, and other formatting to save system memory and speed up text editing.
If your document accidentally switches to one of these modes, your images will disappear behind display errors. Switching back to standard layout forces Word to fully reload its visual layout and fix this picture cannot be displayed error.
Open your Word document on the PC.
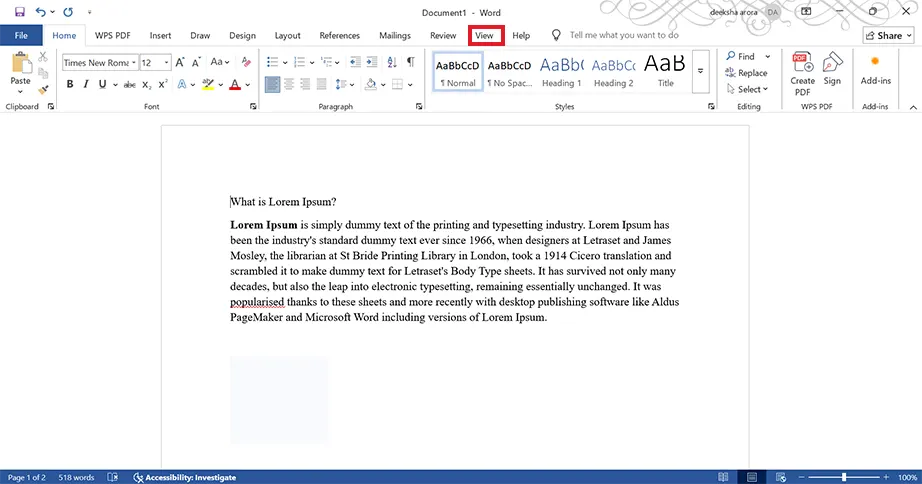
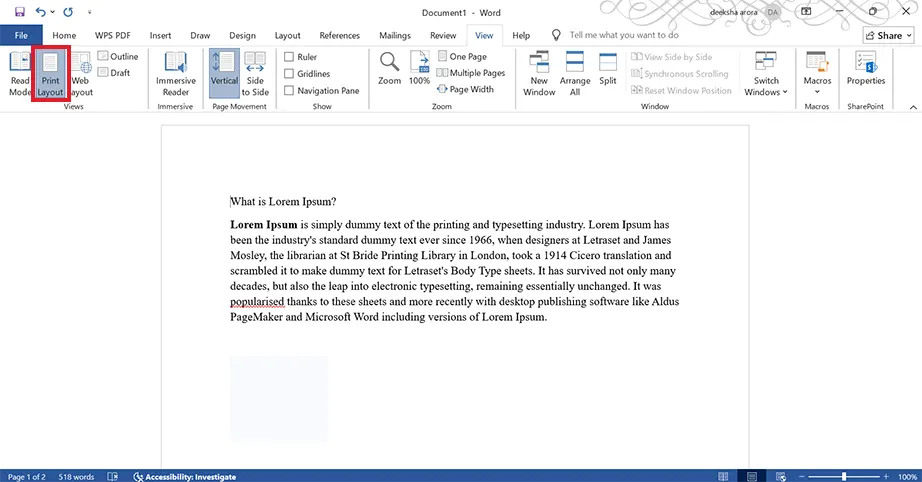
From the top ribbon, click on the View tab.
Select Print Layout or Web Layout under Views.
Quick Tips:
Turn off “Use draft quality” and “Picture placeholders.”
Turn on “Show drawings and text boxes on screen” and “Print drawings created in Word.”
Right-click your broken image, select Wrap Text, and choose the In Line with text option.
Switch your current application workspace from Draft or Outline view to standard Print Layout view.
Reconnect broken media paths by running Word’s built-in Open and Repair tool.
Method 3: Enable “Show drawings and text boxes on screen”
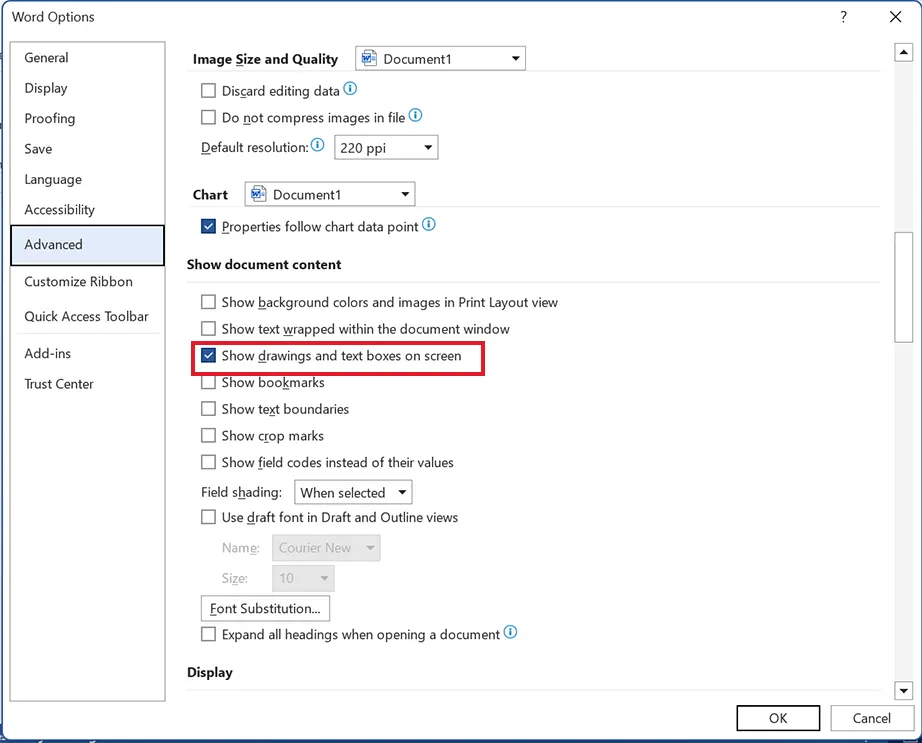
If the “Show drawings and text boxes on screen” option is disabled in your advanced settings, Word completely blocks these graphic elements from loading. This triggers the “This image cannot currently be displayed” error.
Open Microsoft Word on your PC.
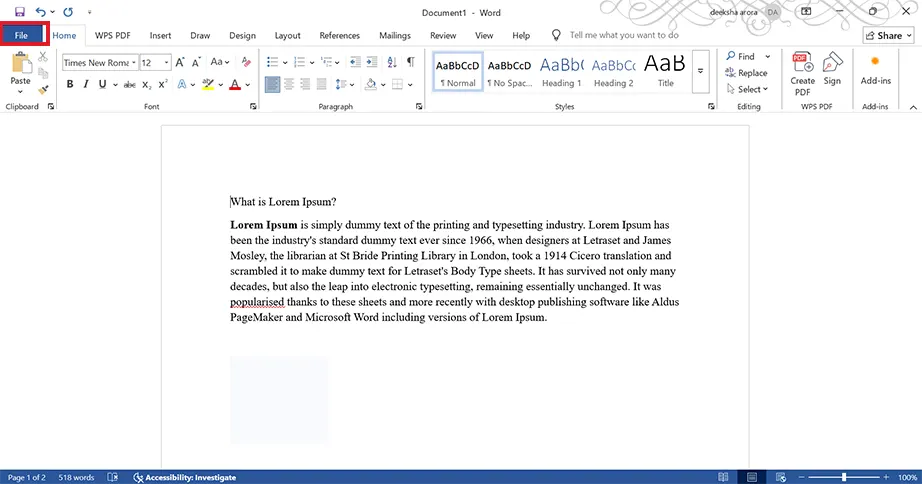
Click on the File menu at the upper-left corner of the window.
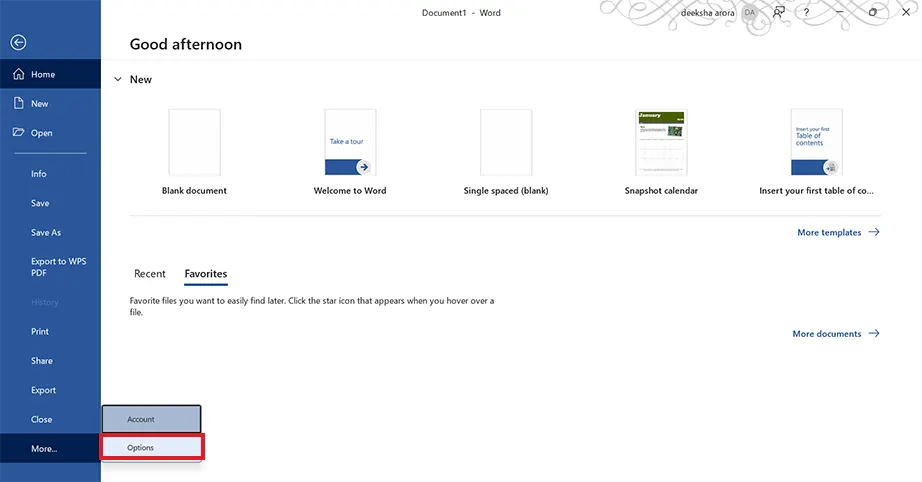
Select Options (orMore > Options)from the bottom-left sidebar.
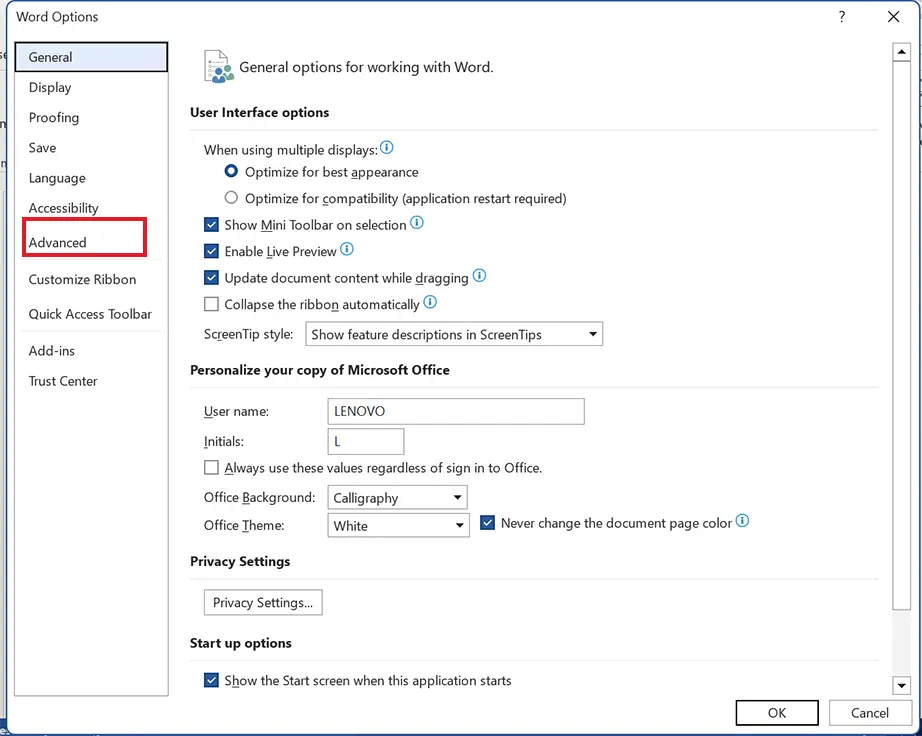
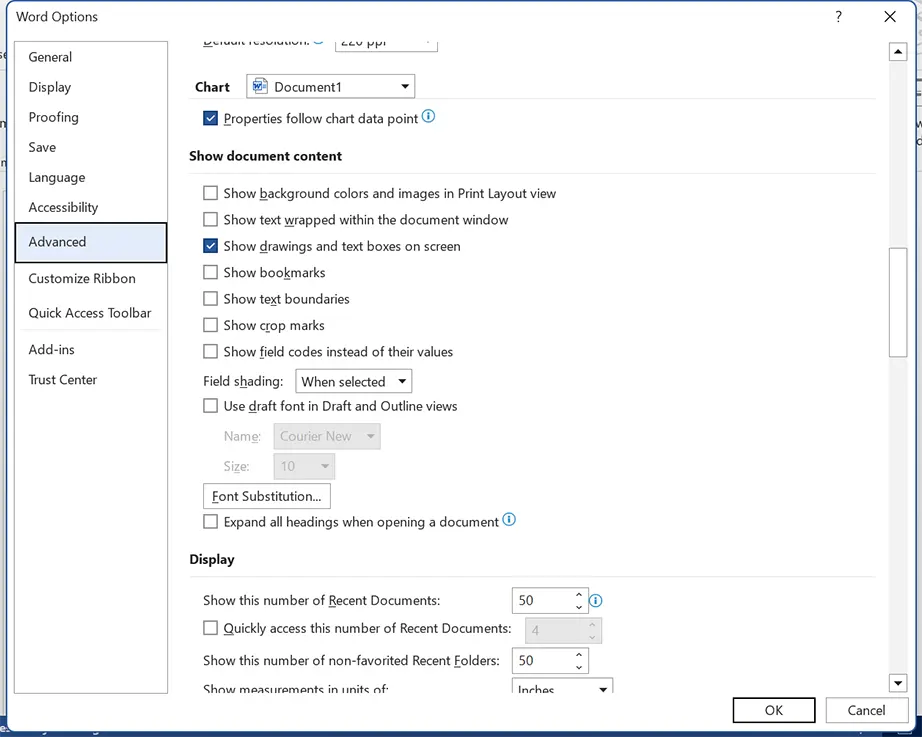
In the Word Options window, select the Advanced tab from the sidebar.
Check the box for “Show drawings and text boxes on screen.”
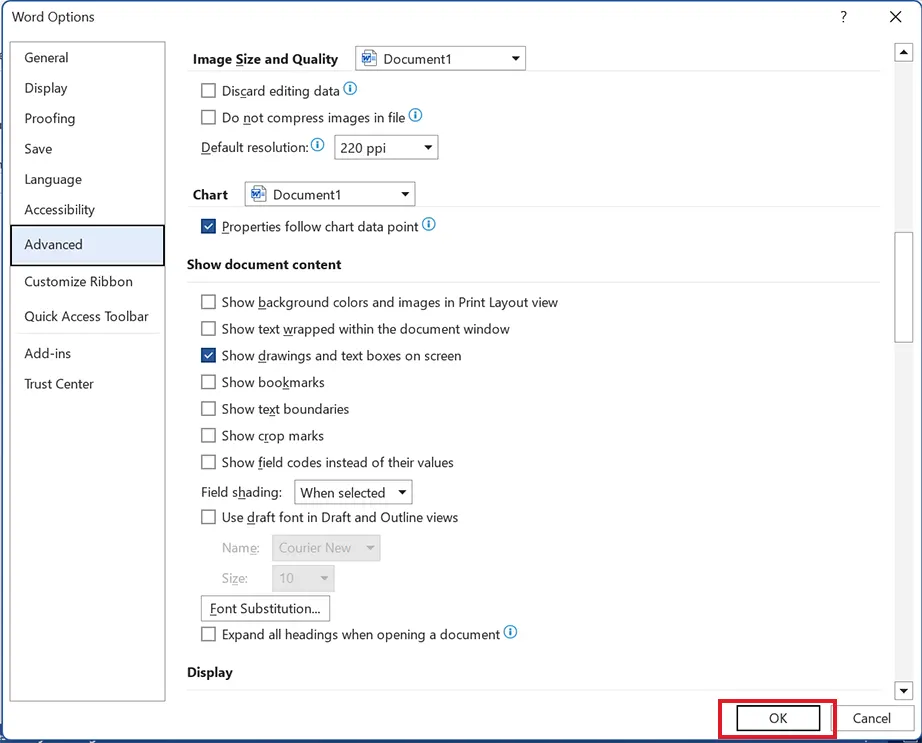
Click the OK button to save the changes.
Fun Fact: Microsoft Word is now powered by Copilot AI, which can write, summarise, and design an entire document for you!
Method 4: Enable “Print drawings created in Word”
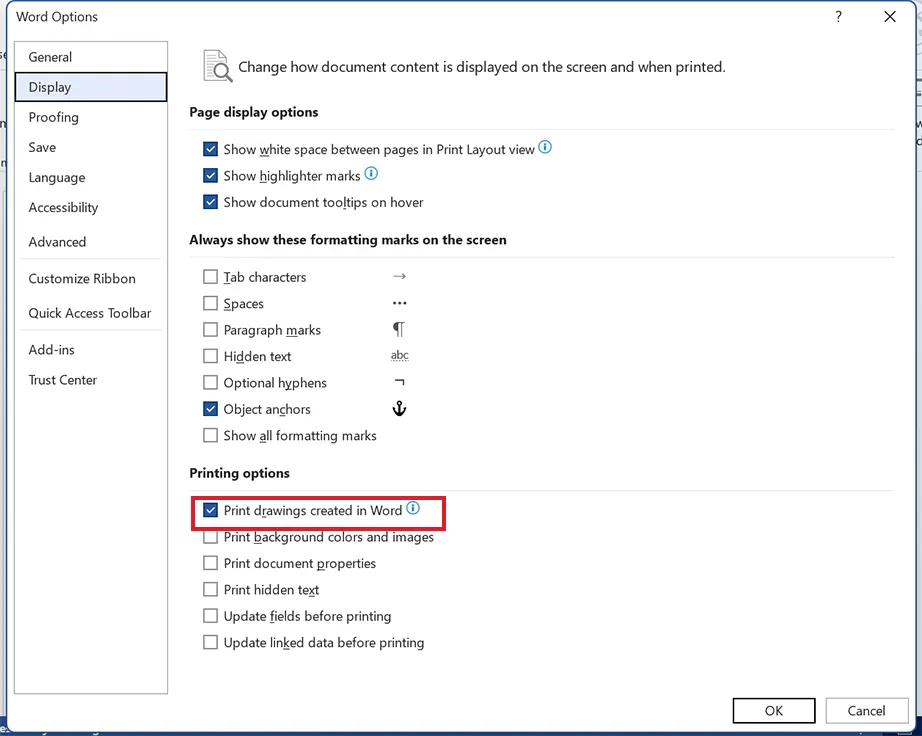
Enabling the “Print drawings created in Word” option in print-preview settings fixes picture not found or picture not available issues by forcing Word to treat all embedded graphics as essential printable objects. So, now the application’s layout engine fully loads, processes, and displays every visual layer directly on your screen, matching the final printed output.
Open the Microsoft Word application on your PC.
From the top menu ribbon, select the File menu.
Select Options (orMore > Options)from the bottom-left sidebar.
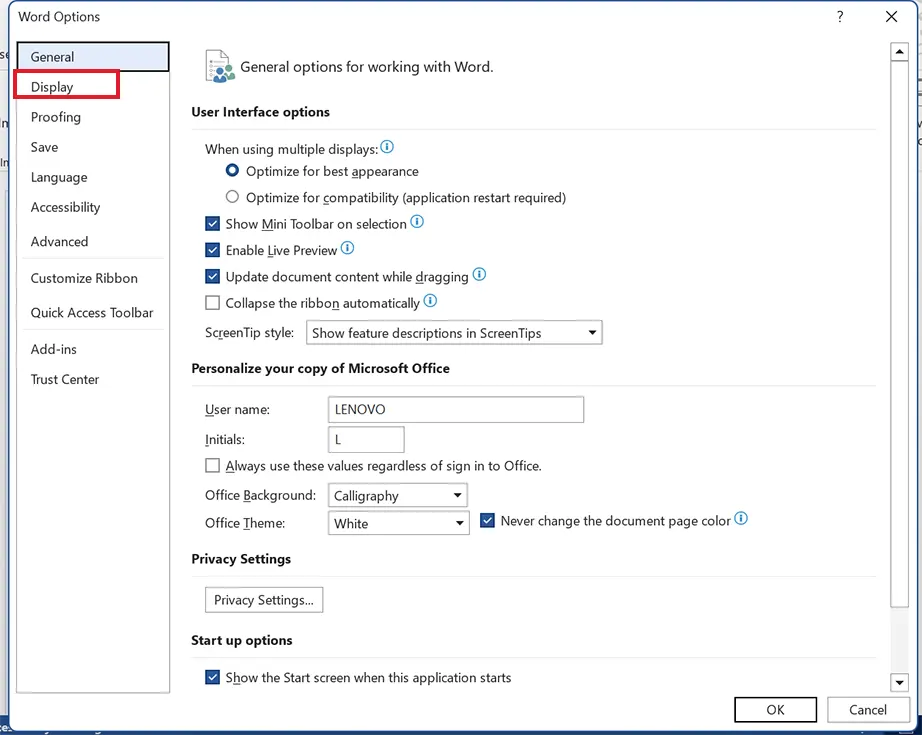
From the left sidebar, go to the Display tab.
In Printing options, check the box next to Print drawings created in Word to enable it.
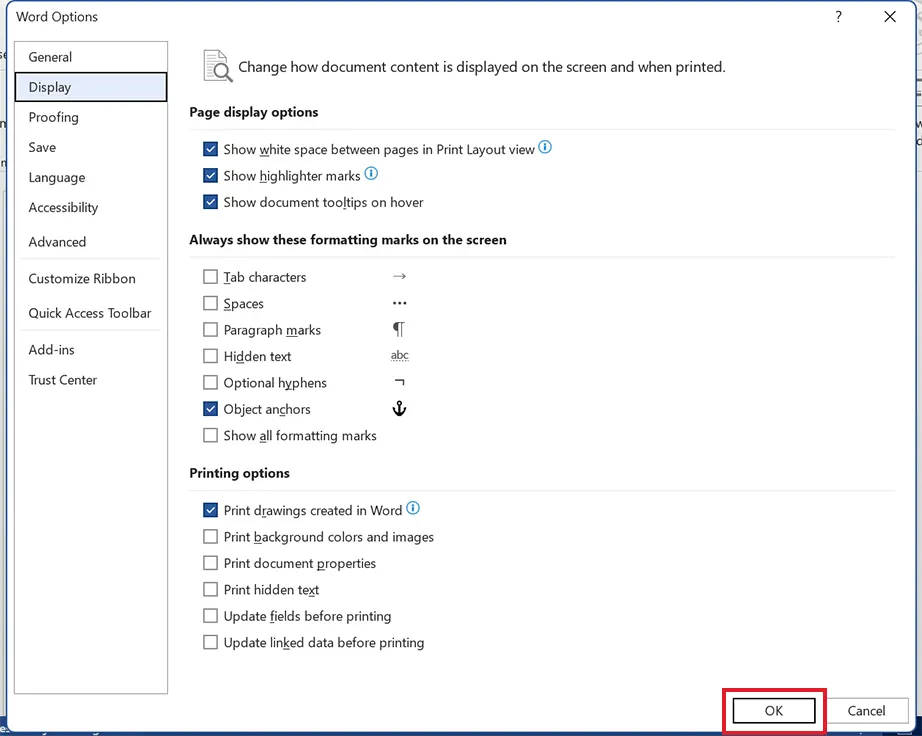
Click the OK button to save the changes.
Method 5: Disable “Use draft quality”
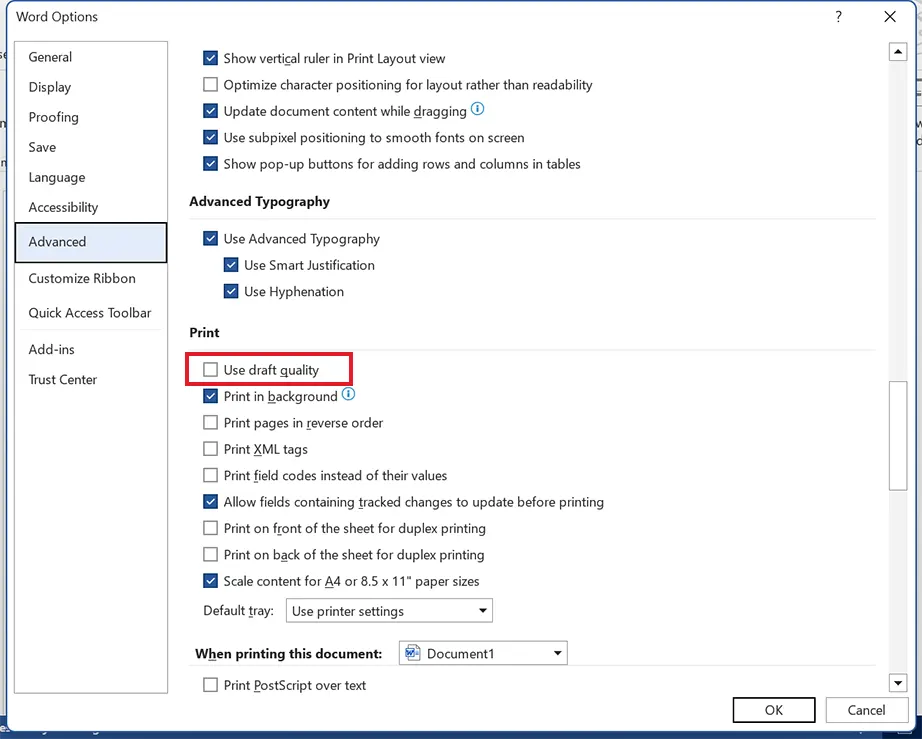
Microsoft Word activates low-resolution modes to save processing power. It prioritizes raw typing speeds over graphic rendering. If the layout is forced into a draft layout, it completely strips out image layers, causing this image cannot currently be displayed word error to appear. Disabling this battery-saving function makes Word pull your graphics out of text-only mode and fully render high-resolution data on your document screen.
You can disable this setting in the application’s advanced options using these steps:
Open Microsoft Word on your PC.
From the top Menu bar, click and open the File menu.
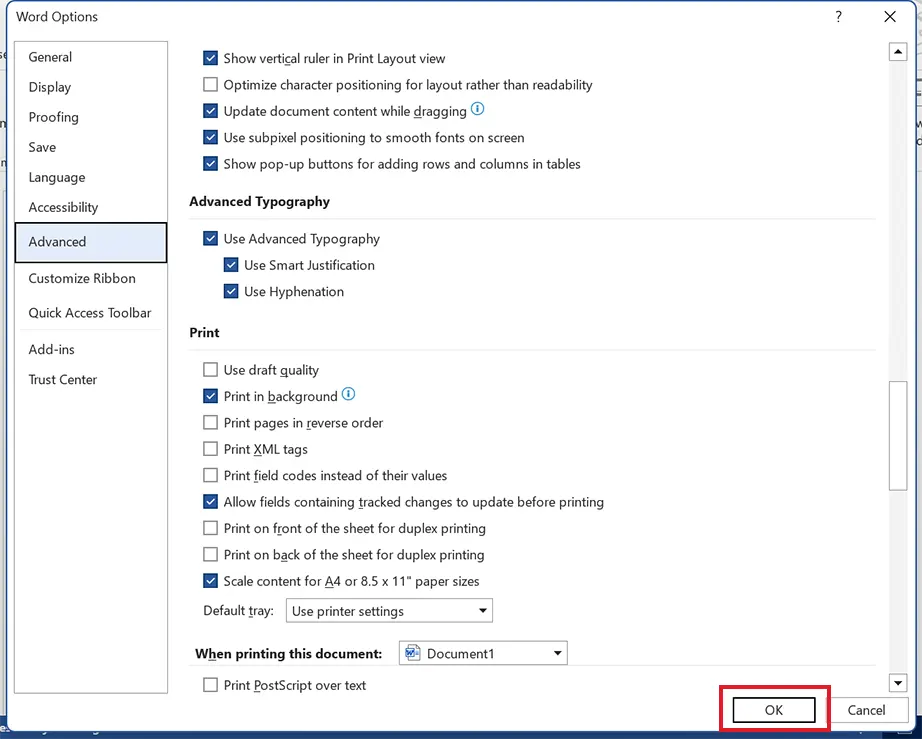
From the left sidebar, go to the Advanced tab.
Scroll down to the Print section and uncheck the box in front of “Use draft quality” to disable it.
Click the OK button to save the changes.
Method 6: Disable “Picture Placeholders”
The “Picture Placeholders” feature is another legacy layout setting that suppresses JPEG and PNG data to conserve system RAM on text-heavy documents. When this is enabled, Word replaces graphics files with empty geometric frames. If you are unable to insert the picture word processors require it to render visuals; simply disable this placeholder filter, and it instantly fixes your picture can’t be displayed issue.
Open Microsoft Word on your PC.
Go to the File menu.
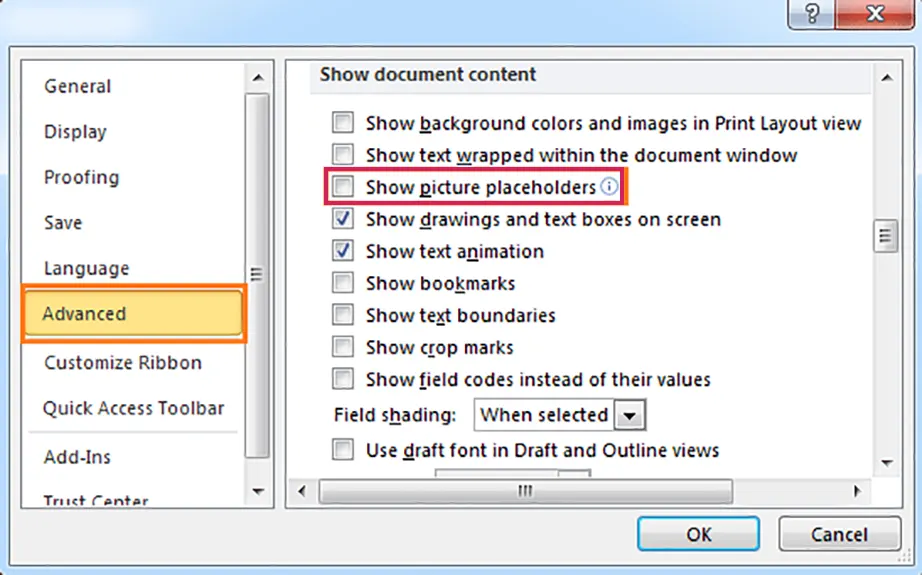
Go to the Advanced tab from the left sidebar.
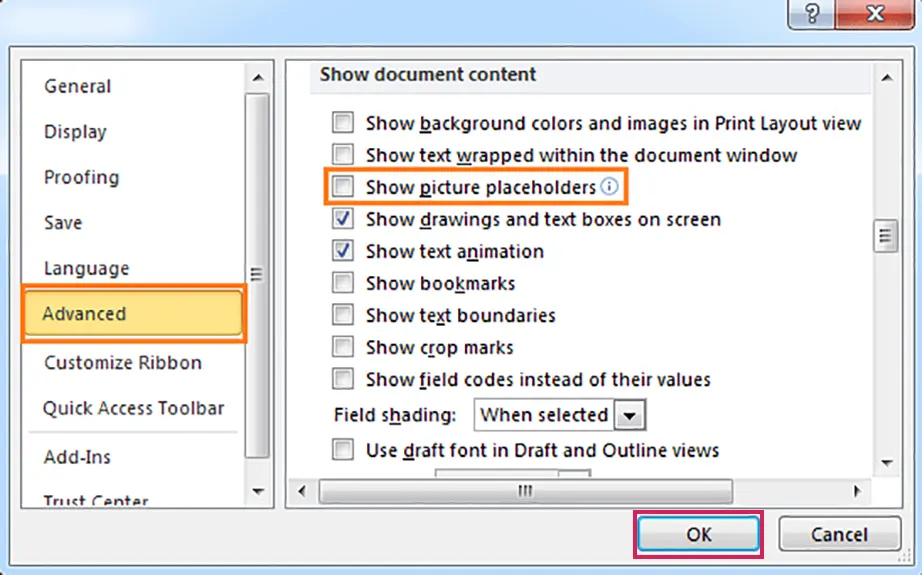
Uncheck “Show Picture Placeholders” to disable it. (Note: This is only available in older Word versions)
Note: If the “Show picture placeholders” checkbox is missing, you are likely using a modern version of Word where Microsoft has removed this legacy option.Alt: Show document content
Click the OK button to apply the changes.
Method 7: Update Graphics Drivers
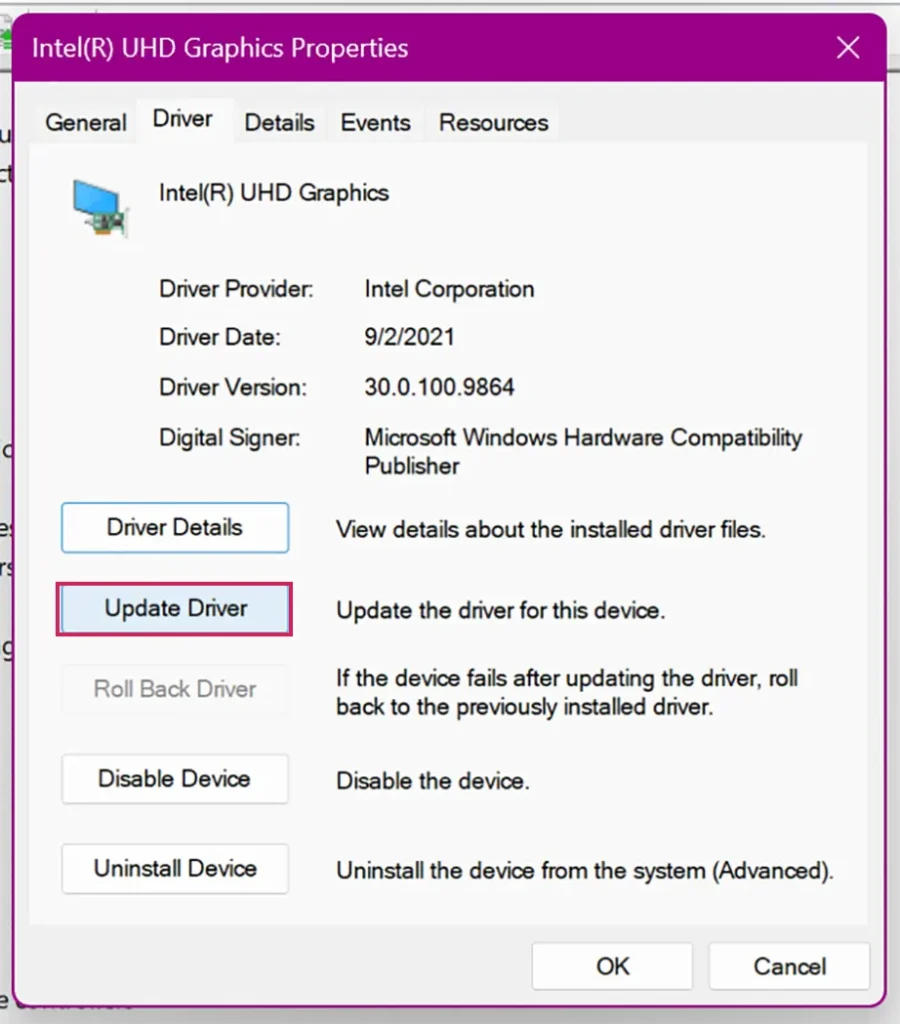
Windows display drivers being outdated or corrupted can result in this image cannot currently be displayed word error. To fix this, update your GPU drivers via Device Manager. This fixes any hardware display failure that is causing you to be unable to load picture or PDF file.
Note:You can also fix this picture can’t be displayed PowerPoint error using this method.
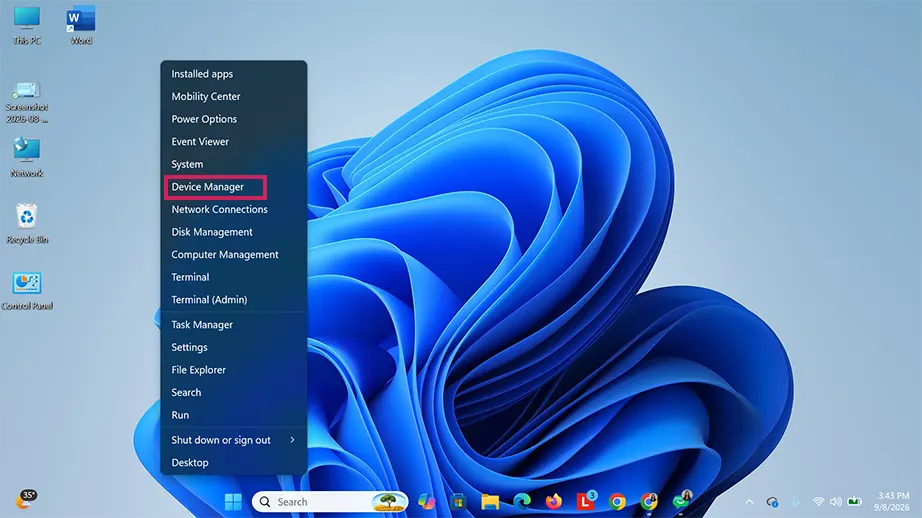
Right-click the Windows button in the taskbar and select Device Manager.
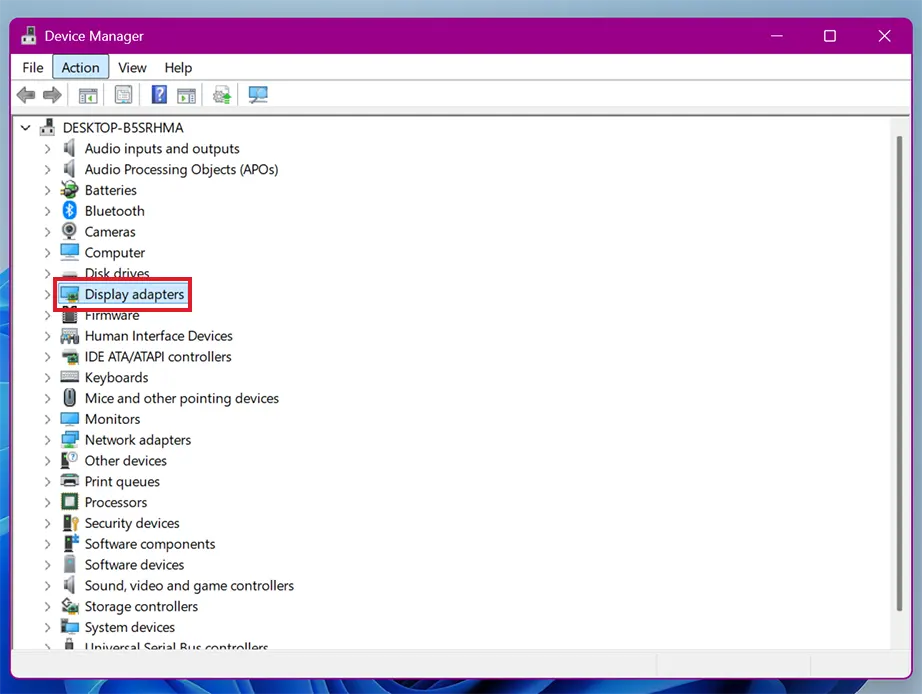
Click the arrow before Display adapters to expand it.
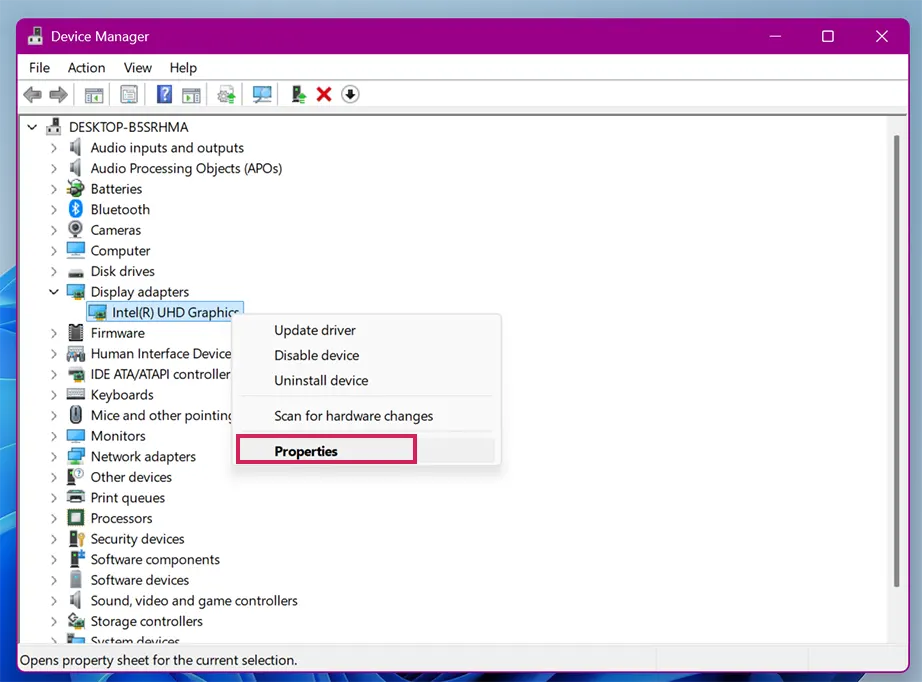
Right-click on the specific graphics driver (such as Intel(R) UHD Graphics 630) and select Properties.
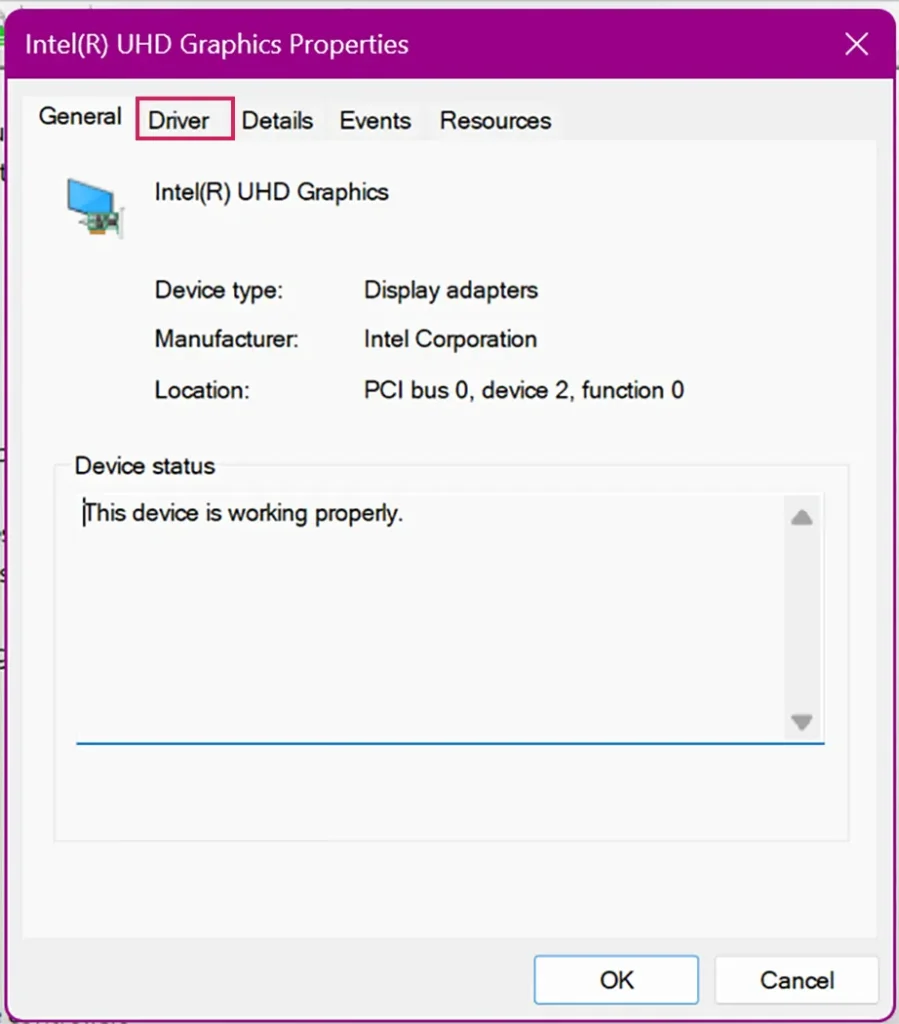
Go to the Drivers tab.
Click the Update Driver button.
Method 8: Repair Problematic File
Modern .docx files are compressed archives containing hidden XML text codes linked to an internal media folder. Using Word’s built-in “Open and Repair” feature launches an automated code audit that scans the document’s file structure and recovers hidden or broken images.
Open the Microsoft Word app.
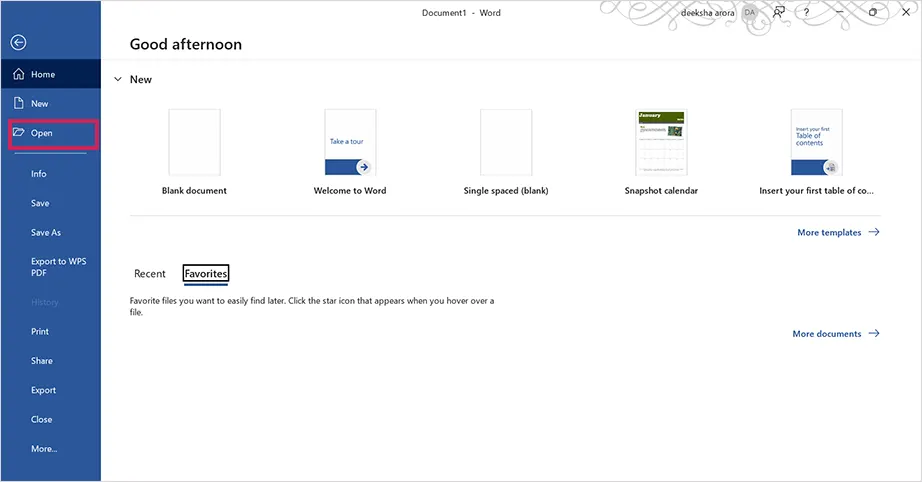
Go to File and, from the left-hand menu, click Open.
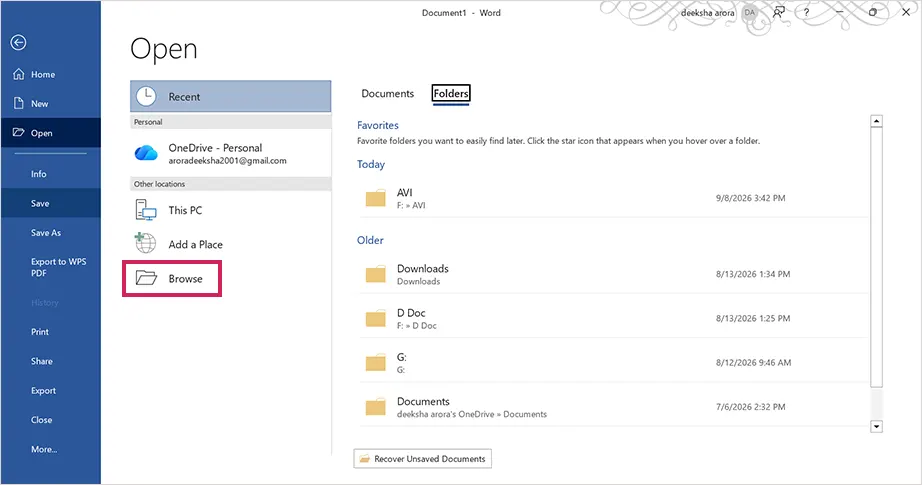
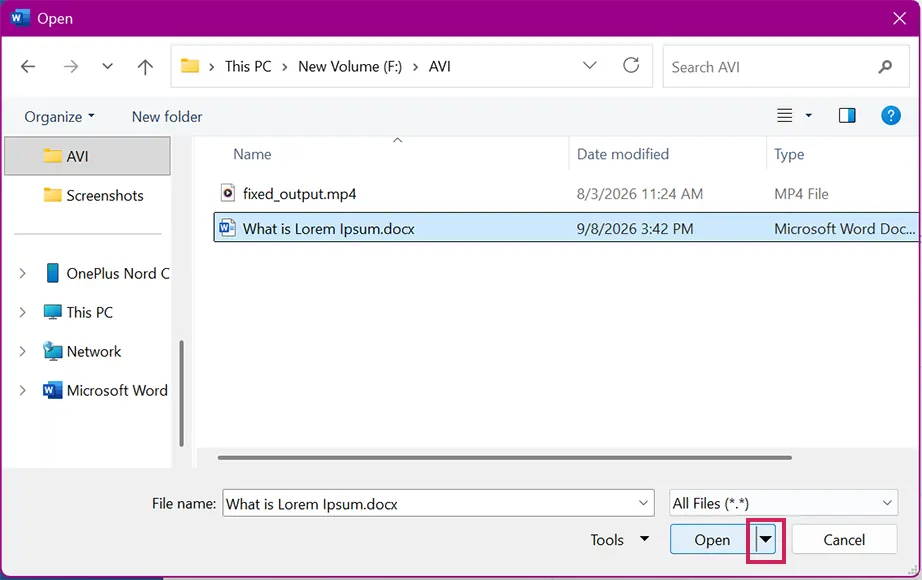
Click Browse and select the Word file you want to repair.
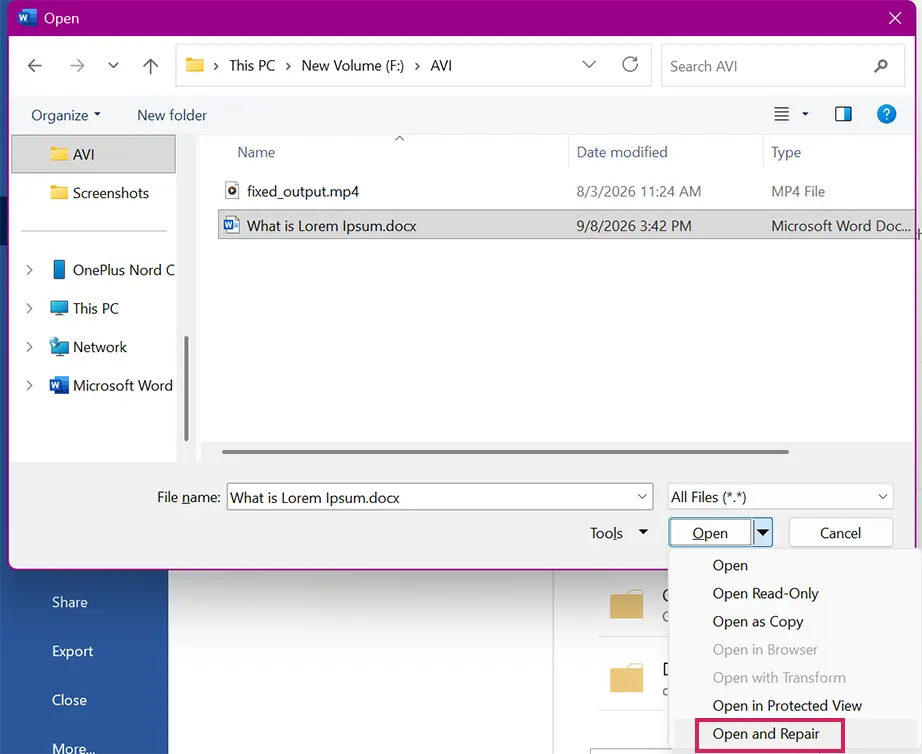
Once selected, click on the small arrow next to the Open button.
Select Open and Repair to fix the Word file and open it.
The solution to this image cannot currently be displayed Word error comes down to a quick setting adjustment. Whether your document accidentally switches to a low-overhead view like Draft mode, is hidden behind text wrapping layers, or has memory-saving features activated like picture placeholders and draft quality, you now know how to fix it.
Since most image display errors are completely reversible and take just a few clicks to correct, keep this handy troubleshooting checklist bookmarked for the next time your visuals refuse to load. Now that your layout engine is fully optimized, your images in Word will display perfectly every single time.
Frequently Asked Questions
Q1: How to fix this image cannot currently be displayed Word?
Ans: To fix this error, right-click the empty image box, hover over Wrap Text, and select In Line with Text. Also, go to File > Options > Advanced, scroll to Show document content, and uncheck Show picture placeholders while checking Show drawings and text boxes on screen.
Q2: Why is my picture in picture not working?
Ans: Picture-in-Picture (PIP) fails when the feature is disabled in your system settings or if the specific app blocks it. On iOS or Android, go to Settings > Apps (or General) > Picture in Picture and toggle it on.
Q3: Why does it shows unable to load picture or PDF file?
Ans: Microsoft Word shows this error when the file path link to an inserted image or embedded PDF object becomes broken. This happens if the source file is moved or deleted from the local drive. Re-inserting it directly or embedding it as an icon instead of linking to an external path fixes this issue.
Q4: How to fix this image does not exist error?
Ans: fix this image does not exist error in Microsoft Word by repairing corrupted file architecture. When a .docx file suffers an unexpected cloud sync error, its internal XML code breaks, making Word think that image does not exist. Go to File > Open > Browse, select the file, click the arrow next to Open, and select Open and Repair.
Q5: Why are my images not displaying in Word?
Ans: Images vanish in Word when memory-saving features or low-overhead layout views are active. If your workspace switches to Draft or Outline view, graphics are hidden by design to optimize typing performance. Activating Picture Placeholders or turning on Draft Quality will also strip visual elements away, leaving empty boxes behind.
Q6: How do you fix this image cannot currently be displayed in PowerPoint?
Ans: Because Word and PowerPoint share the same Office rendering engine, this error starts from hardware acceleration conflicts or broken linked paths. Fix it by opening your presentation, going to File > Options > Advanced, and checking Disable hardware graphics acceleration.
Kajal Singh is a Data Recovery Writer at Notchox, specializing in data recovery, storage systems, RAID, and digital forensics. She writes technical processes, tools, and cases into clear, engaging articles, blogs, and guides. Kajal does thorough research, deep analysis, and collaborates with experts to produce high-quality and engaging content that is easy to understand for every reader.