An unexpected system crash can be frustrating, leaving your files inaccessible or lost. While Windows PCs crash 3.1x more often than Macs, it’s important to understand OS crash recovery. The general process for recovering files after OS crash is diagnosing the failure type and selecting a recovery path based on whether the hardware still functions.
This data recovery article will provide actionable steps to recover files after OS crash using both built-in system tools and professional data recovery software.
Quick Answer:
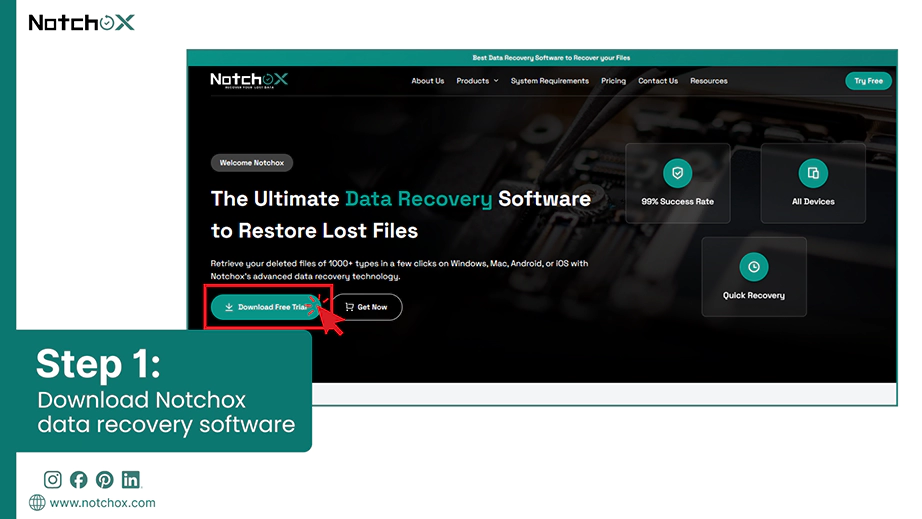
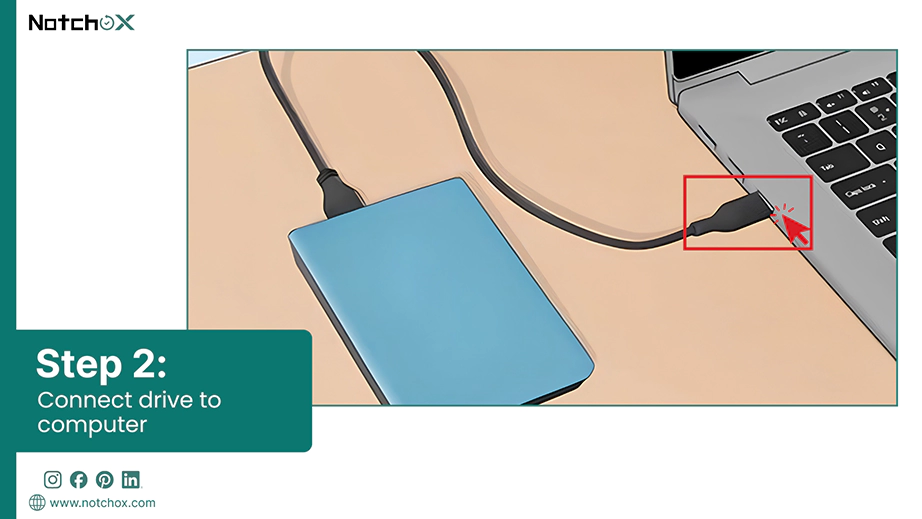
Recovering files after OS crash is possible using Notchox data recovery software. Because your OS is down, remove the crashed hard drive, connect it to a working PC, and install Notchox file recovery software. Select the drive and start the scan. Finally, preview the recoverable files and select the files you want to keep.
How to Recover Files After OS Crash Without Data Loss?
Recovering files after an OS crash requires immediately stopping use of the device to prevent overwriting your information. Next, use a working computer to either boot your crashed system into a “live” USB environment or connect its hard drive externally using a SATA-to-USB adapter for data recovery. Once connected, you can use built-in system tools or data recovery software to restore and save your files directly to an external drive without any data loss.
Method 1: System Methods
For those who prefer not to use third-party tools for OS crash recovery, Windows provides several built-in utilities designed to repair the OS and retrieve your files. However, these tools require precise commands, so it is important to follow each instruction carefully to avoid further complicating the crash.
Through System Restore
If you have previously set up recovery points, you can easily use System Restore on Windows to recover files after OS crash. It reverts your OS to a state before the OS crash occurs. This method is designed to fix system files and registry settings rather than recover deleted files, yet it is a powerful way to get back access to your booting Windows environment, where your files are trapped.
Using these steps, you can roll back system changes for OS crash recovery:
Access from Within Windows:
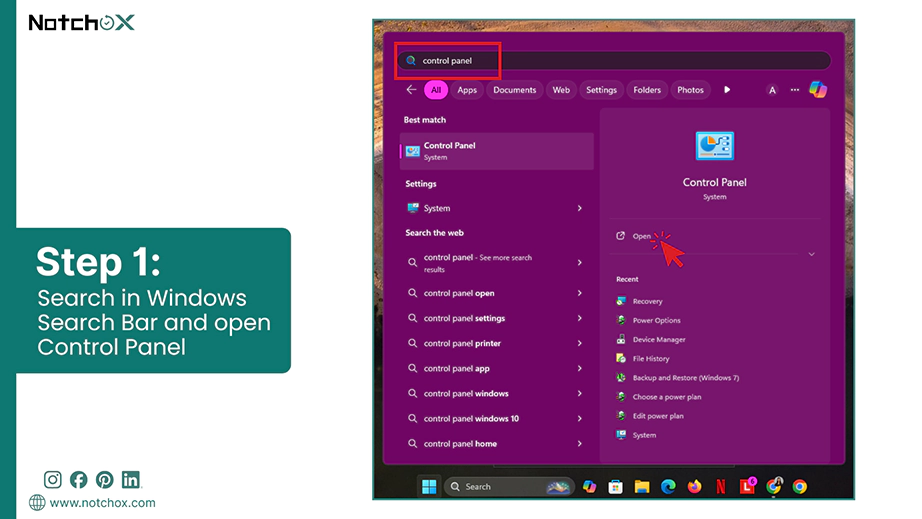
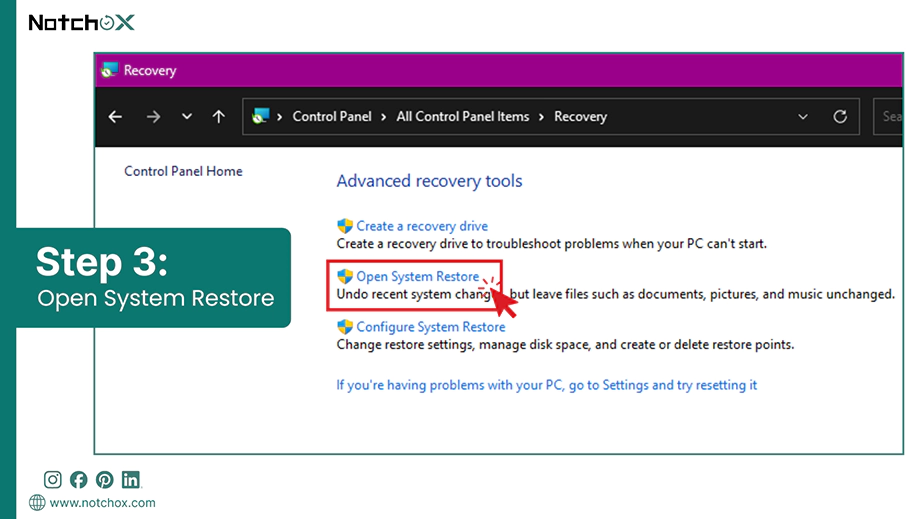
Search for and open the Control Panel on your PC.
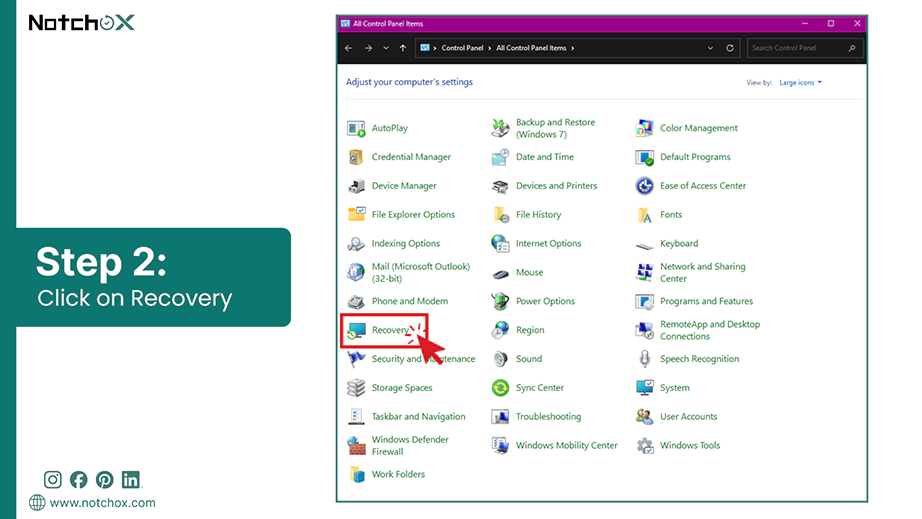
Go to Recovery.
Click Open System Restore.
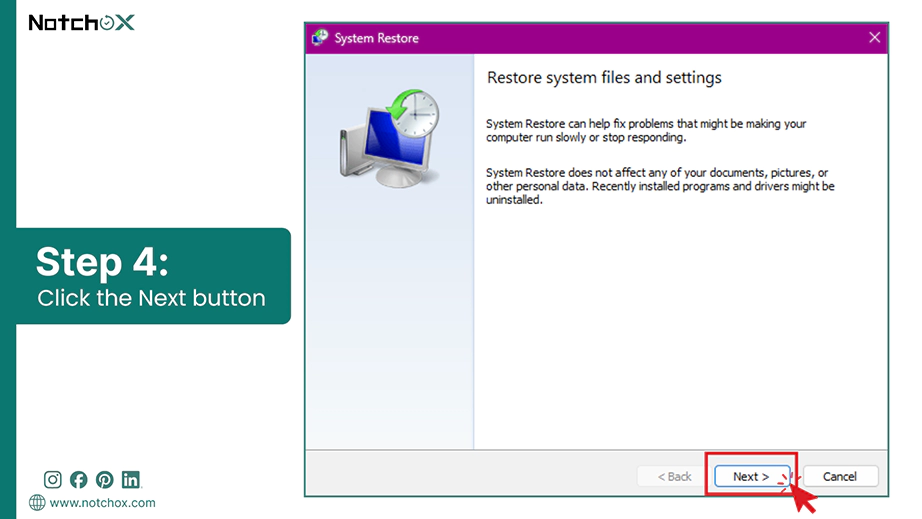
Click Next on the welcome screen.
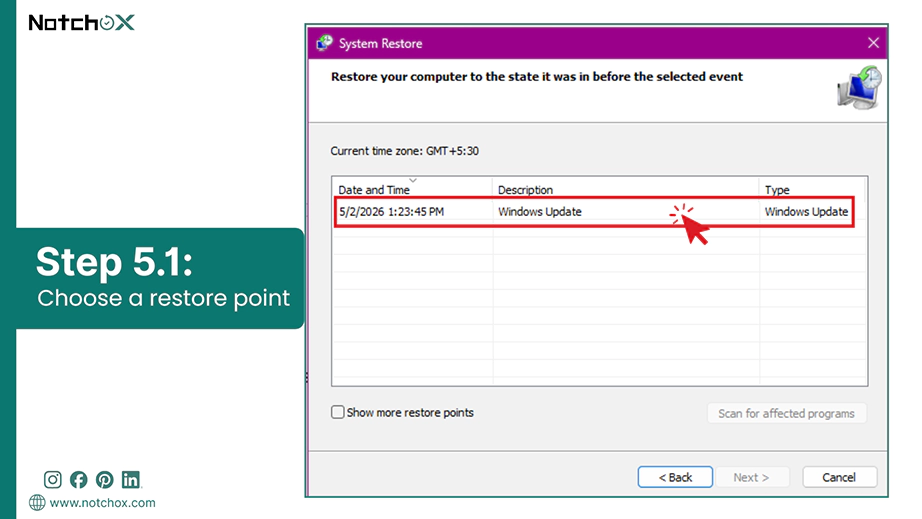
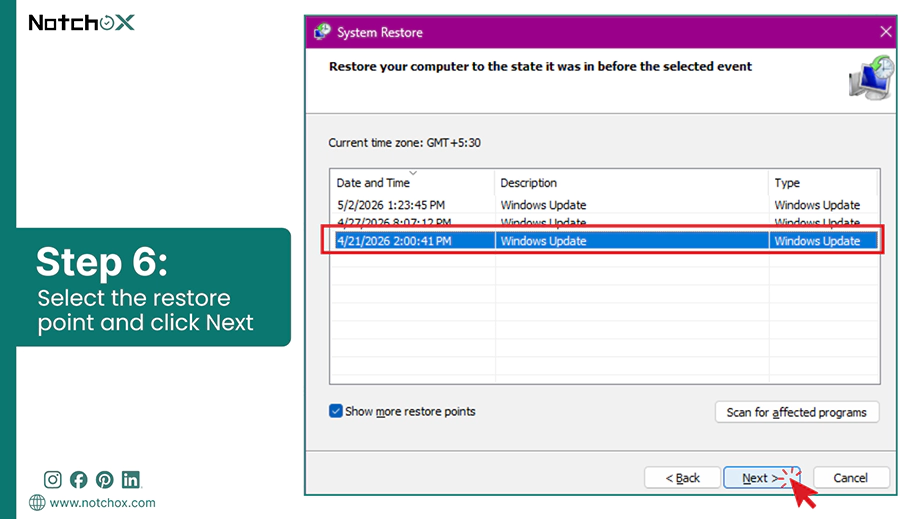
Choose a restore point from the list.
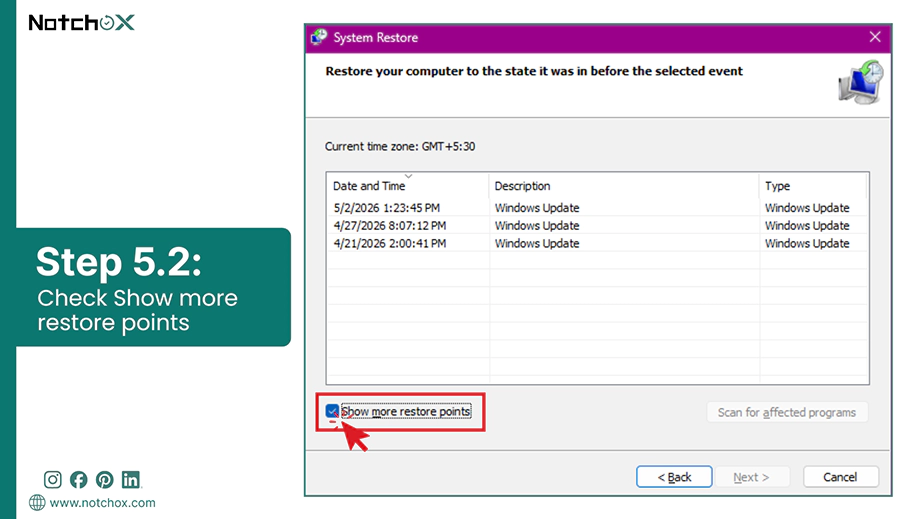
If you don’t see many, check the box for Show more restore points.
Once you get the restore point, click Next.
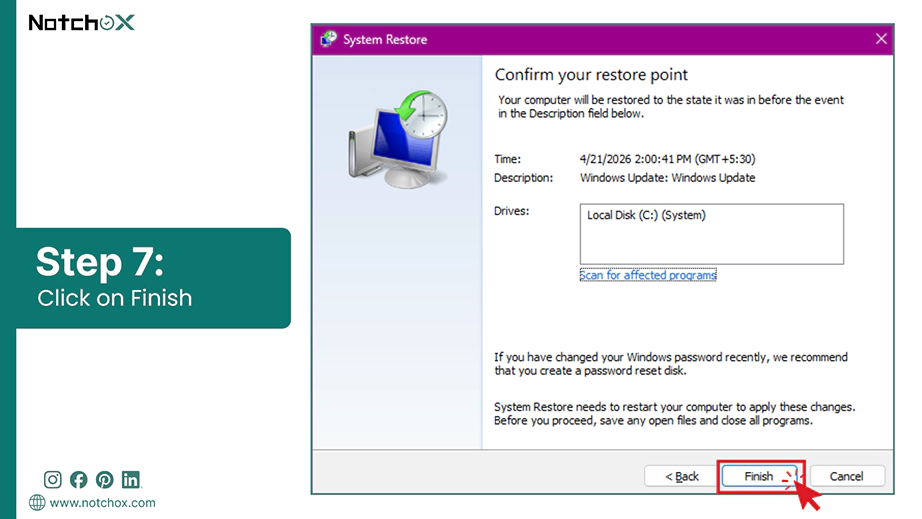
Choose Finish and your computer will restart.
Windows 11 Update: Microsoft sets new 60-day limit for system restore points.
Access if Windows Won’t Boot:
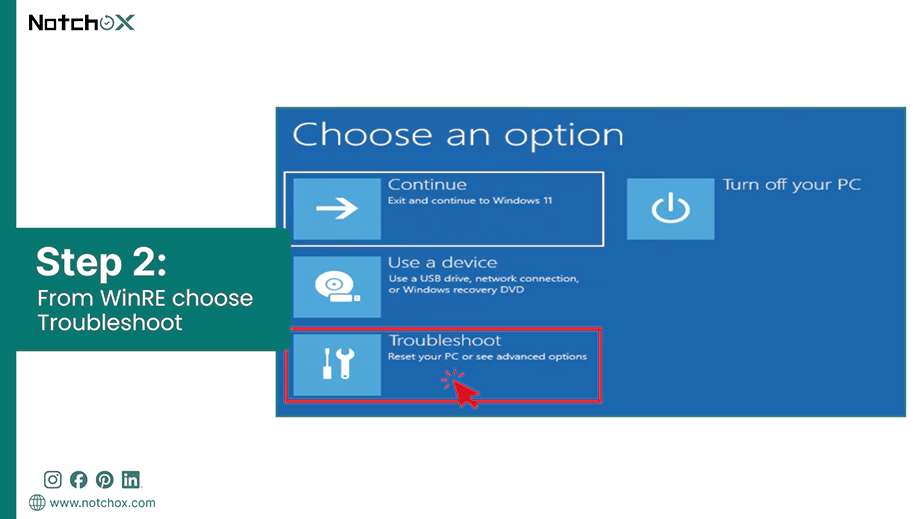
Start your PC and wait for the Windows logo to appear. Press and hold the power button for 5-10 seconds until it turns off. Do this 3 times to enter the recovery environment.
Once in Windows RE, select Troubleshoot.
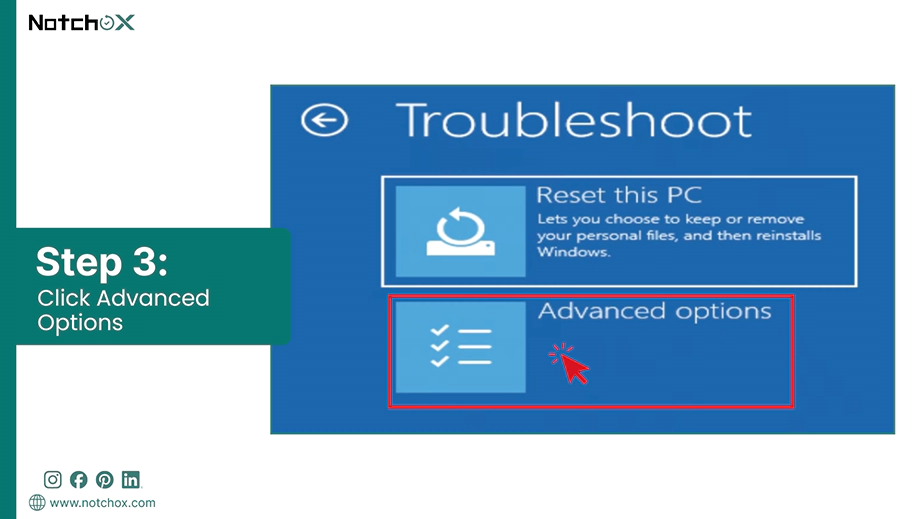
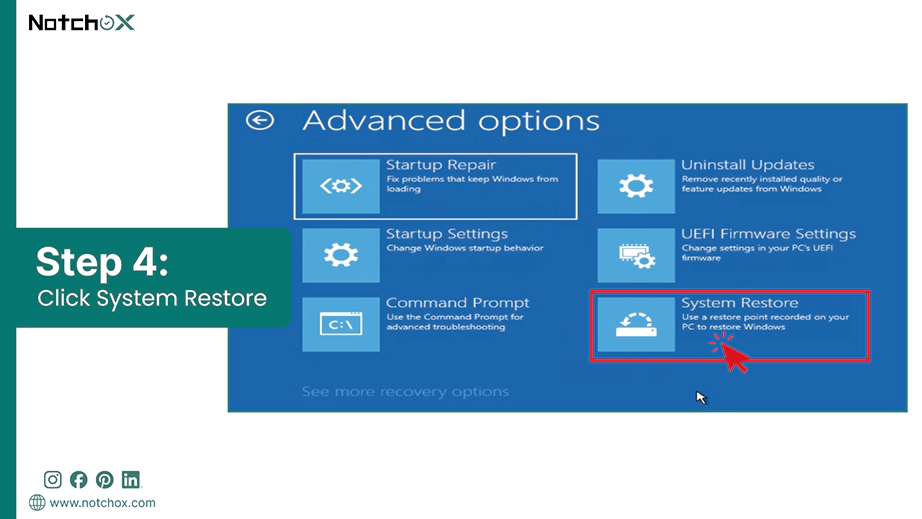
Click Advanced options.
Click on System Restore.
Note: If you can’t find System Restore, click on See more recovery options.
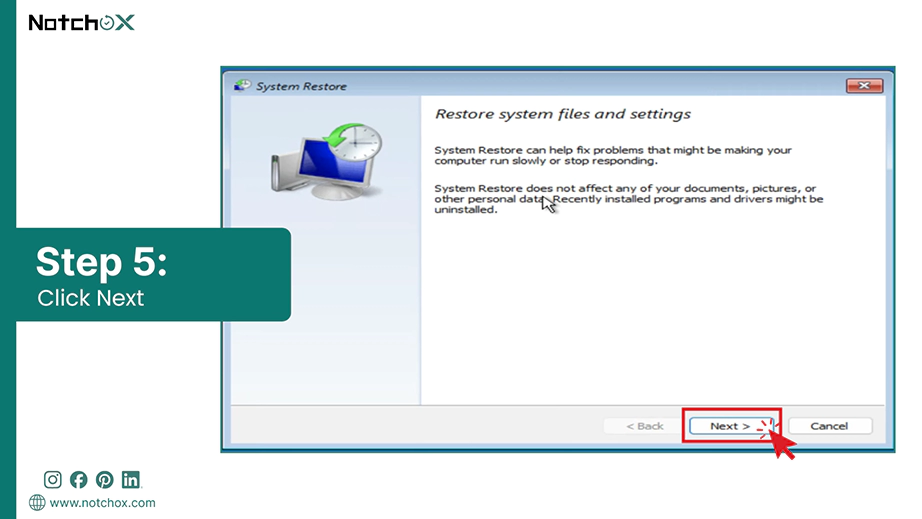
On the System Restore Wizard, click Next.
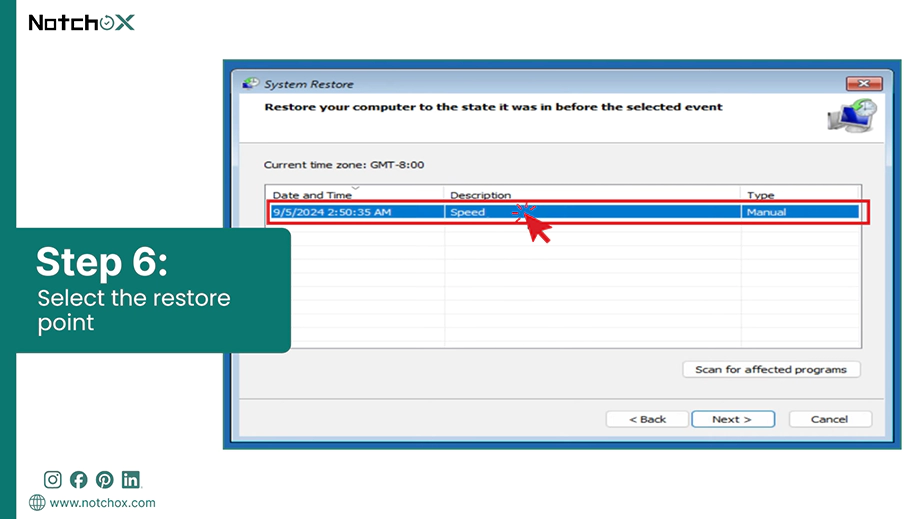
Pick a date and time from the list that was created before the crash happened.
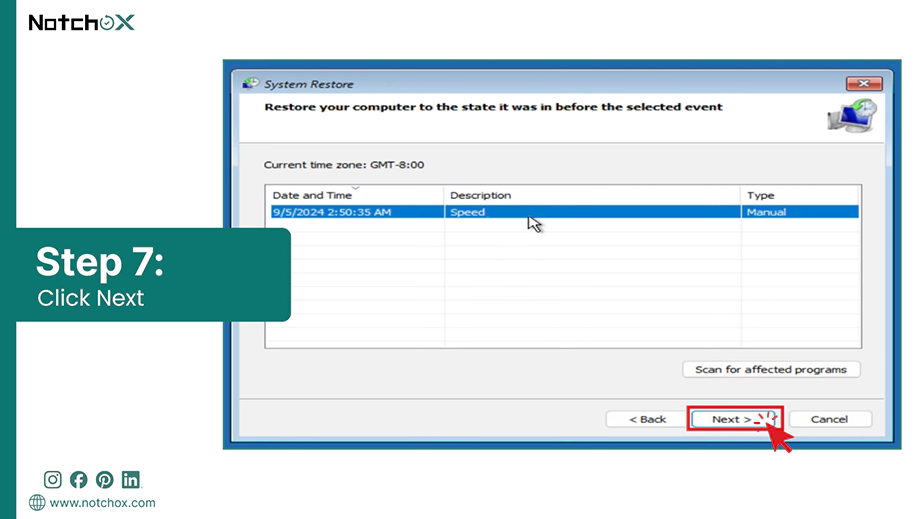
Click Next.
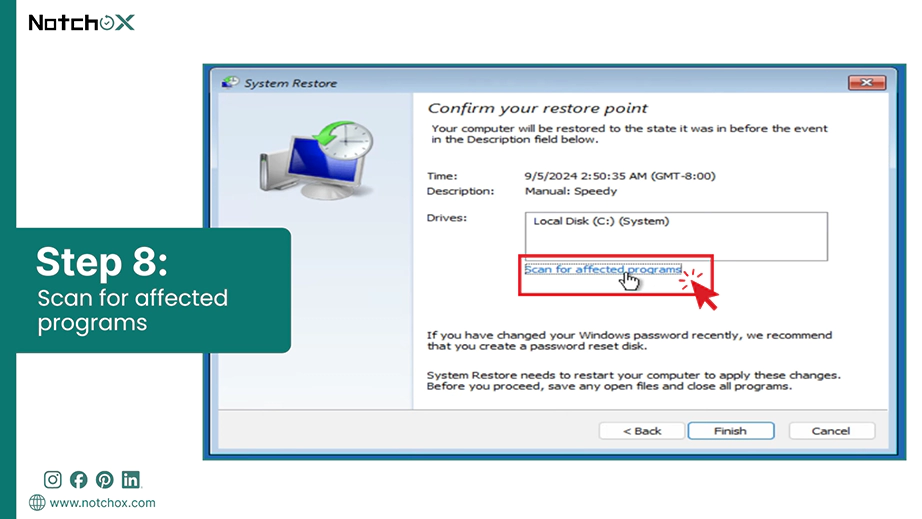
Click Scan for affected programs to see the programs that will be removed.
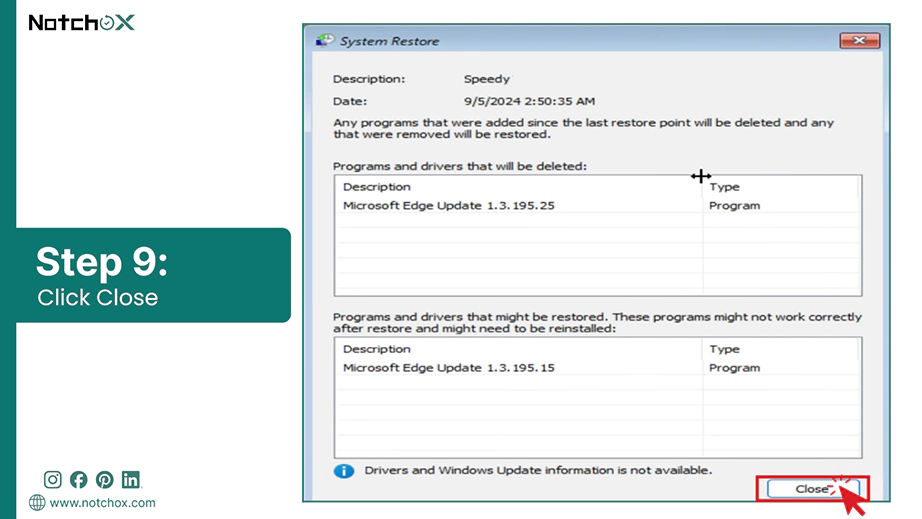
Click on Close.
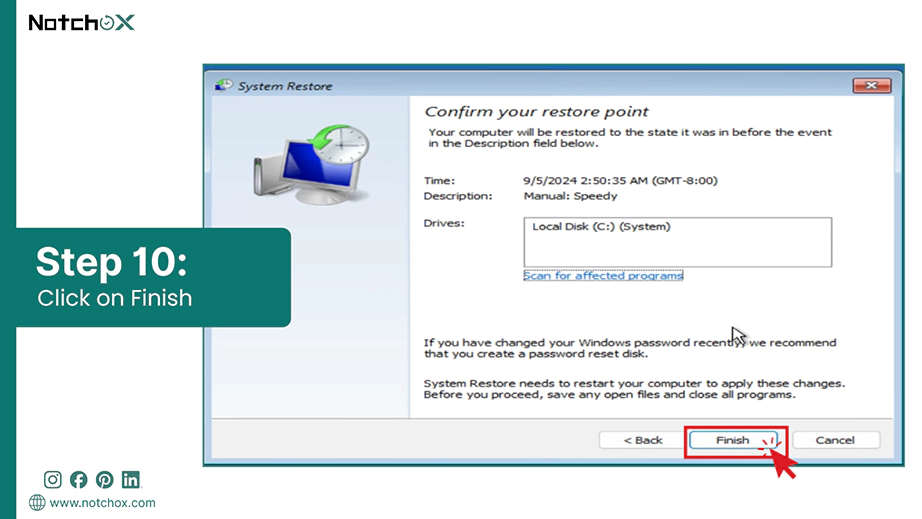
Click Finish.
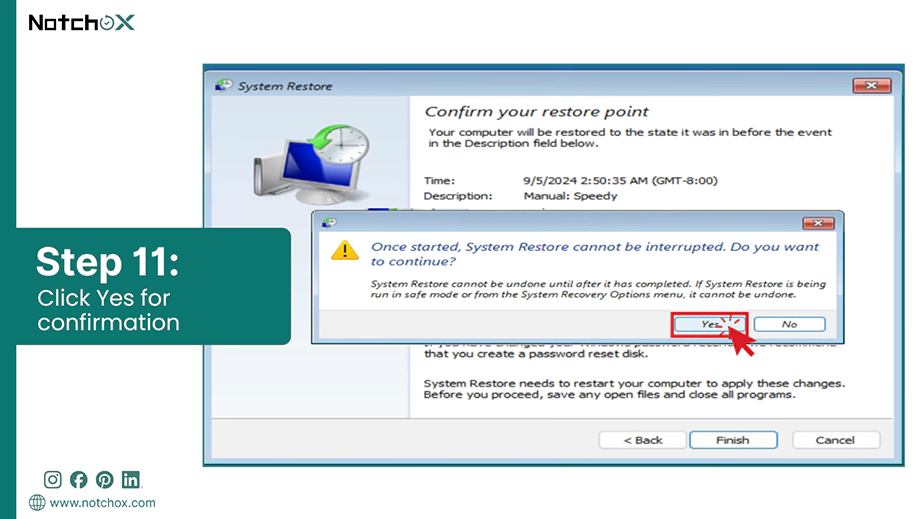
Confirm by clicking Yes.
With your system back online, you can safely secure your files and protect them against future interruptions.
Recovering OS Crash Recovery Using Windows File History
If System Restore doesn’t solve the issue, File History is your next built-in tool to restore files after system failure. Unlike system-wide rollbacks, this feature focuses on user data by taking periodic snapshots of your folders and saving them to an external drive or network.
Note: For the File History plug-in, your external storage is originally used to set up your backups. Windows can not retrieve these versions unless it accesses the physical storage where the copies are kept.
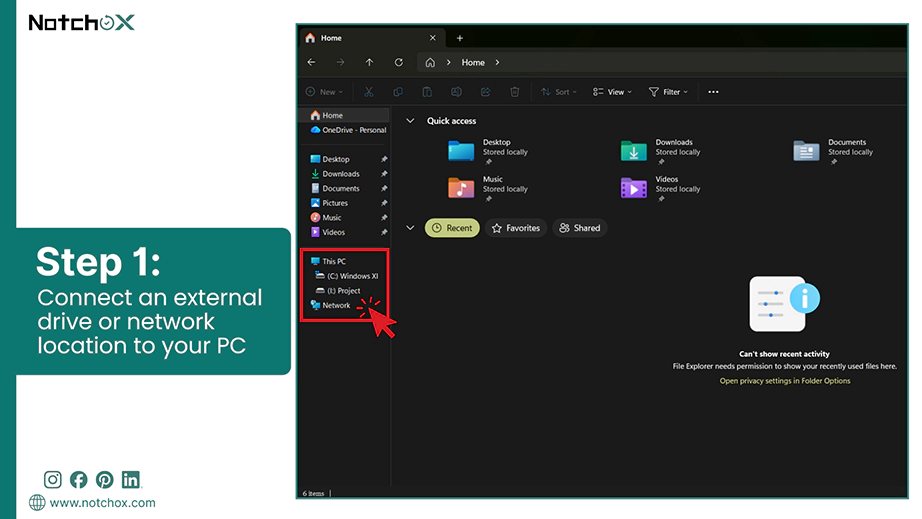
Connect an external drive or network location to your PC.
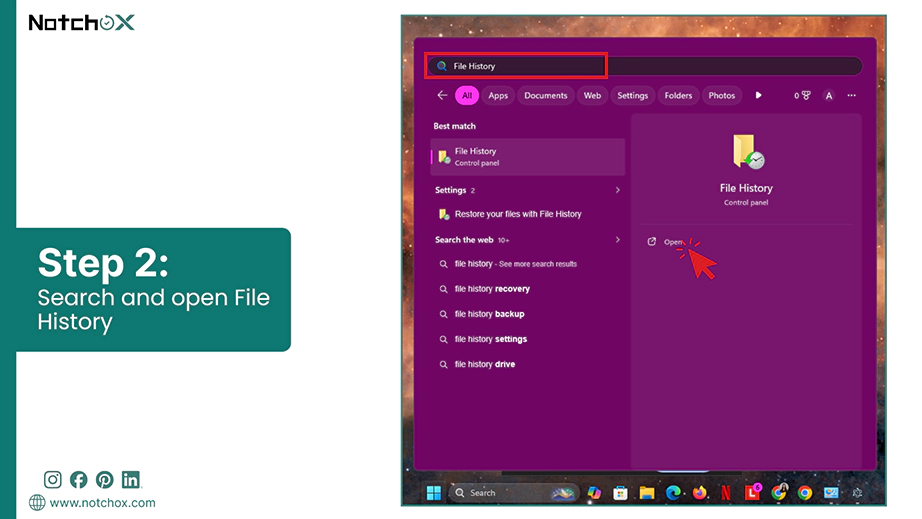
Click the Start button and type “File History.” Select it from the results.
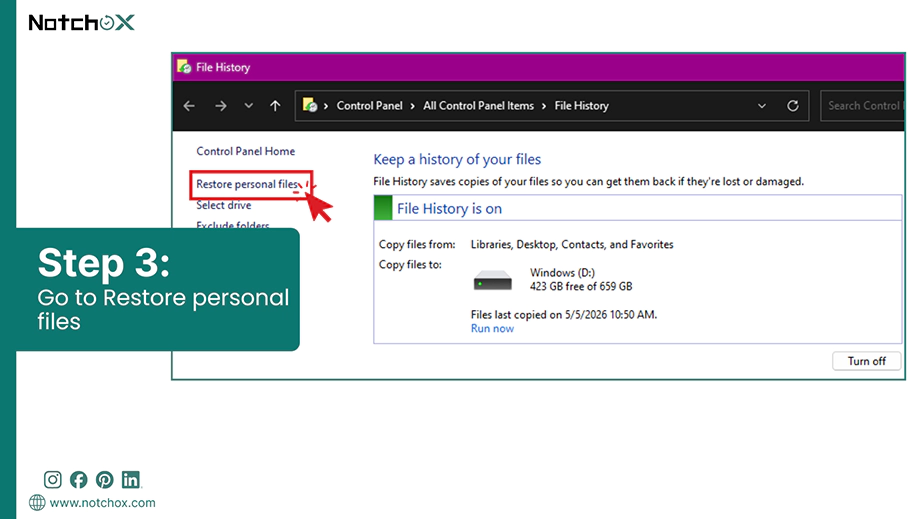
This opens the File History Backup settings. From the left panel, select Restore personal files.
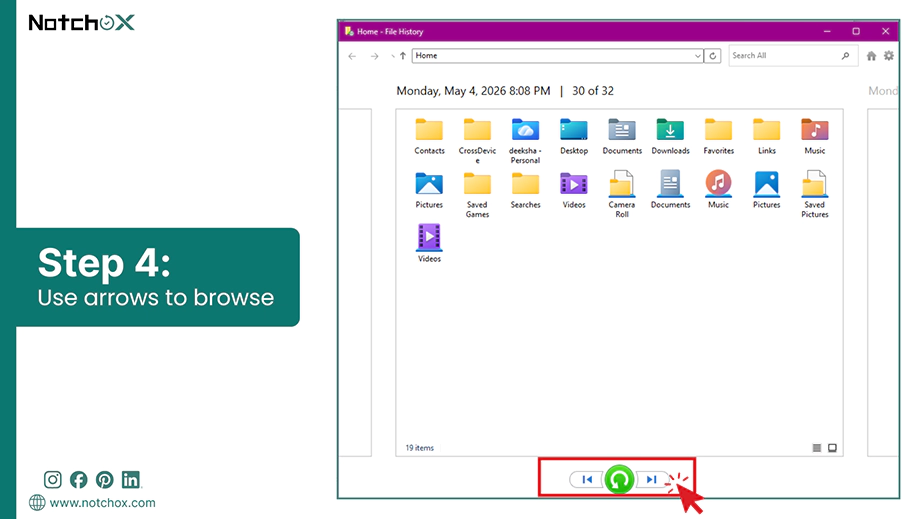
Browse through previous versions using the left and right arrows at the bottom of the Window.
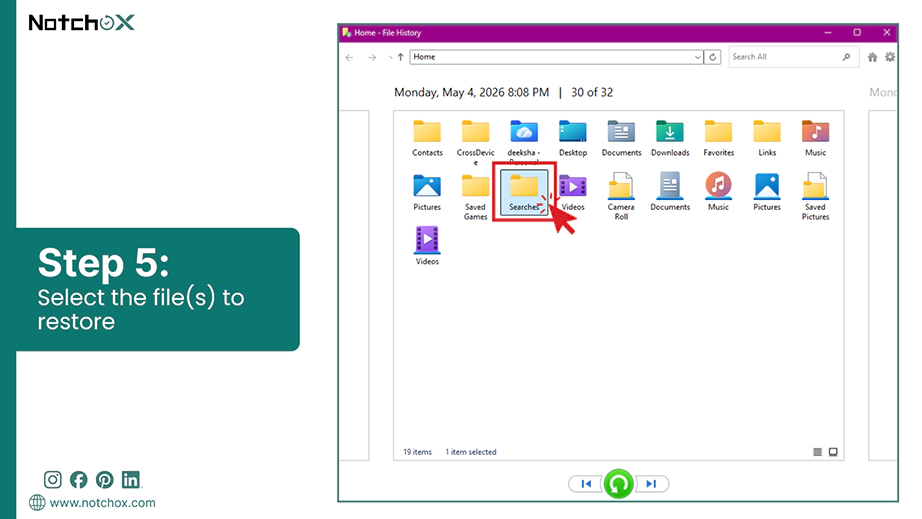
Once you reach the specific date and time before the OS crash, select the files you want to restore.
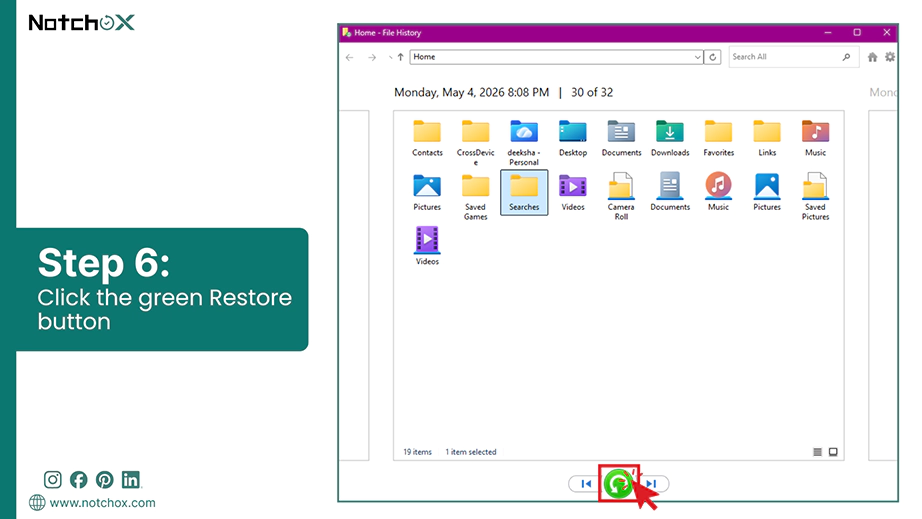
Click the green Restore button to restore the items to their original location.
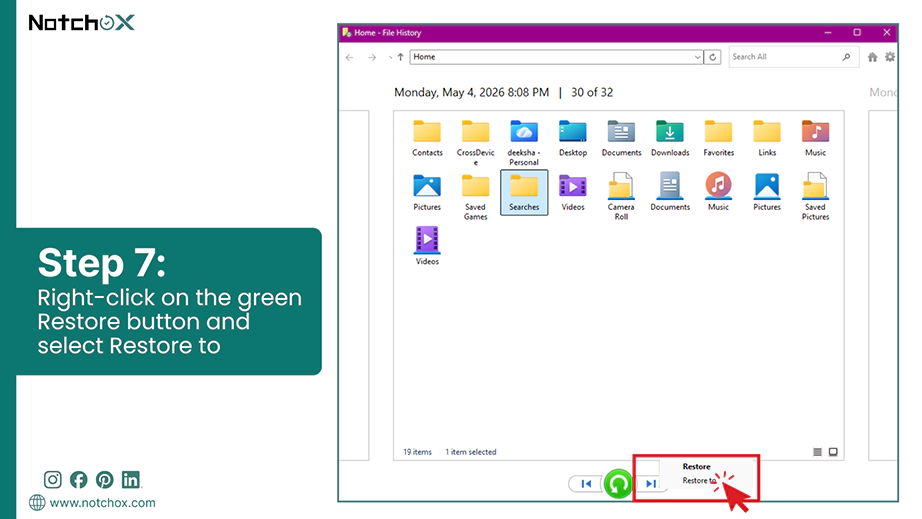
To avoid overwriting existing data, right-click on the green Restore button and select Restore to.
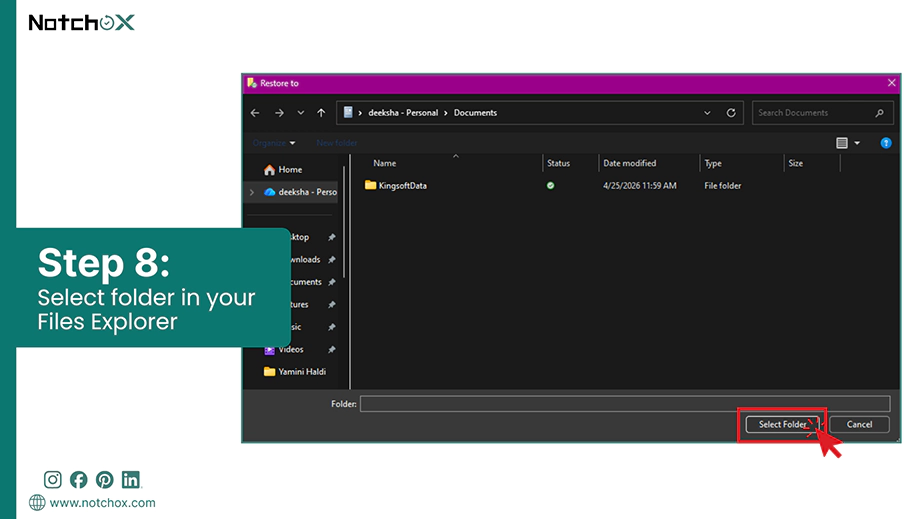
Now, select the desired location in your Files Explorer and click Select Folder.
Booting From a Live USB (WinRE)
When your Windows OS is so badly damaged that it won’t load at all, booting from a live USB to access the Windows Recovery Environment (WinRE) is the ultimate method for system crash recovery. It provides an external gateway to reach your drive. You can execute command-line recovery before attempting a full system repair or reinstallation.
Plug in your USB drive.
Turn ON your PC and start pressing your device’s BIOS key (commonly F2, Del, F11, or F12) to open the boot manager.
Select your USB drive from the list and press Enter.
When you see the Windows Setup Dialog box, hold Shift+F10 to open the command prompt.
Enter the command to list all drives and partitions:
diskpart
Enter the command to list volume:
list volume
From the displayed list, look for the drive that matches your main storage size, select the drive, for example:
select vol 0
Assign the drive a letter:
assign letter=e:
Type exit and press Enter.
Enter the command to copy entire folders.
xcopy [Source] [Destination] /s /e /h /i /c /y
The number of copied files will be displayed once the process is complete.
Tip: To display the folders in the drive, you can go to the parent drive and use the directory (dir) command.
Fixing through SATA-to-USB Adapter
A SATA-to-USB adapter is one of the most reliable methods for OS crash recovery if your computer’s hardware is still functional but the operating system is unresponsive. In this method, you remove the hard drive from the crashed computer and connect it to a working laptop like a standard external thumb. You can simply drag and drop your files into a healthy system without software-based risks.
Power off your crashed PC and remove the internal hard drive.
Plug the SATA end of the adapter into the hard drive and the USB end into a separate working computer.
On the working computer, open File Explorer. You will see Local Disk pop up as you connect.
Simply copy your files and paste them onto the working computer.
Method 2: Use the Data Recovery Software
Third-party data recovery software provides specialised system crash recovery. It is the safety net that you can use after you have exhausted the Windows built-in methods we previously discussed, or if you want a direct solution for OS crash recovery.
Unlike those native tools that rely on existing system maps, these software programs manually reconstruct the data path to restore the files.
How to Recover Data if an OS is Corrupted Using Notchox Data Recovery Software?
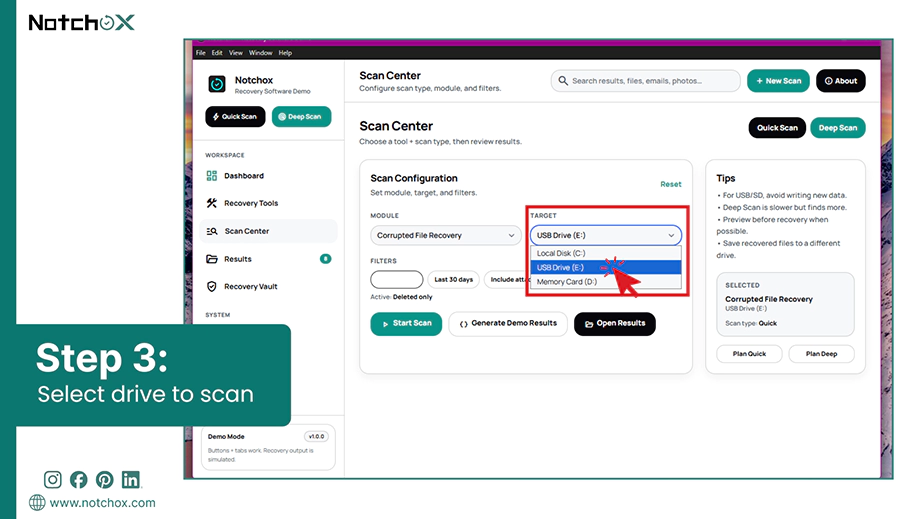
Open the software and select the drive to be scanned for system crash recovery.
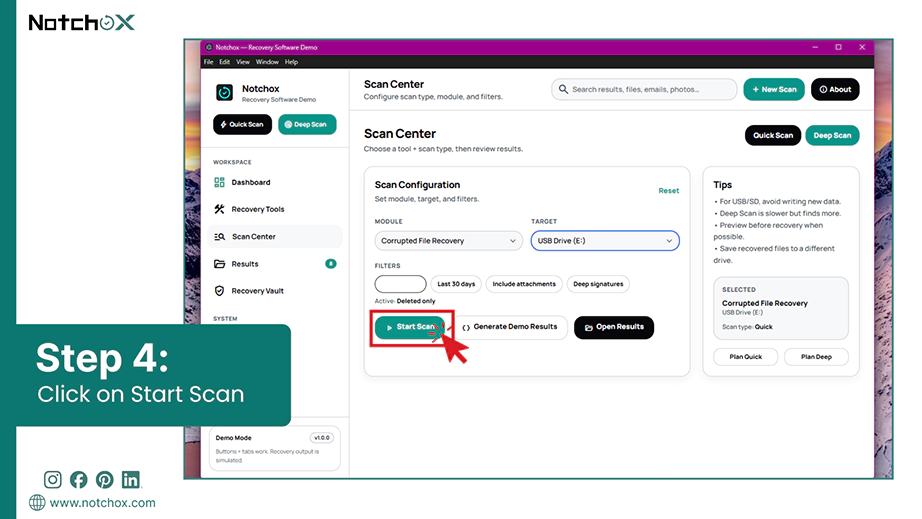
Click the Start Scan button to begin the process. The scan may take several minutes to hours to complete.
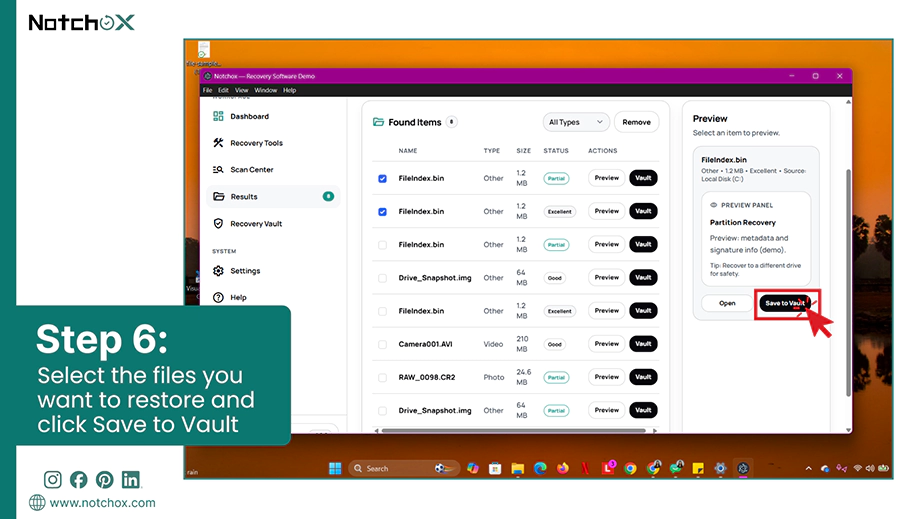
Once the scan is completed, browse the results and click the preview button to have a look at the recovered items.
Select the files you want to restore and click the Save to Vault button to restore them to the separate drive safely.
Crucial Reminder: If you hear clicking, grinding, or any other unusual noise from your OC, stop immediately. These are the signs of hardware failure. Opt for professional data recovery services in such a case.
What to do After System Crash?
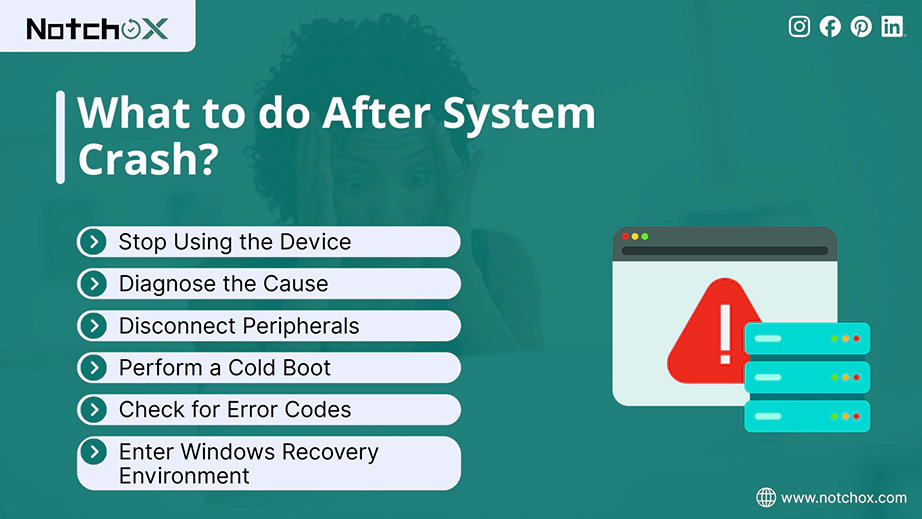
Having explored the expert methods to restore files after system failure, we now shift our focus to the immediate aftermath of the failure. We will see what to do when OS crashes to stabilize your computer and prevent further damage.
Stop Using the Device: Avoid writing any new data to prevent overwriting of files you are trying to recover.
Diagnose the Cause: Check the eros logs to find out what caused the system crash. Listen for any unusual sounds from the PC indicating hardware failure.
Disconnect Peripherals: Unplug the camera, printer, external drivers, etc., because they might be the reason behind complete system failure.
Perform a Cold Boot: If the screen is frozen, hold the power button for 10 seconds to force a shutdown. Wait for a minute before restarting to clear RAM.
Check for Error Codes: Look for “Blue Screen of Death” (BSOD) stop codes or QR codes.
Enter Windows Recovery Environment: Windows should trigger WinRE if it couldn’t start in three attempts. From here, you can run Startup Repair.
By using these steps, you move from a state of emergency to a controlled environment where you can start with OS crash recovery of files. An abrupt failure can also leave individual files damaged — if Windows later throws the “file or directory is corrupted and unreadable” error, that has its own set of fixes.
How to Prevent OS Crash and Data Loss?
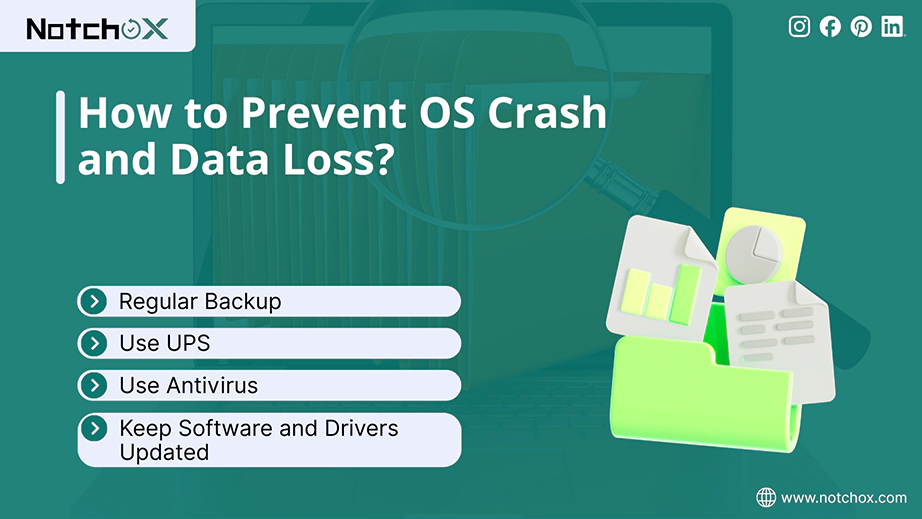
Let’s have a look at some essential strategies to protect your system against OS crash and keep your digital data safe.
Regular Backup: Following the 3-2-1 backup method is the safest way to make sure your files are safe. Keep 3 copies of your data on 2 different media and 1 external copy.
Keep Software and Drivers Updated: Sometimes the crash might be due to a bug that is eventually resolved by updates released. So, always keep your software and OS updated.
Use UPS: An Uninterrupted Power Supply (UPS) is much needed when you have power fluctuations to safely save the data and prevent data loss.
Use Antivirus: Malware and viruses can harm and alter the files, as well as damage the computer. Using a reliable antivirus decreases the chances of OS failure and detects threats beforehand.
TLDR
Though terms like “command prompt” or “system restore” might sound intimidating, they are your simple paths to system crash recovery.
Even if you are not a tech expert, tools like Windows File History, System Restore, WinRE, etc., are built-in tools that can help you recover files after OS crash. Other than that, if you want a simple, direct, and reliable solution, choosing Notchox data recovery software is the best option that does a deep scan of your storage and recovers every file possible.
Frequently Asked Questions (FAQs)
Q1: How to recover files after OS crash in Windows 11?
Ans: To recover files after OS crash in Windows 11, use:
System Restore: Open System Restore > select restore point > Next > Finish.
Windows File History: File History > select file version > restore.
Boot from a Live USB: Open boot manager > select USB drive > press Shift+F10 to open Command Prompt.
Command Prompt (WinRE): diskpart > list volume > select volume > assign drive letter > use xcopy to copy files.
SATA-to-USB Adapter: Remove internal hard drive > connect to a working computer > copy files.
Q2: How to recover data if OS is corrupted?
Ans: Use data recovery software such as Notchox to recover the data when the OS is corrupted. Alternatively, you can remove the internal hard drive and plug it into a working PC, and recover files there.
Q3: What to do when OS crashes?
Ans: Immediate steps to do when OS crashes:
Stop using the drive
Diagnose the cause
Disconnect peripherals
Perform a cold boot
Check for error codes
Enter Windows Recovery Environment
Q4: Can we use data recovery software after the blue screen?
Ans: Yes. As long as the hard drive is physically functional, recovery software can scan the disk for lost or inaccessible files.
Q5: How to get files off a computer that won’t turn on?
Ans: Remove the internal hard drive/SSD and use a SATA-to-USB adapter to plug it into a different working computer to restore the files.
Q6: What happens when an OS crashes?
Ans: When an OS crashes, the system encounters a critical error and stops working. Users can see a frozen screen or a Blue Screen of Death (BSOD). Any unsaved data in RAM is lost.
Q7: Is using data recovery software safe?
Ans: Yes, using data recovery software is safe, but you must avoid saving the recovered files to the same drive to prevent overwriting of the data.
Deeksha Arora is a Data Protection & Recovery Writer focusing on writing accurate, informative, and easy-to-understand technical articles for Notchox’s readers. Her content on the prevention of data loss, understanding risks of device failures, and guides to fix problems helps readers make the right decisions and understand the technical terms easily. She works closely with Subject Matter Experts to ensure high usability and accuracy of her writing.