Deeksha Arora Aug 3, 2026
Ans: The most common causes of SSD corruption are sudden power loss, extreme heat, malware, file system errors, or firmware failure.
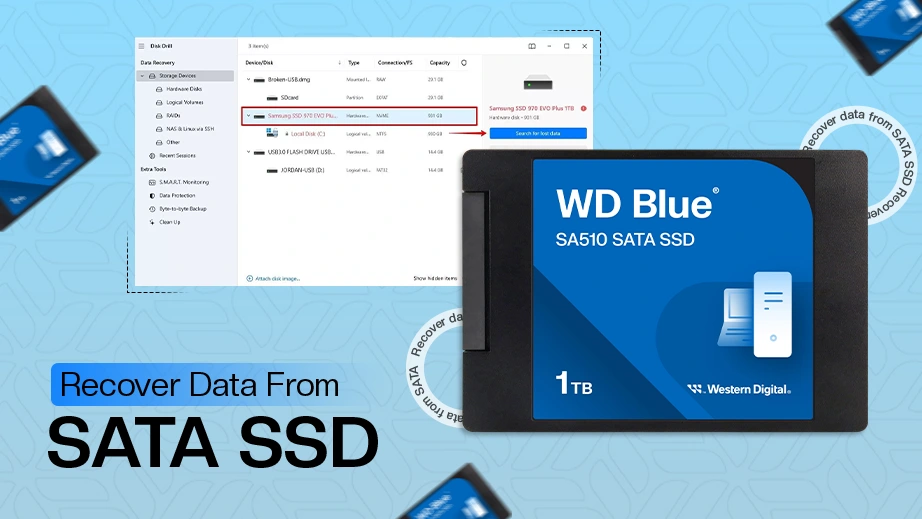
Recovering data from SATA SSD is possible but difficult because of the TRIM command, which automatically clears the deleted data. To recover your files, you must stop using the drive immediately to prevent permanent erasure. If the drive is still functional, you should use data recovery software to scan NAND flash cells, but if the SSD is dead, seek professional SSD data recovery services.
In this data recovery article, we will break down the exact steps to recover data from a SATA SSD using possible methods.
Quick Answer:
Recovering data from a SATA SSD needs a specific approach based on the failure type. A universal solution that works in almost any logical situation is Notchox data recovery software. You can use it to recover data from SATA SSD by scanning the corrupted drive and restoring files through its deep scan technology.
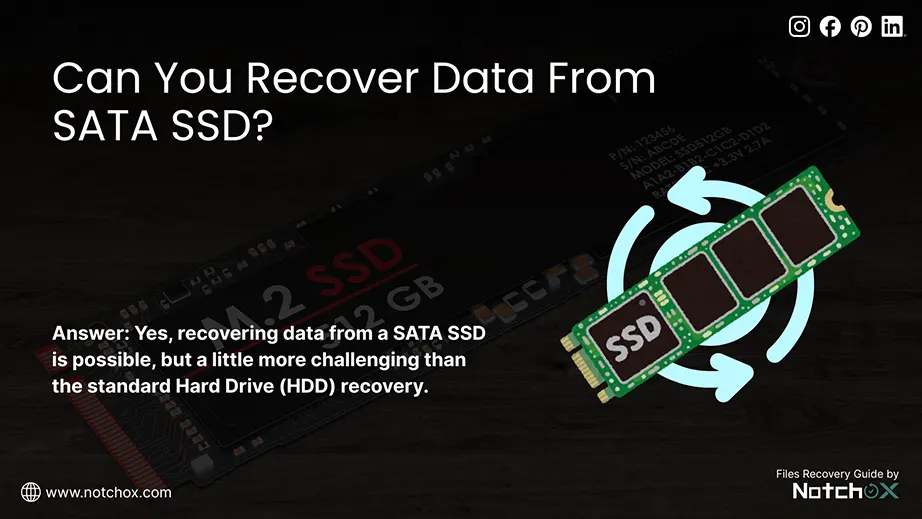
Recovering data from a SATA SSD is possible, but a little more challenging than the standard Hard Drive (HDD) recovery. SATA SSDs work based on flash memory and a background process called TRIM (erases deleted data to keep the drive fast). On HDDs, deleted data stays on physical platters until overwritten.
While you might have also heard about NVMe SSDs that are faster and plug directly into the motherboard, SATA SSDs use the older cable-based connection style. Both use the TRIM command to manage storage cells, which permanently wipes off your files shortly after deletion.
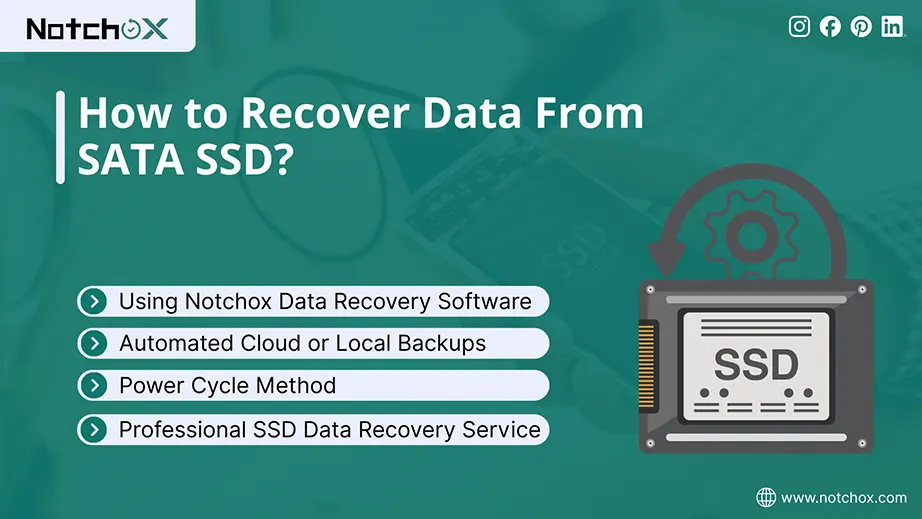
While modern SSDs use complex flash memory structures that make manual retrieval difficult, automated extraction tools can bypass file system corruption to rebuild damaged directories. Now we will discuss the step-by-step process of the most effective recovery methods available. Following these structured procedures will guide you through safely retrieving your lost files from the drive.
If your SATA SSD is still recognized by your computer but your files are missing due to accidental deletion, formatting, lost partition, etc., specialised SSD data recovery software is your best chance for recovery. Because of the TRIM command, it is important to recover the files ASAP. The longer the drive is powered on, the higher the chance the software will find nothing but zeros.
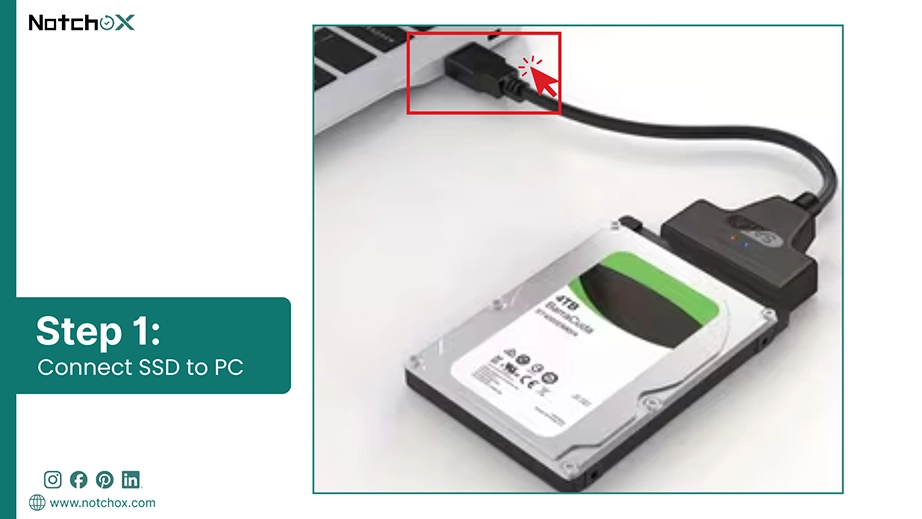
Step 1: Connect the SSD as an External Drive
Connect your SATA SSD to a different and healthy computer to prevent background processes like TRIM that can permanently delete the data. Use a SATA-to-USB adapter to connect the SSD to the computer.
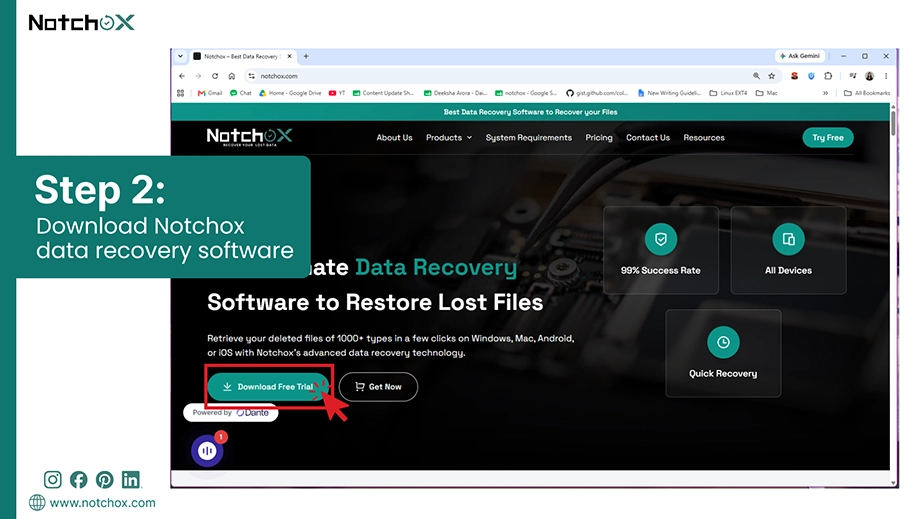
Step 2: Choose a Reliable SSD Data Recovery Software
Select a tool that supports SSD file systems (like NTFS, exFAT, or APFS). A tool that uses sophisticated techniques to recover data without affecting the drive’s health.
Notchox is the best software to recover data from SATA SSD as it is designed to handle flash-based storage. Whether you want to recover deleted JPG/JPEG files, ZIP files, or any type of file, Notchox offers recovery of a wide range of file types.
Download the Notchox data recovery software from the official website and install it on your device to retrieve the data from the SSD.
Step 3: Run a Deep Scan
Open Notchox and select your SATA SSD drive from the list of available drives. Choose the Deep Scan option. This process may take a while as the software looks past the drive’s logical pointers to find the data.
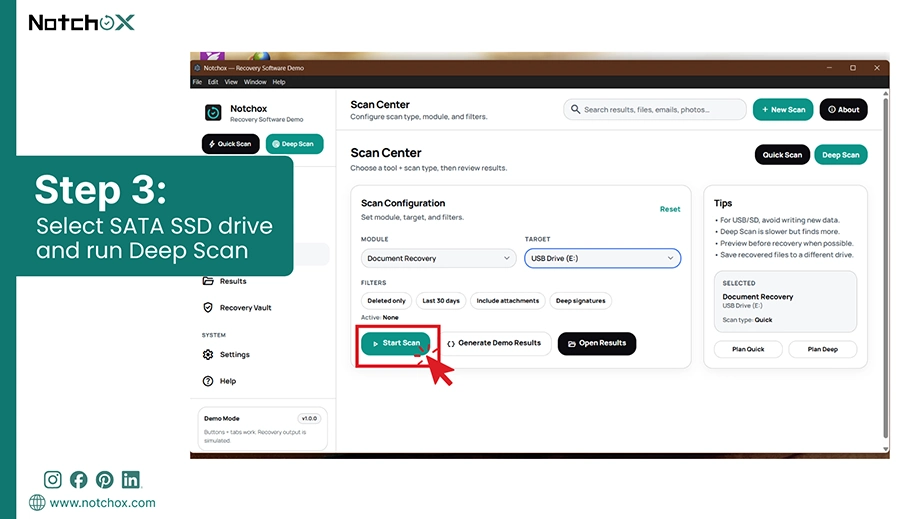
Step 4: Preview and Recover to a Different Location
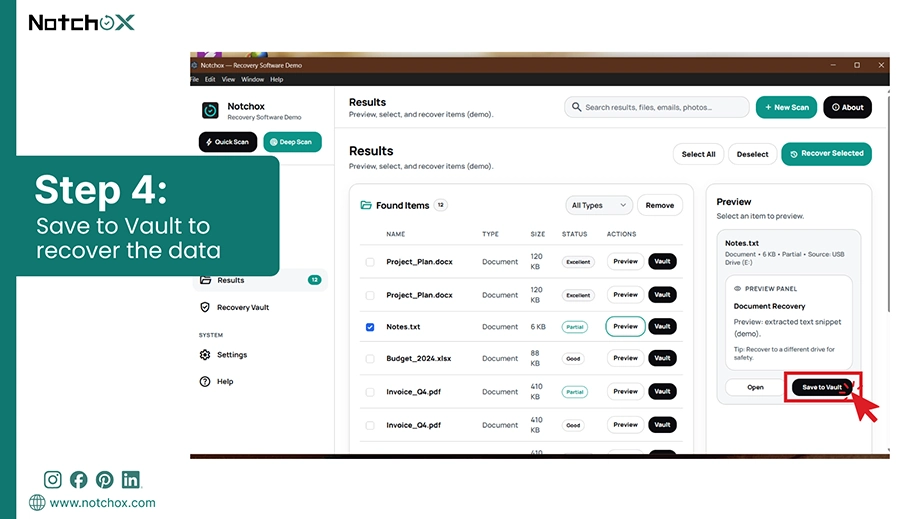
Once the scan is complete, preview the files to verify that they are intact. Once verified, you can save the files to a completely different storage by clicking Save to Vault, so that the recovered data is safe. Saving them back to the SATA SSD will overwrite the very data you rescued with the SSD data recovery software.
If the TRIM command has already wiped the data from your SATA SSD, your only remaining option is to recover data from SATA SSD from a source outside the drive. In case you have an automated backup system running in the background, you can recover the data from there.
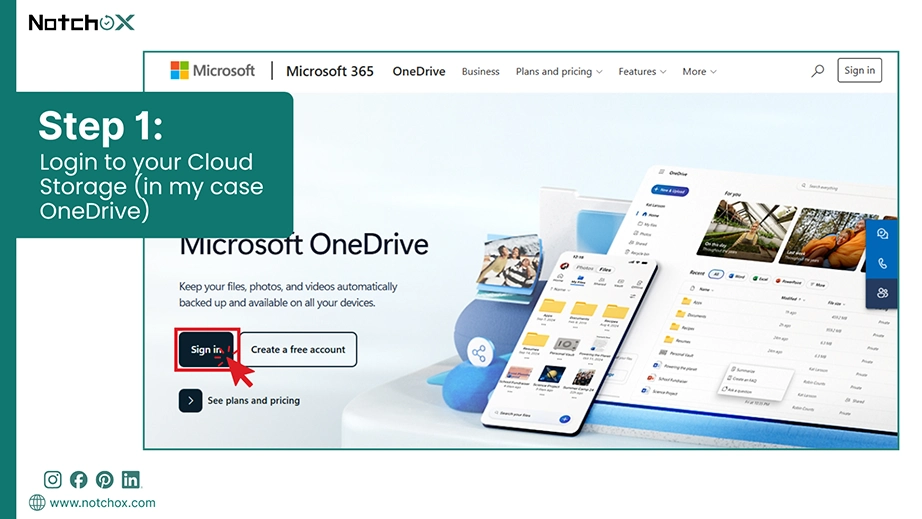
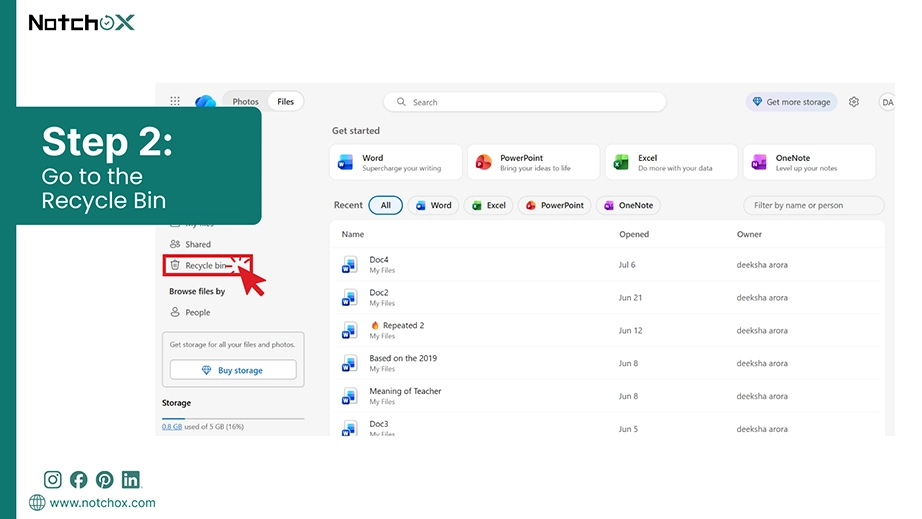
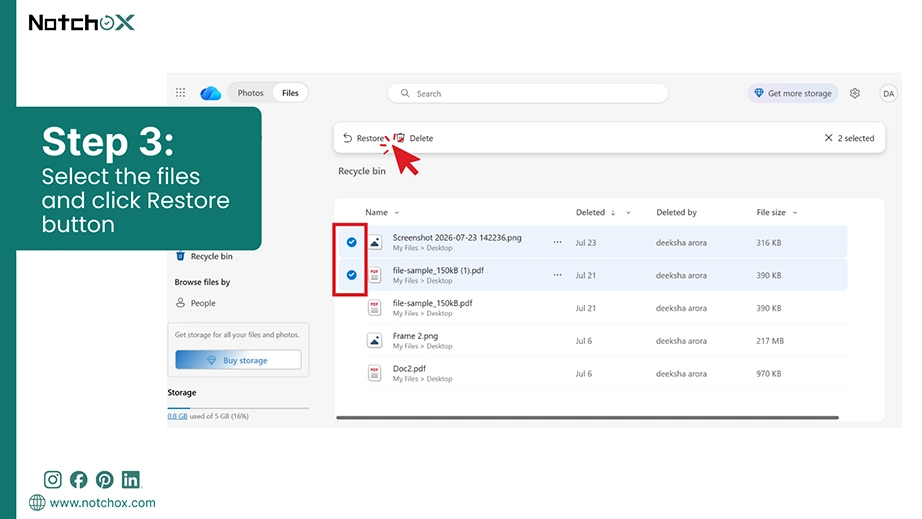
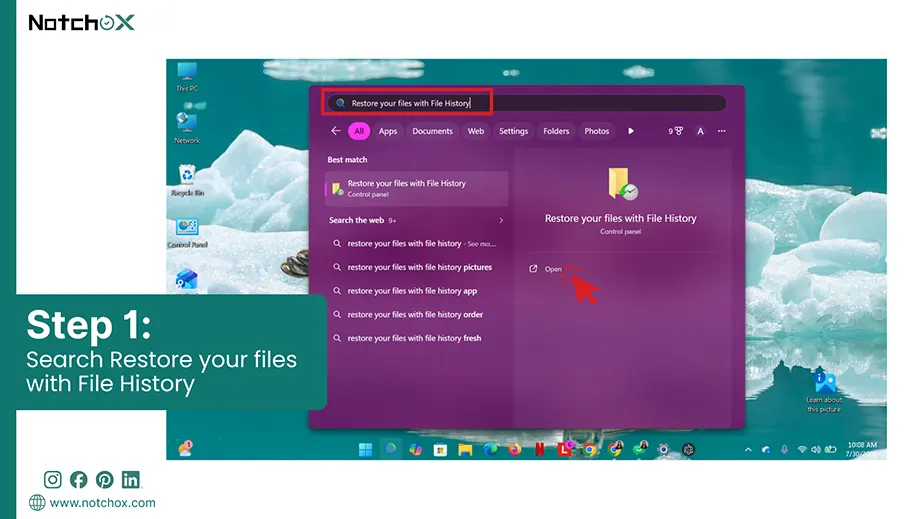
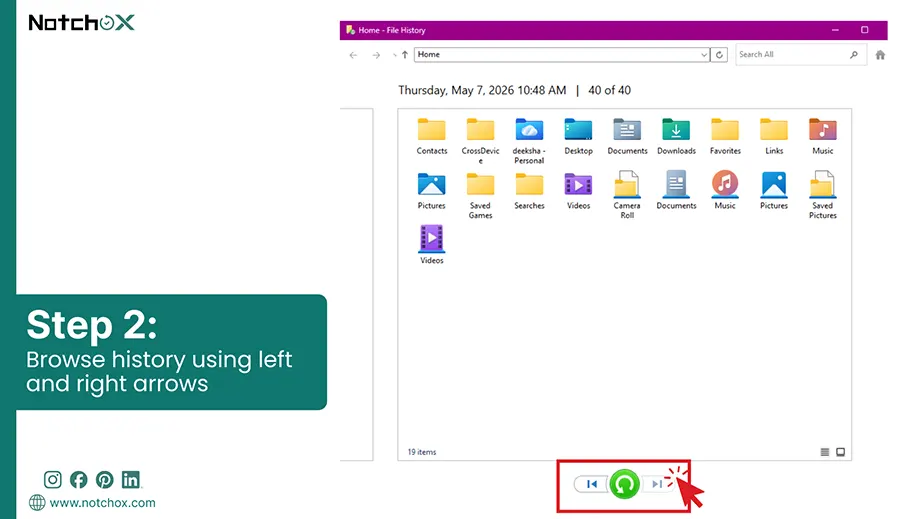
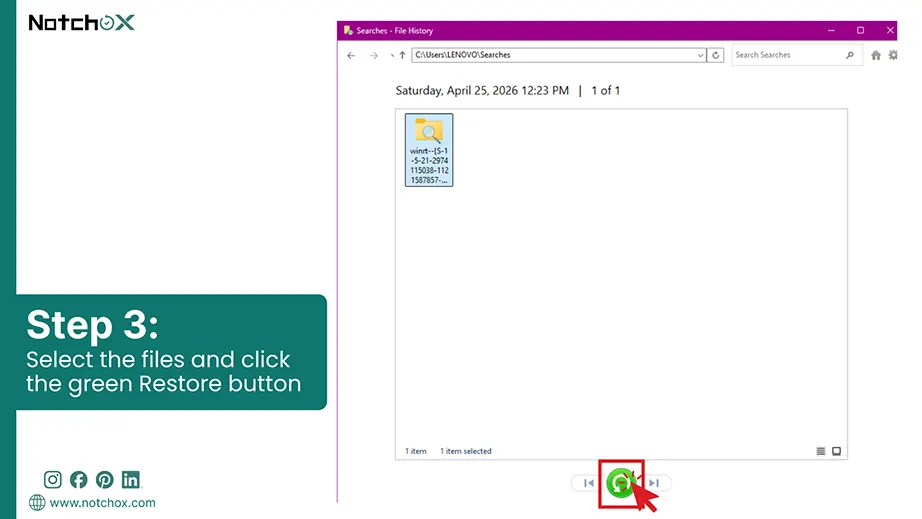
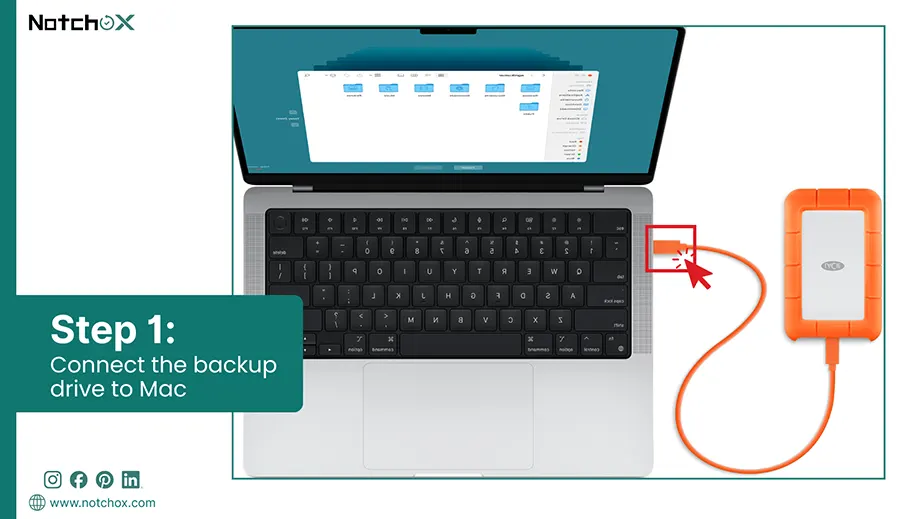
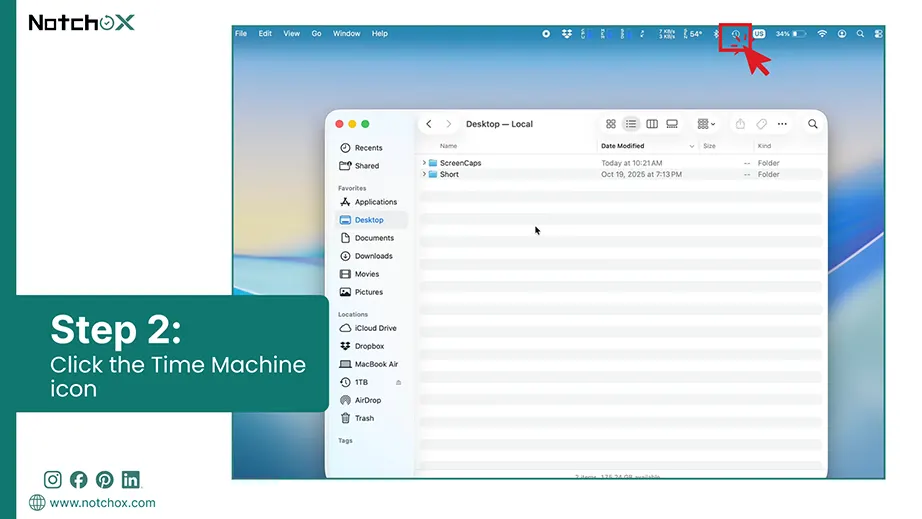
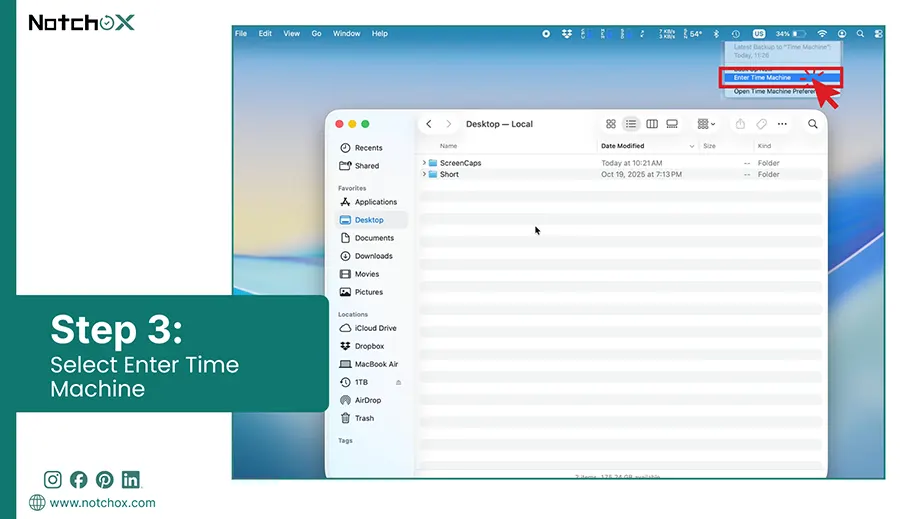
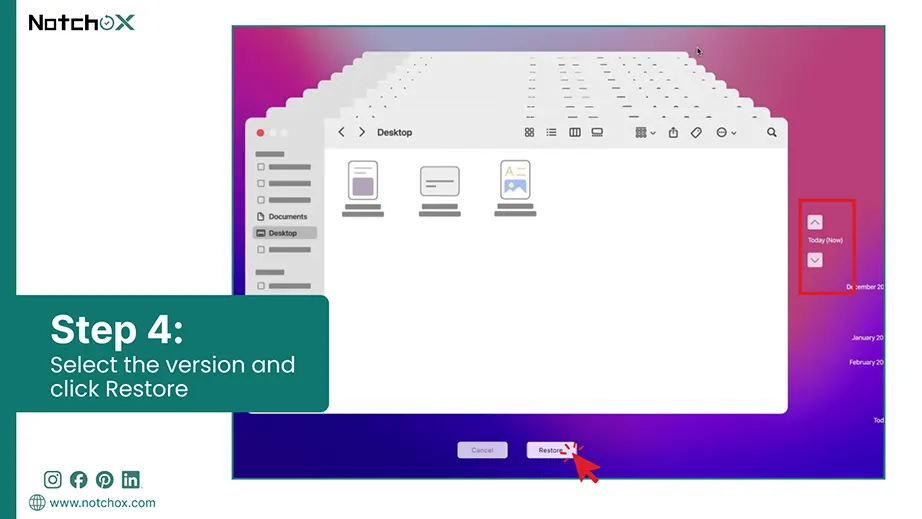
Disclaimer: These methods will work only if you have previously enabled these features. If Cloud Sync, File History, or Time Machine were not active before the data loss occurred, a backup will not be available.
Sometimes a SATA SSD is not actually “broken,” but its firmware is actually stuck. This happens after a sudden power failure or unsafe ejection of the drive. The “Power Cycle” method gives the SSD enough power to fix its internal mapping disturber without the interference of data requests.
How to perform the Power Cycle method to recover data from SATA SSD?
Note: If the drive is detected after this method, back up your data immediately.
If your SATA SSD is physically broken, or if the power cycle method fails to revive your drive, your last option is a professional data recovery lab. These experts work in a specialised environment to recover physically damaged drives using hardware tools that aren’t available to users.
This is the most expensive option. Also, the only way to recover data from SATA SSD that have suffered severe electrical or physical damage that software can not fix.
The TRIM command is a background process that tells your SSD which data blocks are no longer in use, which are then eventually erased to maintain high speed. This keeps your SSD working fast, but also the biggest obstacle to data recovery.
If you have lost data, every second the SSD remains powered on gives the controller a chance to run its “Garbage Collection” and finish the TRIM process. By immediately disconnecting the power, you can stop this from happening.
For Windows:
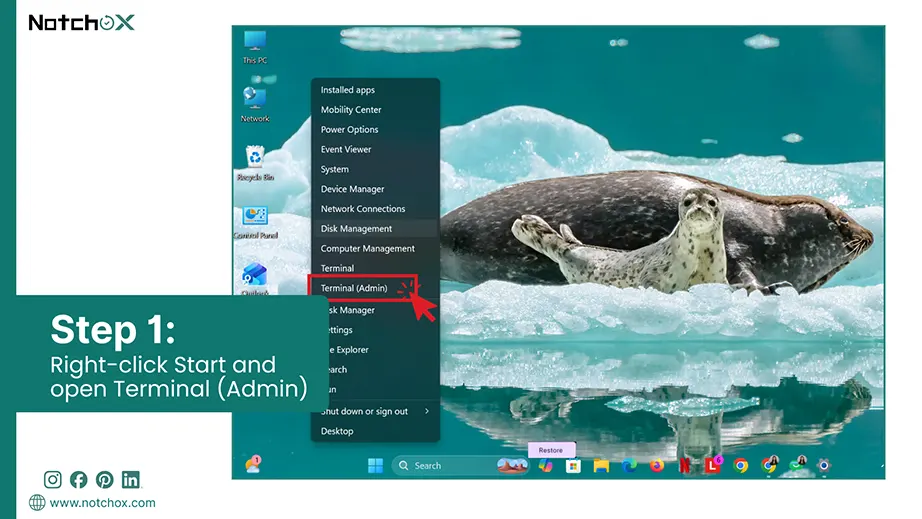
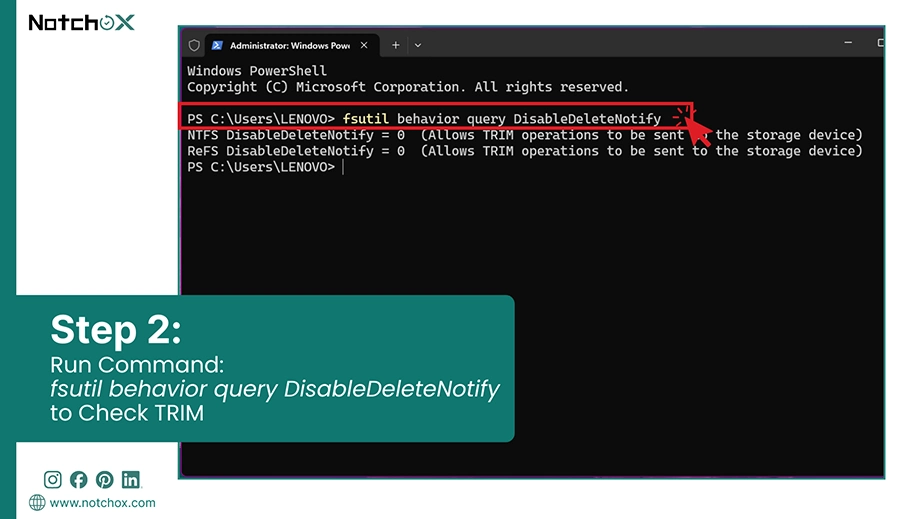
fsutil behavior query DisableDeleteNotify
If you get 0, it means TRIM is currently Enabled.
If 1, TRIM is Disabled.
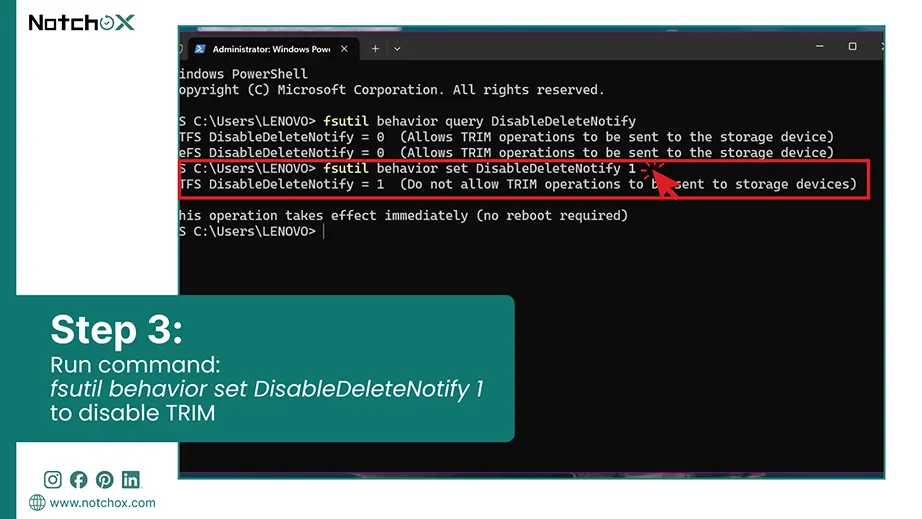
fsutil behavior set DisableDeleteNotify 1
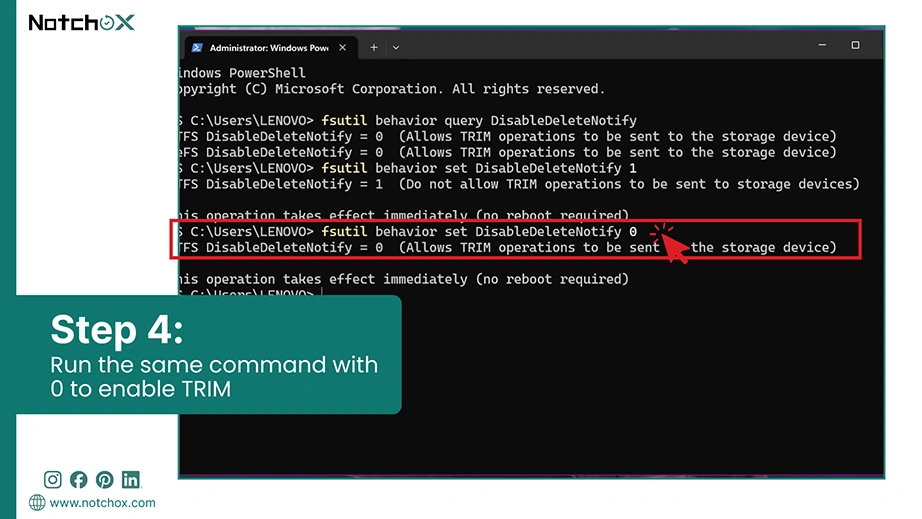
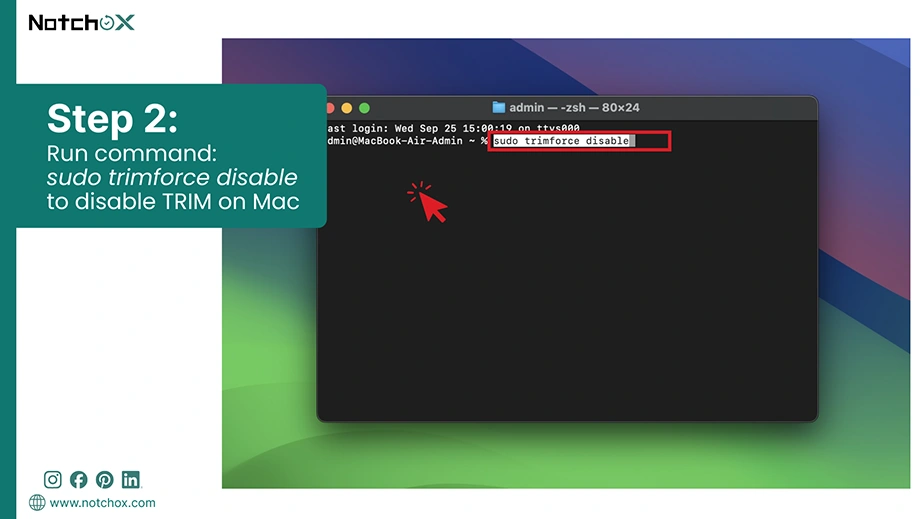
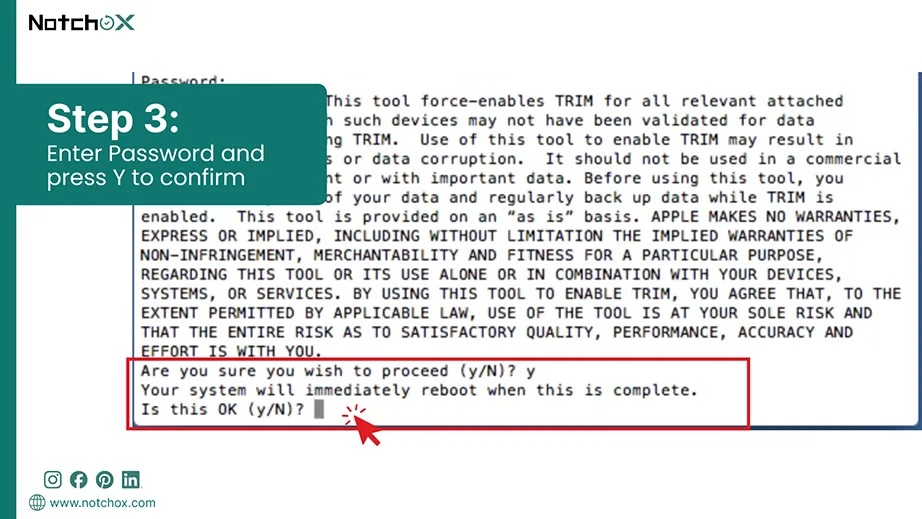
For Mac:
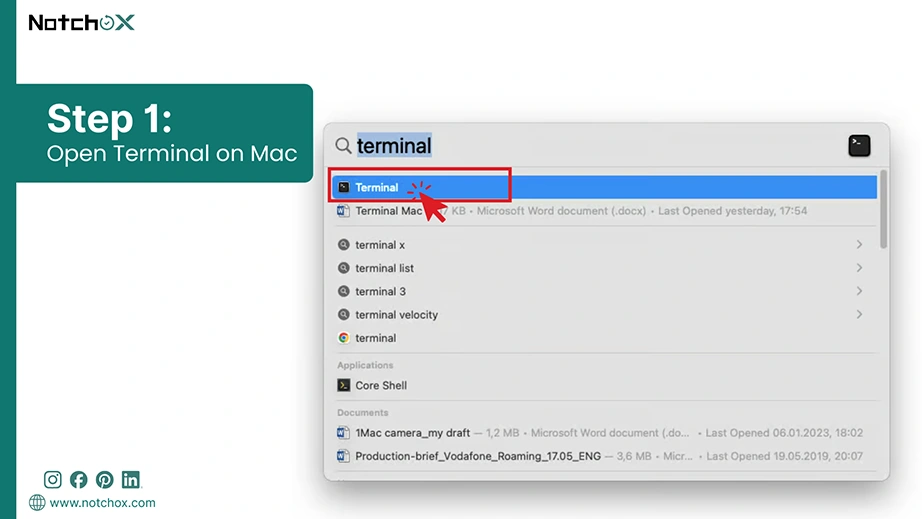
sudo trimforce disable
SATA SSD is said to be dead when a computer can no longer communicate with the drive’s controller, or the firmware has crashed completely. A dead drive shows one of three symptoms:
Follow these steps to know if you can perform a DIY recovery or if you need professional help:
Before assuming the drive is dead, always check for faulty cables or ports.
If the drive doesn’t appear in your file explorer/finder, check if the system sees it.
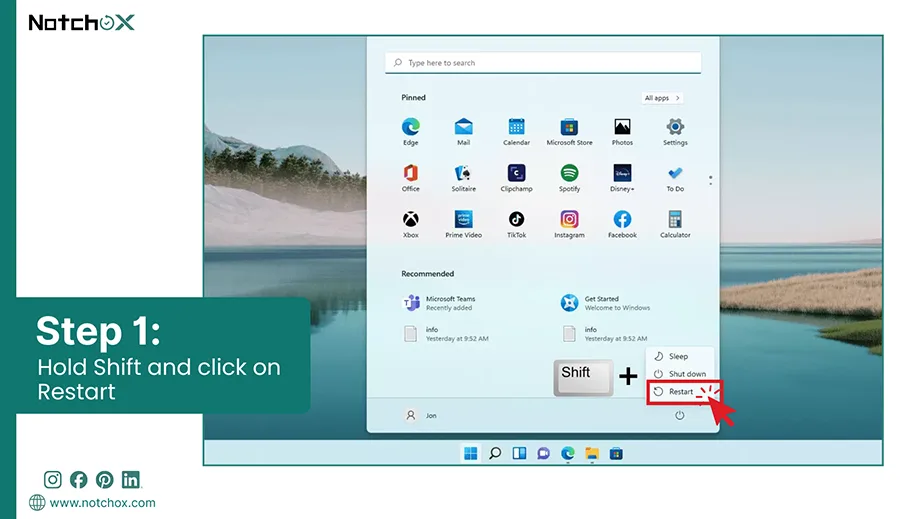
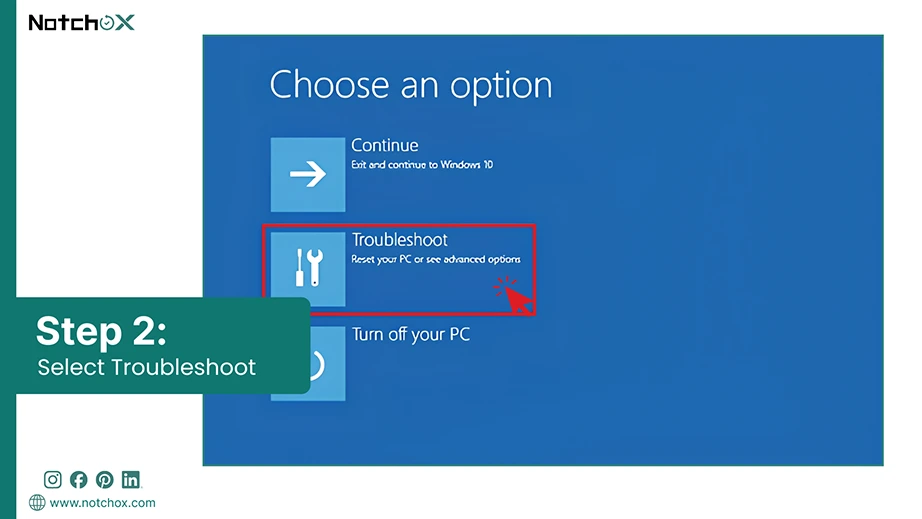
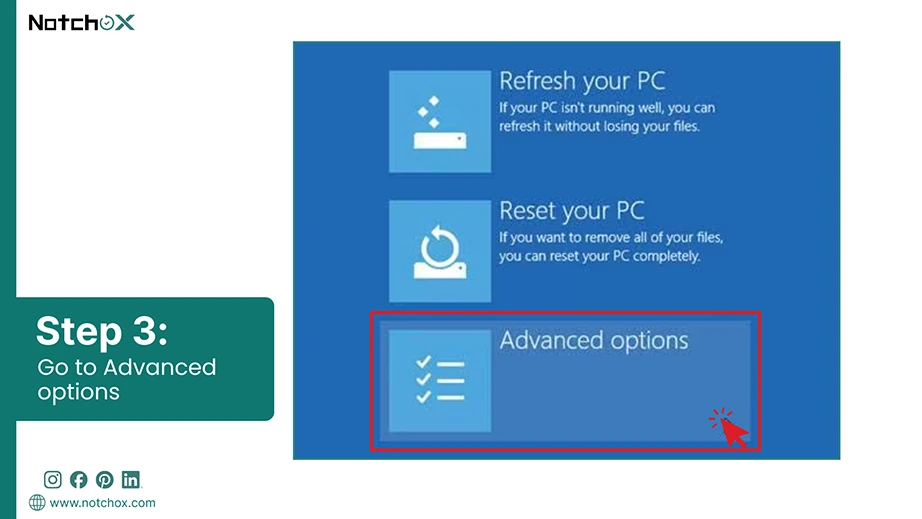
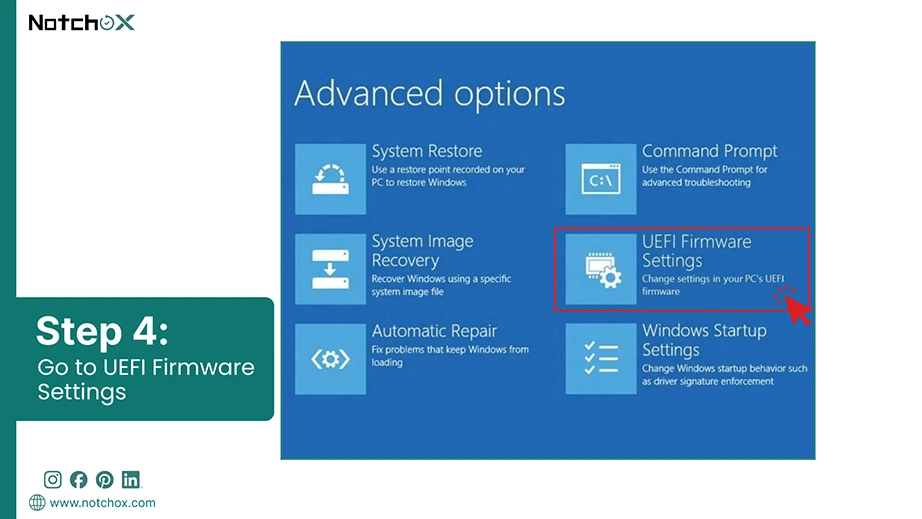
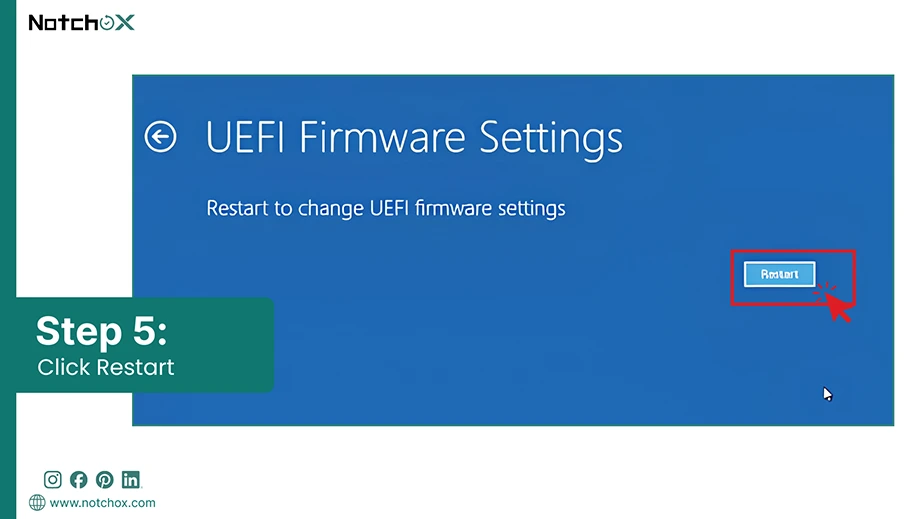
Shortcut: When your PC restarts or loads, you see little text at the bottom like:
Press <Del> to run BIOS, or <F11> to run boot menu
Press <Ctrl+F5> to activate M-Flash for Bios Update
You can follow this to enter the BIOS.
If the SSD is not detected, its controller might be stuck. This trick can sometimes “Reset” the firmware.
If the drive is detected but unreadable, use a dedicated tool like Notchox data recovery software to pull data. Because SSDs use the TRIM command to permanently wipe the deleted data, you must act fast and run a deep scan immediately to find file signatures before permanent deletion.
For the safest results, connect the SSD to a computer using a SATA-to-USB adapter and run the software in a read-only mode. Now, recover your files to a separate, completely healthy drive to avoid further data loss.
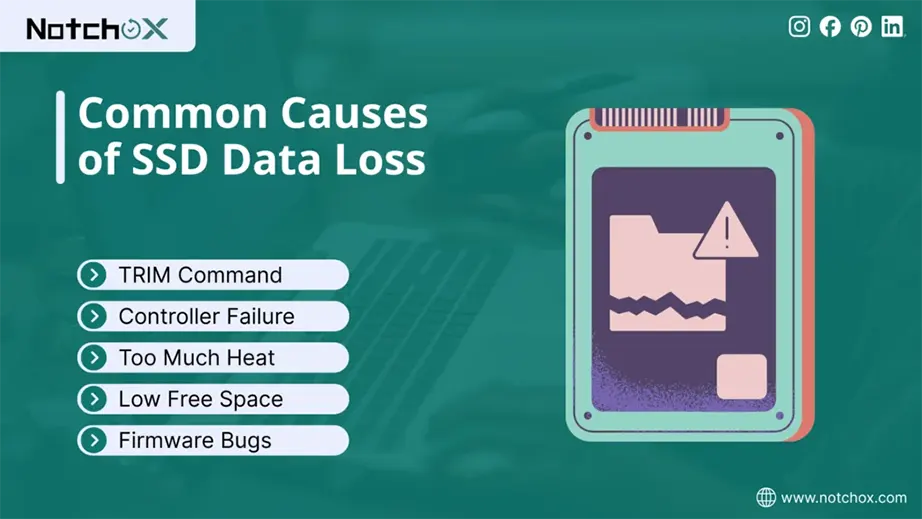
So why do these things actually fail? Unlike old-school hard drives that have moving parts that can physically break, SATA SSDs are all electronic.
Here are the usual causes for SSD failure and data loss:
The bottom line is that SSDs are tricky because they are always trying to clean themselves in the background. If you have lost your files or deleted them, stop using the drive right now and follow Notchox, the professional SSD data recovery software method first, and if the drive is totally dead, give the power cycle method a try. Moving forward, just keep a backup running so you never have to deal with such a situation again.
Ans: The most common causes of SSD corruption are sudden power loss, extreme heat, malware, file system errors, or firmware failure.
Ans: To recover data from SATA SSD, immediately switch the power off to prevent the TRIM command from wiping data. Connect the SSD to a different computer as an external drive and use a recovery tool like Notchox to scan for and restore your files.
Ans: The most effective way is to use a professional SSD data recovery software such as Notchox for data recovery. It runs a deep scan to find data remnants in the memory cells. To download Notchox recovery software, visit www.notchox.com.
Ans: In case the SSD is not detected in the BIOS:
Ans: A quick format deletes the file map, not the data itself. Use data recovery software (such as Notchox) to perform a deep scan and recover data.
Ans: You should consider a professional SSD data recovery service if your drive has physical damage, is burnt, or if software and power cycling can’t make the drive appear in the BIOS.

Deeksha Arora is a Data Protection & Recovery Writer focusing on writing accurate, informative, and easy-to-understand technical articles for Notchox’s readers. Her content on the prevention of data loss, understanding risks of device failures, and guides to fix problems helps readers make the right decisions and understand the technical terms easily. She works closely with Subject Matter Experts to ensure high usability and accuracy of her writing.