First developed in 1992 by Microsoft, AVI is the standard video format for Windows. If your video is showing some error, here are some quick basic troubleshooting tips. First, try changing the file extension (from .avi to .mp4 or .mkv) and see if your media player reads it. If that fails, try opening it in a different program like VLC, or reboot your PC.
Still corrupted? Don’t worry, I’ve got you covered. Let’s walk through how to completely repair corrupted AVI files!
Quick Answer: You can repair corrupted AVI files by opening them in VLC Media Player to rebuild the broken index, or by using DivFix++ to remove the corrupted data blocks. For deeply damaged files, using professional tools like Notchox Corrupted File Recovery Software can repair your AVI file.
How to Repair Corrupted AVI Files Using Free Tools?
Alright, let’s get into the actual fixes. You know what? You don’t need to spend any money to get your video back. Before you even think about buying expensive software, you should definitely try these free tools first. We are going to discuss the open-source tools that developers use to fix AVI file corruption. Whether the video index is broken or the file header is missing, these three completely free methods will get your video back to playing. So, take your corrupted AVI file, open up your computer, and let’s start to repair AVI file right now.
Method 1: Fix AVI Files with VLC Media Player
VLC Media Player is not just a program to play video and audio. It actually has some really smart automated features built right in. It can scan your broken video data and repair structural errors on its own without making you do any complicated coding.
We can use it in two different ways to save your video. First, we can have VLC automatically fix video errors whenever the file opens. Second, if the damage is more severe, we can use VLC to completely re-encode the video into a working version.
Fix Video Errors
If you think your video is corrupted in a way that it freezes, skips, or cannot be played properly, VLC can look at the broken index layout and fix the playback errors automatically.
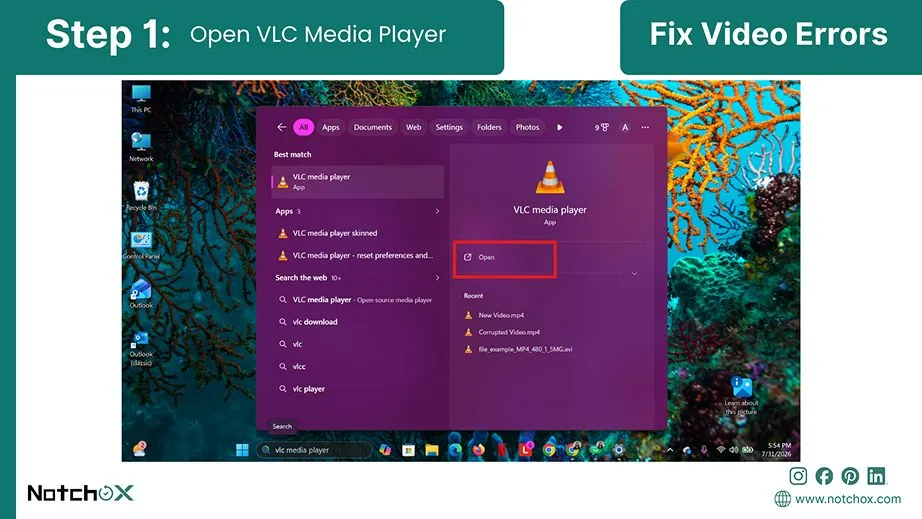
Open your VLC Media Player on your desktop to get started.
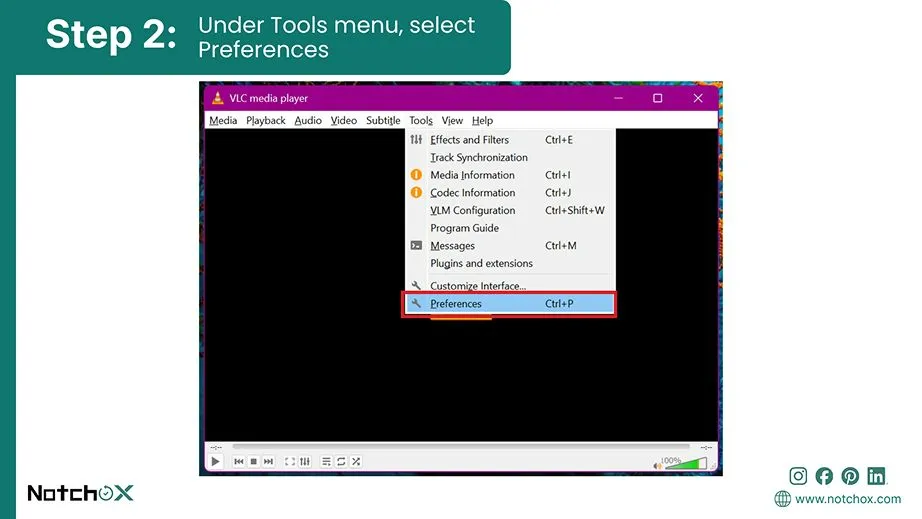
Go to the Tools menu at the top and select Preferences (or press Ctrl + P) from the dropdown list.
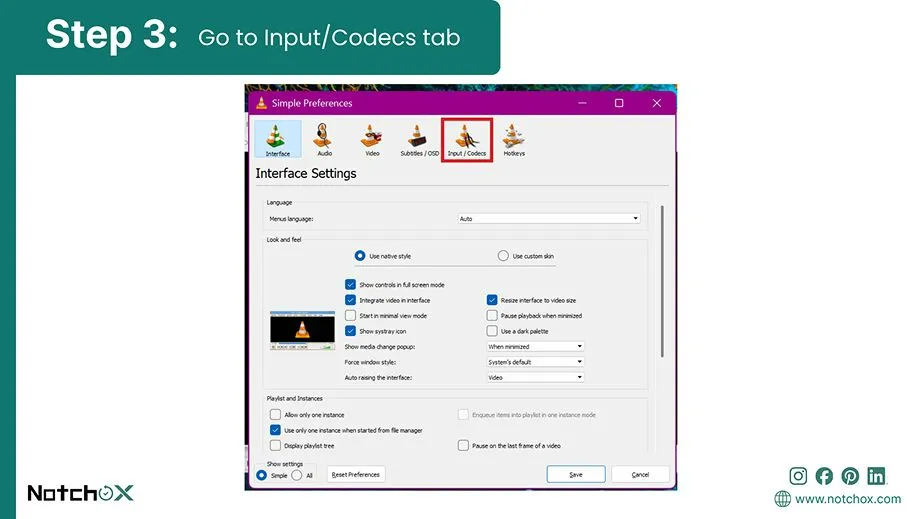
Click on the Input/Codecs tab in the top menu of the preferences window.
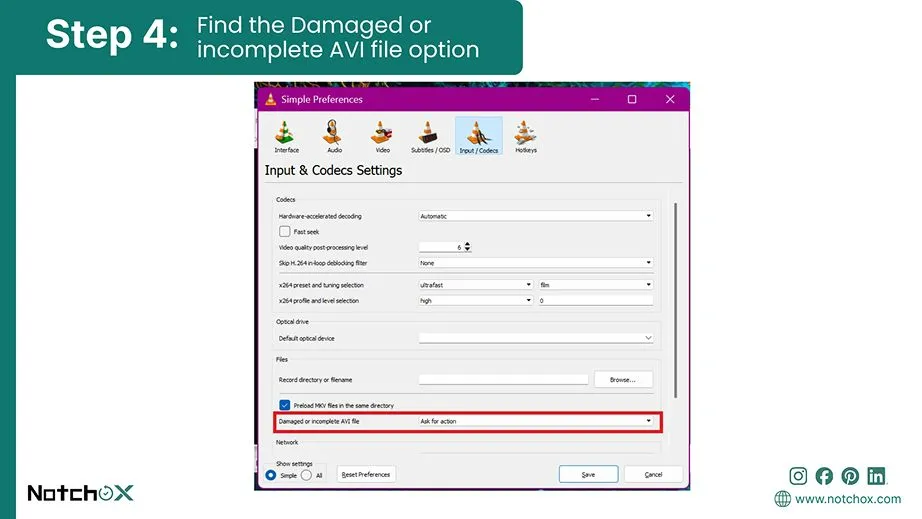
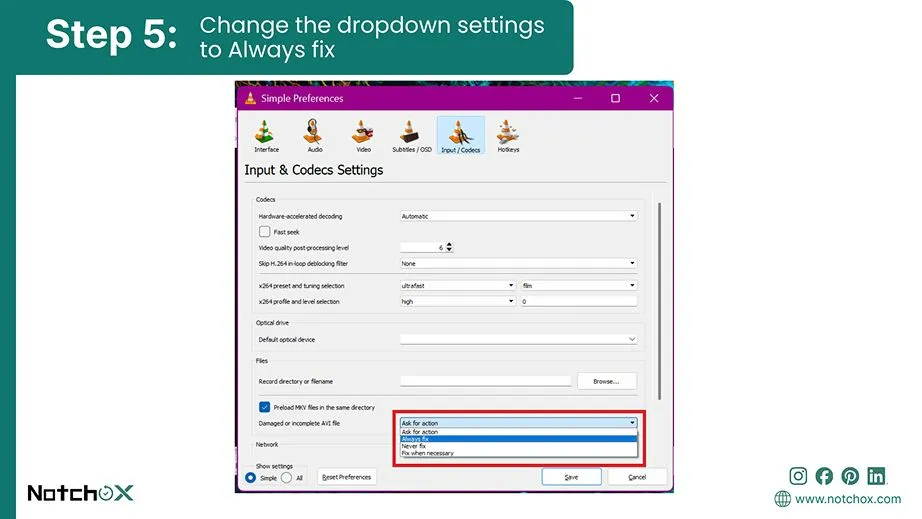
Find the Damaged or incomplete AVI file option by scrolling down to the Files section.
Change the dropdown settings to Always fix so VLC automatically repairs the file structure on launch.
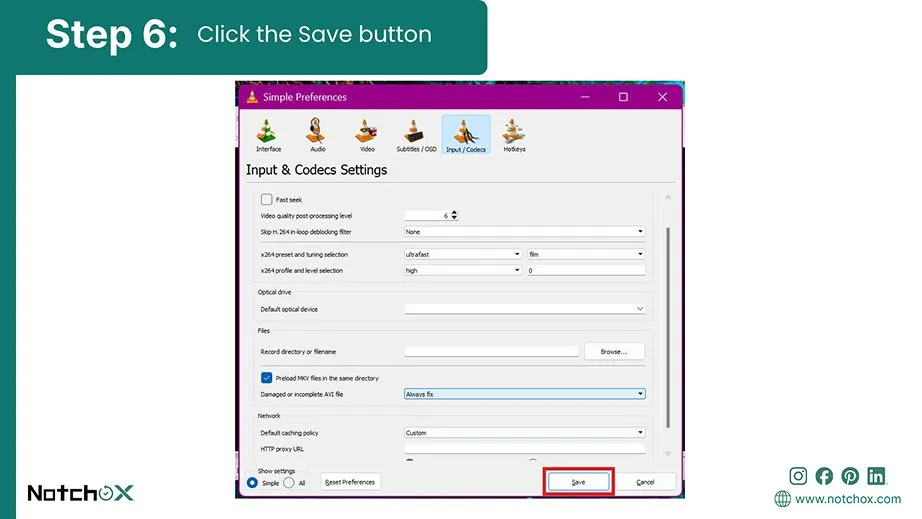
Click the Save button at the bottom to apply your new settings permanently.
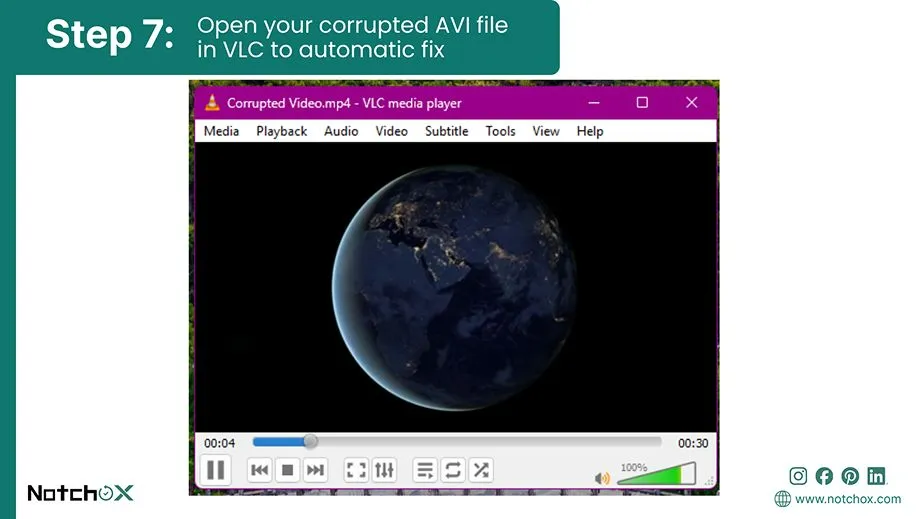
Open your corrupted AVI file in VLC to let the player automatically fix the errors and start smooth playback.
Re-encode the Video
If the file structure is broken so badly that basic playback fixing doesn’t work, we can use VLC to re-encode the entire video. This process basically extracts both audio and video out of the corrupted AVI video and packages them into a new clean file format like MP4.
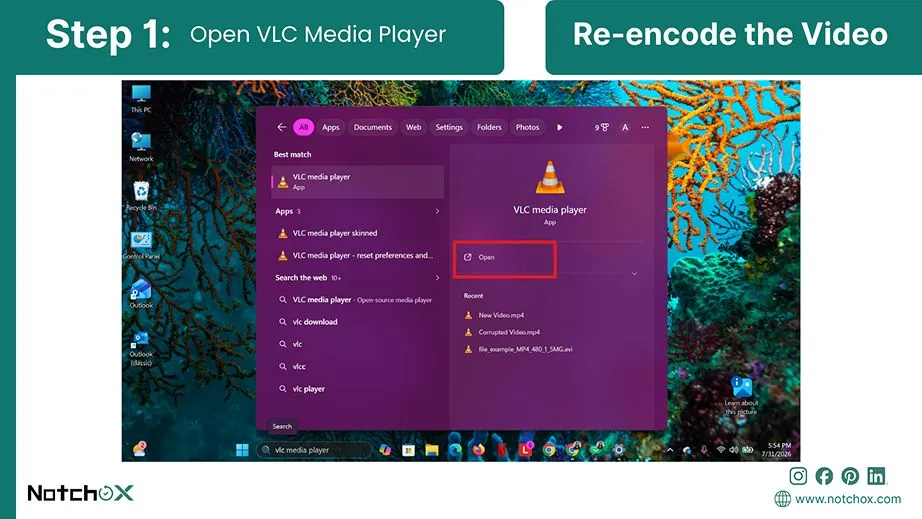
Open VLC Media Player on your computer.
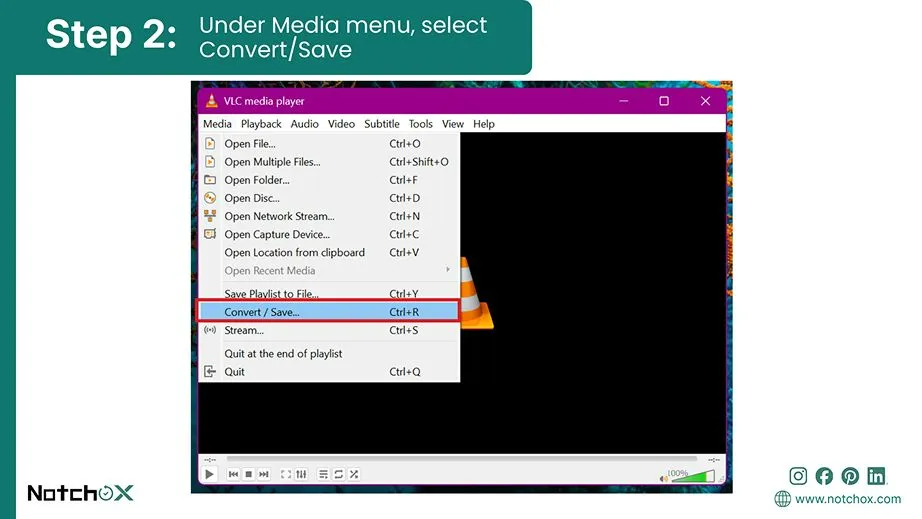
Click on the Media menu in the top-left corner and select Convert/Save… (or press Ctrl + R).
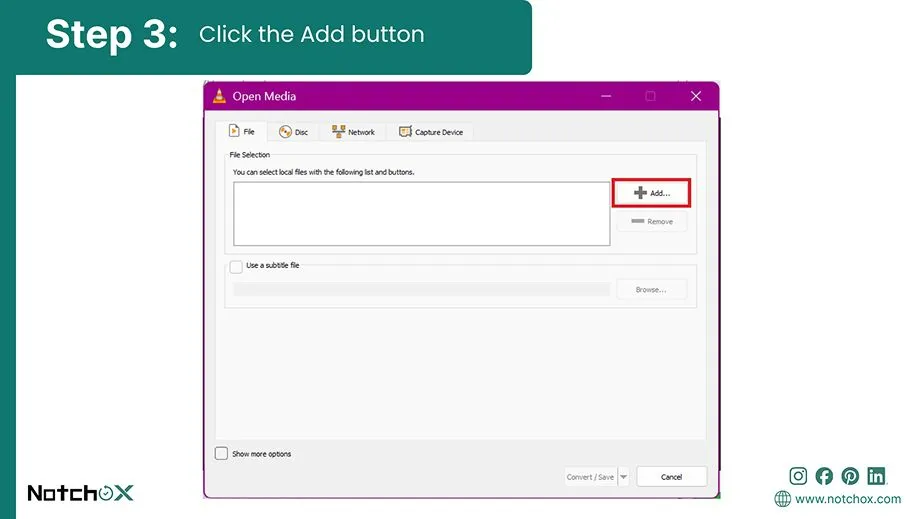
Click the Add (+) button to browse and select your damaged AVI file not playing from your storage.
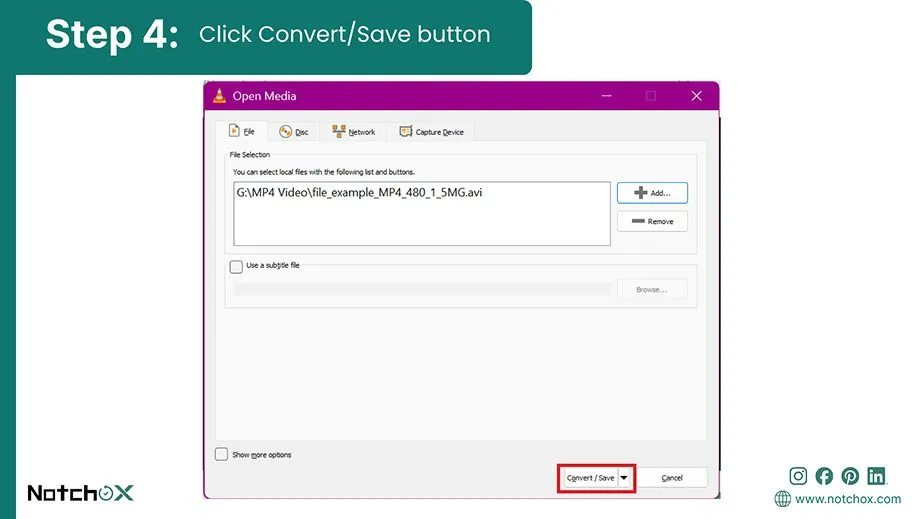
Once selected, click the Convert/ Save button at the bottom of the window to open the encoding settings.
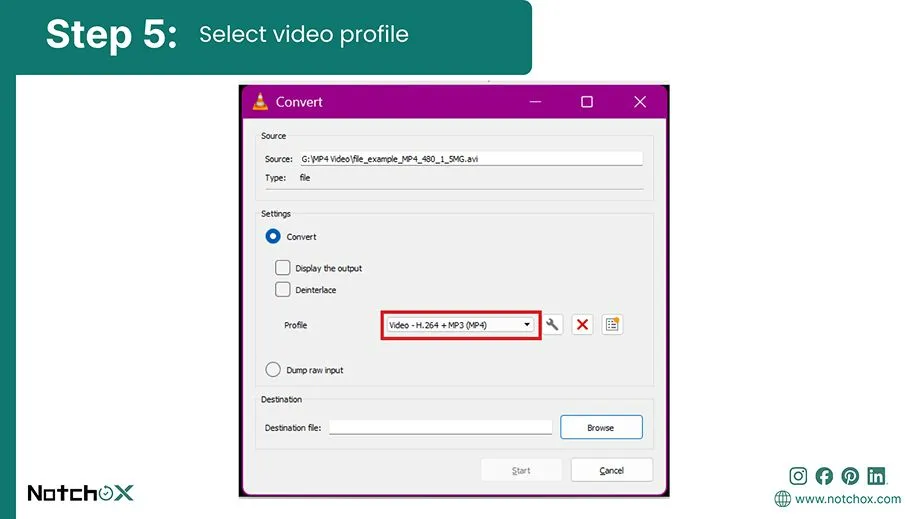
Choose a standard profile from the dropdown menu, such as Video – H.264 + MP3 (MP4).
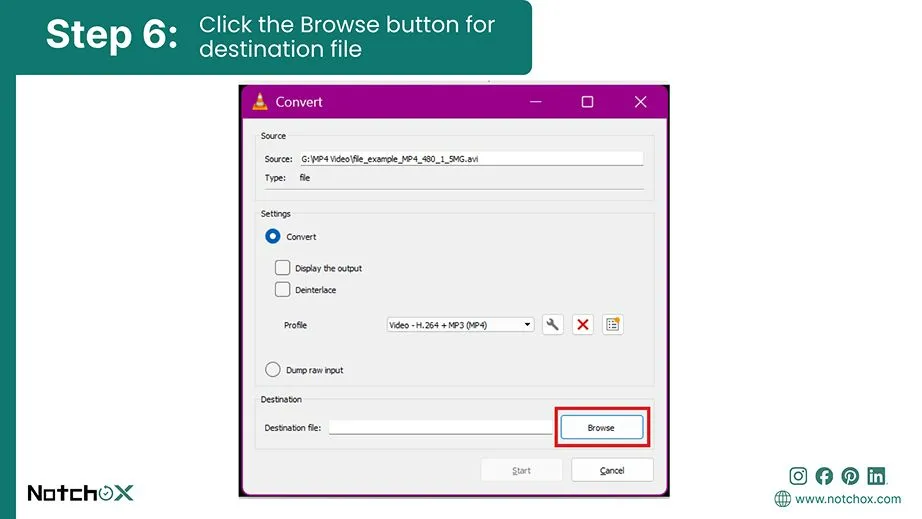
Click the Browse button next to the Destination File to choose where to save your new, repaired video.
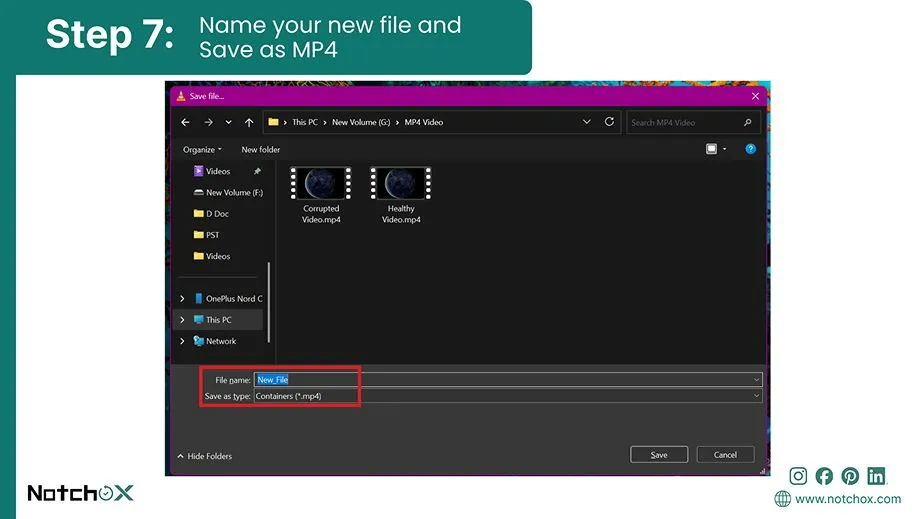
Name your new file and make sure the file extension ends in .mp4.
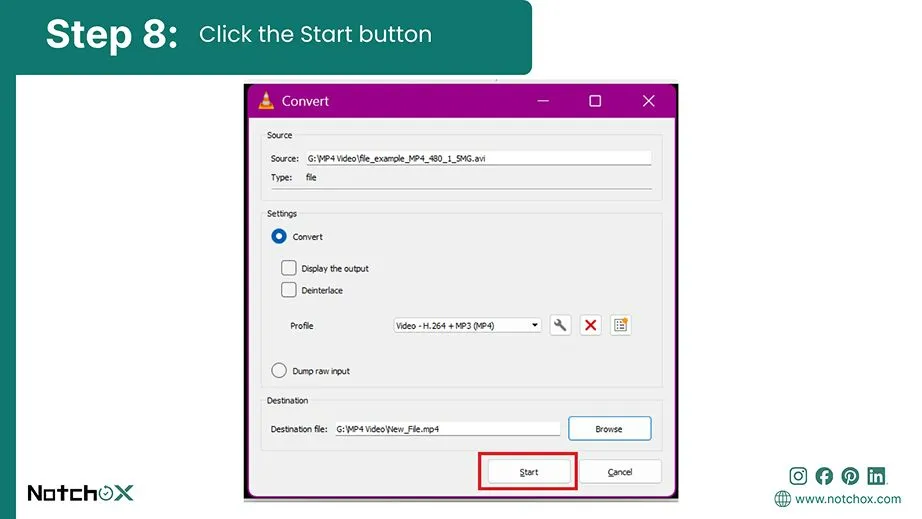
Click the Start button to begin the re-encoding process to break the AVI index, and wait for the timeline bar to finish loading.
Method 2: Fix AVI Index Using DivFix++
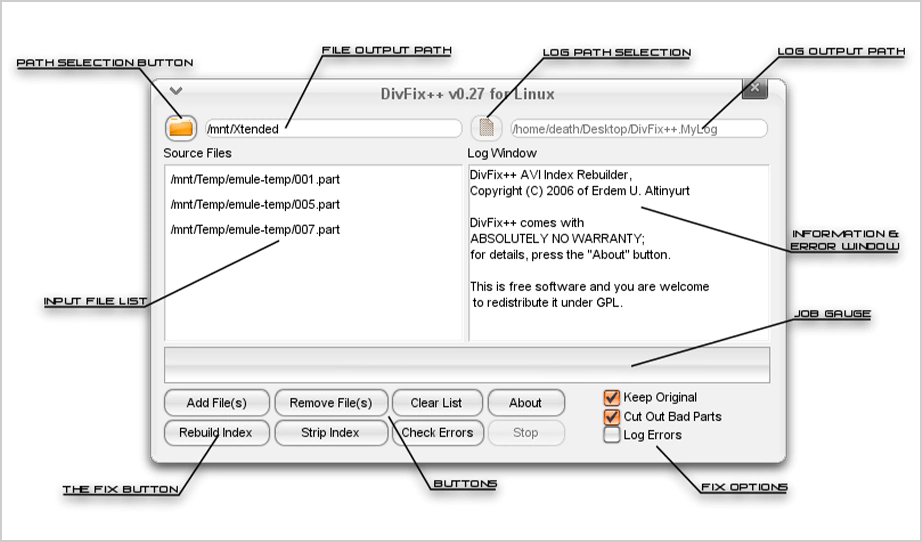
If you are dealing with a broken AVI index or severe AVI header corruption, you can use specialised video repair software called DivFix++. It opens your damaged AVI file and rebuilds the index table from scratch, removing the broken data. It is super fast and saves you from audio-video sync issues.
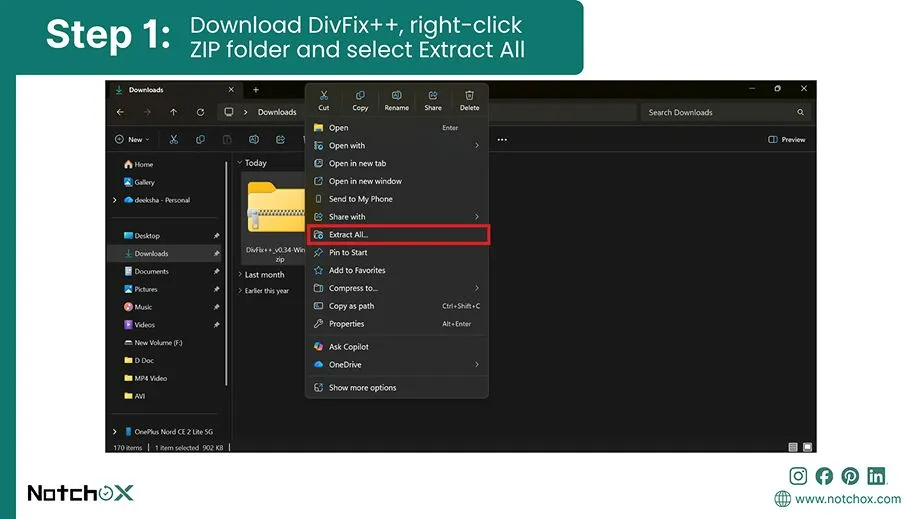
Download DivFix++ on your computer. Right-click on the folder and select Extract All….
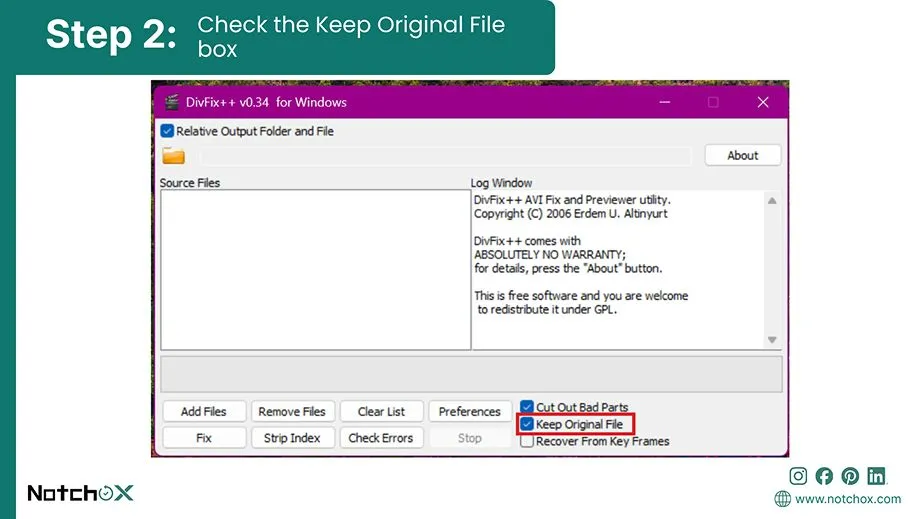
Make sure the Keep Original File box is checked so you do not accidentally overwrite your original AVI file.
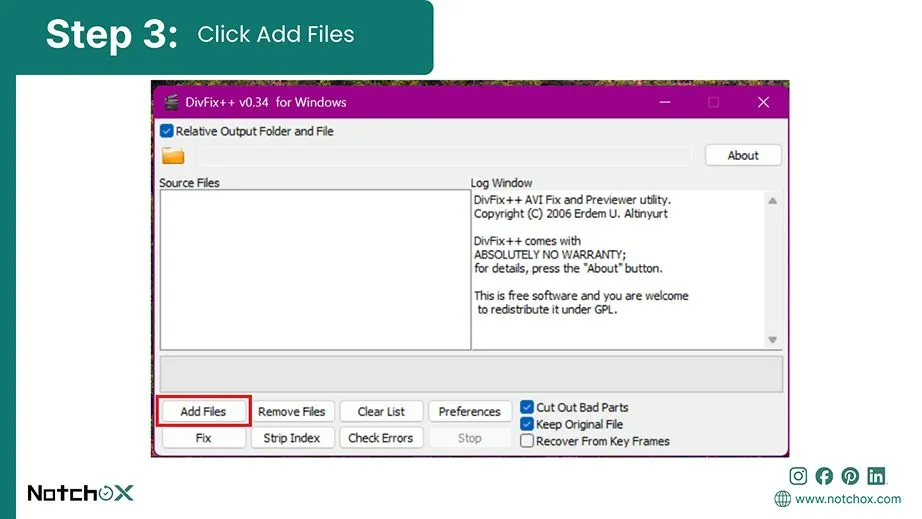
Click the Add Files button to choose your broken video file from your storage folder.
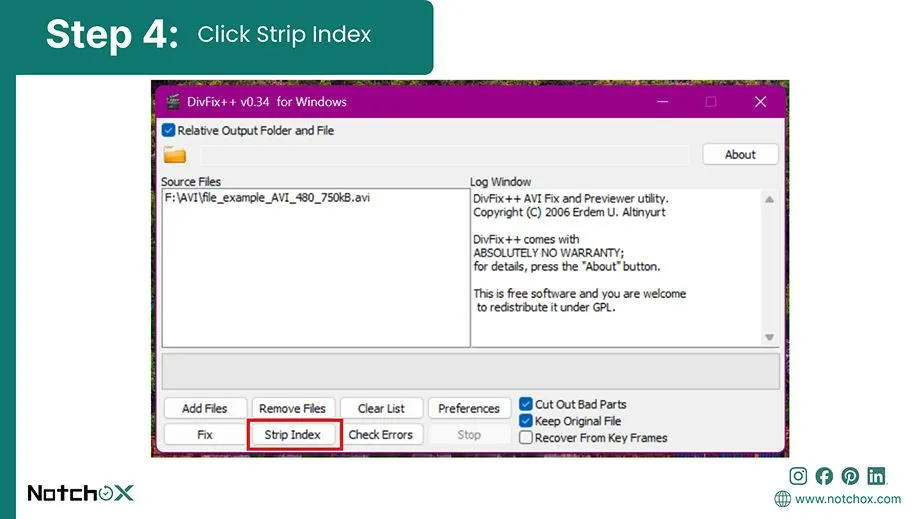
Click the Strip Index button to clear out the unreadable layout data from the file.
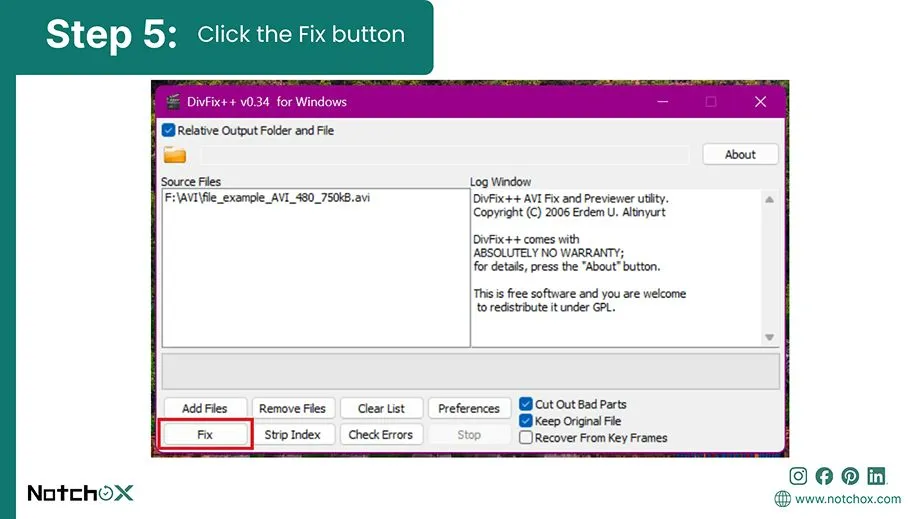
Click the Fix button to let the software automatically repair corrupted AVI files and generate a new working index table.
Open your new video file from the same folder to get error-free playback.
Method 3: Repair Corrupted AVI Files Using FFmpeg
A lot of premium video repair software actually uses an open-source tool called FFmpeg, so we are just going to use it directly for free. FFmpeg is a command-line tool, which might sound a little scary if you have never used it, but it is very simple. Let’s open up your terminal and run a couple of commands to repair corrupted AVI files.
Fun Fact: FFmpeg is also known as the backbone of video streaming platforms. From streaming giants like Netflix, YouTube, and Twitch to media players like VLC, almost every major video platform uses FFmpeg under the hood to process and convert video files.
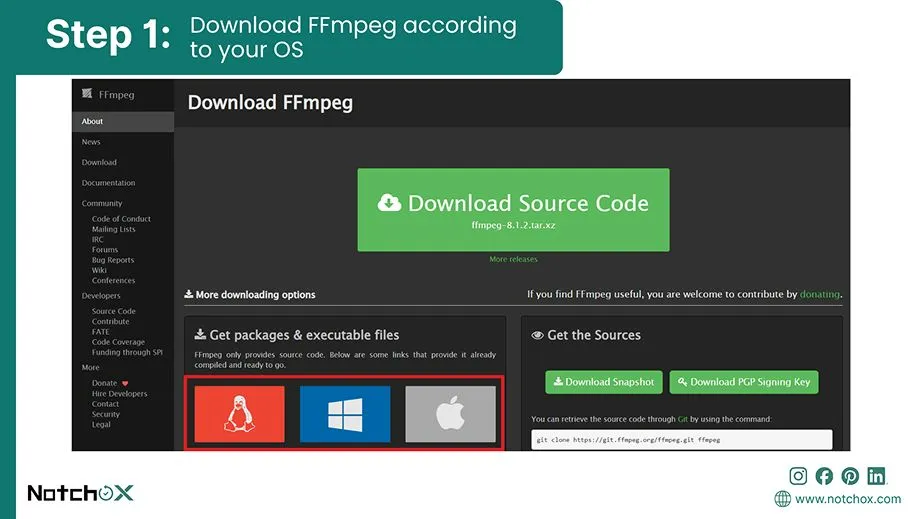
Download FFmpeg and make sure it is added to your computer’s system path.
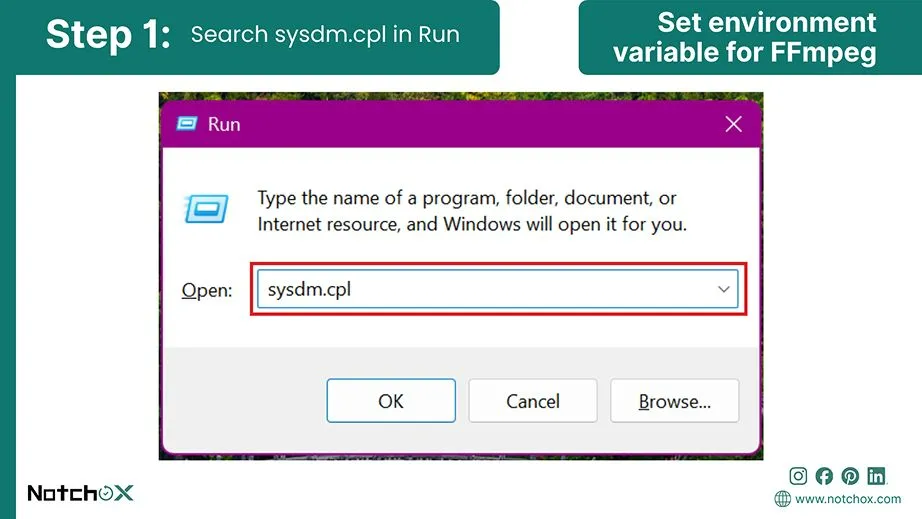
Steps to set environment variable for FFmpeg:
Press Win + R. Type sysdm.cpl and press Enter.
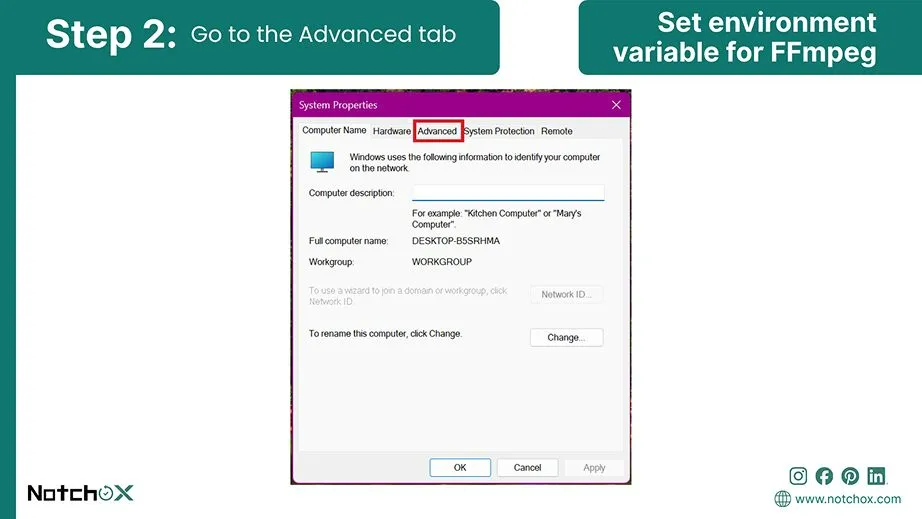
Go to the Advanced tab.
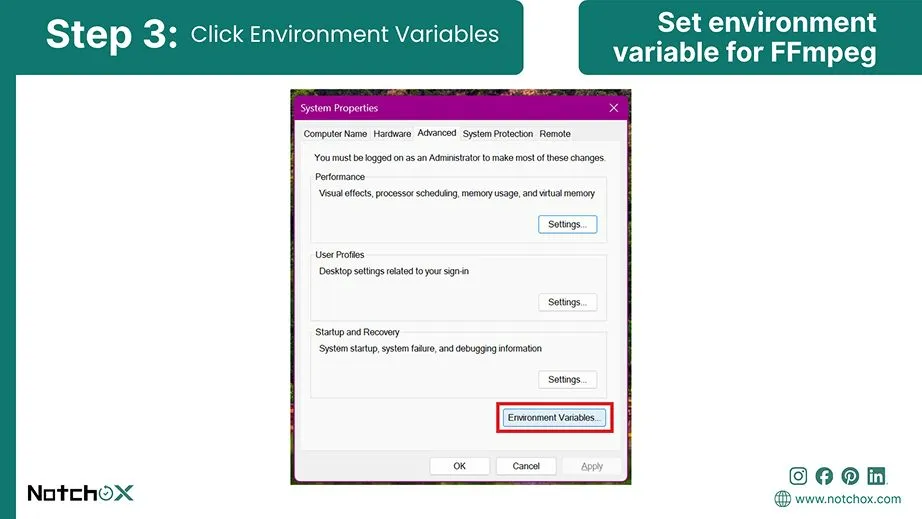
Click the Environment Variables button.
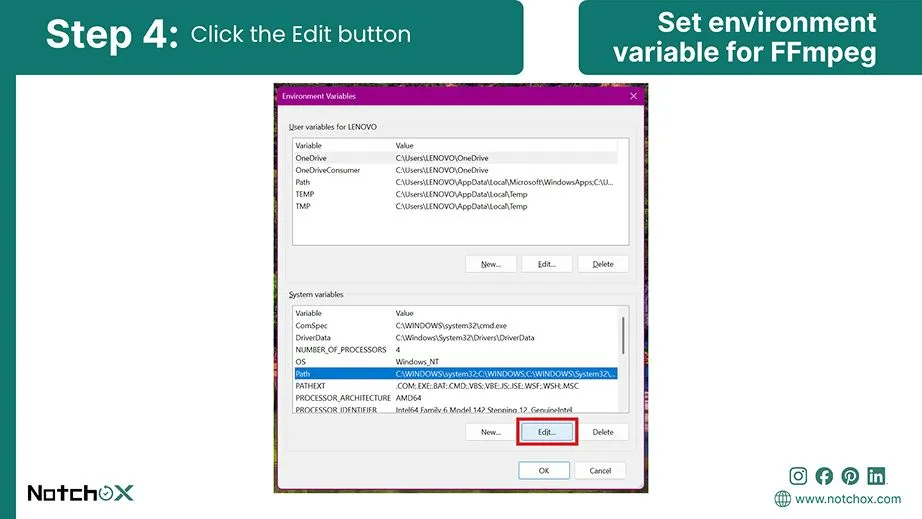
Find the path, select it, and click the Edit button.
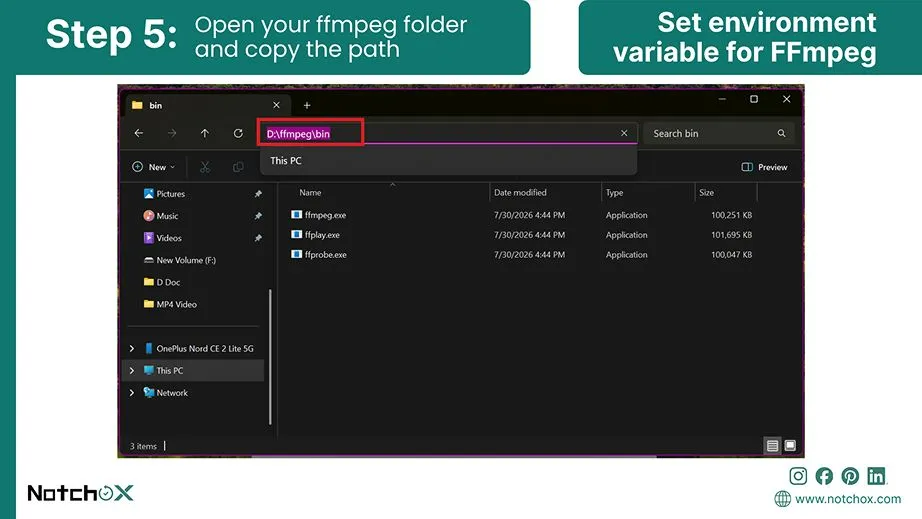
Now go to your Files Manager and open your ffmpeg folder. Go to the bin folder and copy the path.
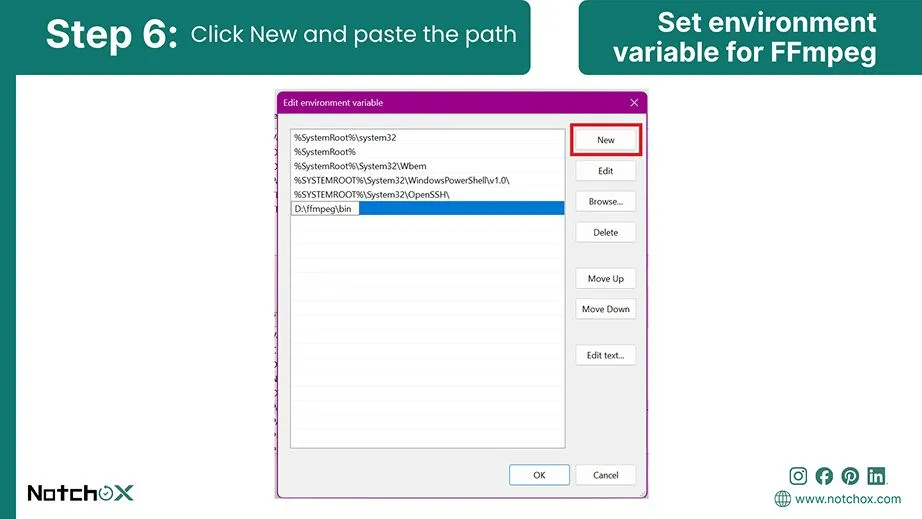
In the Edit Environment Variable Window, click New and paste the path.
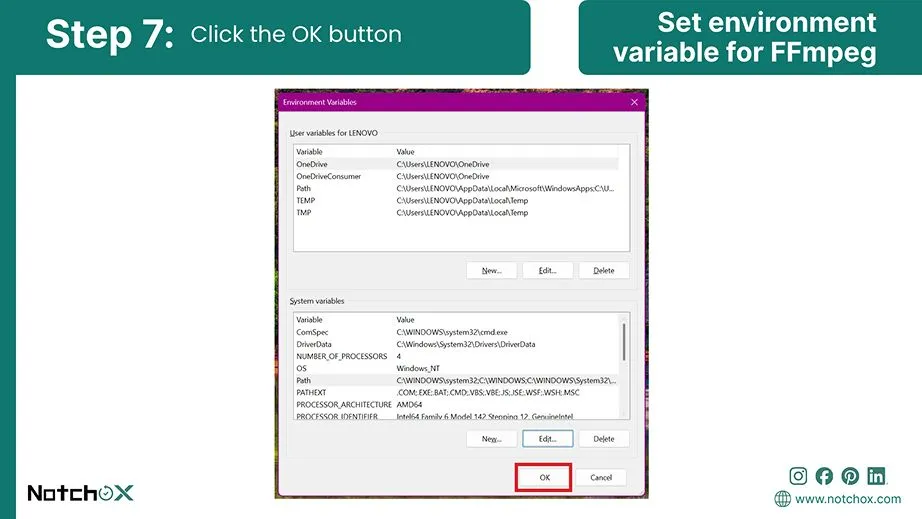
Click OK to exit the Environment Variable Window.
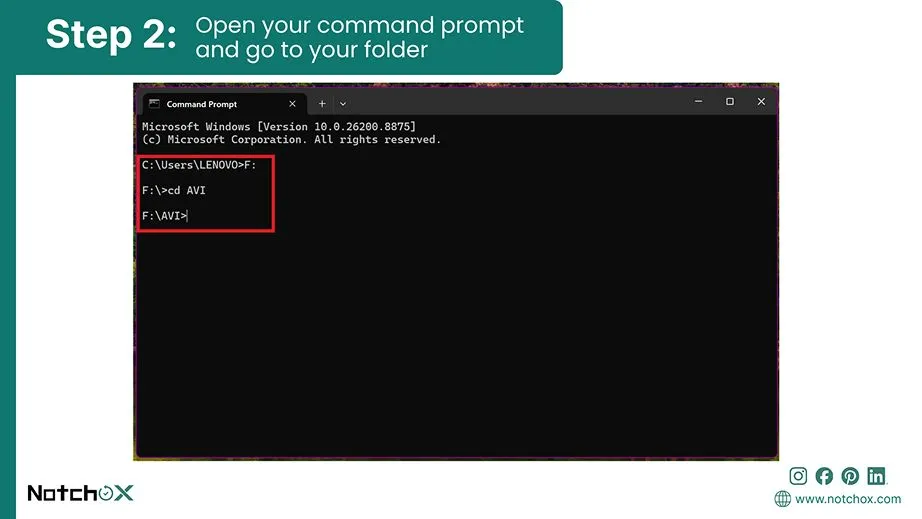
Open your command prompt or terminal window and go directly to the folder where your broken file is saved.
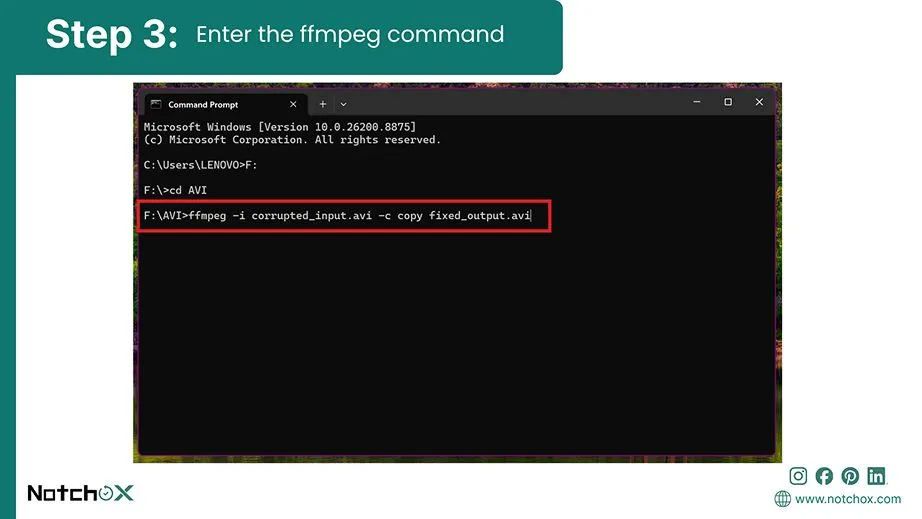
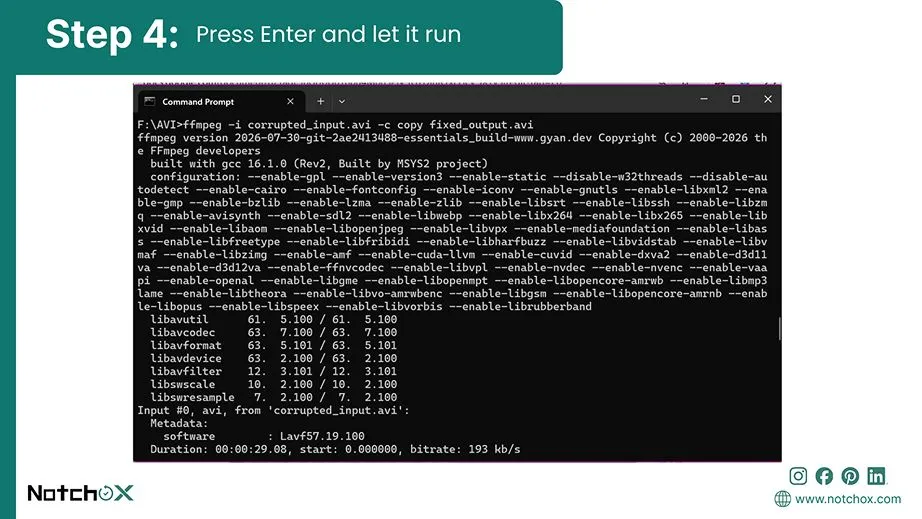
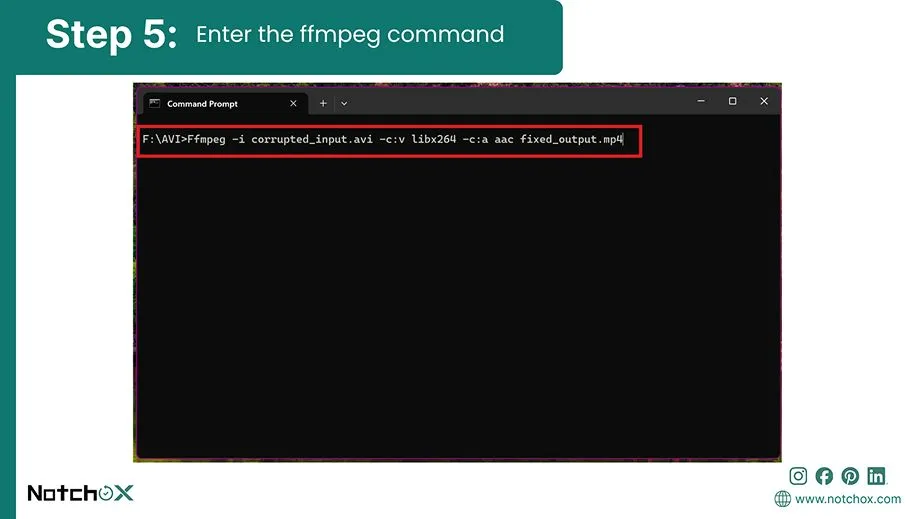
Type the stream command to rebuild the file structure without re-encoding:
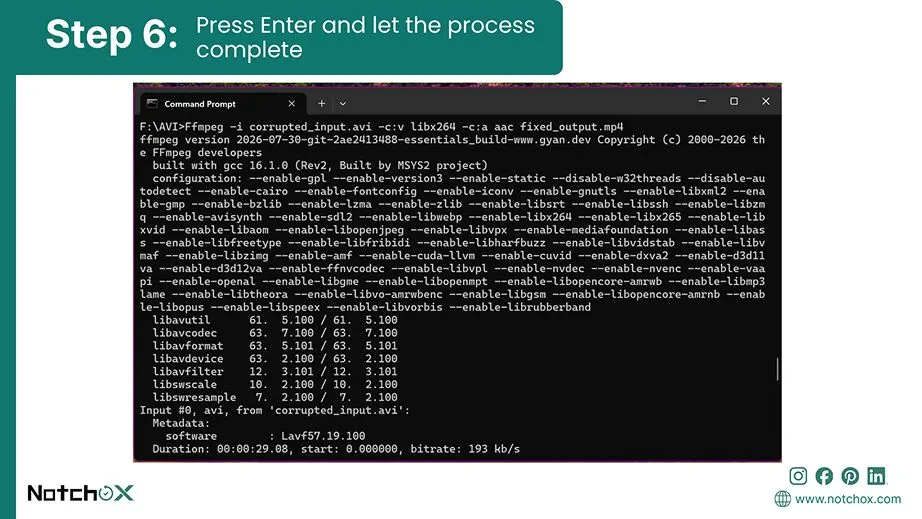
Press Enter and wait a few moments for the software processing timeline text to finish updating.
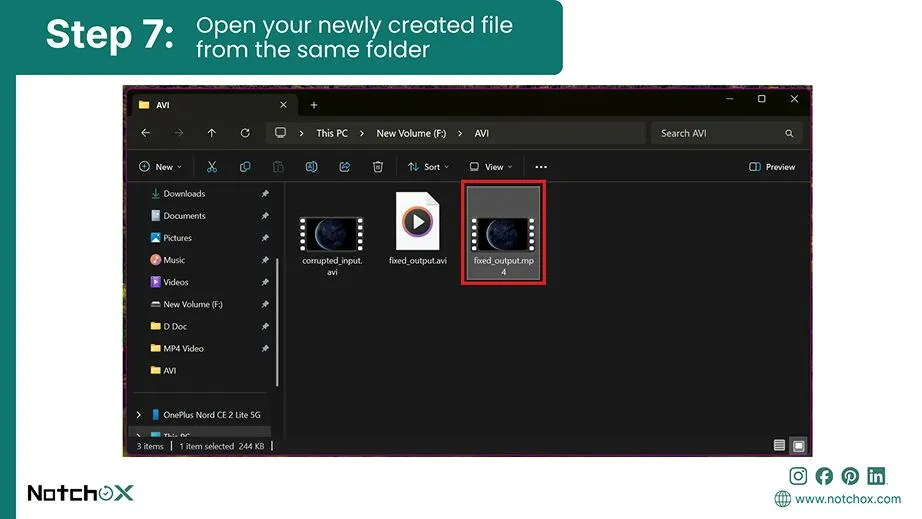
Open your newly created file from the same folder to verify that your video plays smoothly now.
Advanced Methods to Repair Corrupted AVI Files
If you have tried this option and your corrupted AVI video still isn’t working, it is time to step things up. In this section, we are going to look at advanced ways to repair corrupted AVI files when basic apps give up. We will start by running a system check on your storage drive to repair bad sectors and then look at how automated video repair software can fix deep internal file damage automatically.
Method 1: Run CHKDSK to Repair File System Errors
Check Disk (CHKDSK) is a built-in Windows utility that cleans up background drive errors that are causing AVI file not playing issues. You just have to run a few commands on your terminal, and Windows will do the rest of the background processing to repair those broken data pathways for you.
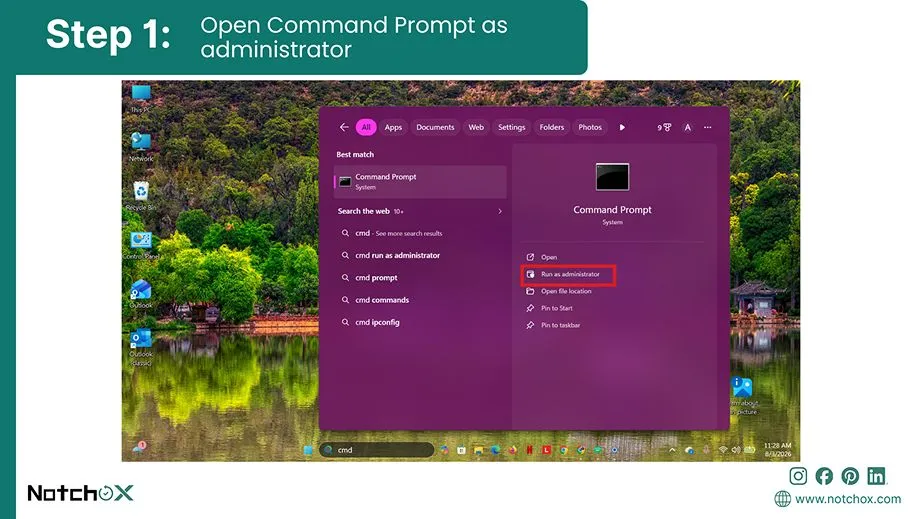
Type cmd in your Windows search bar to find the Command Prompt application. Click Run as Administrator to give it full system permissions.
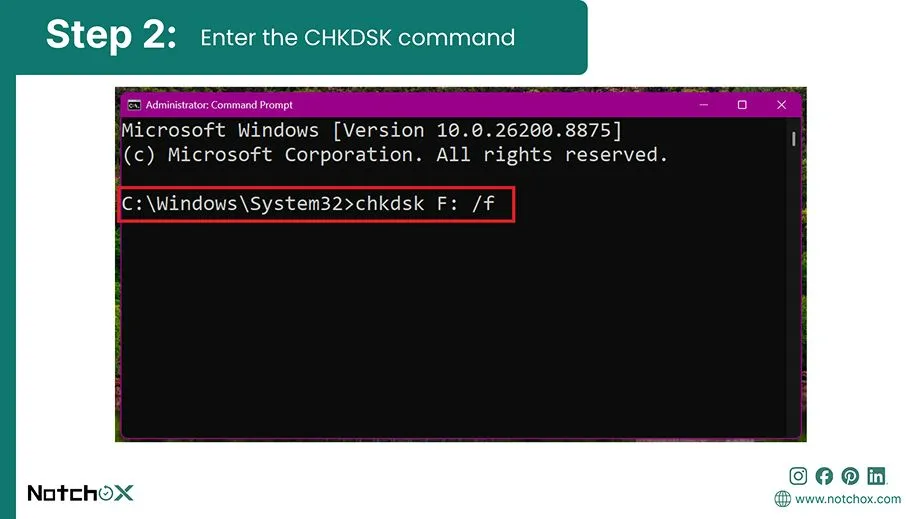
Type the repair command into the window while replacing the letter X with your actual drive letter and press Enter.
chkdsk X: /f
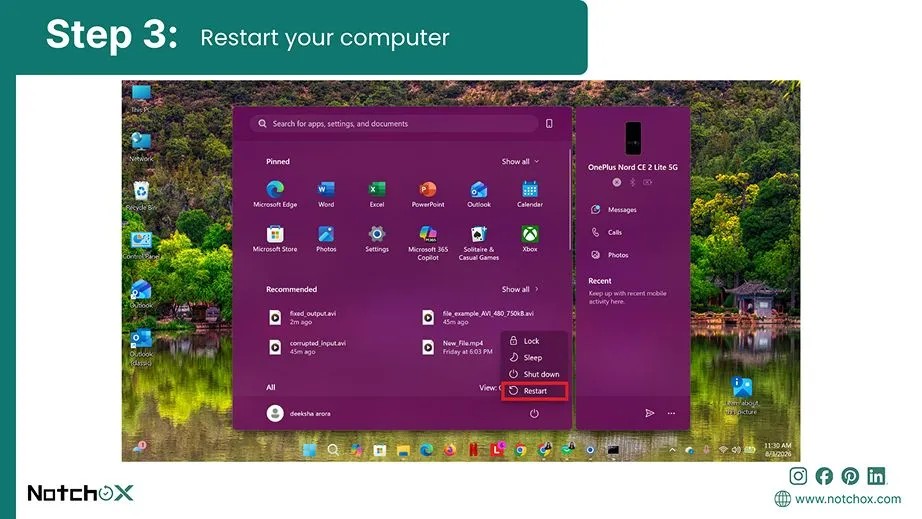
Once the scan is finished, restart your computer to refresh the file system cache.
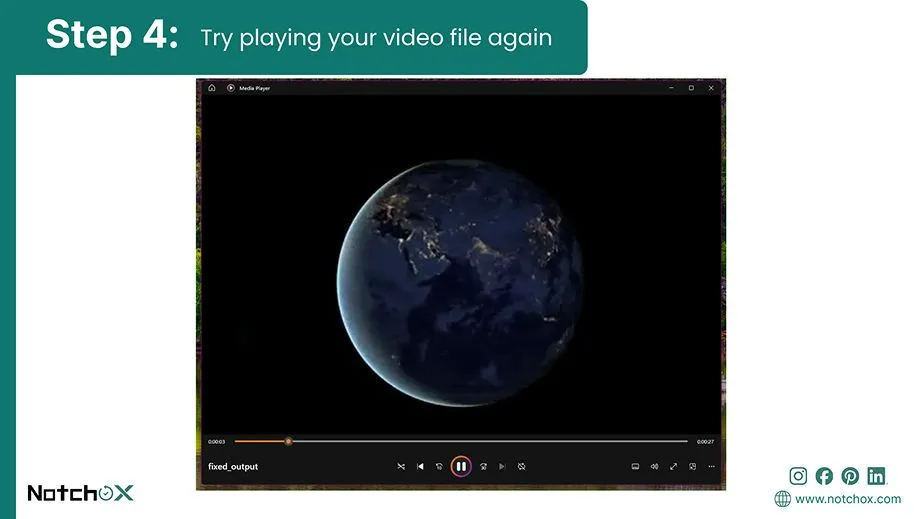
Try playing your video file again to see if fixing the drive worked.
Method 2: Automated Video Repair Software
Now, if your files are still corrupted and won’t run, it’s time to try professional automated video repair software. When free tools fail, it’s usually the internal structure of the file that is broken, and you need a smart program to rebuild it.
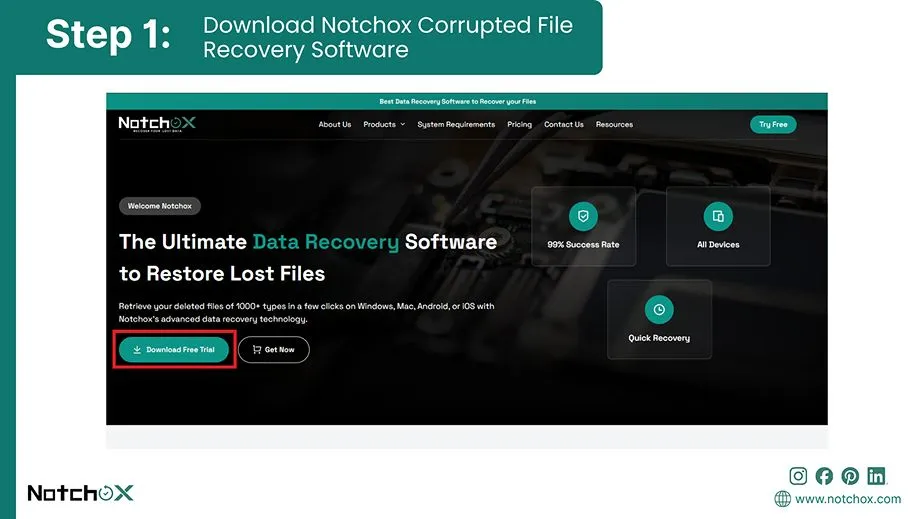
Recover Corrupted AVI Files Using Notchox
Notchox corrupted file recovery software is the best and most reliable among the software available in the market. Run a deep scan to fix your corrupted file and make it work like new.
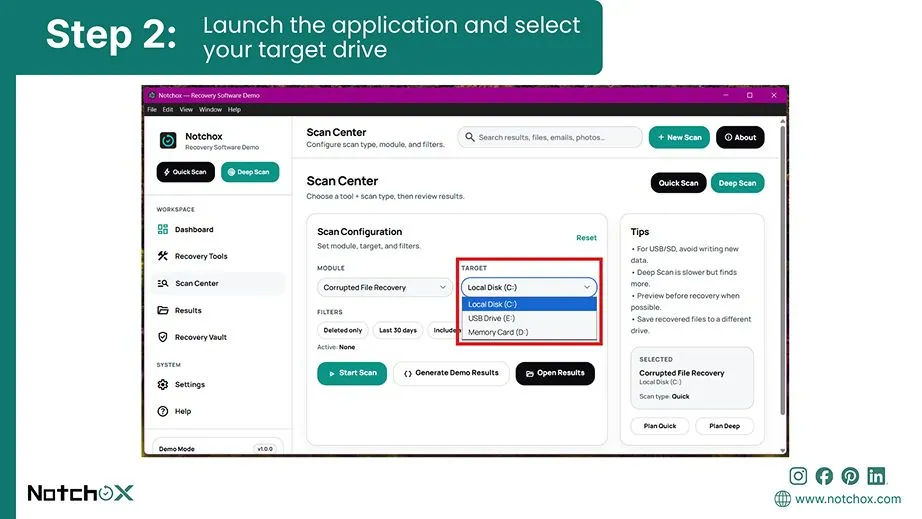
Launch the application and select your target drive containing the file to be repaired.
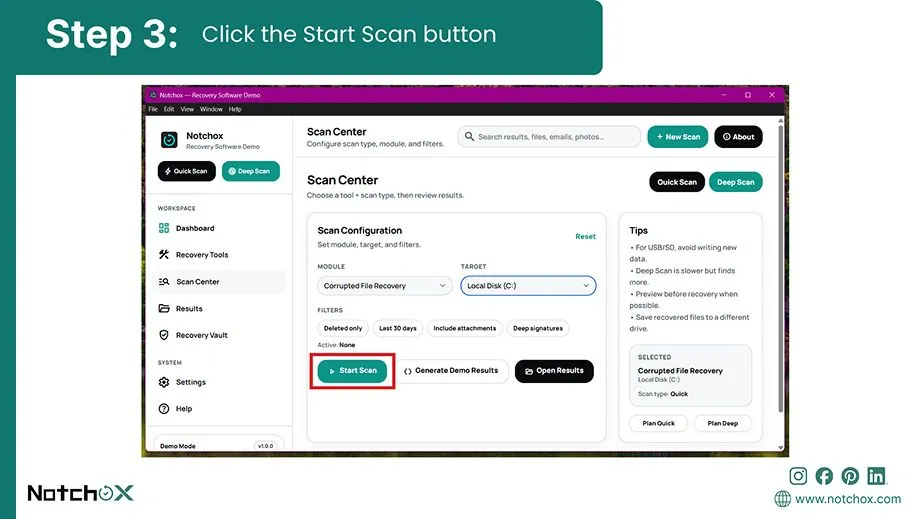
Click the Start Scan button to begin a deep scan to look for the corrupted parts of the file and rebuild it.
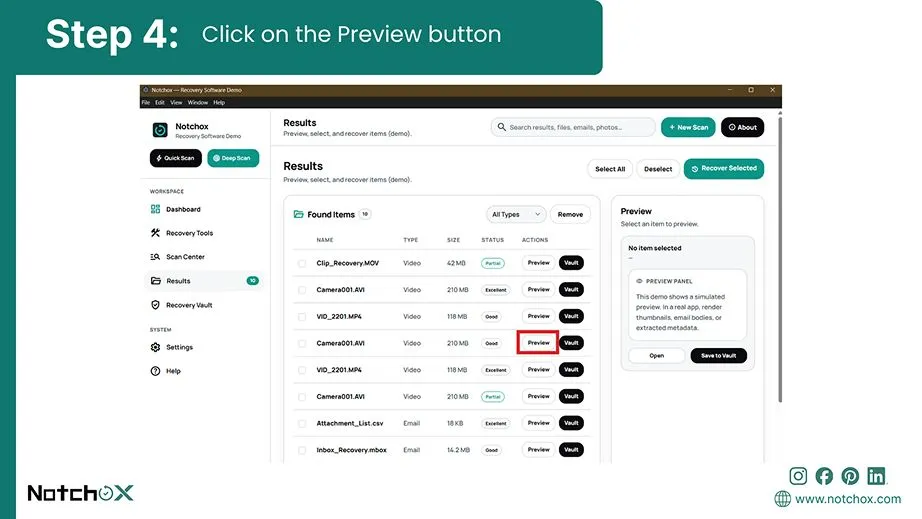
Once the scan is completed, click on the Preview button to check the integrity of the video file restored.
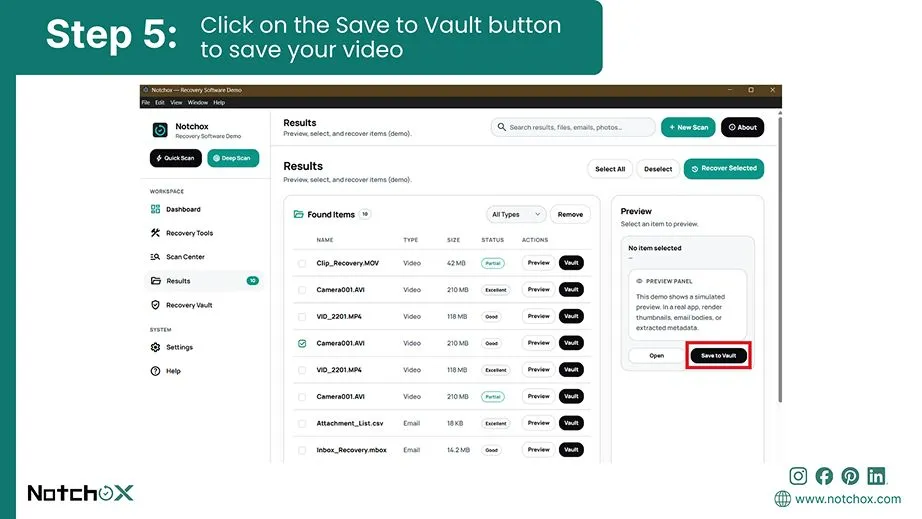
Now select your repaired AVI file and click on the Save to Vault button to save your newly repaired video.
Conclusion
That’s all about how to repair corrupted AVI files. We started with quick tricks like changing file extensions, and then we covered how to use VLC to automatically fix errors. We also looked at how DivFix++ can rebuild a broken file index from scratch and how to use FFmpeg commands to fix deep structural issues. Finally, we also saw how to use corrupted file recovery software when no method works.
Don’t stress over a corrupted video file. Just follow this guide and repair corrupted AVI video files in no time.
Frequently Asked Questions
Q1: Can corrupted video files be repaired?
Ans: Yes, most corrupted video files can be repaired as long as they still show a normal file size. If the core data is still safe, you can use software to repair it.
Q2: How to repair corrupted AVI files?
Ans: You can repair corrupted AVI files for free using VLC Media Player, DivFix++, FFmpeg, or corrupted file recovery software like Notchox.
Q3: Will CHKDSK repair corrupt files?
Ans: CHKDSK doesn’t directly fix the internal code of a video file, but it repairs the hard drive sectors where the file is saved. If your video is unreadable due to a drive glitch, CHKDSK can restore proper data access.
Q4: Why is AVI not used anymore?
Ans: AVI is less commonly used todaybecause it is a legacy format from 1992 that produces massive file sizes because there is no modern compression for that. Modern video formats (MP4 or MKV) give better video quality at smaller sizes.
Q5: Can I convert .AVI to MP4?
Ans: Yes, you can easily convert AVI to MP4 using free tools like VLC Media Player or FFmpeg.
Q6: Why is my AVI file not playing?
Ans: The reason your AVI file is not playing could be a broken AVI index table, severe header corruption, a software issue, or missing audio-video codecs.
Deeksha Arora is a Data Protection & Recovery Writer focusing on writing accurate, informative, and easy-to-understand technical articles for Notchox’s readers. Her content on the prevention of data loss, understanding risks of device failures, and guides to fix problems helps readers make the right decisions and understand the technical terms easily. She works closely with Subject Matter Experts to ensure high usability and accuracy of her writing.