Chromebooks use a cloud-first operating system called ChromeOSthat keeps your files locked down inside the internal drive, unlike Windows PC or Macs. But that doesn’t mean that once you delete your file, they are permanently deleted.
Fortunately, it is possible to recover files from Chromebook, but only under certain circumstances. In this article, we explain native fixes like the local Trash folder, Google Drive cloud backups, and the Chromebook Utility app. Plus, for external drives or SD cards, our advanced Notchox Data Recovery Software makes deep scanning file restoration possible.
Quick Answer: To recover files from Chromebook, open the Files app and check the local Trash folder. If it’s empty, log into Google Drive to restore files from the cloud bin, or use Notchox recovery software to recover the files from external USB or SD cards.
How to Recover Files from Chromebook?
Recovering a deleted file is not a guaranteed process, but the way ChromeOS is built gives you a massive advantage to restore lost files from Chromebook. Because Chromebooks command a massive sixty percent share in schools and educational environments, Google specifically designed the operating system to make fixing these accidents as easy as possible.
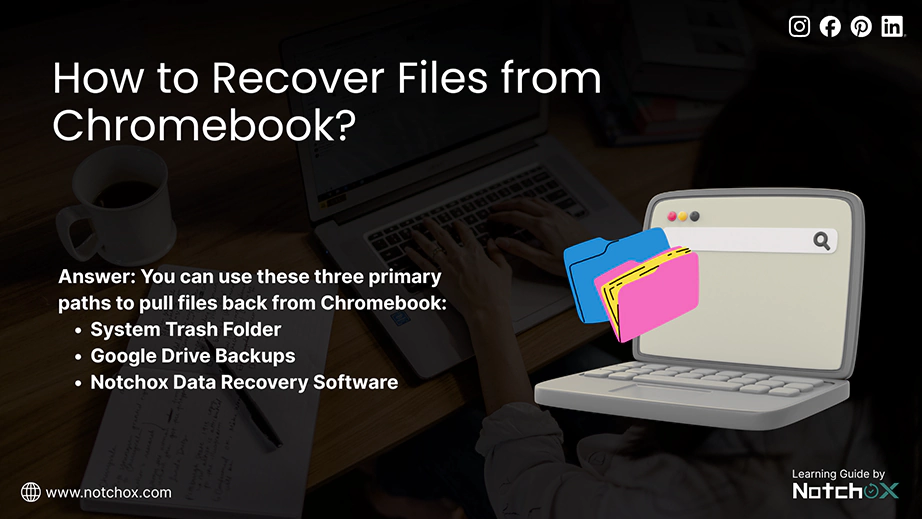
Before we look at each method in detail, let’s do a quick run-through of the three primary paths we’ll be using to pull files back:
The System Trash Folder: Trash on Chromebook is an immediate local safety place that holds on to your deleted downloads for up to 30 days.
Google Drive Backups: The automated cloud mirror that tracks your document histories and keeps a separate online recycle bin.
Notchox Recovery Software: A powerful recovery tool used to deep-scan and restore files from external USBs or SD cards.
Let’s see each method one by one to recover deleted files on Chromebook.
Method 1: Recovering Files via the Local Trash Folder
The deleted file from Chromebook goes to its Trash folder, where they are held for 30 days, giving you a free chance to rescue them.
Chrome OS includes a smart safety buffer built directly into Files Manager to protect local downloads and files. Because Chromebooks traditionally use smaller internal drives to keep performance fast, this Trash folder holds the deleted items exactly for 30 days. This gives you a convenient rescue window before the operating system permanently deletes them to keep your disk space clean.
Here is how to recover deleted files from Chromebook Trash:
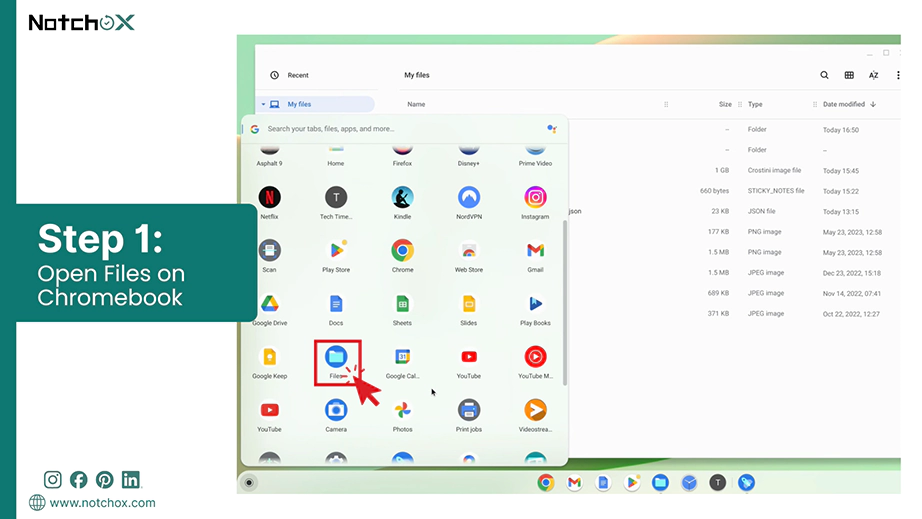
Step 1: Launch the Files App
Click on the App Launcher in the bottom left corner. Double-click on the blue folder icon. This is the central center for all your local storage.
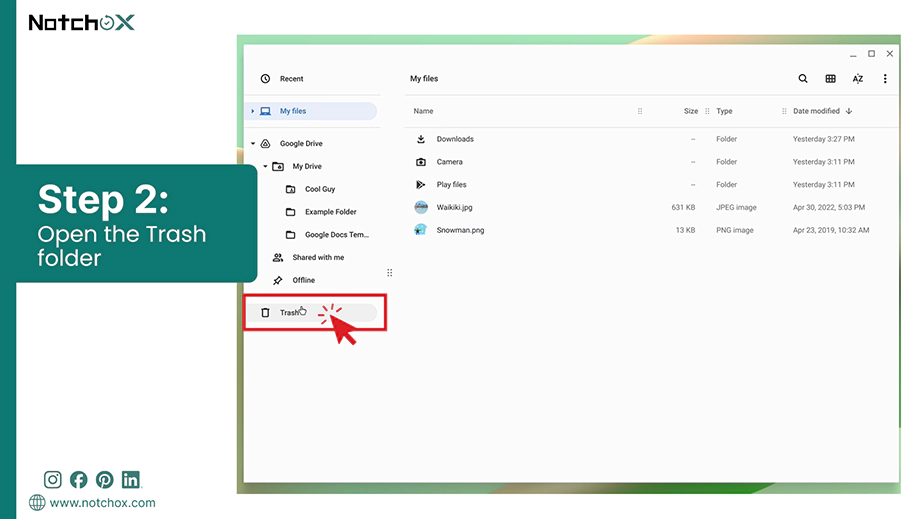
Step 2: Access the Local Trash Folder
Look at the left sidebar menu and click Trash. Remember this folder catches files deleted from your local “Downloads” partition, not your cloud files.
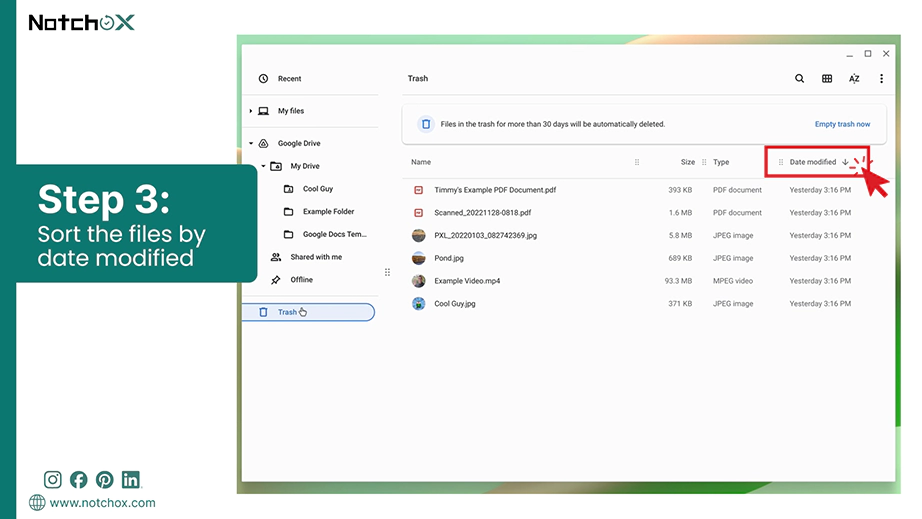
Step 3: Use Sorting
If you have many files, click the Date modified column at the top. This will sort your files by the day they were deleted, saving you from scrolling endlessly.
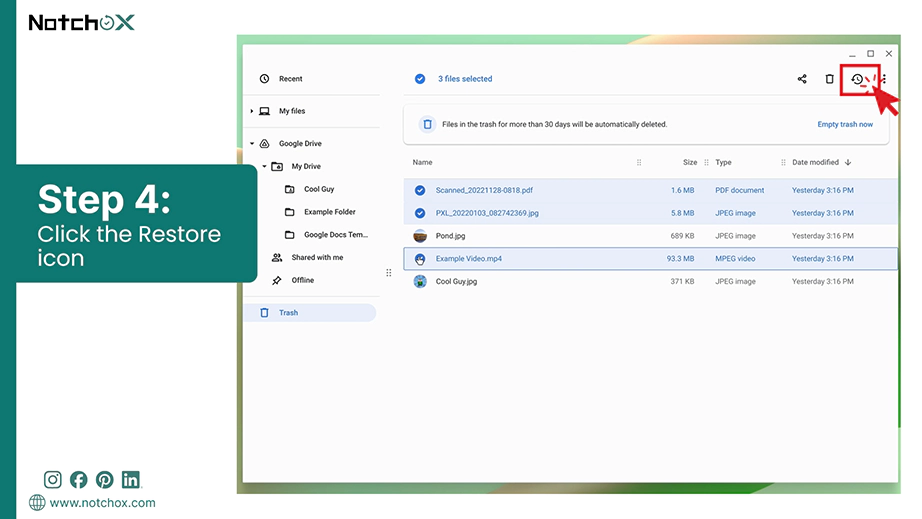
Step 4: Restore the Files
Select the deleted file(s) and select Restore from trash at the top. ChromeOS will automatically put it back in the exact folder it came from.
Hack:To save time, you can just click the file once and press Alt + Backspace on your keyboard. This is the official ChromeOS “Undo” command for accidental file deletions.
Method 2: Restoring Files Using the Google Drive Cloud Backups
Chromebooks automatically sync your workspace folder directly to Google Drive. This cloud-first architecture means if you accidentally delete a file from your synced folders, it isn’t erased from the drive. Google Drive keeps them in the online server-side vault (Google Drive’s Trash) for 30 days.
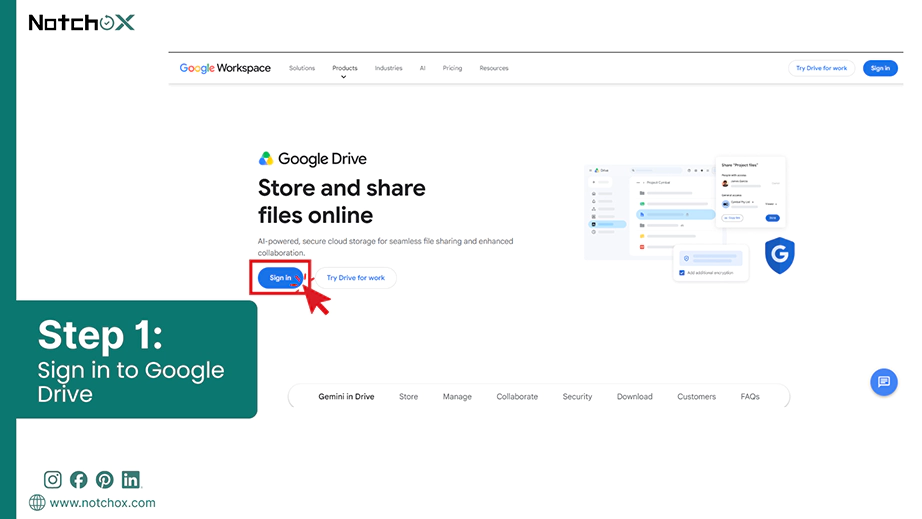
Open Google Chrome and go to drive.google.com. Confirm you are logged into the same Google account as you are signed into your Chromebook.
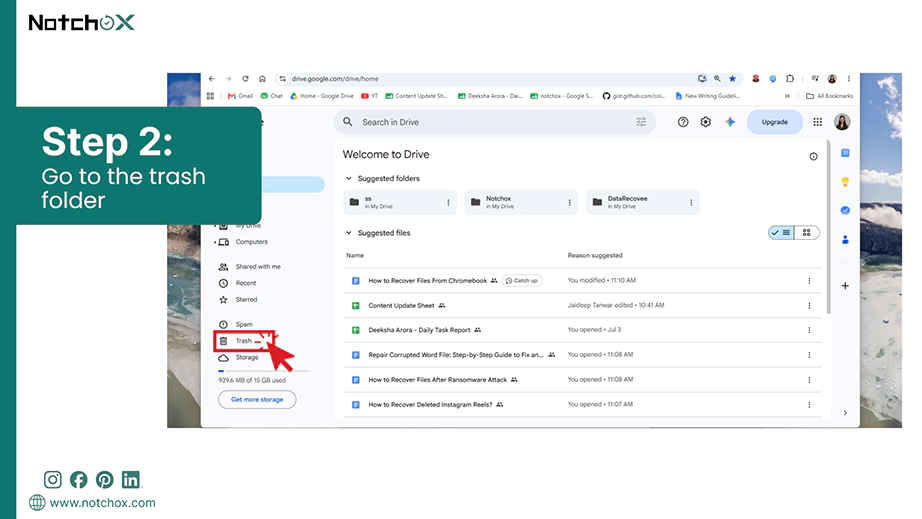
Step 2: Enter the Cloud Storage Bin
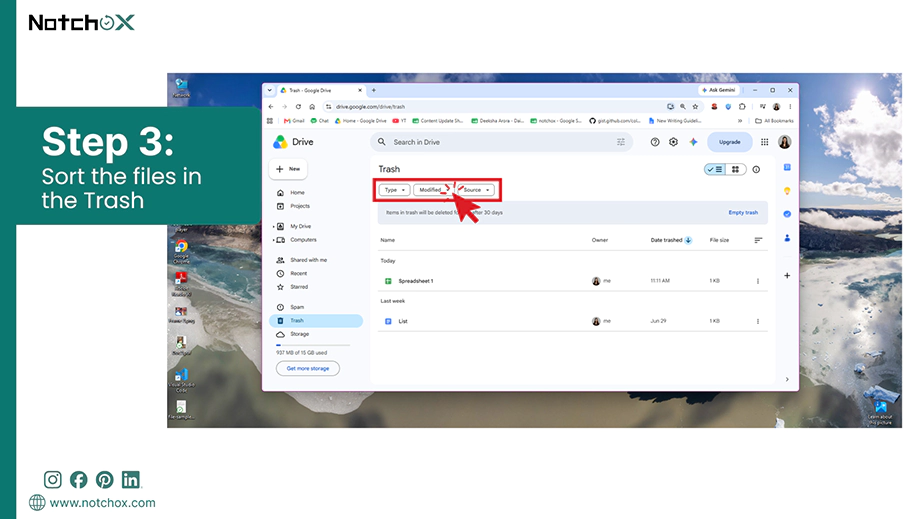
Look at the left sidebar and click the Trash icon. Here you will find all your deleted files from Google Drive.
Step 3: Select the File
Scroll through the list to find your deleted item. You can use the filter chips at the top of the screen to sort by File type (like documents, Images, or PDFs) or People to find shared files. For example, you can locate deleted Word document on Chromebook Google Drive trash.
Step 4: Recover the Files
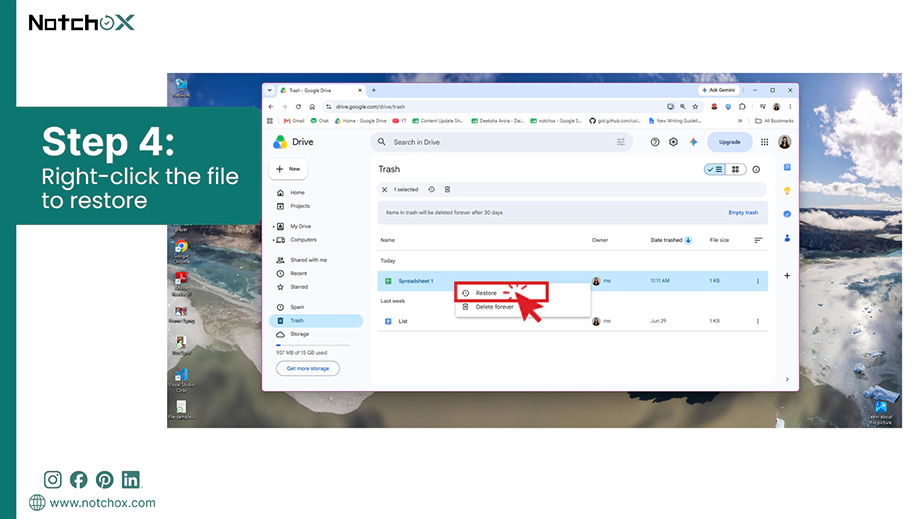
Right-click the selected file and click Restore. This pulls the file out of the bin and sends it straight back to its original cloud folder.
Open your Chromebook Files app and click on the Google Drive tab. Look for the restored file that has instantly synced back to your offline desktop view.
Reverting Version History
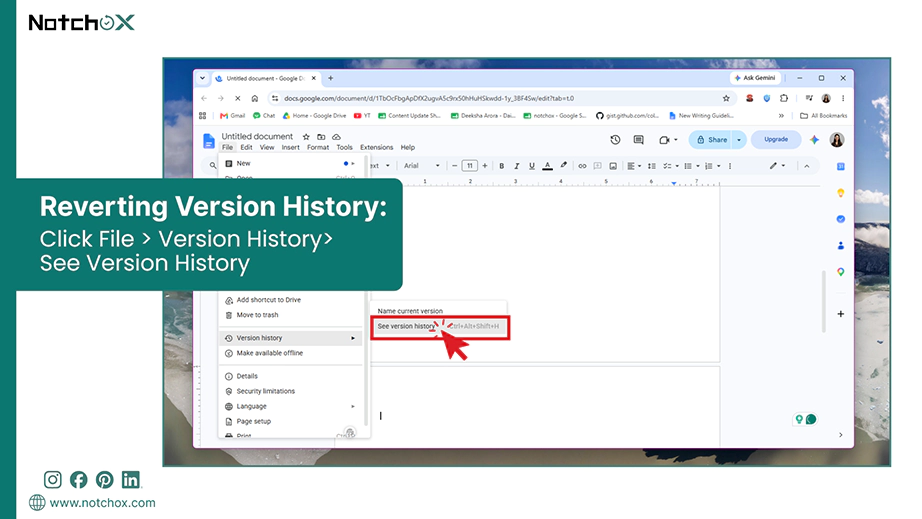
Did you accidentally overwrite your text or erase an important section instead of deleting a whole file? Google Drive tracks every single edit you make, meaning you don’t need to use the trash folder to fix a mistake.
Simply open the modified document in your browser, click File > Version History> See Version History.
File deletion can also happen due to a system crash. If your device boots up to a “ChromeOS is missing or damaged” screen, Chromebook Recovery Utility will help you restore lost files from your Chromebook. It basically repairs the system and re-establishes a stable environment so you can log back into your profile.
Note: While the Chromebook Recovery Utility won’t restore deleted local files, it is important for recovering crashed operating systems. By fixing broken devices, it lets you log back into your Google Account, which instantly re-downloads all your synced cloud documents, profiles, browser data, and more.
Method 3: Recovering Files from External Storage Using Notchox Recovery Software
External storage does not share ChromeOS’s restrictive internal hardware encryption. So, if you delete files from an external flash drive, memory card, hard drive, etc., you can connect it to any Windows or Mac computer and deploy Notchox Recovery Software to recover files from Chromebook hard drive (external only).
Detailed steps for Chromebook file recovery from external storage:
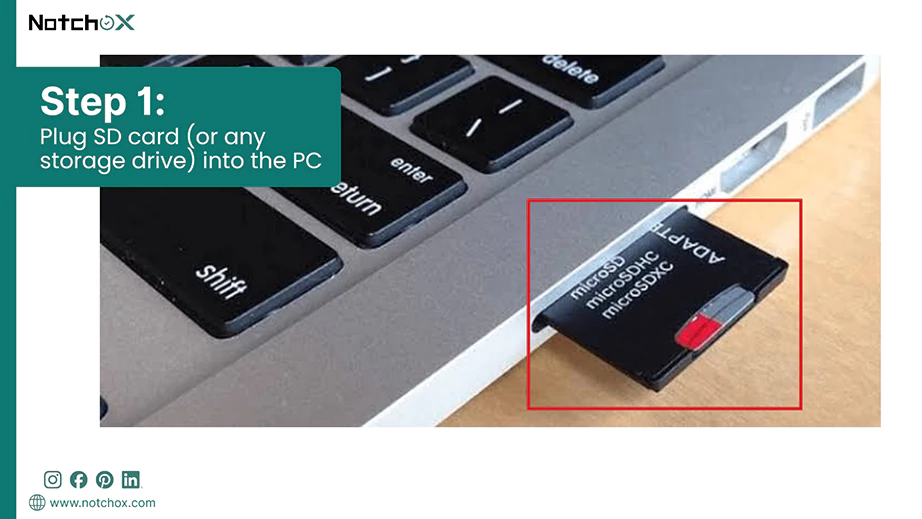
Step 1: Connect the Storage Drive
Unplug your flash drive or SD card from your Chromebook and plug it into a Windows or Mac computer.
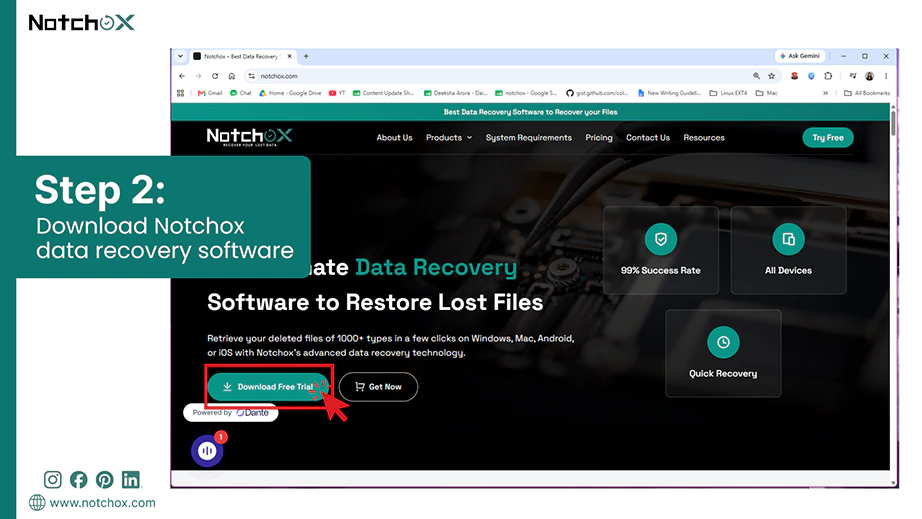
Step 2: Launch the Notchox Recovery Software
Download the Notchox Recovery Software on your laptop. Open it, and it will trigger a setup wizard to guide you through the process.
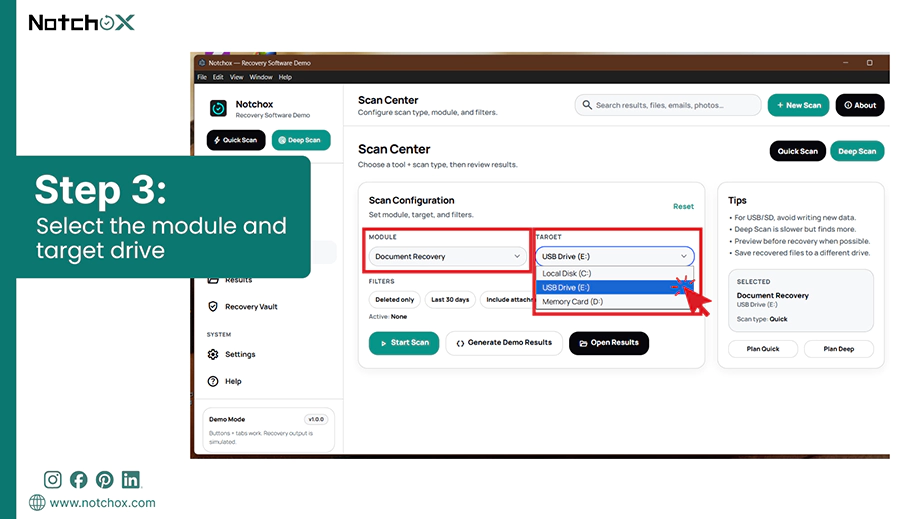
Step 3: Select the Target Drive
Select the Recovery Module and choose the drive letter associated with your connected external USB or SD card partition from the drop-down location menu.
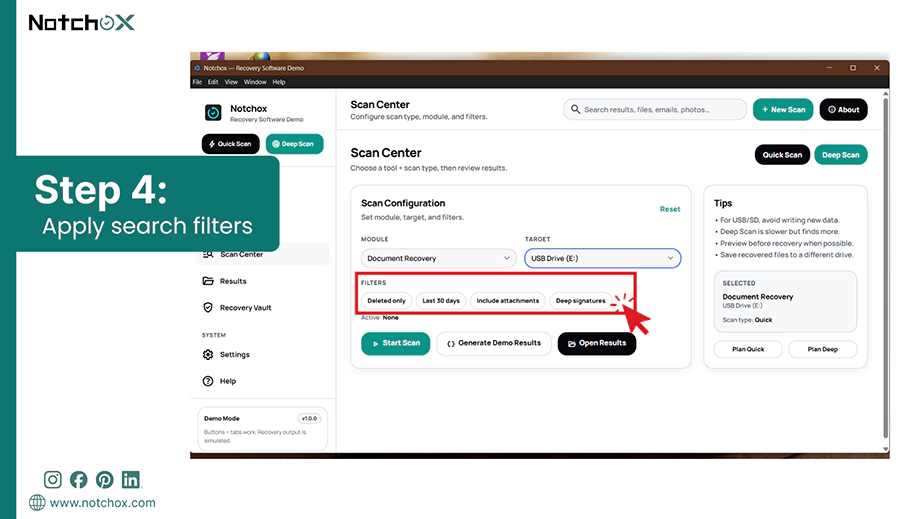
Step 4: Specify the File Criteria
Apply filters such as “Deleted only,” “Last 30 days,” “Include attachments,” or “Deep signatures” to narrow down the system results.
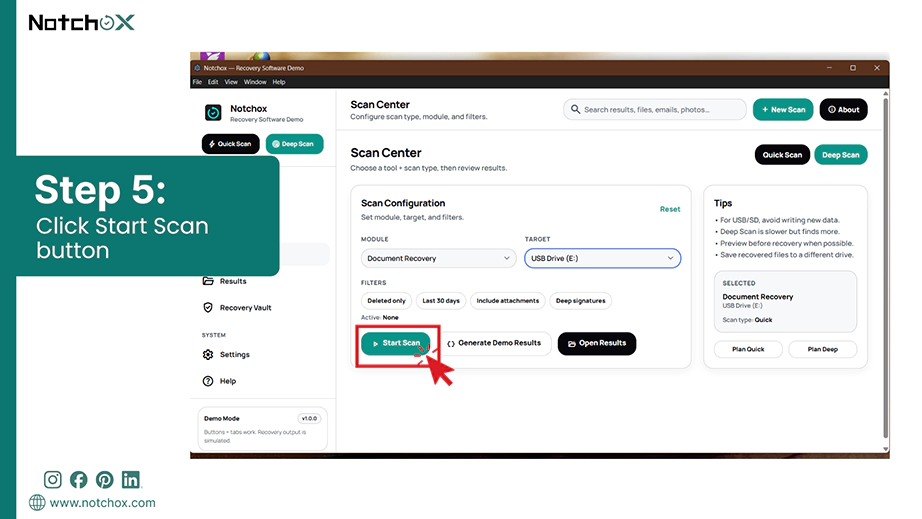
Step 5: Run the Scan
Click the Start Scan button to begin the recovery process. Notchox will run a scan through the entire physical drive looking for recoverable files.
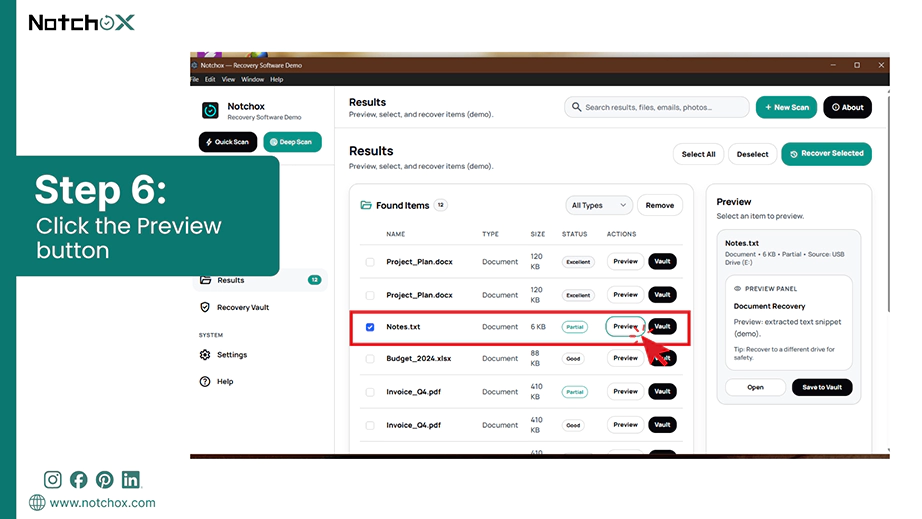
Step 6: Preview the Files
Click the Open Results button to see the list of recoverable files. You can select the item and click Preview to check its integrity and confirm recovery.
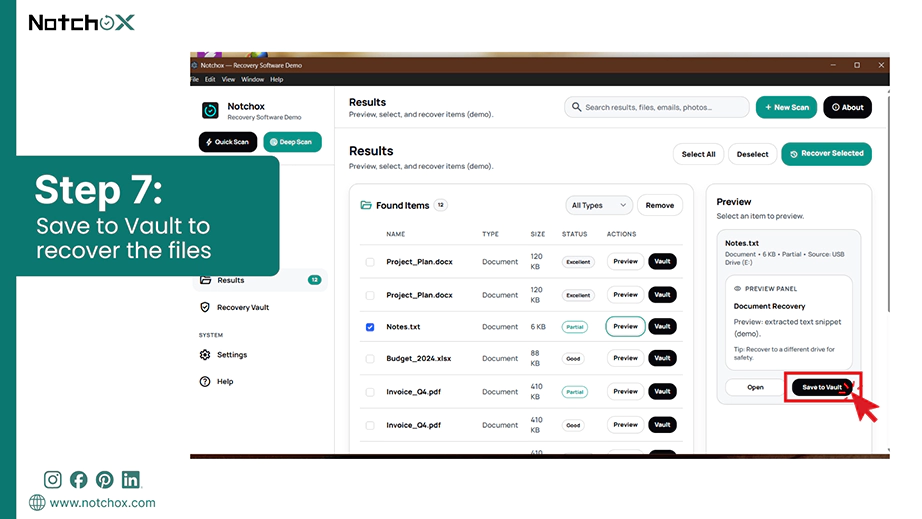
Step 7: Recover the Files
Now, finally, select the files and click the Save to Vault button to safely restore lost files from Chromebook external drive using Notchox.
Here’s the Takeaway
You saw that you can recover deleted files from Chromebook using the local Trash folder, Google Drive trash, or use Notchox data recovery software on your external USB drive. There is always a clear way for Chromebook file recovery.
The best thing you can do right now is change your default download location to Google Drive. This simple change means all future files are saved to the cloud automatically, increasing the chances of recovery.
Frequently Asked Questions on Chromebook Recovery
Q1: How do I get my files back on my Chromebook?
Ans: The quickest way to get your files back is to open the blue Files app and click the trash folder in the left menu. If you see your deleted file there, right-click it and select Restore from trash to send it right back to its original folder.
Q2: How to restore pages on Chromebook?
Ans: To bring back a webpage or browser window you closed by mistake, press the keyboard shortcut Ctrl + Shift + T. Also, you can press Ctrl + H to open your full browsing history log and click on the link you visited earlier.
Q3: How to retrieve deleted files on Chromebook?
Ans: Open the Files app and click Trash in the left sidebar to restore local files deleted within 30 days.
For cloud documents, check your online Google Drive recycle Trash.
If you lost data from a USB or SD card, connect it to another Windows or Mac PC, and run Notchox data recovery software.
Q4: Where can I get an app removed by mistake on Chromebook?
Ans: Open the Google Play Store and go to Manage apps & devices > Manage > Not installed to reinstall a removed app. For Chrome extensions, check chrome://extensions or search for the extension in the Chrome Web Store to add it again.
Deeksha Arora is a Data Protection & Recovery Writer focusing on writing accurate, informative, and easy-to-understand technical articles for Notchox’s readers. Her content on the prevention of data loss, understanding risks of device failures, and guides to fix problems helps readers make the right decisions and understand the technical terms easily. She works closely with Subject Matter Experts to ensure high usability and accuracy of her writing.