Deeksha Arora Aug 17, 2026
Ans: Start by checking your hardware by reconnecting the hard drive. If it is a software glitch, assign a missing drive letter in Disk Management or update your driver.
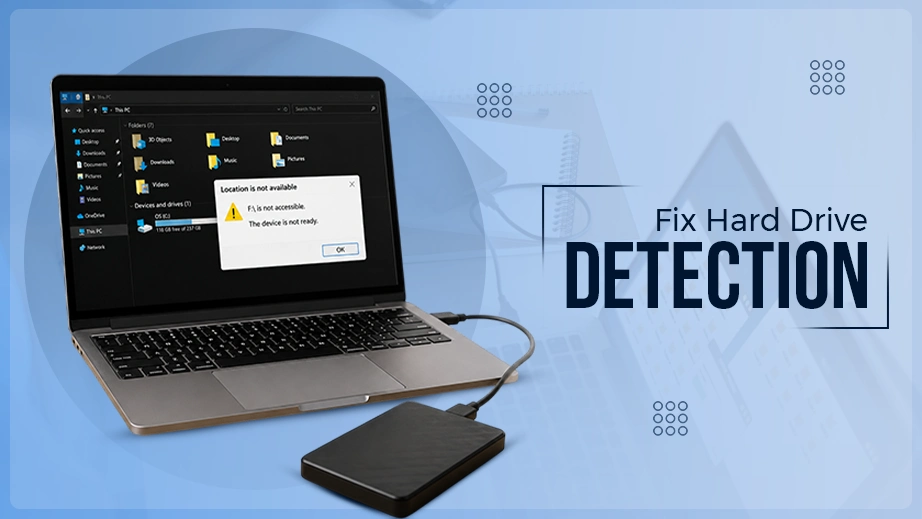
Is your internal hard drive missing or completely unresponsive? Whether your drive is not detected in Disk Management, Device Manager, or BIOS/UEFI, you are in the right place. According to Blackblaze’s Q1 2026 Drive Stats, enterprise HDD annualized failure rates average ~1.36% across more than 300,000 drives.
This guide will help you safely recover and fix a hard drive not detected. We cover every scenario: from simple drive letter reassignment to changing storage controller mode. Follow these step-by-step methods to troubleshoot the failure and restore access to your files immediately.
Quick Answer: You can try to fix a hard drive not detected by reseating the internal SATA and power cables first. If the problem is a software glitch, you can restore access to your missing files using Notchox Data Recovery Software before securely initializing or reformatting the disk partition structure.
To fix a hard drive not detected, you need to follow a simple elimination process. The fastest answer is to check your hardware connections first: unplug and firmly reseat the internal SATA and power cables, or try a different port on your motherboard. If the drive is getting power, the problem is usually a quick software settings issue. You can fix it by assigning a new drive letter in Disk Management, initializing the Disk, or updating hard drive drivers in Device Manager.
Now you know the methods to fix a not initialized disk or internal hard drive. Let’s see these methods step-by-step in detail.
The first case we are looking at here is when your internal hard drive shows up in Disk Management but stays completely inaccessible. This happens when a drive has a logical error, file corruption, improper format, etc. Windows detects the physical drive, but it can’t read the file layout. This leads to an unallocated drive or a not initialized disk.
Let’s look at the solutions for this case:
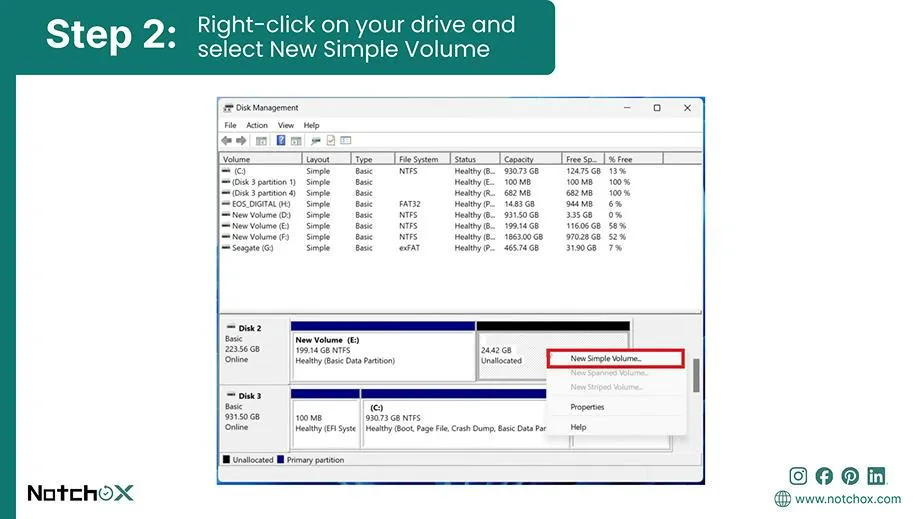
Unallocated drive means the usable partition container is not mapped out, though Windows recognizes it. Here are the actions needed to allocate this space and assign a fresh file system partition:
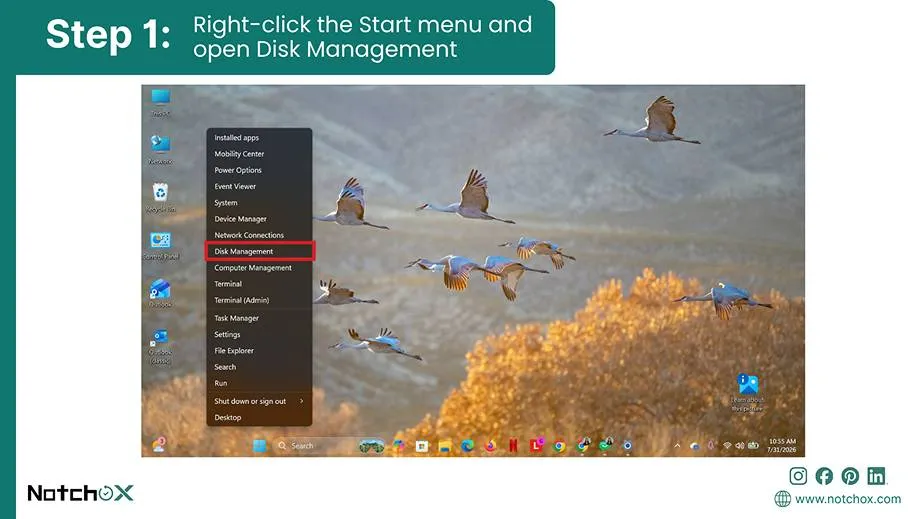
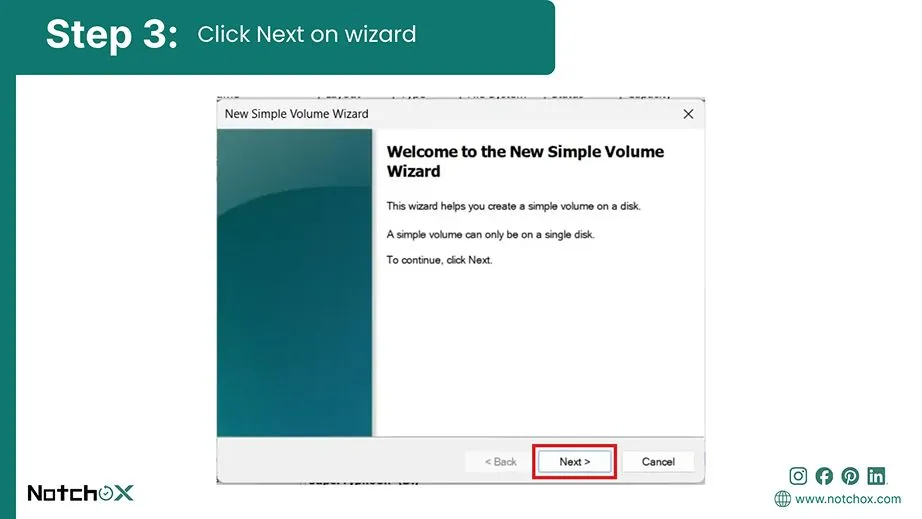
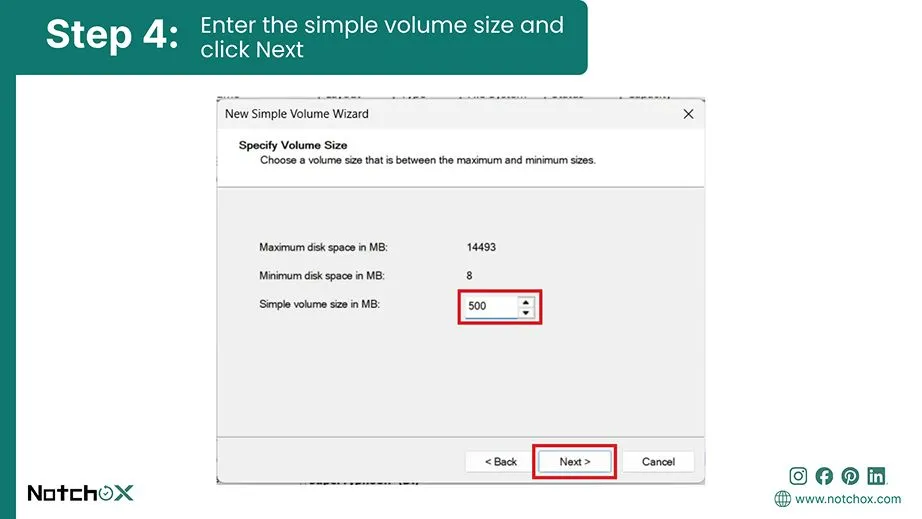
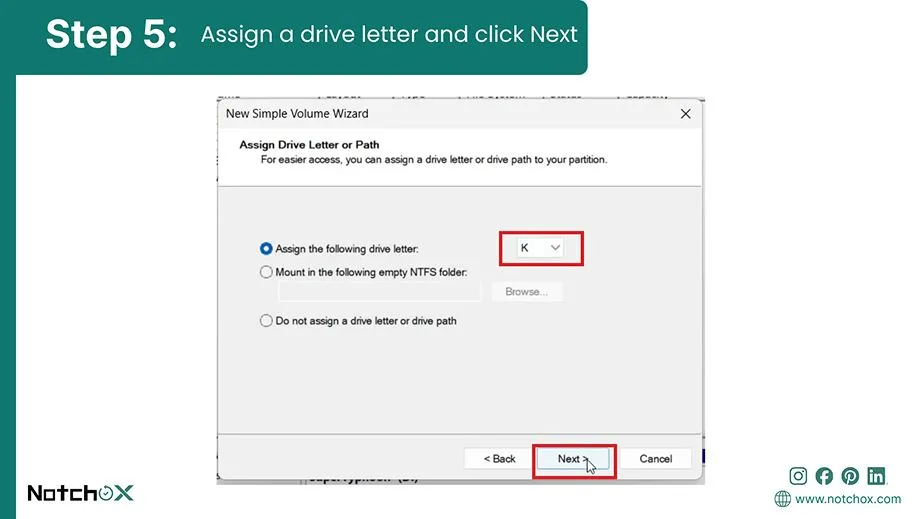
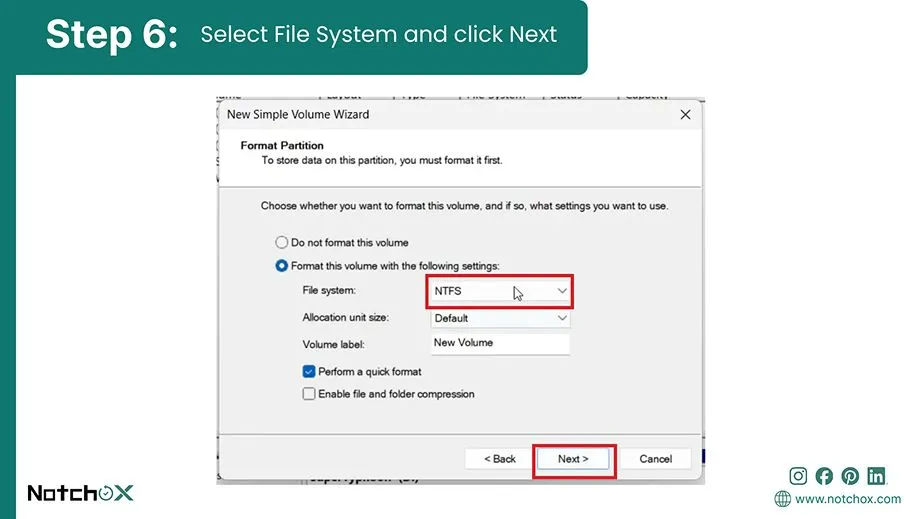
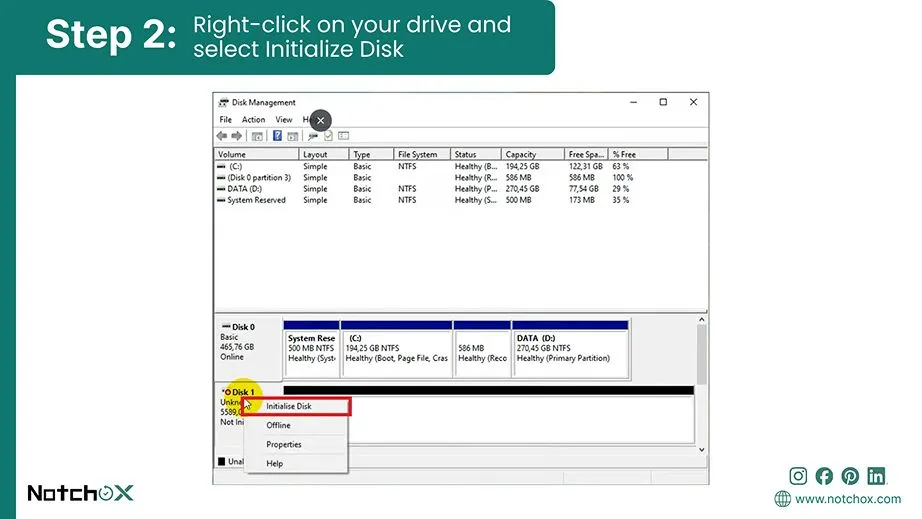
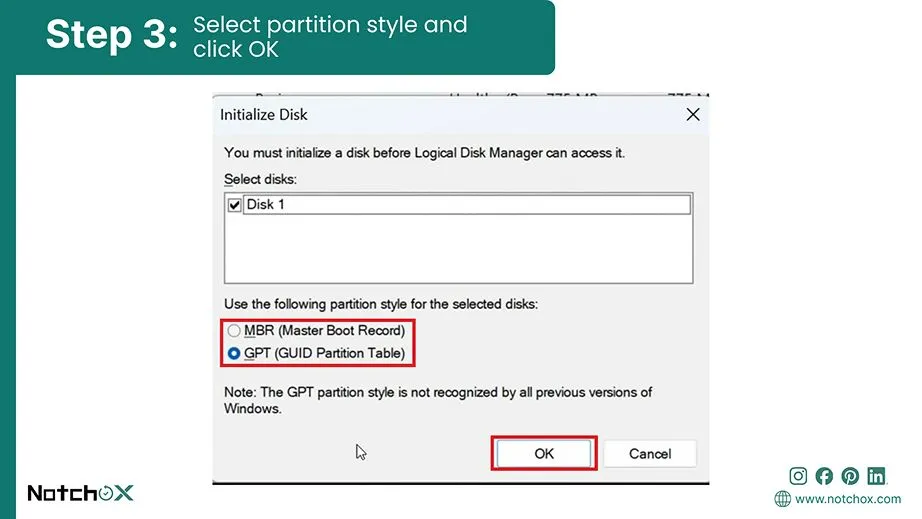
Windows’ failure to read the disk’s master boot record layout results in a not initialized disk. Before we can even partition or save anything on it, we have to initialize it to get the drive accessible to the operating system again.
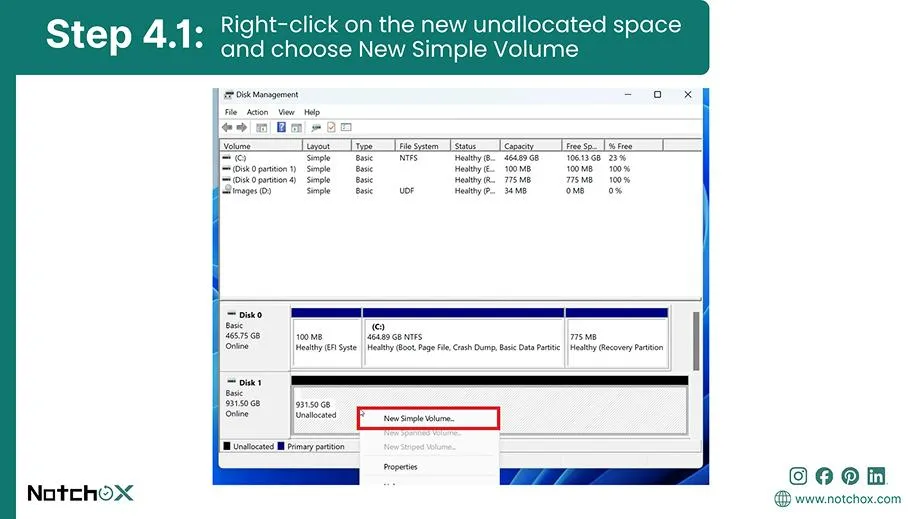
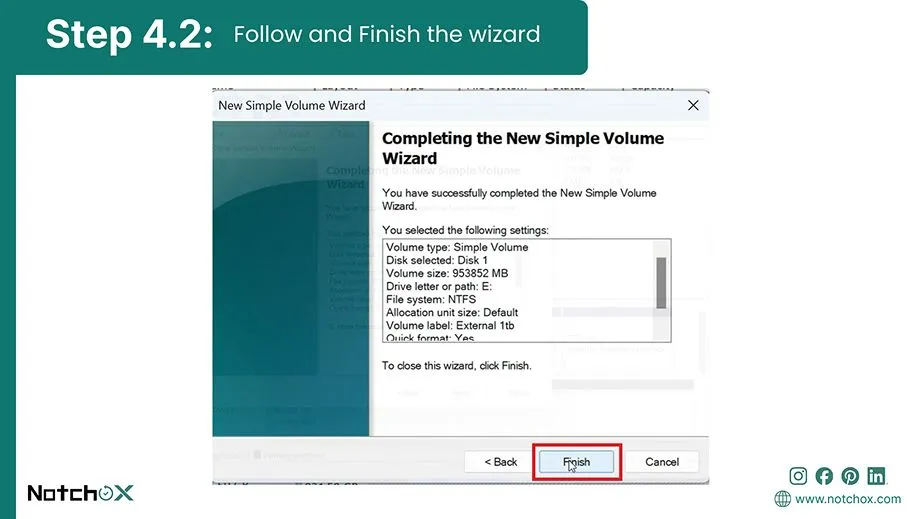
(i) Right-click on the new unallocated space and choose New Simple Volume.
Note: If the drive had files, stop here and use Notchox data recovery software to scan the unallocated space before formatting it.
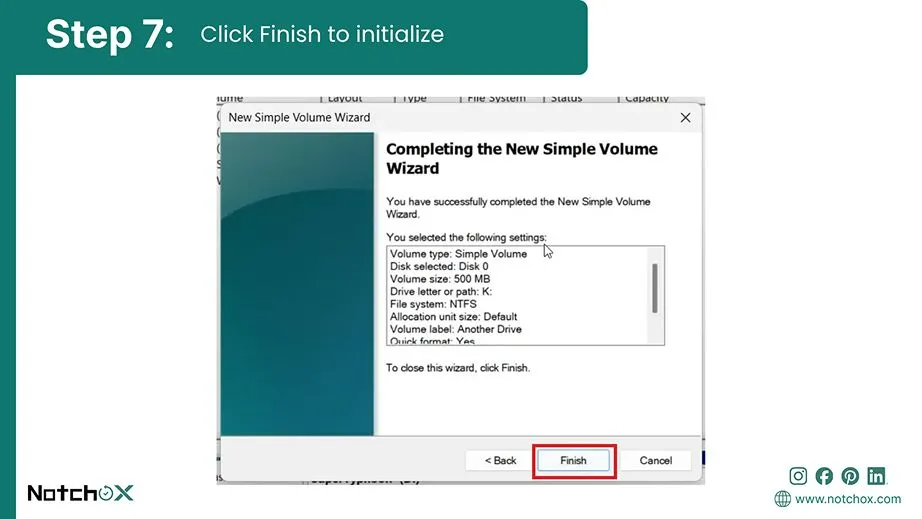
(ii) Now follow the wizard, configure the volume, assign a drive letter, and click Finish.
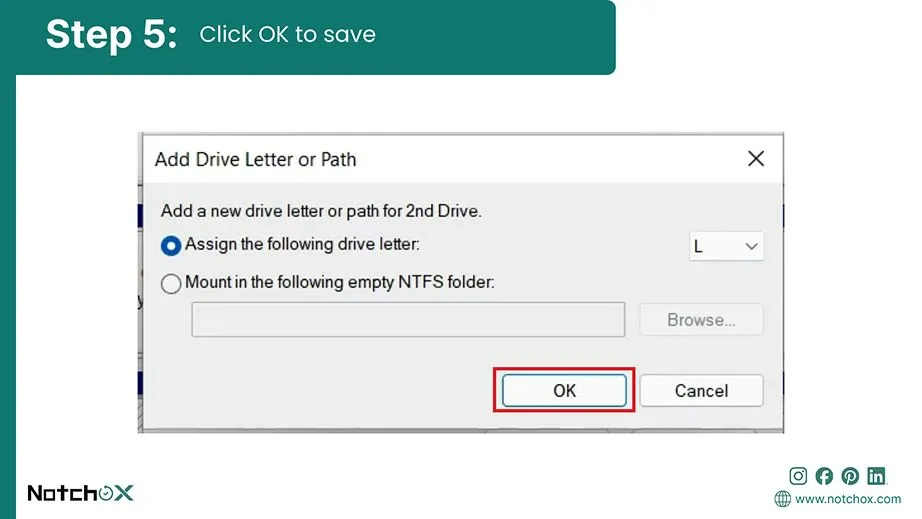
File Explorer also can’t access a drive because it doesn’t have an access path. This is a classic drive letter conflict, and we can fix it by assigning a new drive letter to the volume block.
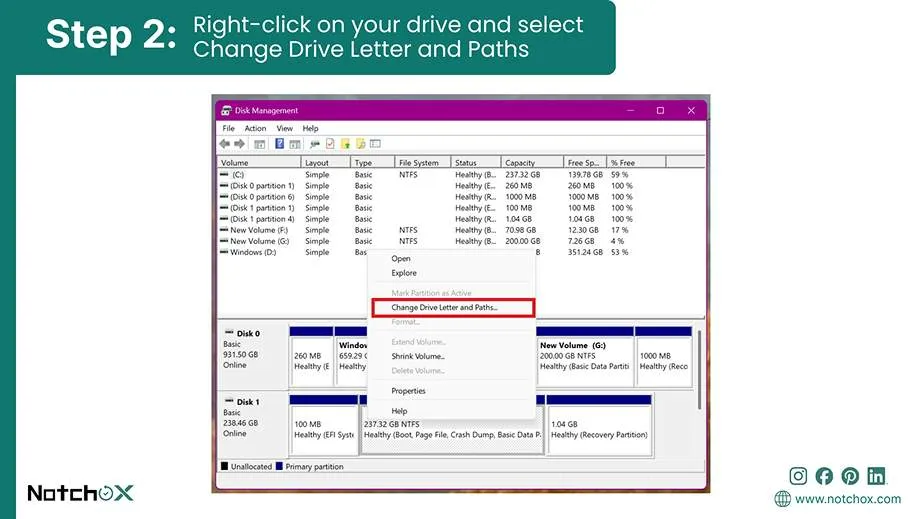
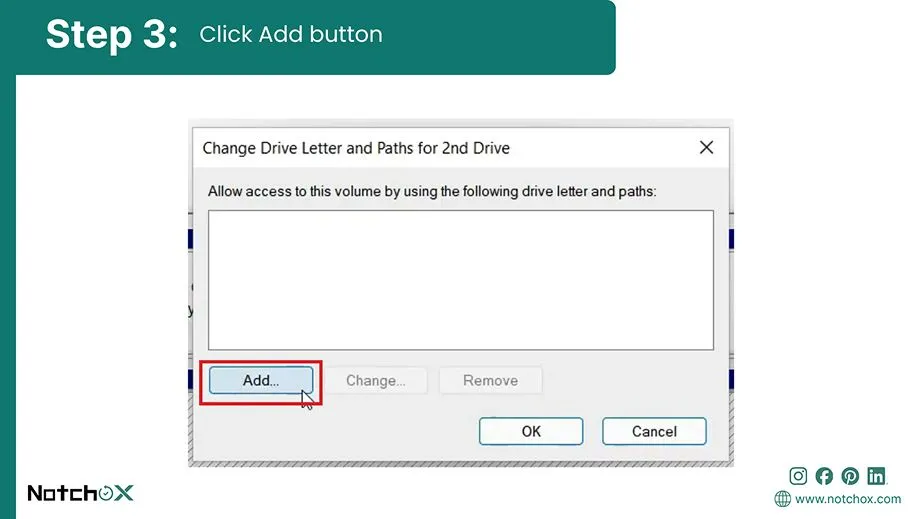
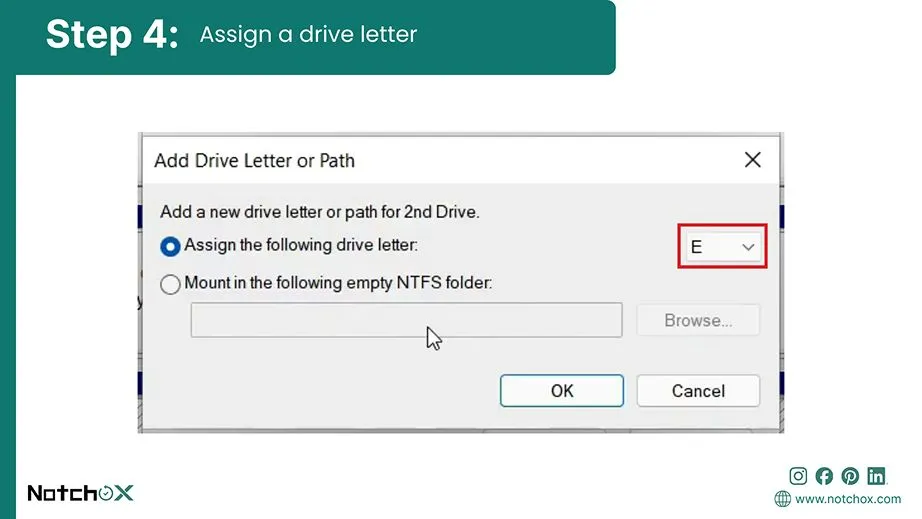
Note: If Change Drive Letter and Paths is grayed out, the partition may be unallocated or have an abnormal status.
The next case we are covering here is when your drive shows up in Device Manager but not in Disk Management. Sounds strange, right? This happens when Windows recognizes the drive but, due to outdated software or a glitch, gets confused. The OS knows the drive is present, but cannot map the layout.
Now we will see how to force Windows to recognize a drive.
In case of temporary communication glitches with the hardware ports, Windows built-in hardware scan fixes it. You just need to manually trigger this scan using the following steps:
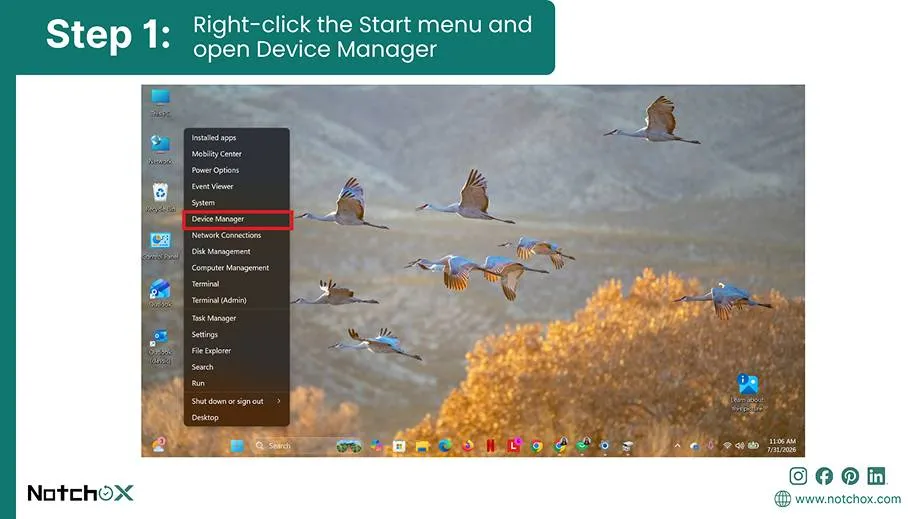
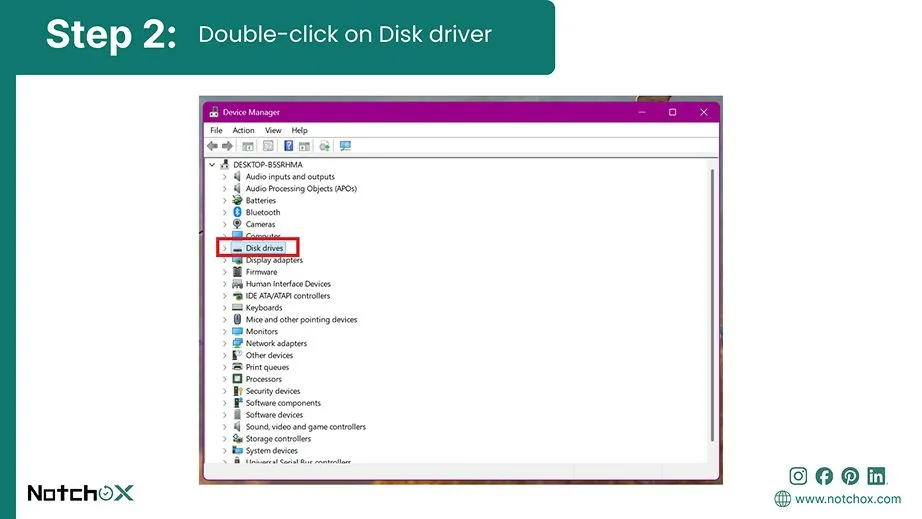
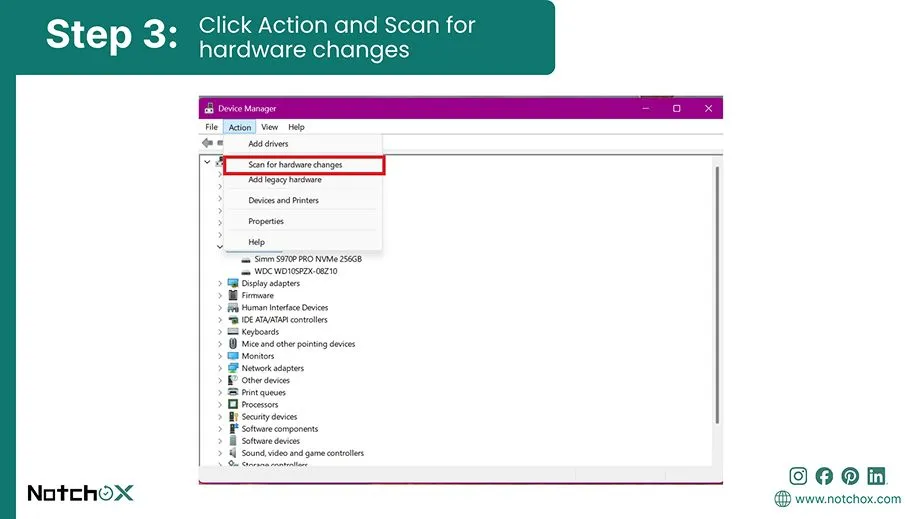
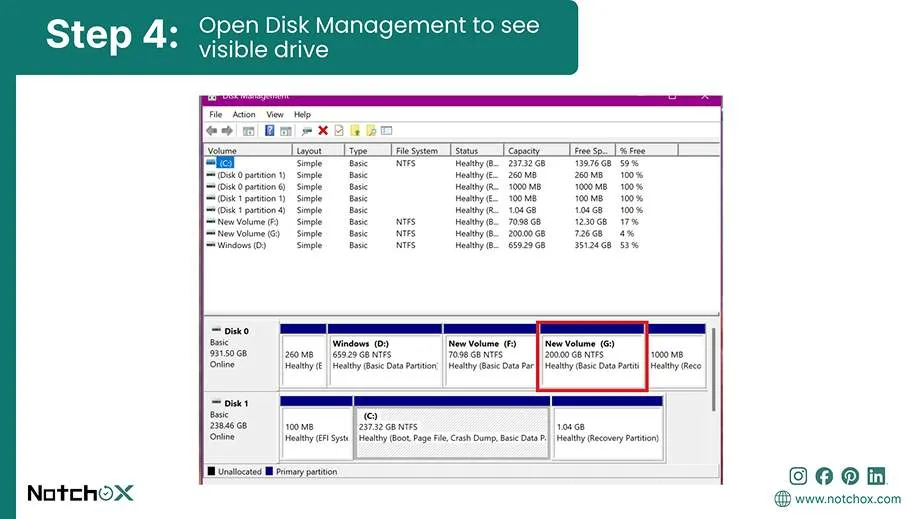
In case the drive still doesn’t show up, uninstall the device and restart your computer to automatically reinstall the storage driver.
An outdated or incompatible controller driver will block Windows from communicating with your drive even if everything is plugged in perfectly. To fix this, update storage drivers in the Device Manager.
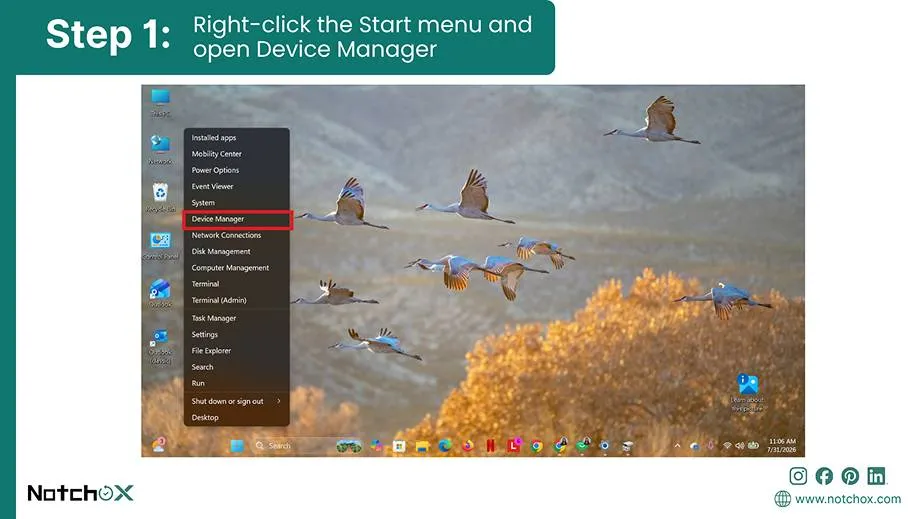
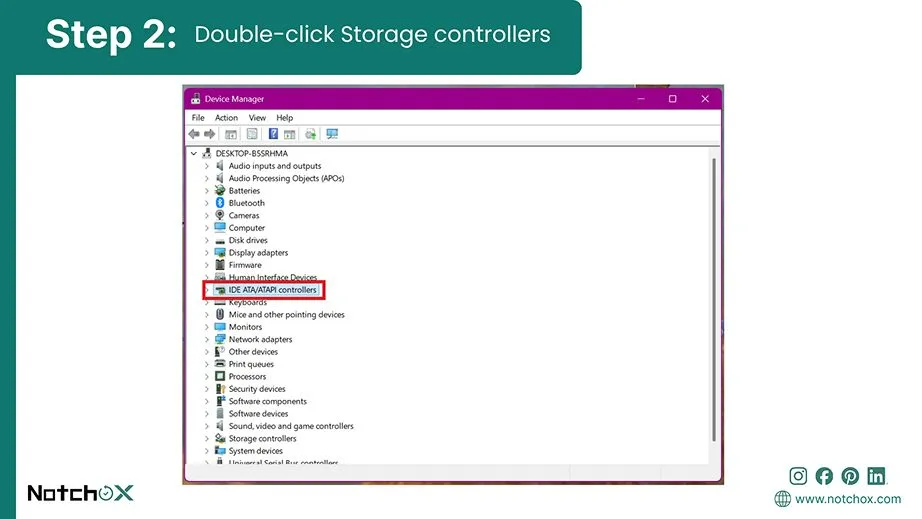
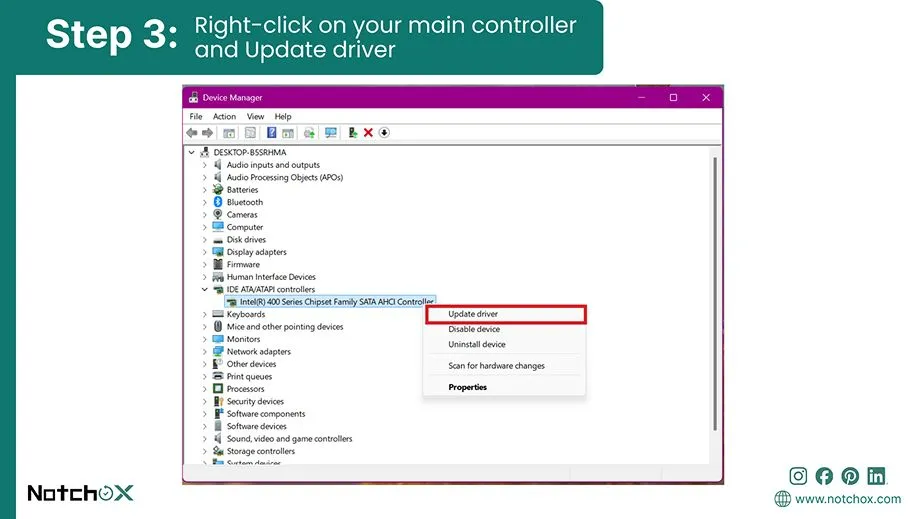
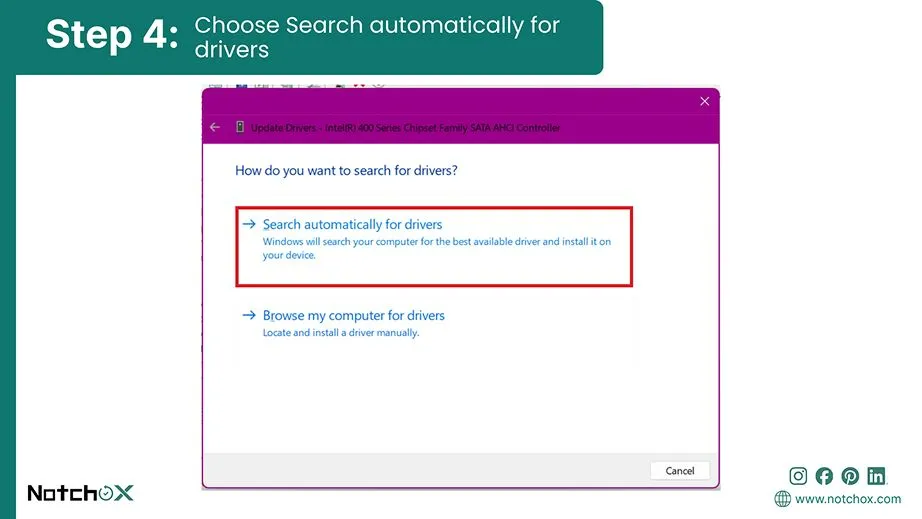
Note: If you downloaded a driver from your motherboard vendor, choose Browse my computer for drivers instead and follow the onscreen prompts.
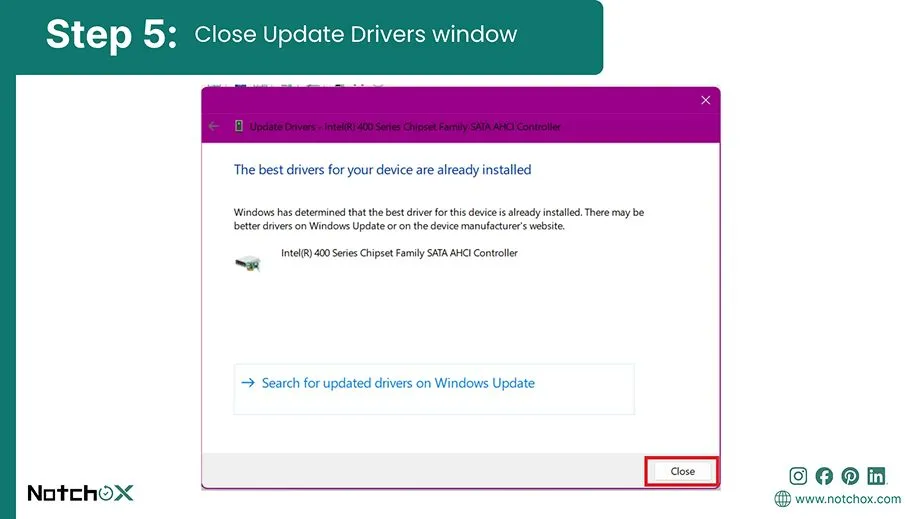
There is also a situation when hardware is alive and recognized by the system firmware but mismatched between your motherboard and Windows, blocking Windows from loading it. To fix this, you can use BIOS/UEFI detection.
By going directly into your BIOS setup tool, we can adjust the storage communication protocols to line up with what we expect to see.
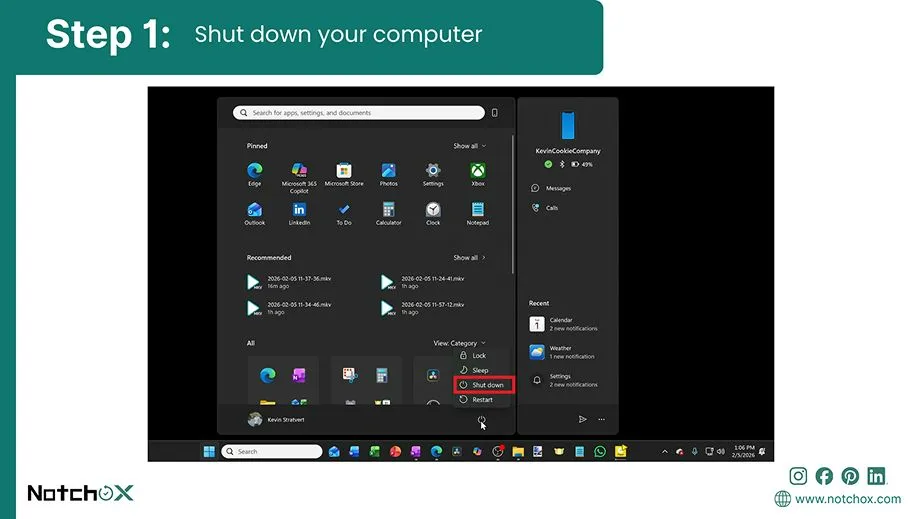
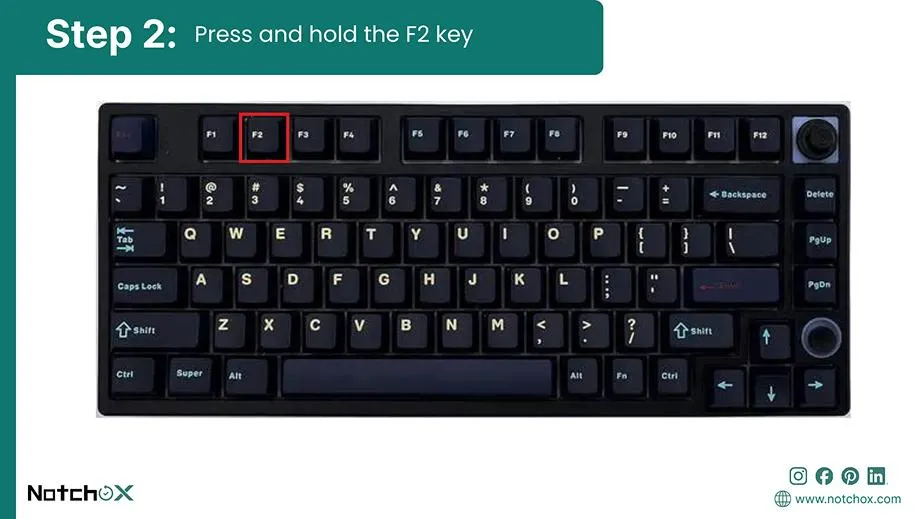
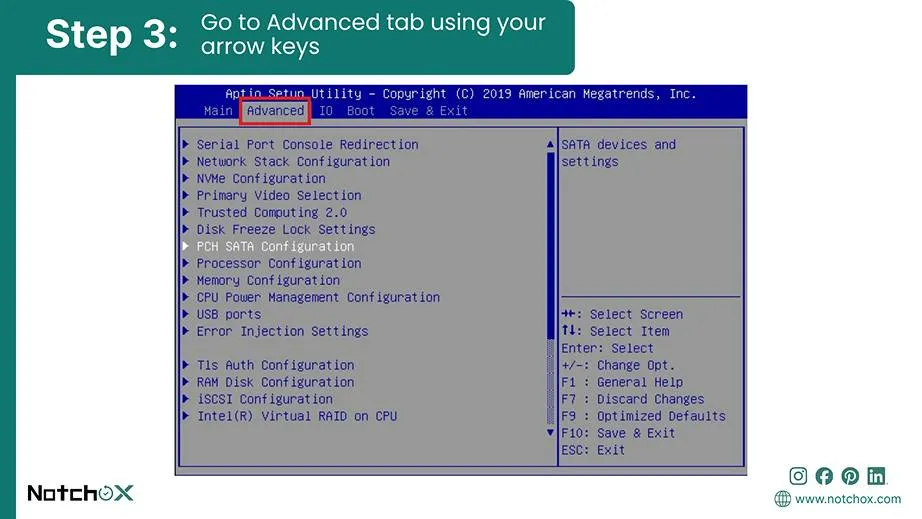
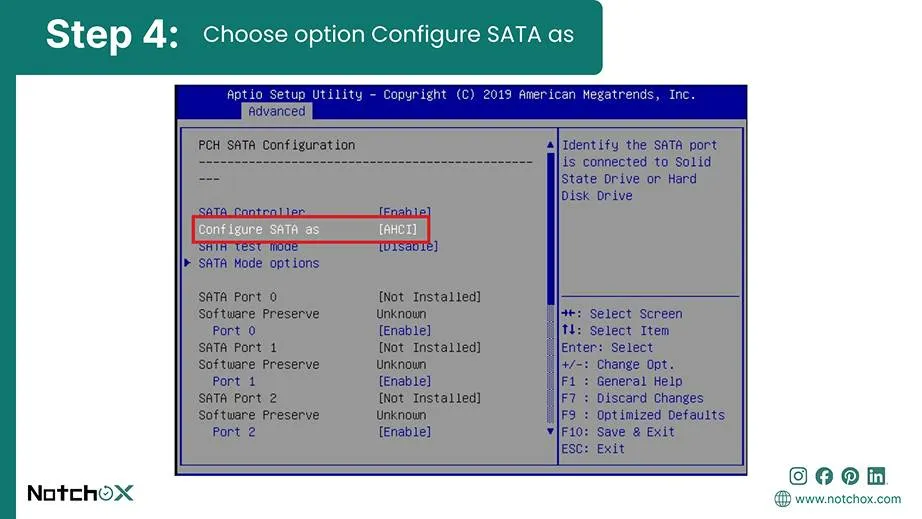
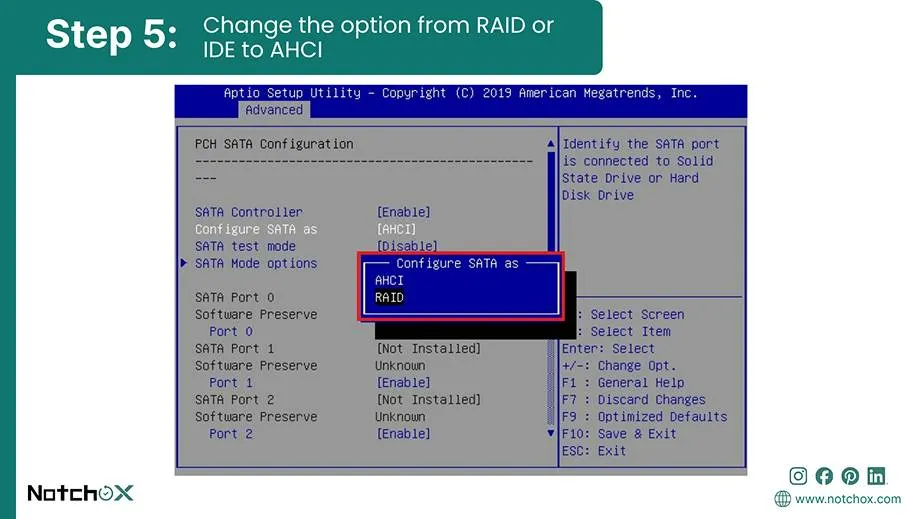
Note: Motherboard interfaces may vary by brand, listing this as SATA Mode Selection or SATA Configuration. The naming changes, but the core process remains identical.
What happens when the motherboard firmware itself doesn’t see this device? This is due to a total power or hardware connection failure. Don’t throw away your drive yet. We need to run some physical diagnostics that we’ll be discussing here.
When software fixes don’t help, the motherboard cannot find the physical hardware. To fix this, we have to open up the computer case and run physical diagnostics.
If your BIOS/UEFI still refuses to detect the hard drive after you have verified all the internal cables, you need to isolate the device and check for any physical drive failure.
The easiest way to do this is to remove the drive and connect it to a completely different working computer. You can connect it internally or use a USB-to-SATA adapter dock for ease.
After you have plugged it into the secondary computer, boot straight into its BIOS or Disk Management utility. If the drive shows up in this PC, it is perfectly fine, and your original motherboard or the power supply is the reason for the hard drive not being detected.
But if the drive remains dead here, it means there is a severe physical hardware failure.
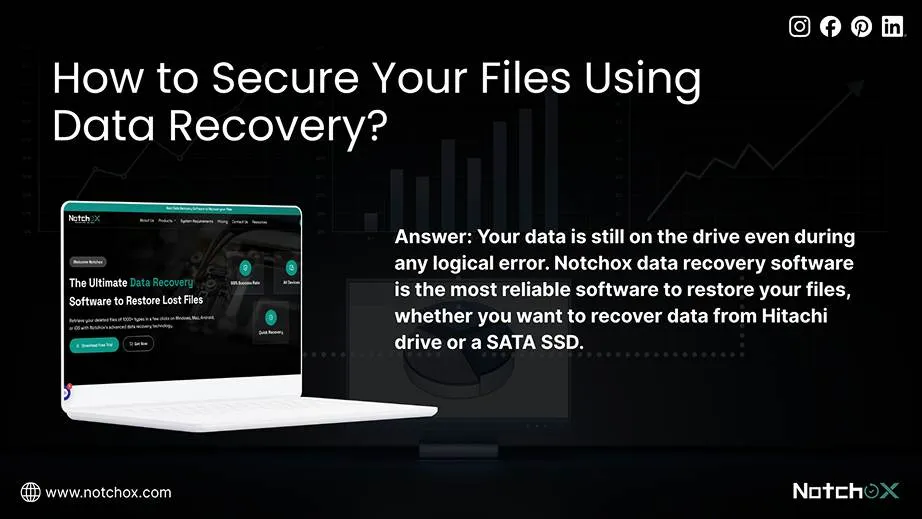
Now that we have covered all the troubleshooting paths, you must remember that with fixing comes the risk of data loss. Also, you may face situations where you have successfully fixed the layout, but the files inside the drive are inaccessible. In that case, you need to recover the drive data before trying any fix.
See what your drive needs during logical vs physical failure to restore your files safely:
| Drive’s Current State | What It Needs Right Now | Risk Level |
| Logical Issues (RAW, Unallocated, Missing Path) | Run Notchox Data Recovery Software immediately | Low Risk(Hardware is completely stable) |
| Physical Damage (Clicking or beeping sound; completely silent) | Power down and go for Professional Lab Services | High Risk(Software will cause permanent loss) |
Notchox data recovery software is there to recover your files when your internal hard drive shows up in Disk Management but remains trapped as an unallocated drive, a not initialized disk, or a RAW file system.
Because the data is still there on the drive even during any logical error, Notchox software is the most reliable software to restore your files, whether you want to recover data from Hitachi drive or a SATA SSD.
Here is how we get them back:
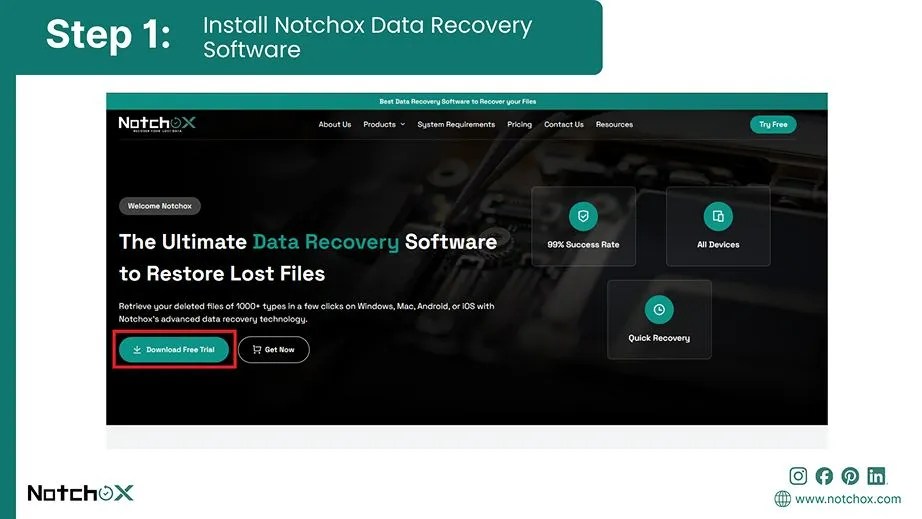
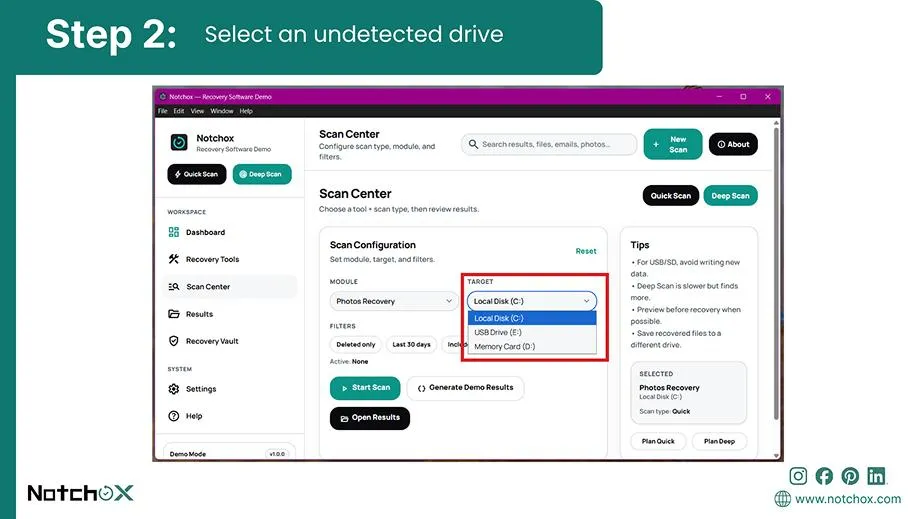
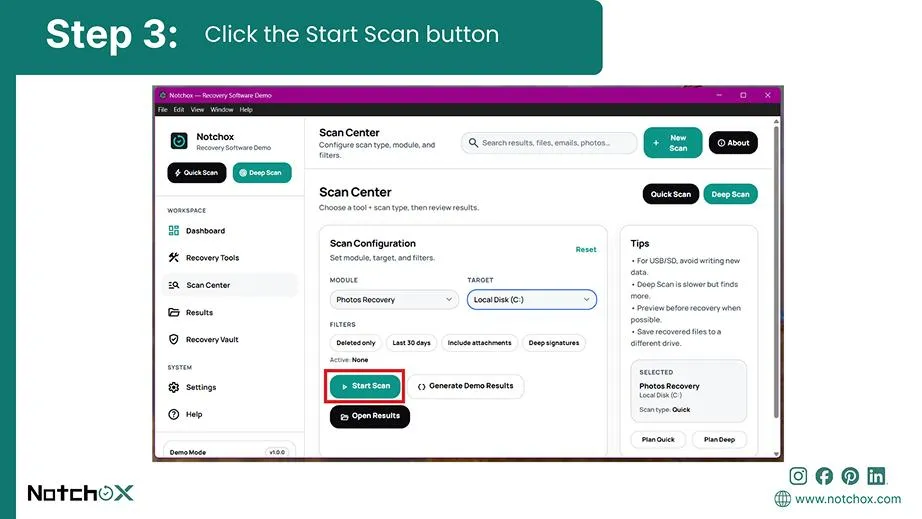
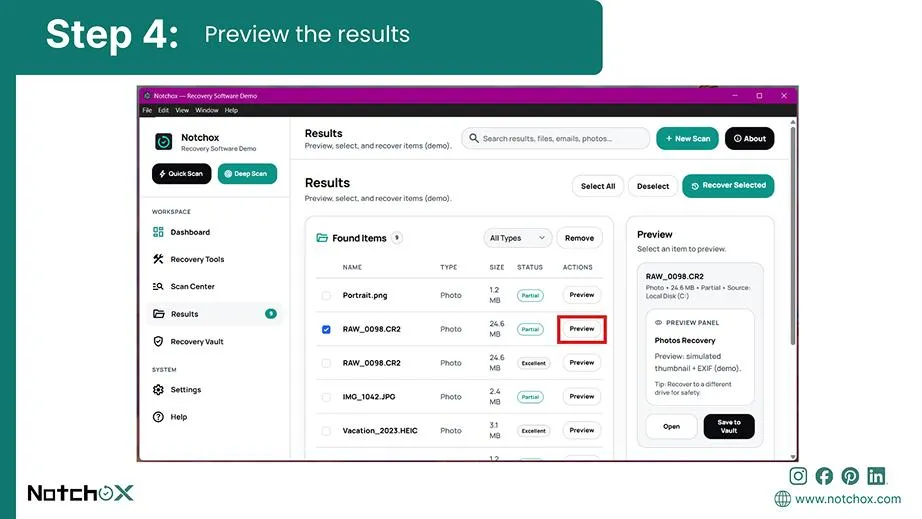
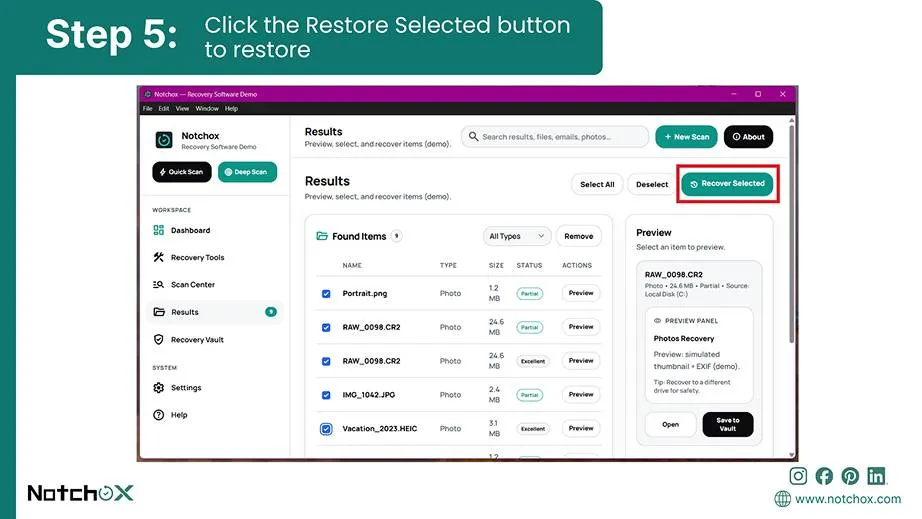
Now look, software tools can really recover data, but they only work if your hard drive’s mechanical components are physically healthy. If your drive doesn’t even spin or if it makes any type of unwanted sounds, i.e., physical drive failure, running data recovery software on it is risky. In fact, NIST infrastructure guidelines remind us that keeping a backup is the single most important rule to save your data from a dead drive. If you do not have a backup and your drive is already clicking or beeping, send it to a cleanroom-certified professional data recovery lab where technicians can safely extract your files in a specialised environment.
So, here’s a bottom line on managing a hard drive not detected: fixing this issue doesn’t require you to be a tech pro. Most of the time, the fix is really simple: you either have to push a loose SATA cable back into place, or give Windows a command to assign a missing drive letter.
The most important takeaway today is to protect your files using the best data recovery software before you change any major settings.
Ans: Start by checking your hardware by reconnecting the hard drive. If it is a software glitch, assign a missing drive letter in Disk Management or update your driver.
Ans: Listen closely to the device for any physical sound. A physically failing hard drive may produce clicking or beeping sounds, fail to spin, or may not be detected in BIOS/UEFI. An undetected drive spins smoothly and vibrates normally but stays hidden due to logical software settings.
Ans: Your PC cannot find the drive due to a communication breakdown. The reason can be:
Ans: Open Device Manager to scan for hardware changes or update the drivers. Next, check Disk Management to see if the volume requires a fresh drive letter.
Ans: Yes. Mechanical internal hard drives contain moving parts like spinning platters and motorized read/write heads that naturally degrade from regular use.Because of this, mechanical hard drives eventually wear out, although their lifespan depends on usage and operating conditions.
Ans: Hard drive failures are caused by logical and physical failures. Physical damage is caused by sudden drops, overheating, manufacturing defects, power surges that burn the circuit board, etc. Logical failure is when a file system gets corrupted, malware, or an inappropriate system shutdown affects the internal partition layout.

Kajal Singh is a Data Recovery Writer at Notchox, specializing in data recovery, storage systems, RAID, and digital forensics. She writes technical processes, tools, and cases into clear, engaging articles, blogs, and guides. Kajal does thorough research, deep analysis, and collaborates with experts to produce high-quality and engaging content that is easy to understand for every reader.